circa1968
-
Posts
405 -
Joined
-
Last visited
-
Days Won
19
Content Type
Profiles
Forums
Gallery
Events
Store
Everything posted by circa1968
-
I appreciate the positive comments and encouragement. About a week ago I was considering just selling it as-is and letting someone else take it over the finish line. I've got a full head of steam now and looking forward to riding it someday.
-
Thanks, I will look into that. As expected, the inside of the tank is heavily rusted. The rest of the rust I intend to leave as is.
-
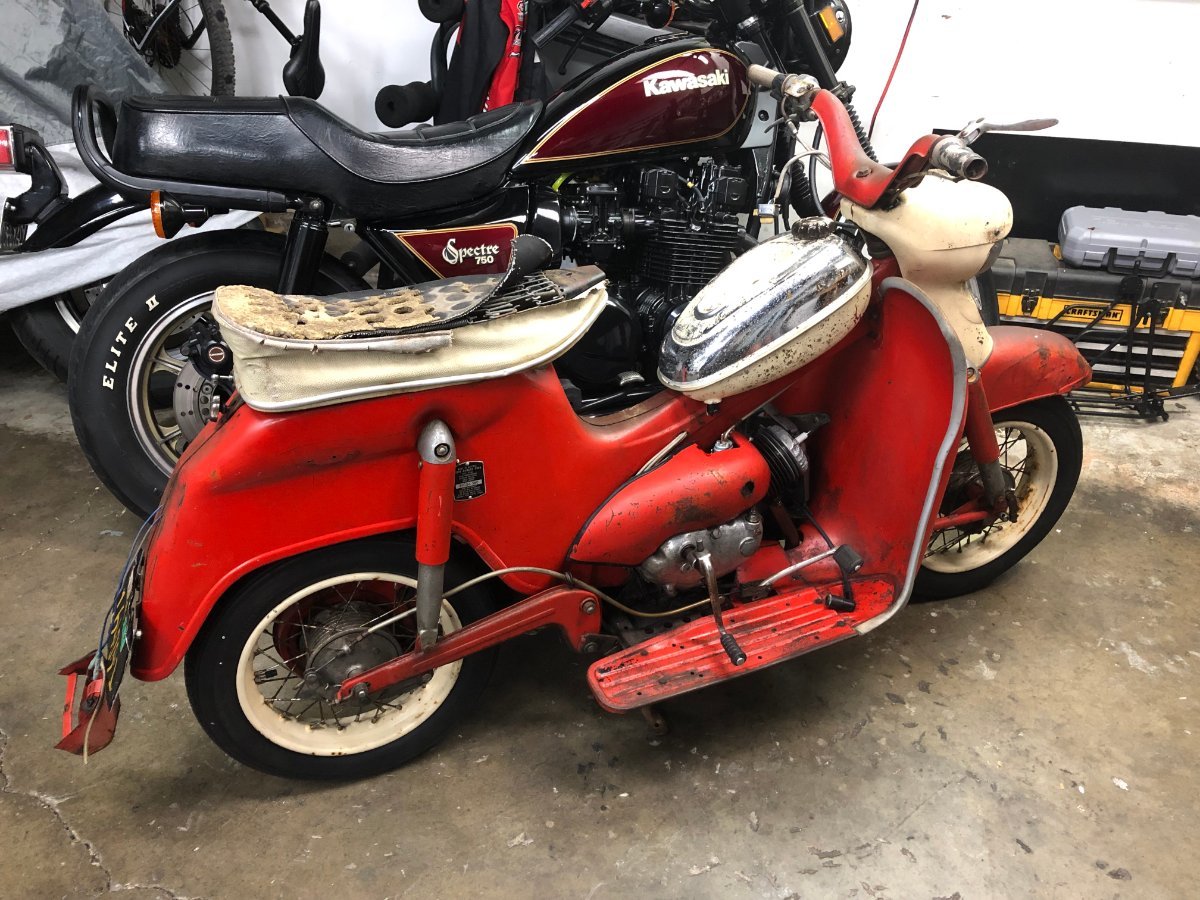
A 1961 Sears-Allstate Compact scooter (aka Puch DS 60). A 60cc 2-stroke with a 3-speed gearbox. I picked it up about a month ago. Everything was seized up. The motor, the wheels, the chain was rusted solid and the cables were all seized. It was about a 5 hour wrestling match to get the wheels off, open up the drum brakes, clean everything out and get them to the point that it now rolls! Chain has been soaking & getting regular 'massages'. It now moves freely, but I may end up replacing it as not terribly expensive to do so. Soaked the cables with penetrating oil, they are all free now, clutch works, gearbox will move through the gears (fresh oil to replace the gunk that was in there). The last registration tag was from 1982, so I'm assuming its been sitting since then. The piston was seized solid into the cylinder, assuming someone ran it w/ regular gas until it seized, then parked it. After a couple hours of wrestling it, with the aid of a block of wood and mallet, was able to free the piston. It did not come with a carb, the original was a Bing 17mm. Rather than chasing the internet to the end to find one, I bought a repop chinese carb, which looks to be fairly good quality for the price, surprisingly. With the engine free, I had no spark, so opened up the flywheel/magneto. Heavily corroded points, cleaned those up and now have a strong spark! Tried to fire it up the other day and nothing....got fuel, got spark...did a compression test and of course it was not good, less than 50psi. Rings are shot, so managed to find some and they are on order. Amazingly enough, there are groups and companies out there dedicated to keeping these old puch scoots running. Many, many parts are available. I don't plan to do a restoration, just a preservation. Get it running, keep the patina and do some scooting on it! Wish me luck! (please)

-
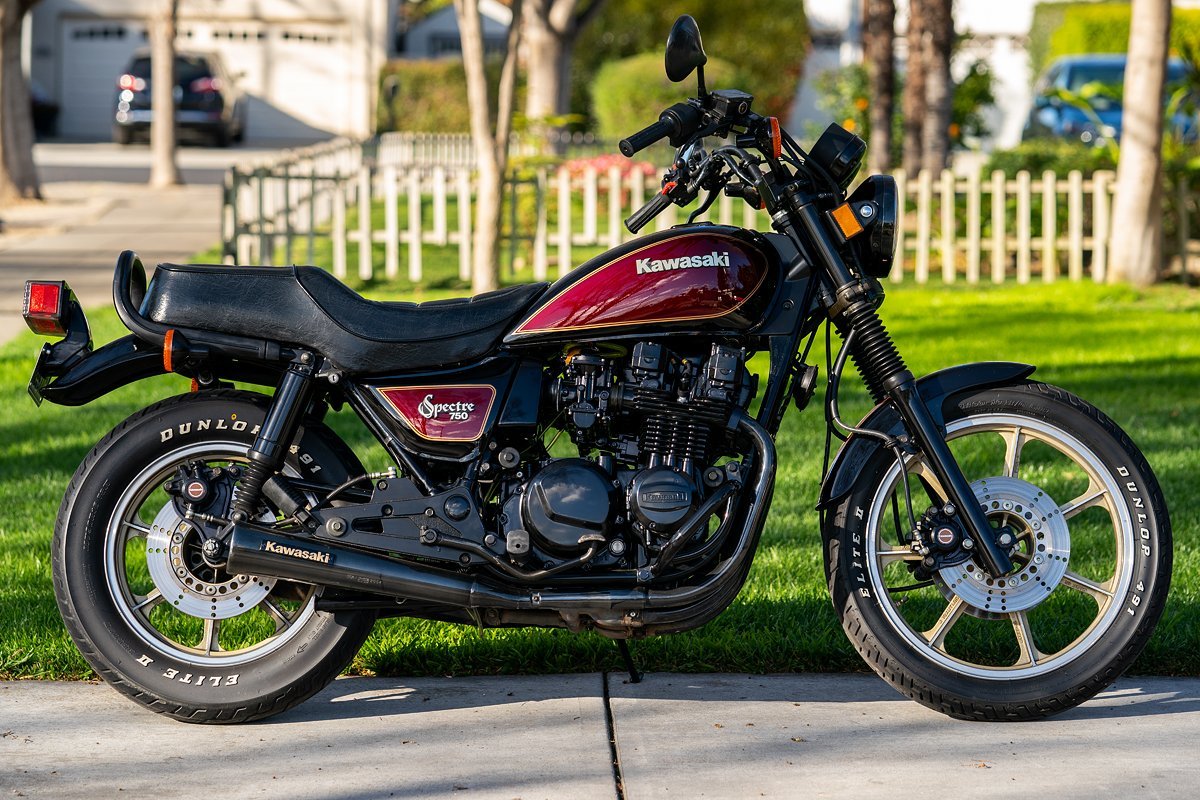
I'm nearing the end of my Kawasaki project. She's turned in to quite the beauty queen, imho and is a hoot to ride! Mechanically, I have adjusted the valves, completely tore down, cleaned & rebuilt carbs, rebuilt front forks & moved the preload spacer to top of the damper rod (took ~1 3/8" travel out of the 6" of travel, lowering the front, giving it a sportier look, while keeping the preload the same), replaced the intake boots and manifolds, rebuilt the vacuum actuated petcock, added a bypass relay to the ignition, changed all fluids and replaced about a thousand o-rings in the process of doing the above. Pretty much all of the above was first time for me doing those jobs. Slow & steady, lots of utube videos, factory & haynes manual, etc. Still need to replace the brake lines and plan to use black braided lines for that. Have really been enjoying the doing and learning. Cosmetically, I blacked out the engine, fork lowers and rear shocks (all gold originally, but weathered). I miraculously came across a 40 year old, in the kawasaki box, brand new gas tank. Also found NOS tank emblems. The original side covers were faded badly & a bit beat up, so I painted them black to match the engine, but then came across a set of side covers on ebay, for a reasonable price that were in decent condition, clear coated them & they look great, applied a fresh coat of clear to the front fender also. The grab bar had a gold strip running through it, so pulled that out and painted it black. Also repainted the 'kawasaki' emblem on the mufflers, first black, then hand painted the lettering. Also repainted the gold kawasaki letter on the back of the seat. I want to eventually paint the wheels black too, but can live with them as they are for now. And there she sits with a mere 7,900 miles with all her pretty new lipstick and makeup!
-
2009 Venture
circa1968 replied to Woody's topic in Links to Classifieds, Craigslist, Ebay, Sales, Etc.
Where I'm at, that definitely applies to import bikes from 70's/80's, but less so for newer stuff. Not sure if that's us older dude's reclaiming our youth or the younger generation wanting to be retro cool, but the market for older bikes is red hot right now. -
Me neither! My thoughts would be to meet/stay at one location (or all nearby in the same town). My idea of camping is a 3*, or less, hotel... But to each his own. My vision of the rally would be a long weekend; day 1: Meet & greet at the end of our ride in at a set location from afternoon into evening, put real names and faces to our stage names, ogle over each other's bikes, etc. Day 2: Group ride to a couple of locations to take in some local scenery, then find a local park to have a group BBQ/picnic (or restaurant) & enjoy some refreshments. Day 3 and/or beyond is whatever each of us decides to do, individually or in groups. And a thought that just popped into my head....If we have a sizable group, let's do some kinda raffle, pass the hat or something, and find a charitable group in the town we descend upon to leave some goodwill behind. As far as drinking AND riding goes. If that's your thing, please go do that somewhere else. To each his own, but I personally do not wish to ride with anyone who is not 100% sober. There are enough variables to contend with already. So, we are up to a count of 3! Any others? Non Venture riders welcome too!
-
Oregon is doable for me. I'm in Northern California (SF Bay Area). Venture West 2022! Anyone?
-
Sweet! Well done and great research on your part! I see that fuse now, its labelled at 'odometer' on the electrical diagram in the tech section, so I didn't catch that the R/G wire off that fuse does indeed go to the audio, along with the odometer. I also now see that my clymer manual correctly calls it 'backup' as that is how its labelled on the fuse box itself, not 'odometer'. Thanks for keeping us posted and letting us all learn something new along the way (at least I did!)
-
I just peaked at the community map, so I know you're all out there. I'm suffering from rally-envy...seems our eastern most contemporaries are having all the fun, comradery and making lasting friendships & memories. Let's celebrate the end (hopefully) of all this covid madness with a rally of our own! If you are in the western part and interested in a rally to meet other venture riders (non-venturers welcome too!), please respond with location, how far/long you'd be willing to travel time frames that work and if willing to help plan/organize. Also, if you have any locations in mind, even better. I'm in San Jose, CA and willing to go ~7-800 miles (two days of travel). Late spring through the fall works for me. Thanks!
-
Yikes! Hope all is well and no flooding issues.
-
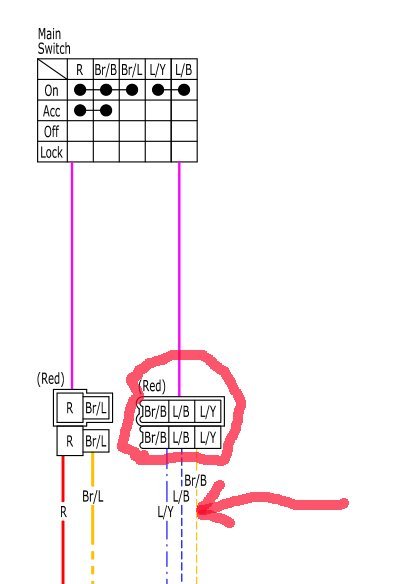
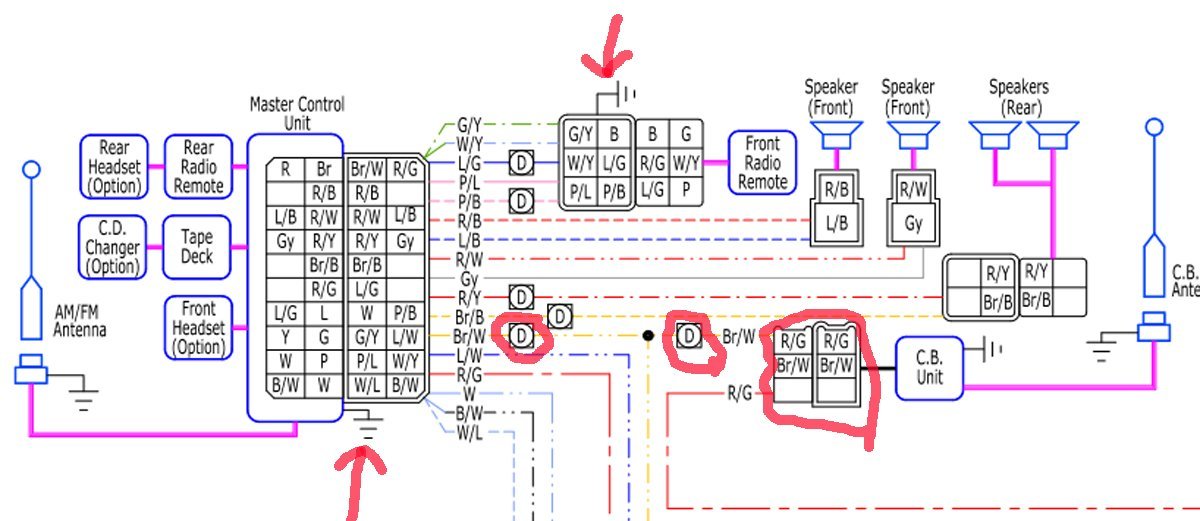
@Junior I took another look at the schematic and there are a couple more points to check out. See the two pics below. There are two more connection points on the Brown/white wire coming from the fuse. I'm 99% certain one of those is the one under the seat going to the CB, but not sure where the other one is located. Also, you will need to check your ground connections for the head unit and the remote. A broken/bad ground connection has the same effect as a broken/bad power connection - no current flow. And lastly, check the connection coming right off the ignition switch. It is the red, 3-pin connector under the tank. radio2.psd
-
Good luck and keep us posted.
-
Would you stop hogging all the rain and send some our way?!? This water rationing nonsense is getting old...
-
Best of Luck! Hope you can get the same results I did on mine.
-
Understandable. I went through the same thought process and was looking for a used seat on ebay to try modifying and that's how I found my corbin. It ultimately took me months of deliberation to build up the courage to do the front lowering. In the end, I'm very glad I did it.
-
I don't see another one on the schematic. Let's start at the beginning, with power. Confirm you have power on both sides of the fuse with a volt meter, using a chassis point for ground, and for grins/giggles, check at the CB connector under the seat, i.e. where you made the repair. If you have power there, the next step is to pull your front fairing off. You will be looking for the larger, white, rectangular connector and specifically the Brown/white wire in that connector. Check again for power with the volt meter. If you have a fine tipped probe on your volt meter, check both sides of the connector. If you have power on one side, but no, or lower voltage on the other, you have a corroded connection. If power is good on both sides of the connector, then find the round, black connector going from the head unit to the remote. My memory is failing, but I think it has either a red or blue tape on it. In any case, just wiggle the cable from the handlebar side and trace it into the fairing. This is the connector that I've had come loose a couple of times, even though it has a latch on it, and when it comes loose, the handlebar remote goes dark and the radio stops working. I believe there is an arrow indicating where to press to release the latch so you can separate the two. If you are at this point, you are looking for either a loose connection or corrosion. If that all looks good and disconnecting/reconnecting the two aforementioned connectors does not resolve the problem, we're getting into hail mary territory. Try disconnecting/reseating each of the other connectors one-by-one. First disconnect to isolate what is on the other end and then turn on the key to see if radio works. If it does, you are zeroing in on the problem. If not, reconnect and check again. If still no dice, do the same for each of the the other connections. If after all that, you've essentially confirmed the head unit has power, the remote is connected (a must) and none of the periphery (CB, cassette, speakers, etc) are causing the problem. That leads to most likely a faulty head unit.
-
@Junior @Pasta Burner I'm a MMIT (Motorcycle Mechanic In Training), working on my youtube certification, 🙂 so with that in mind, lowering the front end was not 'easy', as there are a # of steps involved but it was also not the most difficult thing I've done. If I recall, it took me 3-4 hours from start to finish, with a lunch break thrown in and just being very methodical and intentionally slow. If you are mechanically inclined, you can do it, just take your time and I recommend looking at the exploded view drawings first so you can pre-visualize what the process will be. You can read more about the steps required here: I would recommend removing the tank as the first step, having it out of the way gives a little more room to work and you won't risk any scratches. You will have to remove the front fairing and then remove the nuts holding the inner fairing so you can pull it out of the way. I took an extra step of removing the stereo head unit to make that easier and it probably added no more than 10-15 minutes total for removal and reinstallation - just made it easier to get the inner fairing pulled away. With the inner fairing loose and pulled away, I used a ratchet tie down attached to garage rafters to hold it up and out of the way. Ended up doing the same with the handlebars because they just wanted to flop around. I recall the fork tubes did not want to move at first and it took some coaxing, but then it was easy. Just make sure you make a mark for your starting point and ending point. I'm pretty, uhm...anal..., so I used a set of calipers to get the final position of each side exactly the same, by measuring from top of now protruding tube, to the top of the triple tree. As far as complications with other areas of handling, I will say I experienced the opposite of complications. The handling improved, IMHO. I went with only 1/2" as I did not want to make a drastic change without knowing what the end effect would be. I was shocked at how noticeably better the handling was. The steering was quicker and the bike felt more nimble. This makes sense considering the change, albeit relatively small, was changing the overall bike's geometry in the direction of sport bike (vs. easy rider chopper at the other end of spectrum). Coincidentally, you could install lowering links in the rear (a seemingly much simpler process) and that would move the bikes geometry in the other direction away from sport bike and towards chopper. Lowering the front and going to 4-piston calipers on the front brakes have been the two mods that made me fall in love with my venture all over again. I did a 5,500 mile trip last summer after those two mods and absolutely, positively would not go back to stock setup there. When I come to a stop now, I am able to very gently slow to a stop, with both front & rear brake, then casually bring my left foot down in complete control. Prior to the brake change, I never felt like I had a fine touch on the front brake, it was either not enough or stabbing it to stop, which coupled with not being able to flat foot, had me pulling my right foot off the rear brake so I could get both feet down as I came to a more abrupt stop, making matters worse. Now I feel like a pro when I roll into a stop and if I need to make a more urgent stop, can do so with total confidence, on both braking and balance as it stops. And I'm a big fan of the corbin seat on long days in the saddle. I know some people do not like the firmness, but with some fine tuning of the backrest, I find it very comfortable on long 500 mile days.
-
I'm 5'9"-ish, 31" inseam, and the corbin did help me sit a little lower, but the biggest difference was lowering the front end. I only went 1/2" lower, could have probably gone just a touch lower to be 100% flat foot but its close enough for me. That 1/2" also made a noticeable difference (positive) in how the bike handled.
-
@Marcarl Thank you for that kick to go learn something!! My manual says use a 74H rated tire, which is rated as 827lbs of load & 130MPH. The Shinko 777HD is rated 80H, for 992lbs of load. Manual also says 41psi for load of 198-419lbs. Shinko 777HD spec says Max load @42PSI. I weigh 155, add 12 lbs for helmet, boots & jacket get's me to 167. I will be weighing the rest of my cargo on next trip, but I'm most likely right at, or just over, that 198lbs for total load. Looks like I should be setting the rear to 41psi and safe to do so! Thank you! And once again, best spent $12 ever!
-
Thanks @Pasta Burner I had also been following the spec for my Venture, 36 front/rear for my weight. After my first rear tire wore out after 5k miles, I thought maybe I was underestimating my additional cargo weight, so went up to 40 rear. I have the Fobo sensors and it started shrieking at me when my rear tire hit 49PSI. I was in the middle of nowhere in the middle of NV when that happened, so pulled over and let a few psi out, then kept it at 38 cold, from there. BTW, what is considered acceptable, or safe max psi when the tires are hot? Wear is in the middle of the tire. Perhaps doing longish days of 3-500 miles/day and going a tad, or 30-40 tads, over the speed limit, are factors as well.... I love the ride and feel of 777's, but want to figure out how to get more miles out of the rear. If the answer is slowing down and shorter days, I guess I will have to consider that. Have been trying to find info on what the max hot pressure could hit & still be considered safe, but not having any luck. Everything I read stresses the danger of pressure being too low.
-
What's your secret for getting 10k miles on the rear? I got just over 5k on my first one and closing in on 6k on 2nd one & its just about at the wear indicator. What tire pressure do you run? Thanks
-
I like them on my '07, but am about to put my third rear on to one front, which has 11k miles on it. What's the trick to getting more than 5-6k out of the rear 777 tires? Higher pressure?
-
I think true, under the concept of leaving the scene of an accident, if you are a part of the accident, and definitely if you are the cause of the accident, but I was neither. In any case, as soon as I was past the accident, I was on a 4-lane freeway in the middle of the day and it would have been quite unsafe for me to stop and try to go back. Plus, as I mentioned there were several vehicles right behind me who stopped to assist. I suppose I could have taken the next exit and worked my way back, but that would have taken quite some time here in suburbia. Within minutes, there is typically a mile-long backup behind an accident. Different story if I was in a safer rural area, I would stop to assist without question, regardless of the circumstances of my involvement in the accident.
-
Whoa, I thought it was bad here in Cali @ almost $5/gallon! I know from my own personal experience that a garage door failure is semi-urgent (i.e. wife can't get her car in the garage), but maybe you could queue up several jobs over a few days & plan a single out/back route for a more efficient fuel usage to revenue ratio. For customers who don't want to wait, give them the option of an emergency fuel surcharge. I would think most people can appreciate the situation and would also like the idea of waiting a few days to save some $. I know I would appreciate a small business giving me that option rather than just one option of a higher price. Not sure if you have any local competition, but that could be something to set you apart from them too.
-
Glad to hear you made it through with no major injuries! Scary stuff. Its strange how those things that happen so fast, seem to happen in slow motion at the time & then stay so fresh & vivid in the memory. About 10 years ago, I was on a sweeping fwy-fwy merge curve, which was about to meet a similar curve coming from the other direction before both lanes then merged. It had been raining hard that day and right before the two lanes met, I saw this spray of mud/rocks between the two lanes. It looked like a large water main had just burst wide open. Suddenly a car going sideways emerged from the spray, just ahead of me. I was going around 60mph at the time and before my brain could calculate what I was seeing, the out-of-control car clipped the rear of the car in front of me as the spray of mud/rocks began hitting my car. Both cars spun out, one to the right, one to the left and I even saw a wheel going flying off in one direction. Miraculously, what was right in front of me was a gap and I somehow, instinctively punched the gas and powered through (no time to think, just do), completely unscathed as both cars went spinning out on either side of me. That whole episode could not have been more than 1.5 seconds, if that, but I still see it in slow motion in my head. By the time I had enough brain cells comprehending what just happened I was a good 100 yards past, looked in my rear view mirror and saw others stopping. It wasn't safe for me to do so at that point, so I proceeded home, in shock. Not a scratch or ding or anything on my car. I was 7-8 years off from my last motorcycle at that point, but I think my instinct to punch the gas was still there from my prior moto days. I often find myself seeing something I don't like the looks of and accelerating away from it, pretty much by instinct.