Search the Community
Showing results for tags 'carb'.
-
I have been using Motion Pro carb stick for several years and had no trouble syncing the carbs. The last two times I ha ve tried to sync the carbs I could not even get close. Today the mercury was sucked up into the carbs twice at idle. Have sprayed the carb boots with WD40 and it didn't make any difference in idle. Anyone have andy ideas. Also I replace all sparkplugs. Gene Weir:confused24:
-
My 05 RSTD has been running rough the last two times I used it for the first few miles and yesterday when I started it one of the carb. must have a stuck float. It was running fuel out of the blow by hose. Has anyone else had problems with this or the new fuel with alcohol? Thanks Bill
-
I was tooling through the J and P cycles book the other day.. came across a different carb cover than what Yamaha offers... anyone ever put one on the bike?
-
While at Vogal, I had my carbs synced by the professionals and it ran better and smoother on the hand grips. But, I knew my carbs needed to have the air mixture setting adjusted because at idle the richness would bring tears to your eyes. Without starting the bike, I started around the carbs and found two was about two turns out and one about one turn out. When I got to the front carb on the right side, I tried to turn it and it was pretty tight, but moved a little. When I bottomed out, it would not move and in the process of trying to make it move, I broke off the two raised edges that are on each side of the slot, therefore no more slot. I have another set of carbs I bought cheap off ebay, so I knew at worst, it would take pulling the carbs off and breaking them apart and cleaning them all and putting a spare on. So, if I really screwed the carb up on the bike, it would be ok. What I ended up doing was I used a drill bit that fit the hole with minimal slop and drilled a dimple in the head of the screw. I then used a small drill bit that fit the easyout, or screw extractor as some would know. I was able to drill deep enough to get a hole without drilling so deep that I drilled to where it shanked down to the step area. By tapping the easyout and seating it, I was able to unscrew the adjustment screw. I used a piece of rubber hose on my shopvac to pull out any debris. I was then able to put in one of the spare mixture screws from the other carbs and I was back in business. I then hooked up my son's carb syncing outfit and synced them myself. It took a few minutes, but I got them all the same. Now the bike is again running good and don't bring you to tears when idleing. randya
-
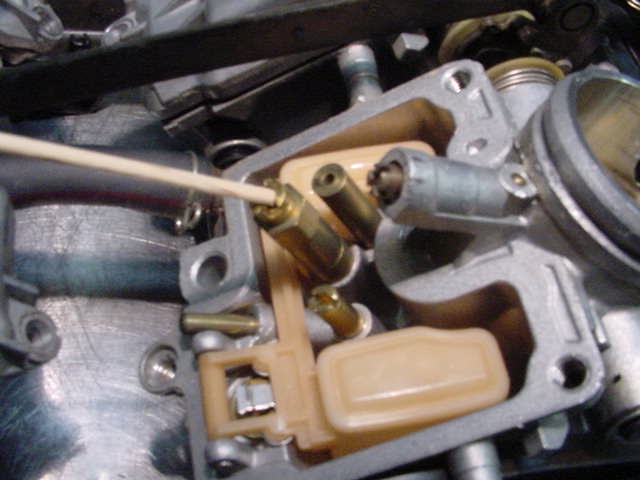
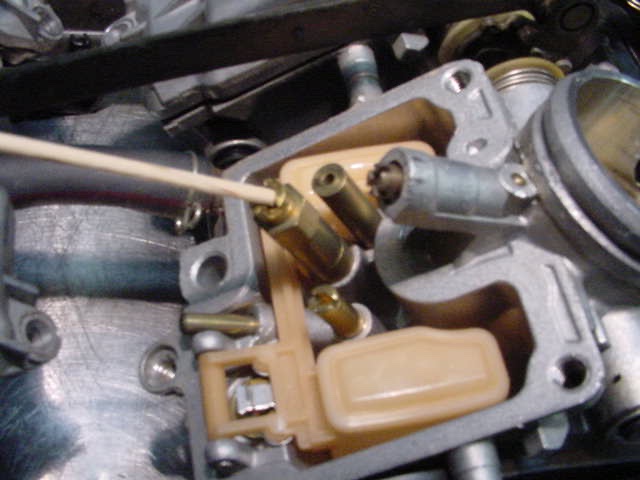
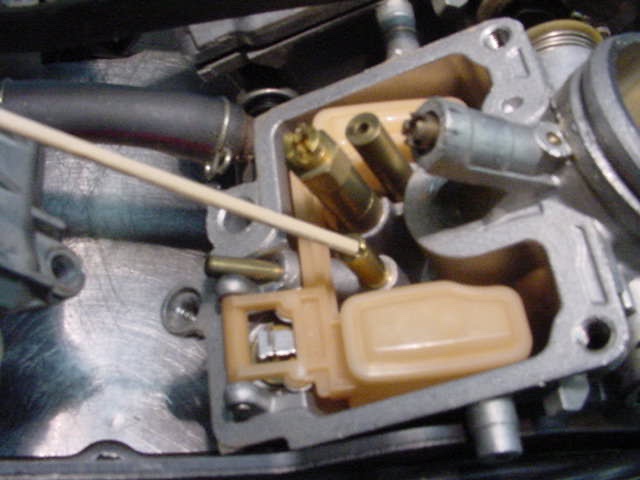
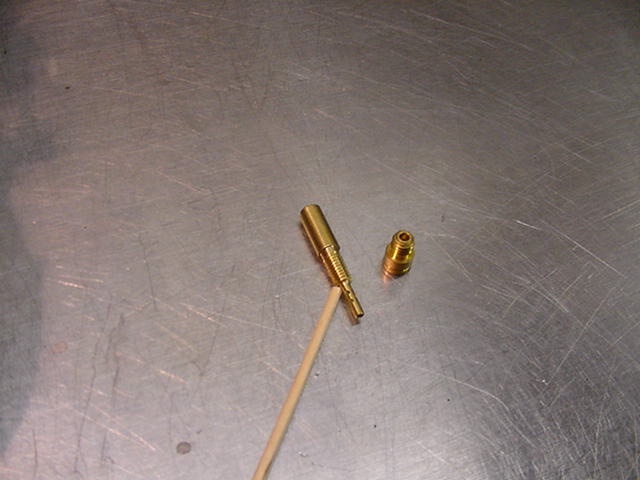
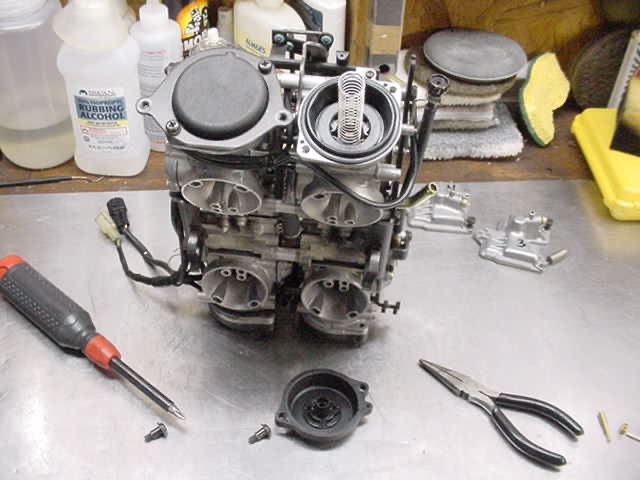
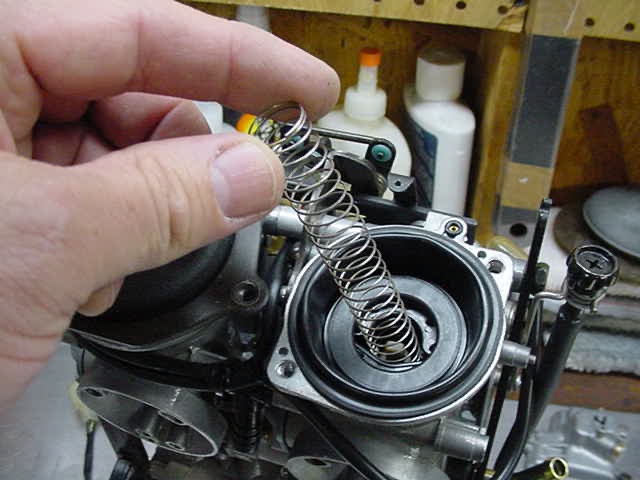
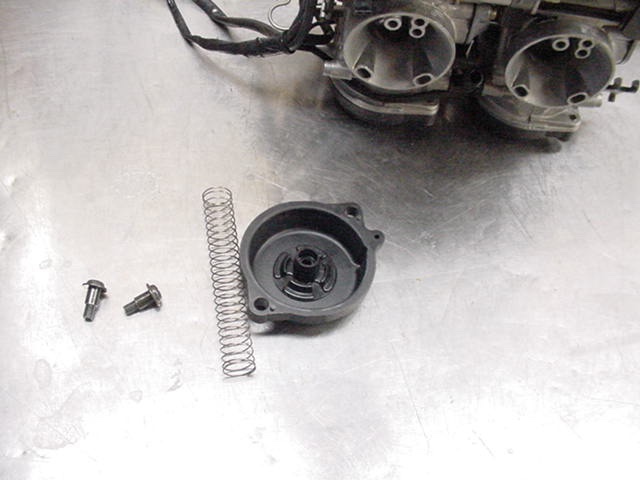
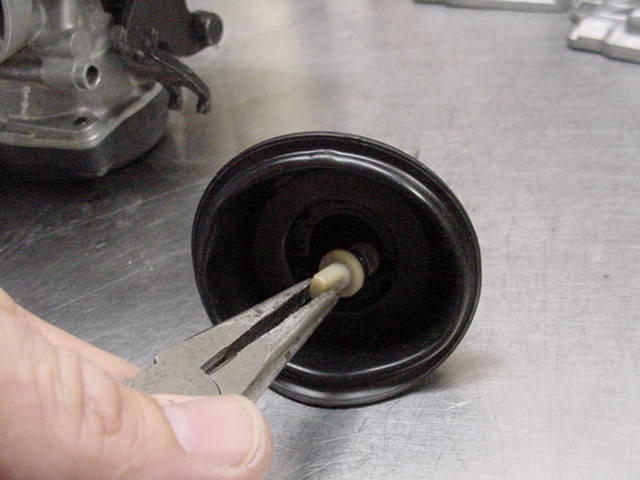
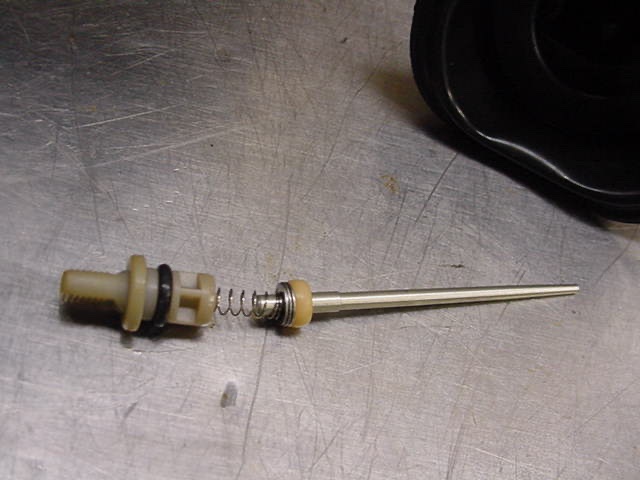
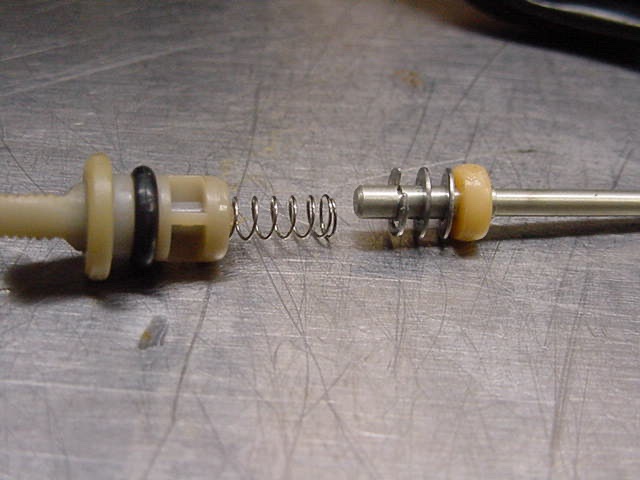
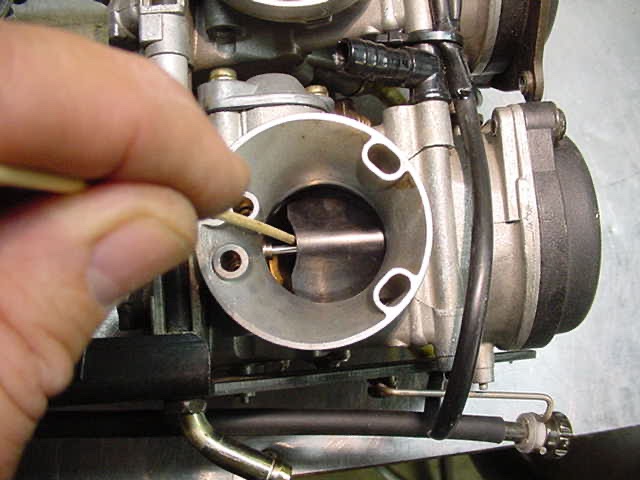
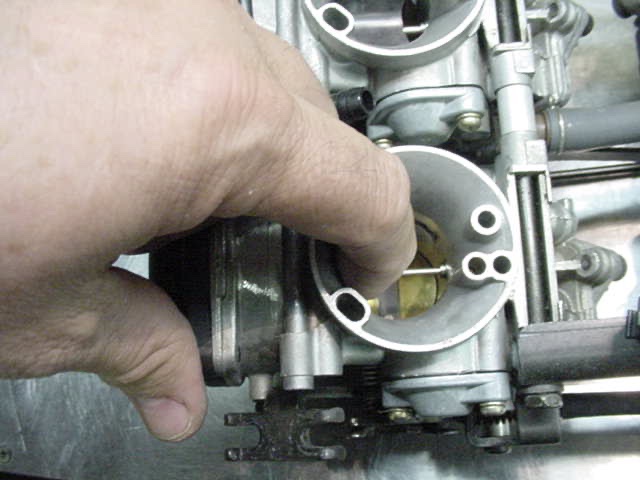
Preface by Don Nelson (Freebird) When Don Murray told me that he was tackling this project, I asked him if he would take some pictures so that we could add them to our tech library. He not only agreed to do so but did a fantastic job of it. Now....is this something you want to do? You'll just have to decide for yourself. The last I heard from Don, he had gone a jet size larger and though he liked the way it ran, a sparkplug inspection seemed to indicate that it was running a little rich. So..he then went a size smaller and didn't feel that it ran as well. So I think he has now gone back to the original main jets and in his case, feels that only the size larger on the pilot jet was needed. That and shimming the needles. Don did a great job so if you find any errors here they are probably my fault in editing. Let me know and I'm make any corrections needed. Re-Jetting the Venture Carbs Thanks to Don Murray for this great write-up After you have removed the carbs and cleaned them set them on a table facing the way you see them in the first picture...it may help you to number them as you see in the picture...you will need to refer back from time to time to make sure you're working on the right carb. The reason I say this is because only two carbs use the same size jets.(1.) Now you'll want to remove the bowls, it may help keep you organize to only remove the bowl of a single carb at a time so you don't install the wrong jet in the wrong carb....don't ask how I know....okay you'll need a #10 allen wrench with a ball end if you don't want to mirer up the bolts...after you get the bowl(s) off this is what you'll see....(2.)(3.) This jet is the main jet! From the factory (stock) it is 122.5 carb #1 122.5 carb #2 117.5 carb #3 120 carb #4 now do you see why I said only remove one bowl at a time....now this only matters if you're changing jets. Here is the main jet after it is removed. It is the one being pointed to with the stick. Okay lets say you want to increase the fuel consumption and maybe increase the HP's (maybe).....without a dyno it's anybody guess if you increased your HP. Okay here's what Joe had said about the correct jet sizes and it worked for me.... carb # 1 up 125 carb # 2 up 125 carb # 3 up 120 carb # 4 up 122.5 along with this jet size increase you should also be using K&N air filters and the "D" cutout in the air filter holders. Now what I found to be a big change was to change the pilot jet....the stock one is 15..replace it with a 17.5 (5.) Here is what the Pilot Jet looks like after you remove it. Again, it is the one pointed to with the stick. The next thing is shimming the needle valves. This is relatively simple and can be done without removing the carbs from the bike if this is the only thing you wish to do. What it will give you is quicker throttle response. Not much commentary here. The pictures tell the story pretty well. Fist thing is to remove the black cover that covers the diaphragms. The spring will just lift out. This is what you have at this point. This is the needle plug holder. Pull it straight out and the diaphragm, slide and needle will lift out. There is an O-Ring here for the vacuum to the diaphragm. Be sure not to lose it. Now...pull straight out on the holder to remove the needle. Here is what the needle assembly will look like. You will want to add some washers to the needle and diaphragm. Now I don't know what Don Murray did but I simply removed one of the washers from the top and and slid it up from the bottom. That shims the needs a bit and is where you get the quicker throttle response. Just disassemble the unit and move one of the washers or buy extra washers from your dealer. Okay...now you just need to put it all back together. After it's back togeher, check the slide. Move it up and let it fall. Use your finger to run this test. If they fall fast rather than just float down as they should, then you probably didn't get the diaphragms back in properly, no sealed. Remove and reinstall them. And that folks, is about it. Reinstall the carbs and go for a ride. If it doesn't run to suit you, just start all over. Jetting is NOT an exact science and unfortunately, it sometimes takes two or three tries to get things the way you want them. Is it worth all the trouble? I don't honestly know....if you try this, maybe you can tell us.
-
I "got the opportunity" so decided I would share... Do you have the carbs off? There's an easy way and a tough way to get the throttle and choke cables off. I finally found the easy way... The carb assembly also needs some "proper" persuasion to get up off their mount boots! Remove the air cleaner... there's a small hose at the front bottom... disconnect it at the air box. There's a large hose at the bottom, rear, center... disconnect it at the ENGINE... this lets you use the hose as a guide when you put it back (plus you can't get to the rear bottom of the air box when it's going back together. Loosen the four rubber boot clamps below the carbs and now it's time to work these up. They don't want to because it's a tight fit but work one side up a bit and then do the other until you have them up. I used two pieces of hardwood to pry the carbs up... one side a bit at a time. Then you pull the carbs a bit out the left side. Run the throttle adjust nut at the handlebar in to get some free cable. Loosen the adjustment coupler right at the carb all the way. Pull THAT cable housing up from the carb cable holder and slide the cable through the slot in the carb mounted holder... there's just enough slack to get it out of the holder! Then you can tip the carbs to see how to disconnect it. Now you can roll the carbs OPEN and get the takeup cable off. The choke is easy, loosen the clamp and slide the cable free. I had three mixture adjust screws set at about 2.5 turns out from bottom and a forth was frozen. I sprayed penetrant spray and over a day worked it in and out a bit at a time... I think the magic setting is 2 to 2.5 turns out from a CAREFULLY bottomed position. More on this later. Before you break the 4 carb assembly apart, make a little drawing of the choke linkage layout and note the spacers and washers on the choke coupling arms. The throttle couplers are straight forward, front and back halves are coupled by a plate and spring on the "balance adjusters", left and right halves are held by a clip-ringed coupling plate. The 4 carb assembly is held together by 16 large (5mm, I think) phillips head screws. These are going to be impossible to almost welded and will round off and make you invent dirty words unless you have the magic thing... the absolute right tool!!! Don't waste time, get one! I used a VERY large phillips bit (from an impact wrench set) that fits "PERFECT" and mounts into a regular socket... mounted on a regular ratchet. This gives you the leverage of the ratchet but you HAVE to have a large bit that fits TIGHT... Take the assembly to the parts shop if in doubt... you'll love me if you do... you'll have lots of new words if you don't. I threw these screws away when I got them out and replaced them with allen bolts from True Value ($4.00, but you'll never mess them up again!!!) Don't even think of using an impact to get these out... you'll break the fragile carb body and be back to inventing dirty words. It's real handy to have a friend hold the carbs on the bench while you break the bolts free. (Did I mention they were tight???) Any good carb cleaner should work fine. It's a question of aggressiveness and preference. Seafoam is good stuff, not terribly aggressive but safe and does a good job with time... you would probably want to soak overnight and follow with a really good scrubbing of parts. B-12 is MUCH more aggressive and (as such) needs more care and attention. I don't think Seafoam eats rubber... I KNOW B-12 WILL. I chose Berrymans so I wasn't waiting so long. It's a toss up to what you like. I didn't want to by 5 gallons of something to allow dipping all 4 carbs and I don't like to have too many "parts" floating around so I planned on doing each carb, one at a time. I used a cut down, lower 2/3s of an anti-freeze bottle as a "dip tank"... it JUST fits one carb body and two pints of cleaner just about cover the carb. You might want to buy three pints so that when you pull one carb, you can drain back most of the cleaner and trash the last bit that has all the dirty junk. I threw in the 5 jets for THAT carb at the same time... if in doubt, make a little diagram of each jet's size and it's location. I cleaned one carb at a time so nothing got mixed up and I could inspect each one on their own. Plus my work area is rather small. Now we have a new, big screw driver bit and four carbs laying on the bench... that bit is going to come in handy for breaking apart the covers! If you still have one "pinned, internal star" screw in each diaphragm cover... buy that tool at the parts store (common tool) and those screws throw them away... it's not worth the hassle... replace all 16 (four per carb) with allen bolts or buy four replacement screws. I used small vice grip pliers rather than buy the tool! It really buggers up the head but... who cares? I WAS a bit worried about buggering one up and still not able to get it out... I later found the right tool was cheap and readily available... I was first "told" it was a "special dealer tool"... grrrrr! Each choke slide can be "overhauled" in-place. Now is a good time as the carb body gives you leverage to get the big nut off. The slide cover nut just unscrews and out comes a spring and brass plunger, check the large brass plunger and spring, grease and reassemble. Then pull the screws holding the choke body to the carb and set aside. The deceleration pump (other side of the carb body) has a spring and diaphragm like a small version of the main diaphragms. These need to be pulled and inspected. The diaphragm can have small tears around the outside rim or maybe a pinhole that would need repaired. They don't "bounce" like the intake slides, they are vacuum driven to smooth sudden deceleration so they are basically set to "trip" open on activation. Clean and set these aside. On top, just inside the intake barrel, is a fixed, small orifice brass jet that comes out to be dipped and scrubbed carefully. I found a small, pointed art brush was perfect. Inside the carb diaphragm cover is a large spring and diaphragm assembly, pull and set aside. Inside that carb cavity is a large orifice brass jet that comes out to be dipped and scrubbed... There's also a small O-ring at the bottom edge that the diaphragm cover seals ... pull and set aside. Inside the float chamber area, pull the float and float valve. Unscrew the large brass screw (and washer) running through the main jet body... this holds the diaphragm needle housing. Pull the main jet body and pull it's three jets... the long, metering jet inside the middle tube (a large pierced tube looking thing), main jet on side and a small orifice jet in the left tube... this one needs care in cleaning. Be careful with the rubber plugs... they bounce real well if dropped and important that they fit tight when you reassemble!!! The diaphragm needle housing (large brass shaft) can now slide out through the center of the carb body... note that there's an O-ring under the main jet body block that slides over this shaft. Set everything aside with the jets and needle housing to end up in the soaker with the carb body. Ease the rubber drain hoses off the plastic barb very carefully and set aside. The carbs come with a brass sleeve in the carb body that keeps the idle mixture screws "captive" Carefully use a progressively larger drill and drill these out. Use air or ANYTHING to get all those brass filings out. NOW pull the idle mixture jets, spring, washer and O-ring. Use a small wire with a hook on the tip to pull the washer and o-ring if needed. Now go back and get the REST of the metal filings you missed! The carb bodies and jets are now ready to dip. B-12 liquid and spray are good cleaners for disassembly... do NOT use them on assemblies or on a running bike. It's too aggressive and can mess up rubber parts. For regular cleaning I use PJ carb cleaner... it's safer and also it's flammable so it actually HELPS a running engine (it surges like you sprayed ether!) where B-12 isn't and will want to kill the engine! Did I mention it kills rubber parts? "The factory-set needle-valve screw..."??? These are very fragile, tapered metering jets. I spray B-12 on a clean rag and buff these tapers and the main jets. They should be smooth and clean. Any nicks or scrapes and they are trash. The idle mixture screws on ANY carb are set by, very carefully, running them IN so they gently seat and then count the turns OUT from there. I think factory is right around 2 turns out. If you get heavy handed and screw them in hard, you damage the needle seat and get to replace that carb!!! It's a spring loaded screw... use a tight fitting flat blade screwdriver and ease then in. If in doubt... run them in and out a bit to clean the threads and get a better 'FEEL" for them bottoming. For repairing the pinholes in the main diaphragms, I was told to buy some Yamabond 4 It's put on very thin with a toothpick on the "worn spots".... I've only recently put the carbs back on and have run a few tanks through but when I repulled the diaphragms the stuff was exactly like when I put them in. This yamabond stuff is fairly thin and is perfect for this apparently and is also a great gasket seal but just use a tiny bit... Even better is to buy new ones! Oh yeah... don't mess with "close" O-rings... if they don't measure perfect or just a hair big... walk away! There's lots of sources... Napa didn't carry small ones but Kragen did. Napa usually has those odd parts that you need.

