.jpg.74ad527ee3b944bb2fbbda340f151e7c.jpg)
yamagrl
-
Posts
977 -
Joined
-
Last visited
Content Type
Profiles
Forums
Gallery
Events
Store
Everything posted by yamagrl
-
.thumb.jpg.c4a003e98a39017035bc287be592ba02.jpg) You'll probably make it home just fine. Last year, as many folks here are aware, I pulled the engine out of Big Red and repaired the 2nd gear issue of the early 1st gen Mk 1" Since I really didn't know "Jack" about this stuff it took me about 3 months. Whenever I do something like this I have to do extensive research. And then I typically have to do it 4 or 5 times. I take it apart, put it together. Then I take it apart and put it back to together again and again and again until I can do it in the dark and behind my back. However, most things on the bike I still can't talk intelligently about because I just don't know and I have to ask/post. And if I have anything wrong, then please, somebody offer the correct information. Granted, Big Red is an '84, but there is, for this purpose, no significant difference in the 1st and 2nd gens transmissions. Gear ratios differ and the shift shaft has some differing part numbers, but I suspect that is due to the Cruiser style position for the shifter. I'm in agreement with Eck and V7goose about shifting with no clutch. This transmission is fully syncromesh and when functioning properly you can, without using the clutch, up-shift through all gears and down-shift through all gears, including neutral. Downshifting requires a bit of finessing the engine speed. Using the clutch during shifting is recommended and can make shifting smoother. The only thing the clutch is absolutely necessary for is to put the transmission in gear while standing still. First off, make sure the shifter linkage is working correctly. But I don't see the linkage causing the problem that you describe. The shift shaft only has to rotate about 15 degrees in order to shift from 2nd-3rd-4th and to 5th. The shift shaft extends through the engine and connects the shifter linkage to the shift sector and goes though the engine case at 2 points, one on each side of the engine case. I don't see this as wobbling and oil still remain in the crankcase. Considering that the shifter, shift shaft and shift sector movement is the same through all up-shifts from 2nd -5th, it seems like the dilemma would be present in all up-shifts and maybe downshifts as well. . If the problem persists after you fix any issues with the linkage and you can rule out the linkage as the culprit then... I suspect it may be internal and below I'll show you where and why. First take a look at the pictures at the bottom. I purposely inserted them full size so that you don't have to enlarge them each time you need to reference them. The 3rd gear dogs are tapered in order to draw the gears together. If they do not engage fully the transmission would kind of hiccup as the dogs skip. The taper on the dogs is engineered to provide a VERY positive engagement of the dogs into the slots. This is why it goes in 3rd better when torquing the engine. The torque is drawing the gears together. This taper is quite visible in the picture with the red arrows. This I think is the logical explanation. First let's understand how 3rd gear works... 3rd/2nd gear pinion is rotationally fixed to the main shaft and always spins with the main shaft (input). It also slides back and forth for other engagements. 3rd gear (driven) spins freely but is laterally fixed in place on the drive axle (middle gear shaft or output) 4th gear (driven) is rotationally fixed to the drive axle(middle gear shaft or output) and slides back and forth for engaging 3rd or 1st When up-shifting the shifter rotates the shift shaft, turning the drum and the 3# shift fork tab which rides in that squiggly groove causes the #3 shift fork to move the 4th gear (driven) to the left and engages the 3rd gear dogs into the slots in the side of 3rd gear (driven). This marries 3rd gear (driven) to 4th and turns the main axle (output shaft). Viola! you are in 3rd gear! ..now, what I think is happening... the shift drum may be binding or otherwise having trouble rotating through the 3rd gear up-shift range in the groove... The #3 shift fork tab is probably worn on the right side which is the thrust side of the tab while up-shifting to 3rd gear. And the squiggly groove in the shift drum is probably worn on the right side (thrust) as well. This would likely cause rough rotation of the drum at that location, resulting in insufficient lateral movement of the fork. This might limit how far 4th gear (driven) is pushed to the left making it difficult to engage the dogs in to 3rd gear. You can see that 4th gear (driven) does a lot of stuff. It engages 1st gear, it engages 3rd gear, it contains the groove for #3 shift fork tines and of course it is half of 4th gear. The reason I think the tab is worn on the right side is because you did not mention any problem down-shifting from 3rd and no problem going into 1st. The left side of the tab and groove has the thrust while engaging 1st and disengaging 3rd. The #3 fork is likely bent from the stress as well. Do you have any problem coming out of first at all? Maybe a bit stiff? How does 4th and 5th function? If you are running a low viscosity oil such as a synthetic, you might try 20-50. In single sump engines the oil lubes the transmission and clutch and since neither are ultra-close tolerance. The heavier dino oil will probably afford a bit of buffer to the drum and forks and maybe smooth out the shifting a little. Most transmission issues are not related to the actual gears, but to the engagement of those gears. All the other stuff in there. I'm not on the site all the time and I may not be on much this week. PM or call if you need an answer and don't hear back. My contact info is on my profile. Good luck.
You'll probably make it home just fine. Last year, as many folks here are aware, I pulled the engine out of Big Red and repaired the 2nd gear issue of the early 1st gen Mk 1" Since I really didn't know "Jack" about this stuff it took me about 3 months. Whenever I do something like this I have to do extensive research. And then I typically have to do it 4 or 5 times. I take it apart, put it together. Then I take it apart and put it back to together again and again and again until I can do it in the dark and behind my back. However, most things on the bike I still can't talk intelligently about because I just don't know and I have to ask/post. And if I have anything wrong, then please, somebody offer the correct information. Granted, Big Red is an '84, but there is, for this purpose, no significant difference in the 1st and 2nd gens transmissions. Gear ratios differ and the shift shaft has some differing part numbers, but I suspect that is due to the Cruiser style position for the shifter. I'm in agreement with Eck and V7goose about shifting with no clutch. This transmission is fully syncromesh and when functioning properly you can, without using the clutch, up-shift through all gears and down-shift through all gears, including neutral. Downshifting requires a bit of finessing the engine speed. Using the clutch during shifting is recommended and can make shifting smoother. The only thing the clutch is absolutely necessary for is to put the transmission in gear while standing still. First off, make sure the shifter linkage is working correctly. But I don't see the linkage causing the problem that you describe. The shift shaft only has to rotate about 15 degrees in order to shift from 2nd-3rd-4th and to 5th. The shift shaft extends through the engine and connects the shifter linkage to the shift sector and goes though the engine case at 2 points, one on each side of the engine case. I don't see this as wobbling and oil still remain in the crankcase. Considering that the shifter, shift shaft and shift sector movement is the same through all up-shifts from 2nd -5th, it seems like the dilemma would be present in all up-shifts and maybe downshifts as well. . If the problem persists after you fix any issues with the linkage and you can rule out the linkage as the culprit then... I suspect it may be internal and below I'll show you where and why. First take a look at the pictures at the bottom. I purposely inserted them full size so that you don't have to enlarge them each time you need to reference them. The 3rd gear dogs are tapered in order to draw the gears together. If they do not engage fully the transmission would kind of hiccup as the dogs skip. The taper on the dogs is engineered to provide a VERY positive engagement of the dogs into the slots. This is why it goes in 3rd better when torquing the engine. The torque is drawing the gears together. This taper is quite visible in the picture with the red arrows. This I think is the logical explanation. First let's understand how 3rd gear works... 3rd/2nd gear pinion is rotationally fixed to the main shaft and always spins with the main shaft (input). It also slides back and forth for other engagements. 3rd gear (driven) spins freely but is laterally fixed in place on the drive axle (middle gear shaft or output) 4th gear (driven) is rotationally fixed to the drive axle(middle gear shaft or output) and slides back and forth for engaging 3rd or 1st When up-shifting the shifter rotates the shift shaft, turning the drum and the 3# shift fork tab which rides in that squiggly groove causes the #3 shift fork to move the 4th gear (driven) to the left and engages the 3rd gear dogs into the slots in the side of 3rd gear (driven). This marries 3rd gear (driven) to 4th and turns the main axle (output shaft). Viola! you are in 3rd gear! ..now, what I think is happening... the shift drum may be binding or otherwise having trouble rotating through the 3rd gear up-shift range in the groove... The #3 shift fork tab is probably worn on the right side which is the thrust side of the tab while up-shifting to 3rd gear. And the squiggly groove in the shift drum is probably worn on the right side (thrust) as well. This would likely cause rough rotation of the drum at that location, resulting in insufficient lateral movement of the fork. This might limit how far 4th gear (driven) is pushed to the left making it difficult to engage the dogs in to 3rd gear. You can see that 4th gear (driven) does a lot of stuff. It engages 1st gear, it engages 3rd gear, it contains the groove for #3 shift fork tines and of course it is half of 4th gear. The reason I think the tab is worn on the right side is because you did not mention any problem down-shifting from 3rd and no problem going into 1st. The left side of the tab and groove has the thrust while engaging 1st and disengaging 3rd. The #3 fork is likely bent from the stress as well. Do you have any problem coming out of first at all? Maybe a bit stiff? How does 4th and 5th function? If you are running a low viscosity oil such as a synthetic, you might try 20-50. In single sump engines the oil lubes the transmission and clutch and since neither are ultra-close tolerance. The heavier dino oil will probably afford a bit of buffer to the drum and forks and maybe smooth out the shifting a little. Most transmission issues are not related to the actual gears, but to the engagement of those gears. All the other stuff in there. I'm not on the site all the time and I may not be on much this week. PM or call if you need an answer and don't hear back. My contact info is on my profile. Good luck. -
Little Feat
-
Tailwaggers
-
House of the rising sun
-
side bags won't open.
yamagrl replied to garyS-NJ's topic in Venture and Venture Royale Tech Talk ('83 - '93)
If its in the Set Position. (90 degrees) perpendicular to the length of the bag it should turn clockwise. The set position is actually unlocked but latchable. we recorded a 10 second video. https://goo.gl/photos/Hf7Zvi3PzHAKAGsv7 -
Profound Revelation!
-
side bags won't open.
yamagrl replied to garyS-NJ's topic in Venture and Venture Royale Tech Talk ('83 - '93)
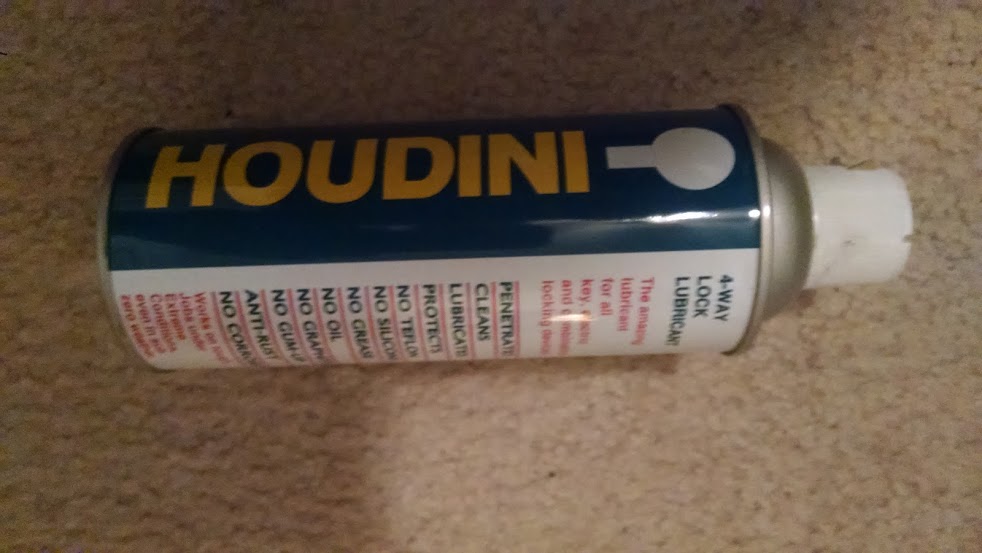
I had a similar problem on my side bags about 3 years ago. The key would turn from the locked position to the center position but not all the way to open position. The key will come out while in the center position. So I gently, but firmly turned the lock with a straight screwdriver and it opened. I found my problem to be the linkage mechanism and not the lock or the key. Once opened, I removed the cover over the latching mechanism and lubed it. Worked perfectly. My left side bag is starting to get a little tight, so I think need to do them all again I use Houdini. You will probably have to get it at a locksmith. I sprayed mine in 2012 I have riden several hundred miles in hard rain on several occasions and they are just now needing it.
-
Here is a youtube video
-
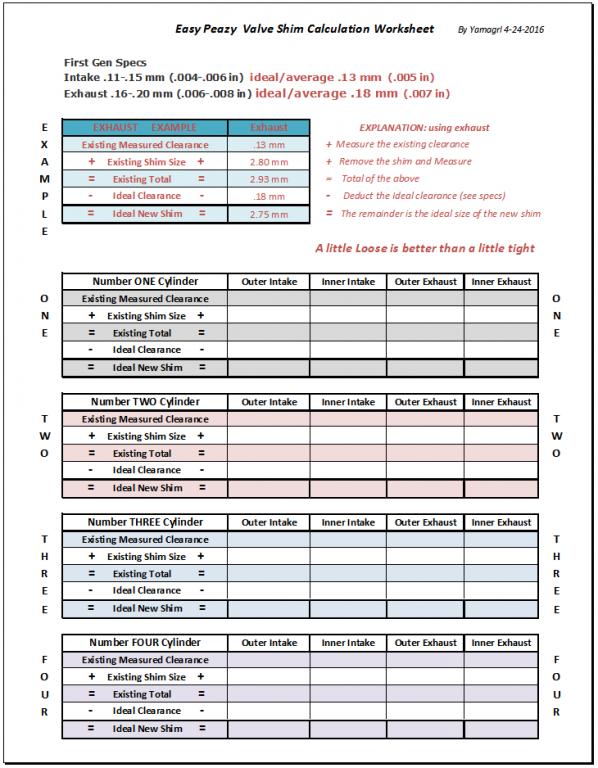
...while adjusting Big Red's valves today I made discovery. Probly nuthin' major but it hit me like a "Profound Revelation"! ...if you "Think Metric" it's simple math. No need for an Excel spreadsheet or shim table. After a few times it just comes to ya. ...of course it works the same for the intake and exhaust valves and whether the valve is too tight or too loose. First Gen Specs Intake .11-.15 mm (.004-.006 in) ideal/average .13 mm (.005 in) Exhaust .16-.20 mm (.006-.008 in) ideal/average .18 mm (.007 in) THINK METRIC Measured Clearance + Existing Shim = Existing Total - Ideal/Average clearance = Ideal new shim size. Example: exhaust valve measuring .13 mm clearance (a bit tight) with an existing installed shim 2.80 mm Measured Clearance .13 mm + Existing Shim 2.80 mm = Existing Total 2.93 mm - Ideal/Avg Clearance .18 mm = Ideal new shim size 2.75 mm We all know that numbers rarely work out perfectly like the above example. And we do not always have the exact shim we might need. So I'll work out another example: Exhaust valve measuring .13 mm clearance (a bit tight) with an existing installed shim 2.68 mm Measured Clearance .13 mm + Existing Shim 2.68 mm = Existing Total 2.81 mm - Ideal/Avg Clearance .18 mm = Ideal new shim size 2.63 mm Your choice may be 2.60 rendering .21 mm (slightly over the loose end of specs) 2.65 rendering ..16 mm (limit on the tight end of specs) I think slightly loose might be better. It will wear into the specs, whereas max tight will soon wear out of the specs. And ya probly wanna verify things with a micrometer. "Close enough for government work" Measured with a micrometer...Marked with a grease pencil... and cut with a chain saw! Attached is a PDF Worksheet. Print it out. Heather Easy Peazy Valve Calculation Sheet.pdf
-
...while adjusting Big Red's valves today I made discovery. Probly nuthin' major but it hit me like a "Profound Revelation"! ...if you "Think Metric" it's simple math. No need for an Excel spreadsheet or shim table. After a few times it just comes to ya. ...of course it works the same for the intake and exhaust valves and whether the valve is too tight or too loose. First Gen Specs Intake .11-.15 mm (.004-.006 in) ideal/average .13 mm (.005 in) Exhaust .16-.20 mm (.006-.008 in) ideal/average .18 mm (.007 in) THINK METRIC Measured Clearance + Existing Shim = Existing Total - Ideal/Average clearance = Ideal new shim size. Example: exhaust valve measuring .13 mm clearance (a bit tight) with an existing installed shim 2.80 mm Measured Clearance .13 mm + Existing Shim 2.80 mm = Existing Total 2.93 mm - Ideal/Avg Clearance .18 mm = Ideal new shim size 2.75 mm We all know that numbers rarely work out perfectly like the above example. And we do not always have the exact shim we might need. So I'll work out another example: Exhaust valve measuring .13 mm clearance (a bit tight) with an existing installed shim 2.68 mm Measured Clearance .13 mm + Existing Shim 2.68 mm = Existing Total 2.81 mm - Ideal/Avg Clearance .18 mm = Ideal new shim size 2.63 mm Your choice may be 2.60 rendering .21 mm (slightly over the loose end of specs) 2.65 rendering ..16 mm (limit on the tight end of specs) I think slightly loose might be better. It will wear into the specs, whereas max tight will soon wear out of the specs. And ya probly wanna verify things with a micrometer. "Close enough for government work" Measured with a micrometer...Marked with a grease pencil... and cut with a chain saw! Attached is a PDF Worksheet. Print it out. Heather [ATTACH]105064[/ATTACH] [ATTACH=CONFIG]105065[/ATTACH] Easy Peazy Valve Calculation Sheet.pdf
-
Eric Burdon
-
Here's a couple of clips from the videos
-
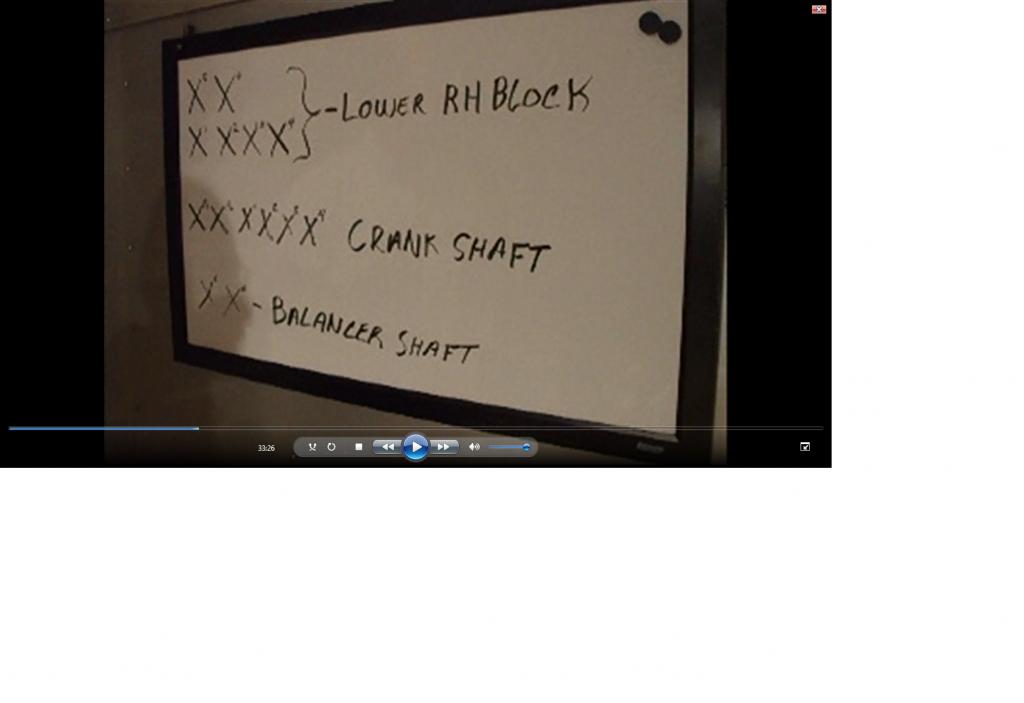
Actually, the bearings are unique to the individual engine. The bearing sizes are determined during the manufacture of your individual engine. Those numbers are used with a formula to determine which bearing (Pink, brown, etc.) The numbers on the block are combined with the numbers on the crank to determine the correct bearing for the particular journal. The calculations for the balancer journals and the rod journals are similar. It is best explained in this video that is available from this link http://www.venturerider.org/forum/showthread.php?t=84030. $20.00 I ordered them and I can tell you that they are invaluable if you are planning on going into the engine. Damon explains everything in great detail and in a very understandable manner. The videos are of the reassembly of a Vmax engine and the complete rebuild of the Vmax Karber-8-ers. They are quite concise and are altogether about 7 or 8 hours. Of course it is for VMax/1st Gen but I'm guessing that most of the procedures for the 2nd Gen are similar. The best 12 bucks I ever spent was on VR membership. The best 20 bucks was for those videos. If you order them say "Hi" to Damon for me Heather
-
Windshield Height
yamagrl replied to Patmac6075's topic in Venture and Venture Royale Tech Talk ('83 - '93)
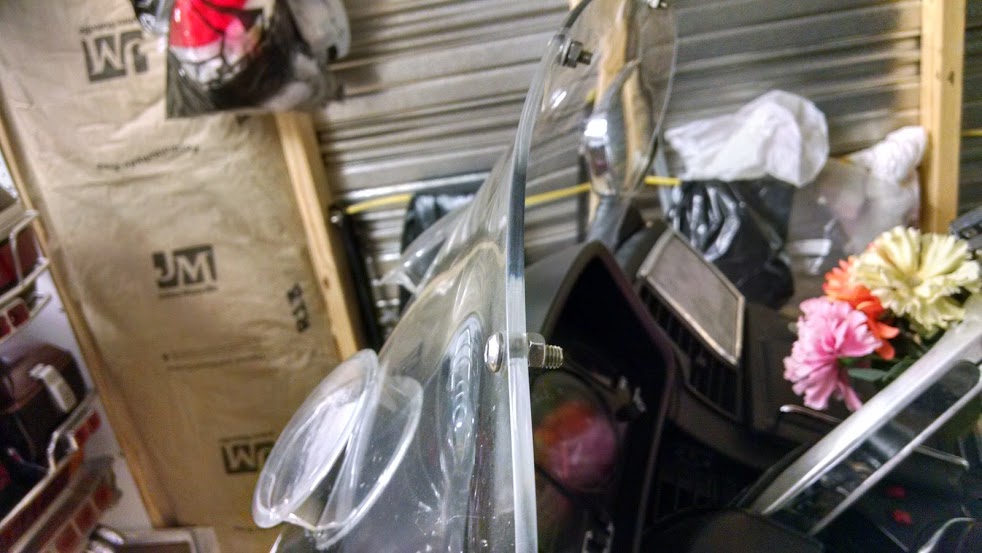
This is what I did to Big Red. I love it! The air passes right above my helmet. (I'm 5-10). I get near zero buffeting and little wind noise increase. Which is saying a lot because quite often I cruise north of 80 (ha, ha, ha mph.. not years). I don't ride 2 up very often but I think the passenger would get more buffeting. Don't waste your time on the Snap-Vents. They don't do much. I have been experimenting/fabricating a laminar lip from the piece I cut off.... hence the fasteners on the top. First off..I did it all while installed on the motorcycle. That way I could monitor things as I progressed. You know... look at it from the front, sit on the seat, stand on the pegs, gaze at it, yada, yada, yada. I removed about 6 inches with a laminate trimmer. Do not attempt to cut acrylic or poly-carbonate (Lexan) with a jig saw. You will not like the result. Just use a router or Roto-Zip with a spiral cutting bit and a VERY HIGH speed. Free-cut/freehand. Just go slow and stay away from the line. Rotary cutting can get away from the best of us. I covered the surface with clear packing tape to protect the surface. Mark on it where you want to cut it. Next, I used a belt sander with 120 grit and I worked parallel with the edge of the windshield until I got the arc of the edge pretty well perfected. Then I used 220 on a random orbit sander to further perfect the edge. Then hand sanded with 320 to further polish the edges. Then 0000 steel wool. The edge looks factory finished. No torch. I then proceeded to flare about 1 1/2 to 2 inches of the edge. I used a heat gun (not a blow dryer) on high...High... HIGH!!! If you are working with an OEM you will have to get it as hot as Hades and it's still hard to bend. Wear gloves. A torch might have come in handy here... seriously.
-
I ran into this issue with my Vstar 1100 a few years back. The three prong bulb has 2 prongs at the lower part of the base and one that is offset closer to the glass. This is the common prong. On the 1157 you have one prong on the lower section and one prong on the upper. Remove the single lower prong with a file. That leaves a single (common) prong. The 1157 will then fit perfectly...albeit with only one prong. Ideally the 3 prong is best, but for a buck and if you are in a pinch, the 1157 will work fine.
-
Carb diaphragm question
yamagrl replied to mxvet274's topic in Venture and Venture Royale Tech Talk ('83 - '93)
Yep. Just received them Friday. I have not yet installed them and it will likely be a couple of weeks before I do. I think (just a hunch) that sd10 or sd1 simply indicates singles or lot of four. The odd thing though is that they are cheaper if you buy four singles $17.95ea. -
Counterterrorism
-
Tunes
-
Farm
-
Lloyd's Of London
-
Tantrum
-
Temper
-
Around
-
Hits
-
Cheech