Bob K.
-
Posts
167 -
Joined
-
Last visited
Content Type
Profiles
Forums
Gallery
Events
Store
Everything posted by Bob K.
-

Imight have gotten carried away on my 89VR tonight...
Bob K. replied to uhfradarwill's topic in General Tech Talk
You are a better man than I. A couple $2 cans of this from Walmart per year squirted into every nook and cranny, let it soak and run off on its own, then hose off with gentle water. Plus there's something pleasing about it foaming up and expanding. It's kinda like a bubble bath...except for men. You should bottle your initiative and sell it! You'd be rich!
-
pic of carb cables
Bob K. replied to garyS-NJ's topic in Venture and Venture Royale Tech Talk ('83 - '93)
Concur. That was the only way I could get the stinkin' things back on. All the guys talking about attaching them when the carbs are back on the bike--without splitting the cables at the junction box--are magicians in my book. -
I'm not sure how you figured all of that out, cimmer! I spent about 20 minutes on the fiche at PartShark and finally gave up. I ordered the www.brakecrafters.com rebuild kits for the front and rear.
-
Swing arm/differential joint seal
Bob K. replied to dna9656's topic in Venture and Venture Royale Tech Talk ('83 - '93)
Exactly! -
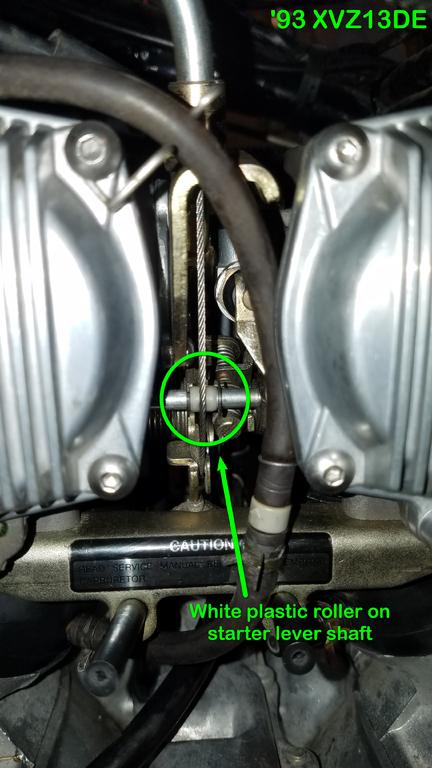
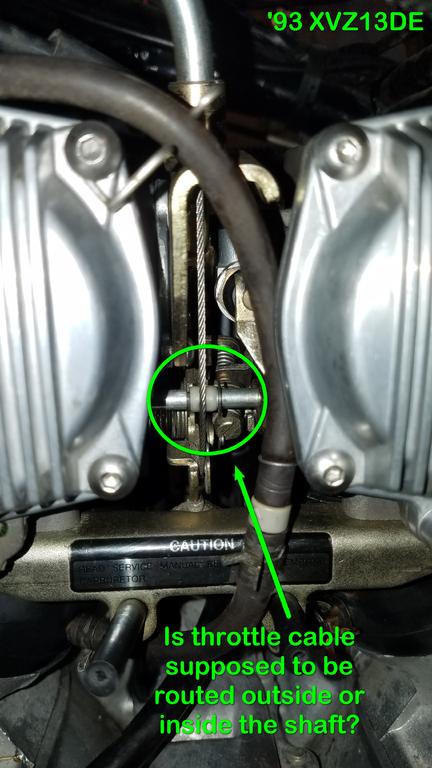
Steve--Are you being humorous or serious? Explain further, please. My throttle cable, when routed correctly inside the shaft, would never have enough slack in it to even come close to touching the white plastic roller. By the manual, Throttle Cable #3 is only supposed to have 1-2 mm of free play. Weird stuff. Those original designers need to be interrogated under a bright light!
-
I'm baffled. Consensus says I have the primary throttle cable routed incorrectly on my '93. It's not supposed to go around the white plastic roller/bearing on the starter lever shaft. Instead, the throttle cable is supposed to go on the inside of the starter lever shaft and directly to the throttle linkage. The angle of the throttle cable bracket does seem to support that idea in that it points toward the throttle linkage rather than toward the plastic roller. Yet when I look at this area, I can't see anything that would then touch the plastic roller, so what is its purpose? It's not needed to position the starter lever shaft or hold anything in place on the starter lever shaft. Is it a vestigial remnant of some sort? I don't want to reassemble any further until I'm positive I've got everything back where it's supposed to go.
-
Absolutely gorgeous! If you put it beside a brand new one, I think I'd have a hard time finding differences.
-
Swing arm/differential joint seal
Bob K. replied to dna9656's topic in Venture and Venture Royale Tech Talk ('83 - '93)
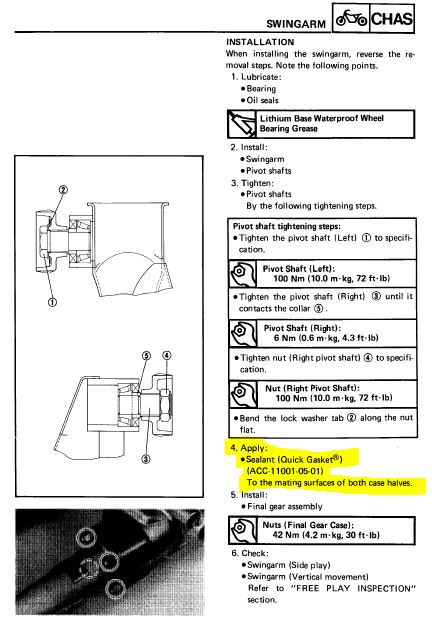
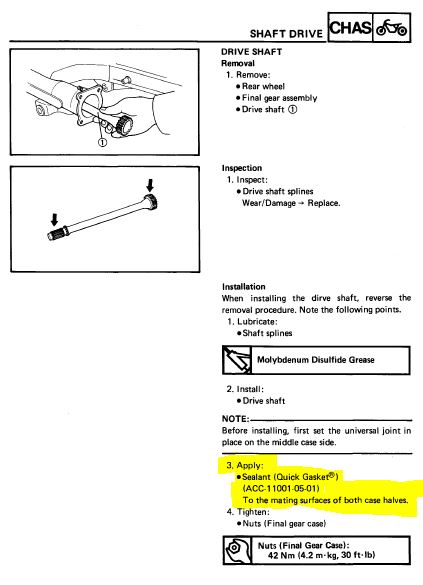
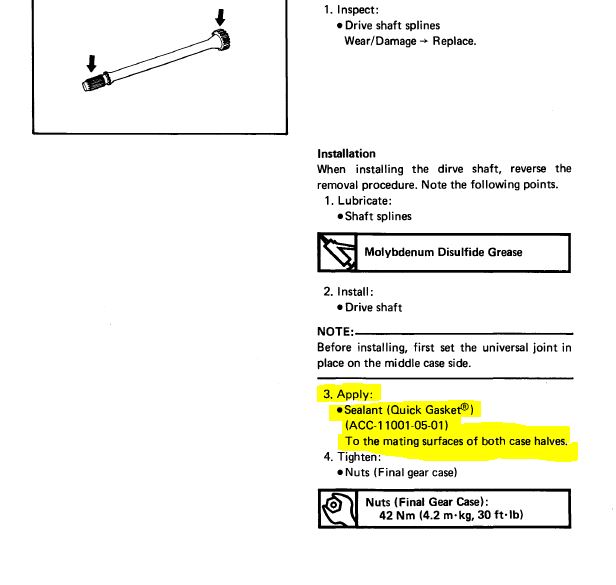
I noticed the same language in 2 separate spots in the '86 - '93 service manual. It shows up once in the swing arm maintenance section. It also shows up in the shaft drive maintenance section. In both instances, the next step is installing the final gear assembly and tightening the 4 nuts (final gear case). That's the only time I can find parts in the swing arm or the final gear assembly referred to as a "case" in order to get the "case halves" reference. Does the '83 - '85 say something different? I'll make a note in my manual if I've interpreted these sections incorrectly.
-
pic of carb cables
Bob K. replied to garyS-NJ's topic in Venture and Venture Royale Tech Talk ('83 - '93)
I found a couple other pictures on the Googles that show that routing as well. Ugh. If you need me, I'll be out in the garage. I'm still curious about the purpose of that white plastic bearing. There's nothing on or near the starter lever shaft right there that would require a rolling surface. -
pic of carb cables
Bob K. replied to garyS-NJ's topic in Venture and Venture Royale Tech Talk ('83 - '93)
Do I have the primary throttle cable routed incorrectly then? I currently have it on the outside of the white plastic bearing. Is it supposed to be on the inside? Seems weird that it would be routed that way because I don't think the cable would ever touch the plastic bearing if the cable is routed on the inside. What purpose does the plastic bearing serve then?
-
Swing arm/differential joint seal
Bob K. replied to dna9656's topic in Venture and Venture Royale Tech Talk ('83 - '93)
Sorry. It's from the '86 - '93 service manual. -
Swing arm/differential joint seal
Bob K. replied to dna9656's topic in Venture and Venture Royale Tech Talk ('83 - '93)
The service manual says to put sealant between the two halves. I never have. I haven't seen any ill effects--water intrusion, etc.--because the surfaces are pretty tight. This time, I put a little grease on each surface...just because.
-
Fuel flow question
Bob K. replied to SpencerPJ's topic in Venture and Venture Royale Tech Talk ('83 - '93)
Did you ever find a solution for your issue? Was it fuel related? -
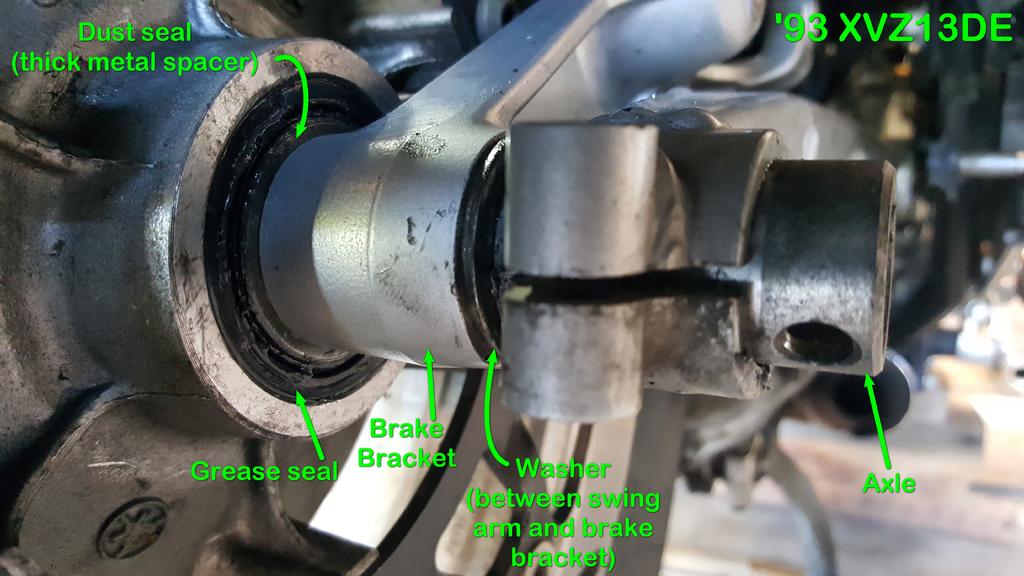
Nevermind. I think I've got my answer from @Prairiehammer pictures here: https://www.venturerider.org/forum/showthread.php?138422-rear-wheel-bearing-seal-order&p=1048432#post1048432 Nothing covering the grease seal from what I can see.
-
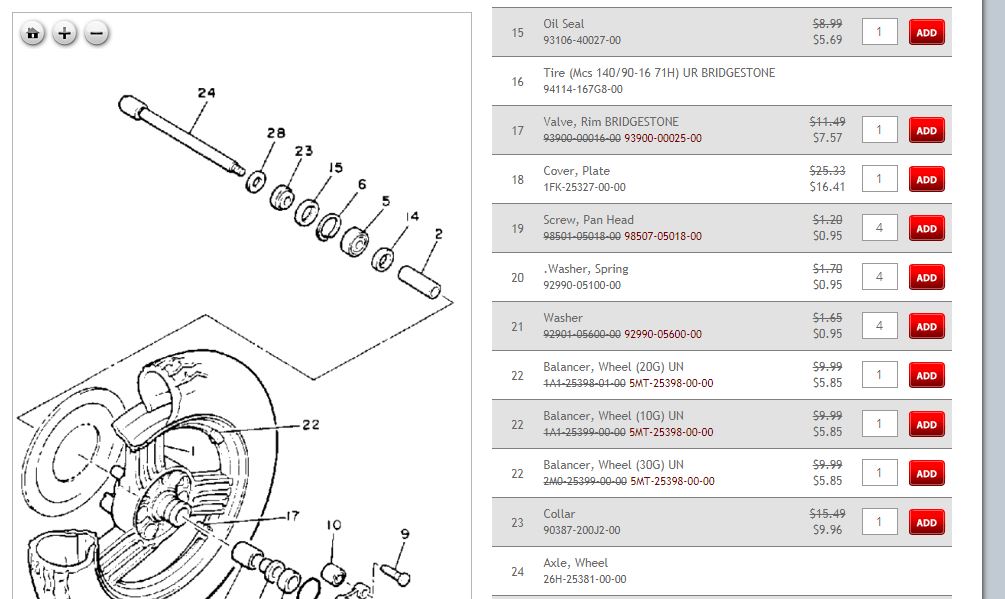
Is there supposed to be a dust cover of some sort (say, a big washer) covering and protecting the grease seal on the right side of the rear axle assembly? I'm the 2nd or 3rd owner of the bike and I don't ever recall seeing one there, but it sure seems weird that the grease seal would be exposed to the elements. The fiche doesn't show one. The #23 collar (what I have labeled as the "dust seal" or thick metal spacer on my picture) and the #28 washer that goes next to the swing arm are pictured, but I don't see anything else that could be a cover for that grease seal. Is there supposed to be some kind of cover or protection for that grease seal? Or, does it just stay exposed?
-
When you say "they are factory linked from the factory", what is factory linked? Do you mean the individual pistons within the caliper or are you talking about the linked braking system? (On my '93, the rear and front left are linked. The front right is operated only by the right brake handle.)
-
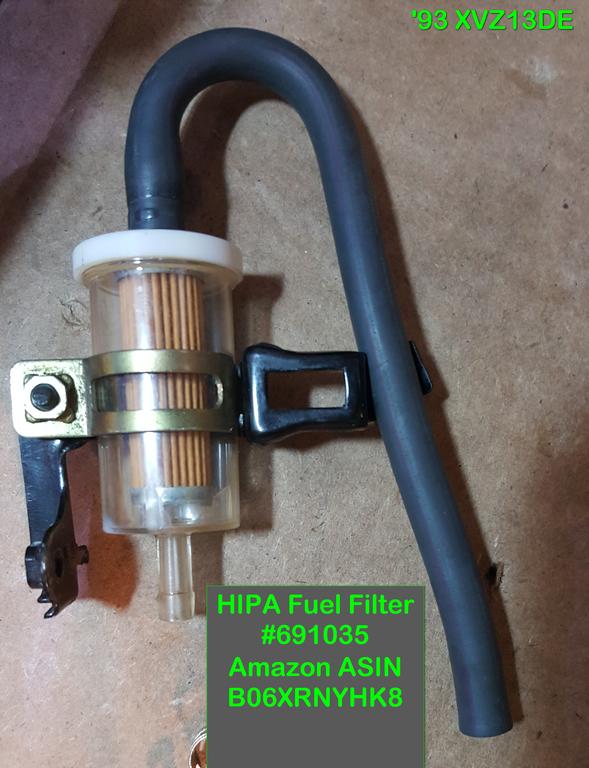
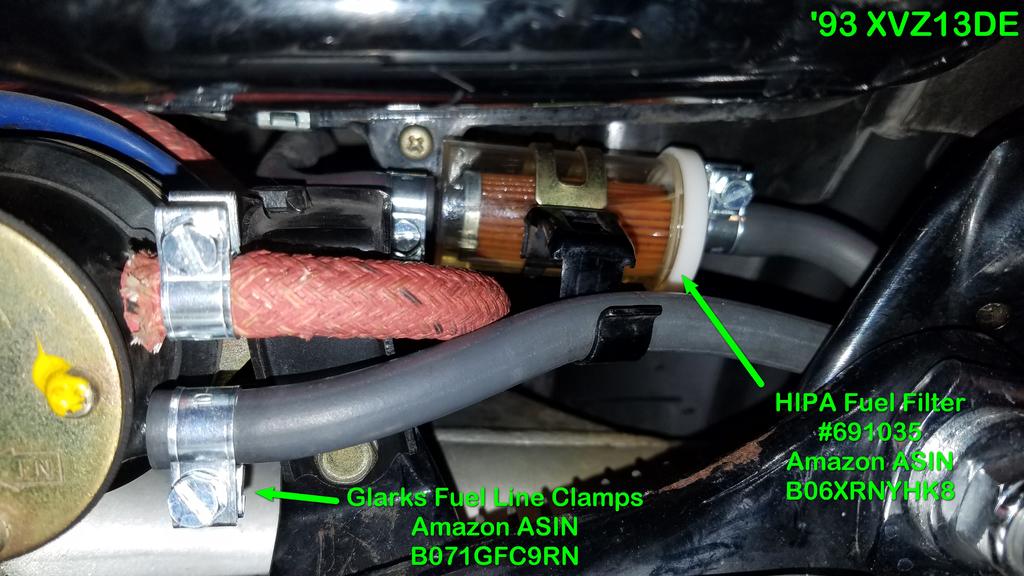
The parts fiche shows the same part number for the fuel filter all the way up through my '93, so I think the ones we're looking at for '86+ bikes will work on your MKI bike. Try this thread for fuel filters: https://www.venturerider.org/forum/showthread.php?135294-Fuel-filters-for-86-93-Ventures. I tested the HIPA filter today and it passes fuel as fast as the fuel pump can click.
-
Fork seals, again!
Bob K. replied to CaseyJ955's topic in Venture and Venture Royale Tech Talk ('83 - '93)
Tony--Have you considered taking abuncha pictures of all your fork components and posting them here? We might be able to see something and relate to problems we've had. -
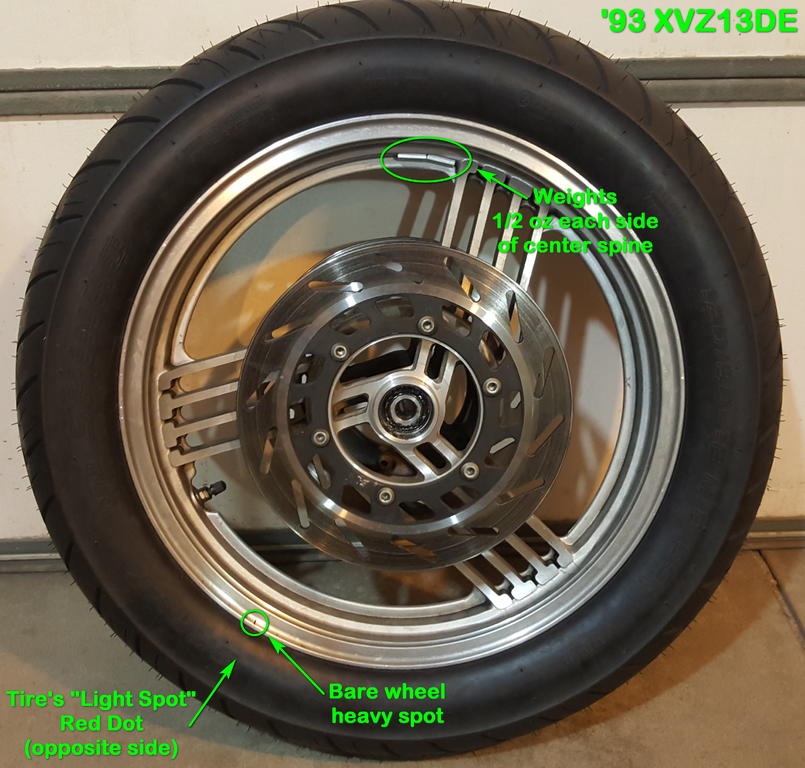
To balance the tire, I aligned the Shinko tire's "light spot" red dot with the bare wheel's heavy spot. I did this because of Shinko customer service saying I should align the red dot with the valve stem. While this would seem to indicate the red dot is the tire's light spot, customer service would not directly tell me what the red dot signifies. I still had to add the ounce of weight about opposite the bare wheel's heavy spot. It's crazy: I spent an hour with the Googles and no one can get their stories straight when it comes to tire dots. Yellow is supposed to be the light spot. Red is supposed to be the spot of maximum radial runout (the "high" spot on the tire). Most say align the dot--red or yellow--with the valve stem but they make the (incorrect) assumption that the valve stem is the heaviest spot on a wheel. Further, by saying the red dot always takes precedence and should be aligned with the valve stem, they all seem to be conflating radial runout with weight. If a high spot (red dot location) on the tire is co-located with the heavy spot on the tire, then you'd have the downward pressure of a tire bulge combined with the extra centripetal force of the heavy spot on the wheel. That might make the tire have more downward pressure at that location, which would require more weight opposite that point to balance out the bounce. Keep in mind my tire is gravity balanced, not spin balanced, so radial runout in itself is irrelevant...unless the maximum radial runout spot also happens to be the heavy spot because of the tire being thicker in that location. But then why would Shinko tell me to align the red dot--a potential heavy spot--with the valve stem?? It makes me grumpy that tire companies and internet users are imprecise and all over the map in this discussion. At any rate, thanks for the ideas, Earl.
-
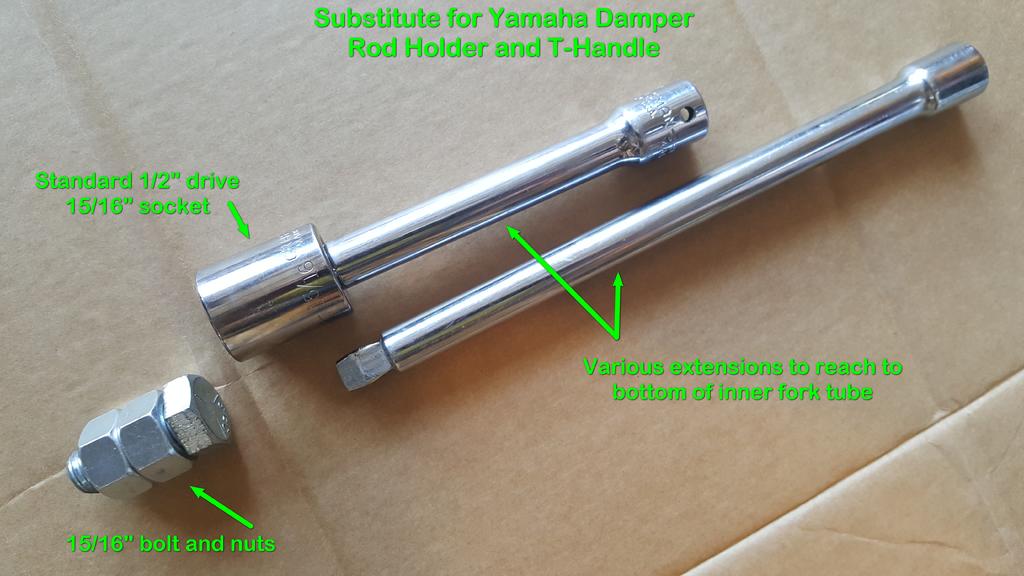
Damper rod bolt size
Bob K. replied to 6pak's topic in Venture and Venture Royale Tech Talk ('83 - '93)
Yes, 15/16" bolts and/or nuts fits perfectly.
-
Fuel filters for 86-93 Ventures
Bob K. replied to cimmer's topic in Venture and Venture Royale Tech Talk ('83 - '93)
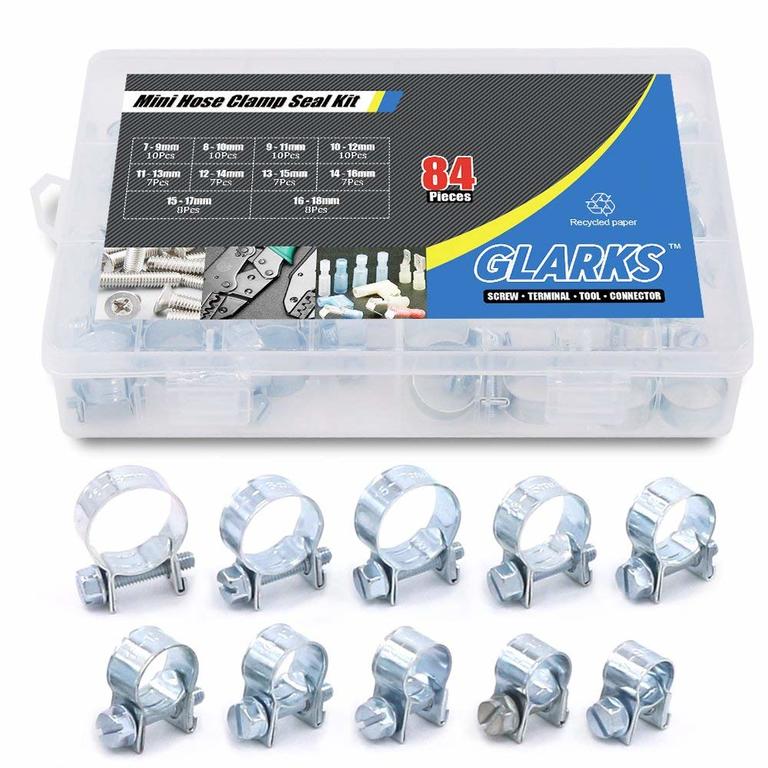
I'm going to give this HIPA fuel filter a try (replaces Briggs & Stratton # 695666 and 691035). It has a clear body, 1/4" inlet and outlet, and fits nicely in the original fuel filter bracket. $8.87 for a 2-pack. It passed the first test today and flows tons of fuel...as fast as the fuel pump can cycle. I'll let you know if I have any future problems with it. https://www.amazon.com/gp/product/B06XRNYHK8/ I also took off the old spring-style fuel line clamps and put on new fuel injector style clamps. They look nice, are much more compact than worm-style gear clamps, and tighten down the hose quite nicely even if the hose is stretched out. Mine was stretched out from the PO using a filter with oversized inlet/outlet. On the old red fuel hose up to the carbs, I like how the pressure is evenly distributed across the entire width of the clamp rather than being concentrated in just the two spots where the wires are with the original screw-down wire clamps. https://www.amazon.com/gp/product/B071GFC9RN/ Looks pretty spiffy when it's all put together.
-
I've reused them. I bent them just a tad more. We'll see how everything works over time.
-
I decided to test different solvents on that varnish/precipitate before doing anything. I soaked the flakes in little containers for awhile. Neither vinegar nor carb cleaner nor fresh gasoline did a thing to it. I went to Plan B: The entire petcock assembly does indeed come out from the bottom by snaking it to one side of the swing arm. I have the rear tire off, so that helped, too. The petcock pick-up tube filter screens were covered with the nasty gunk and had to be cleaned. I left the fuel level sensor out for several days so the tank would completely dry. The varnish turned into a dry layer of flaky scum that was easy to knock off the inner surface. I used a retrieval tool (because it's spring-like and flexible) down through the float hole to knock loose any extra thick stuff. I also used a Campbell Hausfeld air nozzle tool to reach down inside. On close contact, it easily blew the gunk loose. Then I stuck my Shop Vac blower nozzle over the fuel filler neck and blew a ton of air down into the tank, which made all the gunk go airborne inside the tank like a dust storm. Using the air nozzle tool down through the float hole also helped keep everything swirling and airborne. I stuck another smaller Shop Vac suction nozzle down through the float hole and sucked up all the airborne particles. Worked like a charm. I expect any remaining amount over time to be stopped either by the screen filters on the petcock or by the fuel filter itself. I can pull the float valve in the future to see if more cleaning needs to take place.
-
Zag--10 to 15 pounds of air loss overnight ought to be enough to detect leakage with soapy water. If you spray really soapy water on the tire, bead, and valve, do you get any bubbles?
-
Thanks, Scott! I can usually get rust to dance on a magnet because there's usually some ferrous material still mixed in with the ferrous oxide. Appreciate the comment about using white vinegar, too. I think I'll suck out what I can and then fill the tank to the tippy top with vinegar and let it sit. 7 gallons of vinegar is pretty cheap.