.JPG.97d34da93fc67655234eb6371e3710e9.JPG)

Prairiehammer
-
Posts
3,621 -
Joined
-
Last visited
Content Type
Profiles
Forums
Gallery
Events
Store
Everything posted by Prairiehammer
-

A Bucket List Trip. Or how I will spend my summer.....
Prairiehammer replied to The Tooch's topic in Watering Hole
You guys are definitely having issues with geography. From the Day 2 blog entry: "This was taken after crossing the Mississippi River from Indiana into Iowa.":think: From the Day 3 blog entry: "Anyways, on to today. We started out in Keokuk, IL.":doh: As for seeing my tractor; we farm an extensive area, but nowhere near US 136. Keep the rubber down Dave. Have fun! -
From Dunlop: Thank you very much for recent inquiry on Dunlop Tires. Tube type tires require a tube to maintain the proper air pressure as tube type tires are not built the same as tubeless type tires. A tubeless tire has an "inner liner" on the inside of the tire carcass that is designed to be airtight. The tube type tire does not have this same inner liner and if run without a tube will lose air over time. In most all cases tube type tires are designed for spoked rims that would lose air pressure through the spoke nipples. I would recommend ignoring what your friends are telling you on this matter and install a tube in your tube tire tires. Thanks again for your interest. Brent Durfee Regional Sales Manager Dunlop Tires Phone & Fax 714-572-8485
-
CLASS pump & manifold
Prairiehammer replied to garyS-NJ's topic in Venture and Venture Royale Tech Talk ('83 - '93)
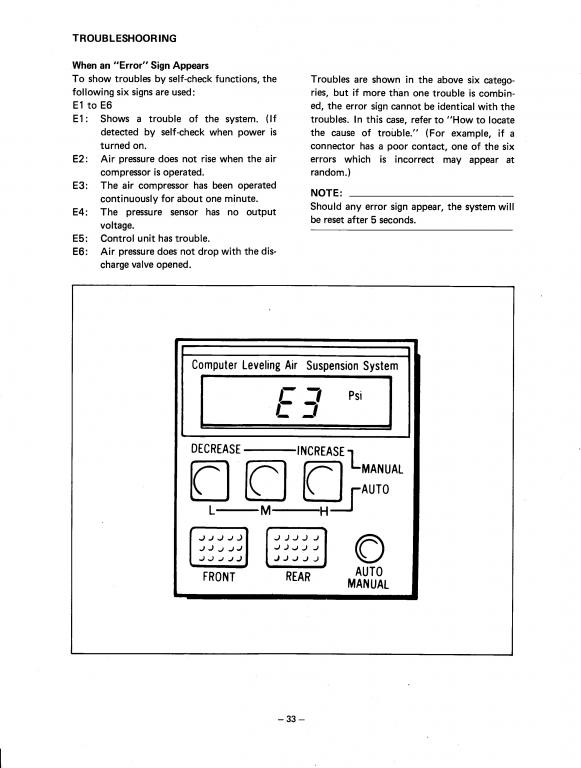
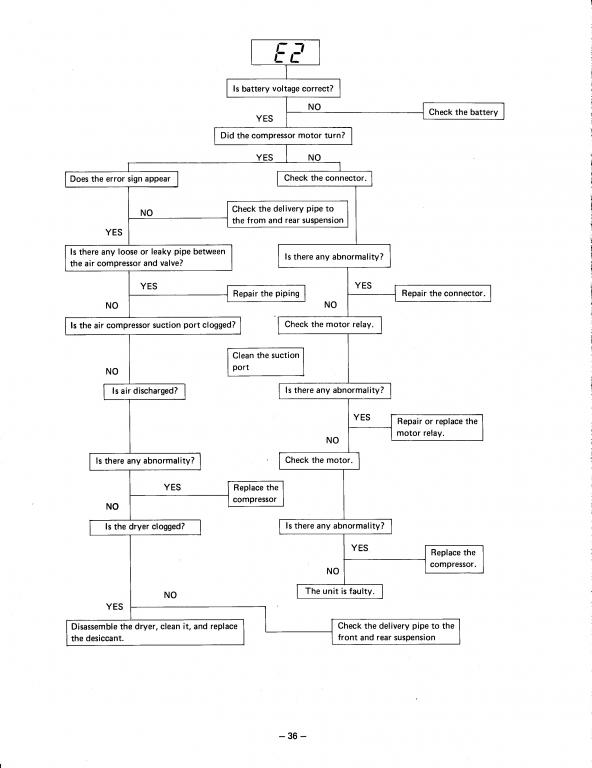
From the Service Manual:| "E2 code: Air pressure does not rise when the air compressor is operated." The causes include worn compressor ring, leaking connections, clogged intake filter, clogged air dryer, unseated solenoid valve(s), reed valve (acts as a one way check valve) defective or dirty.
-
CLASS pump & manifold
Prairiehammer replied to garyS-NJ's topic in Venture and Venture Royale Tech Talk ('83 - '93)
There have been some instances where the desicant has broken down into fine, dust like particles. This dust has been known to migrate to the solenoids, causing sluggish solenoid operation as well as poor sealing in the solenoid valve seat. Silica gel debris may also get into the "reed valve" (a one way check valve of sorts). If the reed valve leaks back, the compressor may be working too long without sufficient pressure build-up, causing the E2 error. -
Here is a thread with missing pictures: http://www.venturerider.org/forum/showthread.php?48559-Brake-hose-description-list&p=472651#post472651
-
Were you able to ascertain the problem with the original head?
-
So it is very possible that the fuel pump is NOT bad. How badly can one mess up the fuel pump wiring? There are only two wires on the pump.
-
Perhaps, but fuel pump failures are extremely rare on the First Gen Ventures.
-
Does it run? Have you ever heard it run?
-
Thanks. You have the simplest Venture to "bob", a 1983 XVZ12TK "Standard". And an early one at that! So when you download the schematic, just ignore the portions that relate to audio and CLASS, since you don't have those things.
-
Well, you had better learn to LOVE electrical schematics. You are going to be reading it alot.
-
Your project is not for the faint of heart or for one who is not familiar with the intricacies of the Venture electrical system. But, since it has been started already, there is no looking back, I guess. The electrical system of the First Gen Venture is fairly complex, what with the safety interlocks, audio, CLASS and ordinary lighting. First thing I would do is to become a Supporting Member, so as to insure that your source of expert advice does not go away part way through your project. You are going to have a lot of questions about "what does this wire do?", "How come it won't start/run after I clipped this wire?", etc. There are some electrical differences between nearly all the years of the First Gen Ventures. So the Second thing I would do is to identify the year and model of the Venture that you have. Look beneath the brake pedal on the frame rail and note the white label denoting the manufactured date and the VIN. Then tell us what the information is. Zagger has done what you are planning, so he may be your primary "go to guy", but the rest of us will be able to help with the details. Freebird's referral to the wiring diagrams (by member Dingy) is the best starting point. Download, print in large format and go for it!
-
I think you should name your new Venture after your Love AND what you do with her (the bike. I don't wanna know what you do with Eileen), so...ILean. Well, shoot! Someone beat me to the punch!
-
interchangeable fuel pumps?
Prairiehammer replied to chocking's topic in Venture and Venture Royale Tech Talk ('83 - '93)
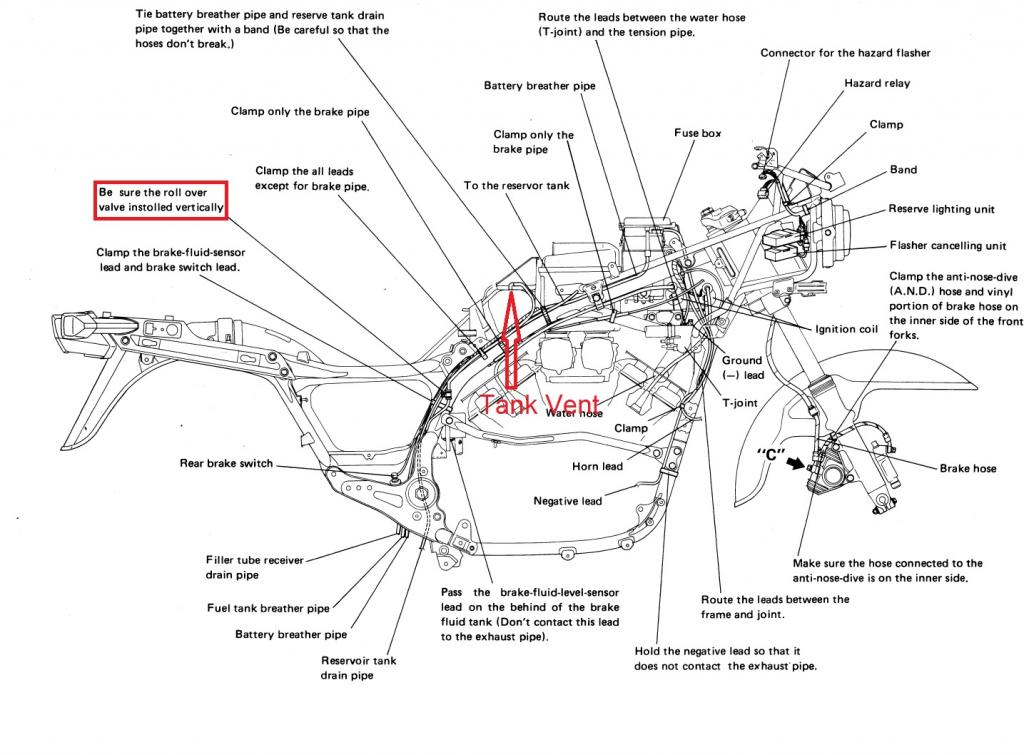
The fuel tank vent on the 1984 is a hose connected to an elbow to the right of the fuel filler. In line with hose is a rollover valve. Remove the right sidecover to examine or orient the rollover valve. The rollover valve is a check valve, intended to prevent fuel from escaping in the event of a "rollover" or tip over. The check valve has been known to stick. At least one time, the operator reported that he overfilled the fuel tank. The check valve prevented the fuel from running onto the ground but it also allowed a sufficient "head" of fuel over the check valve that the tank could not vent properly. The hose exits in front of the rear tire (along with the carb vents/overflow).
-
Marshall Mod .docx
-
Sometimes people get confused about what the "Marshall Mod" actually is. Some think simply replacing the stock antennae with Firesticks is the "Marshall Mod".
-
Ummm. The two bolts that hold the "bling" caliper cover ARE the caliper mounting bolts.
-
The "Marshall Mod" (named for Marshall Gammon) is primarily intended as a modification to the First Gen Venture, where the single antenna is replaced with two antennae; one dedicated to CB, the other dedicated to AM/FM. The splitter on the First Gen is also eliminated when the Marshall Mod is employed. There is no splitter on a Second Gen and the Second Gen already has two antennae, one for CB and one for AM/FM.
-
The advantage of the R1/R6 calipers over the stock is because the R1/R6 caliper is of a "monoblock" construction, whereas the stock XVZ13 caliper consists of two castings bolted together. Much better "feel" and more braking power is delivered by the R1/R6 caliper. No braking power is lost due to spreading of the caliper halves. Furthermore, note that the R1/R6 caliper pistons are different sizes on each caliper. This allows for greater progressive application and a more linear feel.
-
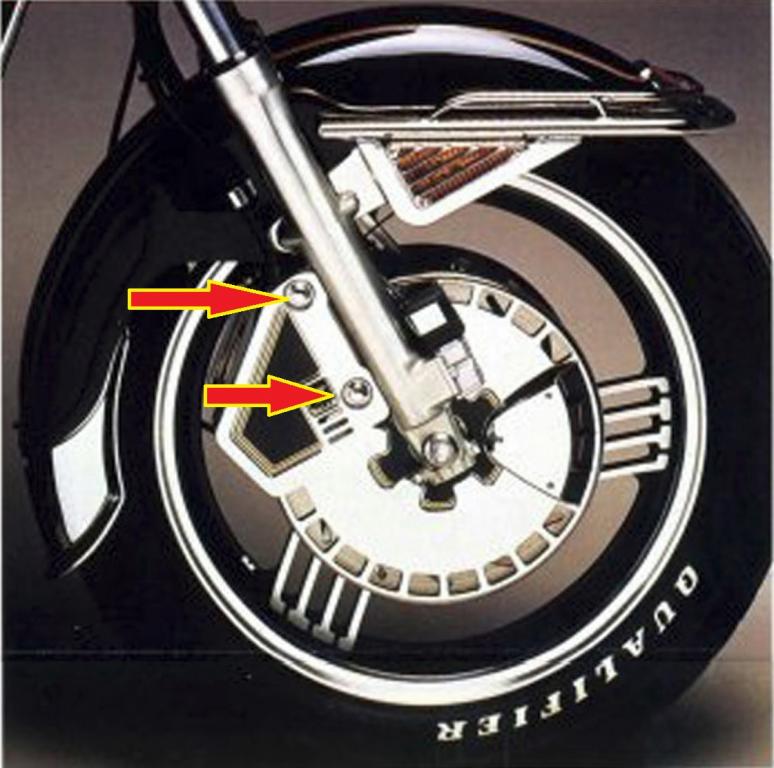
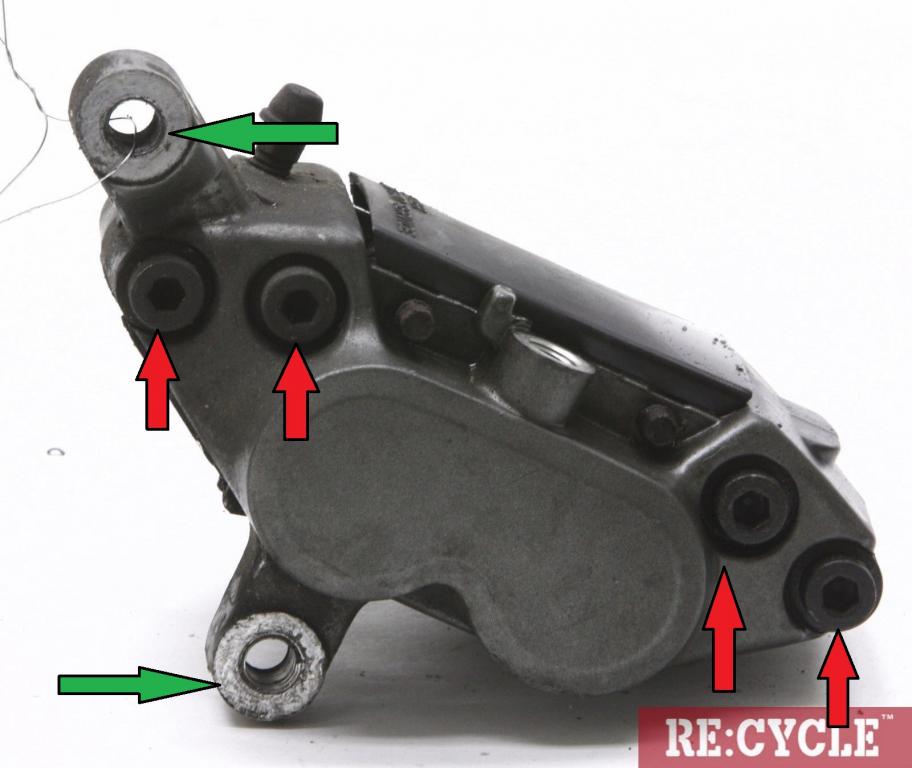
Four bolts? Not if it is stock. Only two chromed washer based mounting bolts. Don't be confusing the four hex socket (Allen head) bolts that join the two halves of the caliper as caliper mounting bolts. The caliper mounting bolt holes are in green. The four Allen bolts are in red.
-
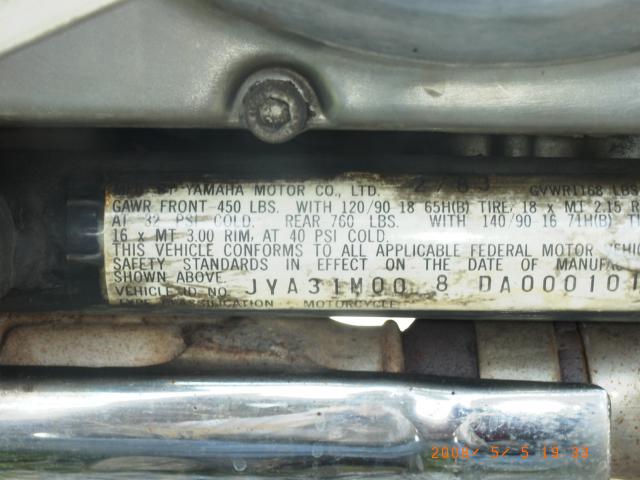
Thank you, Cliff. Despite being published by Yamaha Motors, the information is faulty. Even the color of the "black" 1983 XVZ12TK is incorrect when described as "New Yamaha Black". Correctly, the color of the black 1983 Standard is "Sparkle Crimson Black", Yamaha color code 00AY. Another error is in the Literature numbers; I have a XVZ12TK owner's manual and it is "LIT-11626-03-36", not "LIT-11626-03-35" as stated. It appears they transposed XVZ12TK and XVZ12TDK numbers. Six errors in just two entries in that book doesn't strike me as a highly credible book. Here is photographic proof of the existence of "000101" serial number in a 1983 Venture Royale:
-
I see on the Facebook site Puc got a new parts bike for Tweaks!
Prairiehammer replied to The Tooch's topic in Watering Hole
Thanks, CowpucTooch. I would have gotten it eventually when I investigated the Facebook post more thoroughly. As it was, I had just gotten done with a LONG day of planting, and I was just skimming threads. -
I see on the Facebook site Puc got a new parts bike for Tweaks!
Prairiehammer replied to The Tooch's topic in Watering Hole
Scott, do you care to add Tweaks II to my database? TIA. http://www.venturerider.org/forum/showthread.php?89793-Seeking-1983-1993-VIN-for-a-comprehensive-database