syscrusher
-
Posts
848 -
Joined
-
Last visited
Content Type
Profiles
Forums
Gallery
Events
Store
Everything posted by syscrusher
-
 1993 VR with stock TCI, I switched to Coil Over Plugs (COP). A few days ago I noticed a lot of decel popping on the right muffler. My "Mark's" collector sends the right front and left rear cylinder exhaust to the right muffler. Feeling the exhaust headers I noticed that the left rear one was remaining cool until heat from the right rear one conducted over through their common shield and the where the manifold was joined. I decided to switch the front and rear COP coils on the left so that I could verify whether the problem moved with the coil or stayed where it was. I sat on a short stool while pulling the coils which gave me a view of the vacuum ports (carb sync) and noticed that the end of the port cover for that rear one was laying next to the twinkie leaving the port open on that cylinder and so I replaced it. I did the coil switch as well and now all of the headers get hot pretty quickly after starting the bike. So, no coils were actually found to be bad, my wiring is as it should be, etc. Could having an open vacuum port on a cylinder cause it to not fire? I assume that the slide would not rise in carb for the cylinder that didn't have vacuum but the idle circuit should have been working and heating the pipe. Tell me your theories, or if you really know how this should work, please share the knowledge with me? On my way home last night before fixing this the engine was actually shaking the bike while sitting at a stop light, sort of like a Brand H bike would. I hadn't felt that on this motorbike before yet. A side question, is it a good thing to have the left front exhaust and right rear exhaust routed together through a common muffler and vice versa or not? It is not the way that Mamma Yamahama did it originally and so I have to wonder. It seems like it would be easy to add a crossover pipe between the two rears if it would make things fabulous.
 -
I don't know what I'm talking about here, let that be known upfront. It must not be a "wet" gasket, ie. keeping the oil in? If a gasket prevents binding and we're not worried about liquid retention, etc. then my approach would be to err on the side of a gasket that was (almost) too thick. Maybe I'm just saying what Camos already just said.
-
Upper Cowling Photos Please!??
syscrusher replied to syscrusher's topic in Venture and Venture Royale Tech Talk ('83 - '93)
I'm not a plumbing expert at all but I think one is just expected to use PVC for all plastic applications other than PEX. The black ABS pipe can't be used for pressure carrying applications and really has no advantages over PVC as I understand it and so it just doesn't have a spot on the shelves. -
Upper Cowling Photos Please!??
syscrusher replied to syscrusher's topic in Venture and Venture Royale Tech Talk ('83 - '93)
Oatey's is plumbing glue for ABS black pipe. You can't buy the ABS pipe anymore but you can buy the glue. I think it does contain some MEK, actually it's mostly MEK: 3. Composition/information on ingredients Mixtures [TABLE=width: 500] [TR] [TD]Chemical Name[/TD] [TD]CAS Number[/TD] [TD]% [/TD] [/TR] [TR] [TD]Methyl ethyl ketone [/TD] [TD]78-93-3[/TD] [TD]40-60[/TD] [/TR] [TR] [TD]ABS Resin [/TD] [TD]9003-56-9[/TD] [TD]30-40[/TD] [/TR] [TR] [TD]Acetone[/TD] [TD]67-64-1[/TD] [TD]10-20[/TD] [/TR] [/TABLE] 2.41% Other components below reportable levels *Designates that a specific chemical identity and/or percentage of composition has been withheld as a trade secret -
Upper Cowling Photos Please!??
syscrusher replied to syscrusher's topic in Venture and Venture Royale Tech Talk ('83 - '93)
I did see some of the cracks like you mention and I think that I wish I had prepared them the way you suggest. I exposed mine to acetone (on a rag) and tried to rub the cracked pieces back and forth to work acetone into the joint. I then put the Oatey's on the back of it and worked it a little more before leaving it to set up. I don't have full faith in my repairs and I'll bet yours are better. So far mine worked though. One thing I did do is add ABS shavings to the Oatey's as I worked on things in order to thicken it. The downside of this of course is that it becomes less solvent and more filler, making it even more appropriate for your repair method on cracked pieces and much less so for my method. I wish I could justify the $80 for a hot air plastics welding torch, what I've read and posted here tell me it's the best of all methods for bonding many types of plastics: http://www.venturerider.org/forum/showthread.php?122809-An-Interesting-Read-on-Joining-Plastic-Parts -
Upper Cowling Photos Please!??
syscrusher replied to syscrusher's topic in Venture and Venture Royale Tech Talk ('83 - '93)
Thanks! I think that did help, if only to make me feel better about the condition of my pieces. Egads! So ABS must stand for Aged Brittle Stuff or something like that. I see that it's next to impossible to find ABS black pipe at the big box hardware stores and Oatey sells a glue for joining ABS to PVC. It appears that for plumbing anyway ABS just no longer has any application. I'll come back here later and post a few pictures of what I ended up doing with the parts I was questioning about. I have some vacuum hose that just fit the holes in the plastic for the mirrors and so I cut it just slightly taller than flush and I'm using these washer/spacers to protect the ABS, I hope. It does look like just having a screw in there has chewed those holes larger on mine and in some of your pics. I spent some time trying to repair and bolster my plastics this time using the Oatey black glue for ABS and scraps and then I needed to make pieces fit together again. I had also forgotten what the spacers and things were used for since I would have used more of them if I had them. I did buy small bags of stainless M5 & M6 that I replaced a lot of the existing hardware with and I added some SS washers here and there too. Thanks Again! -
I'm putting my 1993 VR all back together right now but I'm confused about how certain parts are supposed to be assembled. My primary points of confusion are with the lower part of the upper cowling and the mirrors. I didn't take pics of mine like I had planned to when I was taking it apart and can't seem to find any on the site that just show a VR with all the side covers removed except the upper cowling. The parts fiche isn't really easy to understand where this area is concerned. The mirrors look like they should be supported better than just mounting them on top of the ABS plastic covering the metal frame in that spot. It looks like it would be easy to crack the ABS by mounting a mirror there but I don't see any spacers spelled out in the arts fiche or anything. This information on body plastics is sorely lacking here on the site, there is nothing in the read-only Tech Library section for First Gen. With the loss of some of the older photos from threads I was unable to find anything promising in a search of the First Gen Tech Talk area. Please help out if you can?
-
Sorry, I have no knowledge other than to guess that with an added seal outside of the bearing, it would be unlikely to double up the seal unless this extra seal is more of just a dust cover. If removing that extra seal lets you access the bearing to repack grease then that would be another indication as well. I only responded to say that you might get more pertinent info by posting in the "Second Gen Tech Talk" section. You may be able to search for "wheel bearings" in that forum or in the Tech Library for info and maybe photos of the procedure.
-
New radio/intercom cable
syscrusher replied to Big Auggie's topic in Venture and Venture Royale Tech Talk ('83 - '93)
Looking at the wiring diagram those wires stubbing out to the little connector go to the handlebar mounted remote controls for the rider's headset. At least that's the way it was set up for the '86 model, which is the only detailed diagram I have for that piece. -
Tuning the progressive springs.
syscrusher replied to Flyinfool's topic in Venture and Venture Royale Tech Talk ('83 - '93)
It seems like that could work. As I remember the spacing collar has a blocky surface that fit with the top of the air collar in some way as can be seen in my right side photo. I wonder what they (spacers) are really there for? -
Tuning the progressive springs.
syscrusher replied to Flyinfool's topic in Venture and Venture Royale Tech Talk ('83 - '93)
I posted a photo of either side with the left side showing a gap that the air collar could slide up to and release air on MY VR. Is that not visible to others? Anyway, I put a tie-wrap in the gap that will stop casual riding up until theres time to fix it all nicely (correctly). -
Tuning the progressive springs.
syscrusher replied to Flyinfool's topic in Venture and Venture Royale Tech Talk ('83 - '93)
Thanks Jeff, but the tops of the fork tubes are flush with their triple trees and I went through the alignment procedure so that's all good. It's just that there's nothing but air pressure and stichion to prevent the air collar on the left side from moving and letting out the air. I was just now thinking the right width zip-tie might just fill that gap though and save me the hassle of re-doing things on the left until other stuff needs to be done too. It just requires slipping the left fork tube out of the top TT but that means R&R front wheel, fender, fender guard, fork brace, etc. It's the fork brace that'll be a PITA more than anything else. There was a lot of fuzting around involved in installing it the way I did.
-
Run for it, it's the COPs!
syscrusher replied to flyday58's topic in Venture and Venture Royale Tech Talk ('83 - '93)
Thanks for your warning. The 1990 thru 1993 are said to work like IgniTech on output, is this not true as you know it? -
Tuning the progressive springs.
syscrusher replied to Flyinfool's topic in Venture and Venture Royale Tech Talk ('83 - '93)
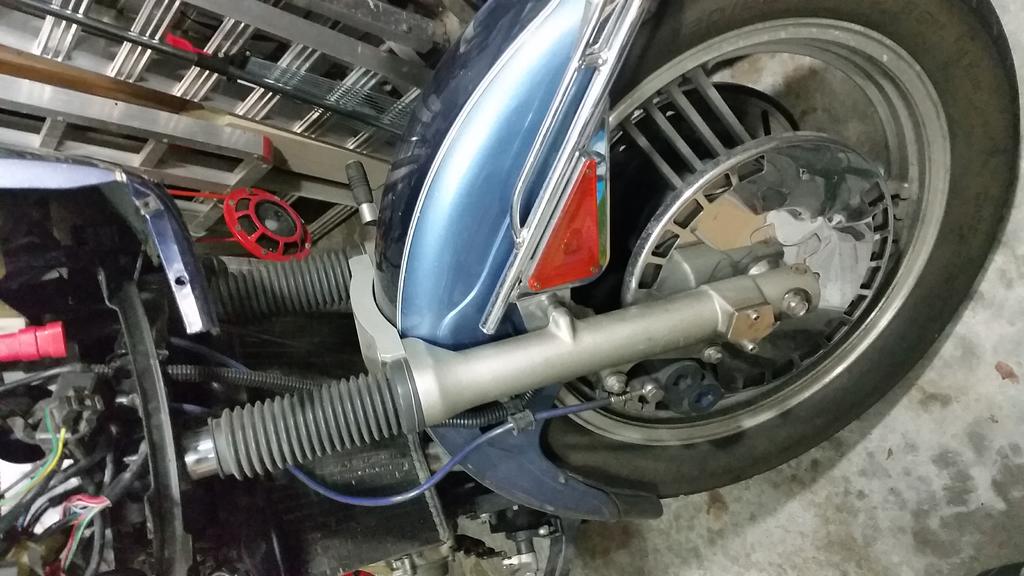
Oh, now that you describe it that way there was a plastic ring that fit the TT a certain way as I recall and corresponding shapes on the right side air collar. I decided to go and have a look just now though. Now I see the "pin" and the plastic ring on the right side but on the left side I see a gap between the air collar and the TT - uh oh. I was very happy to hear about there only being one odd thing on the right side because when I was taking off the front fairing parts I discovered another one of those plastic rings and started thinking that I had leftover parts from my fork tube replacement last year. Now I'm pretty sure that other plastic piece had been stuck on the TT until I wasn't looking and then bailed. At any rate the CLASS is working well and I don't see anything that would make me want to try fixing something that works right now. That is unless someone knows of a reason to put that piece in there that I don't know? I suppose it's part 75 on the "Front Fork" fiche? 75 GASKET 26H-23163-00-00
-
Tuning the progressive springs.
syscrusher replied to Flyinfool's topic in Venture and Venture Royale Tech Talk ('83 - '93)
What? I replaced my fork tubes last year and I don't remember seeing any pin and groove?? There are retaining RINGs that go around the fork tubes in a groove to position the air collars, but where is this PIN again? I have a 1993, is this a Gen 1.1 thing? BTW, I looked at the spacer with the Progressives and I looked at the one with the o-ring and they were so close that I went with the OEM metal one. The way I read the instructions they didn't say use both and I thought the metal one was better being more wear resistant and fitted to the ID of the tube. Then again the fork on my VN2K pogos around through residential intersections with the rain channels and stuff and I still ride it like a madman so I probably wouldn't know good suspension if I sat on some of it sometime. I thought my old buddie's PE400 was like riding a damn cloud and it's been reviled for having the worst suspension of any dirt machine (ever?) My DR650 is amazing and the Venture is good, nice even, better than I expected. My LazyBoy recliner has good suspension but I doubt if it corners all that well. I have Progressives and RaceTech Gold Valves ready to do to the VN2K sometime, but right now the Venture is at the head of the queue for a number of repairs, tweaks, and improvements that won't be noticed by anyone but me. -
Run for it, it's the COPs!
syscrusher replied to flyday58's topic in Venture and Venture Royale Tech Talk ('83 - '93)
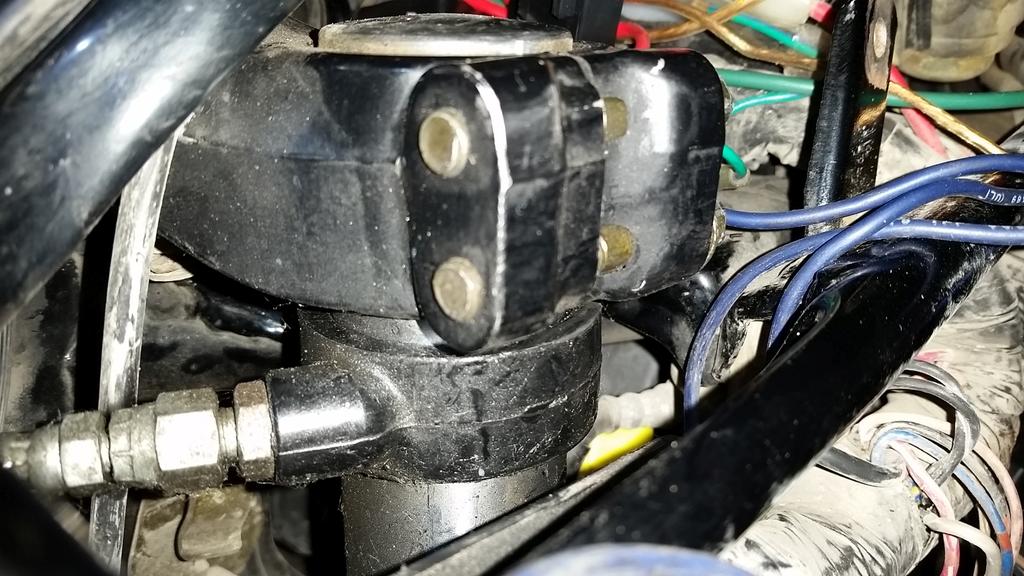
So I actually did go and slip the old rubber boot bottoms over the top of the rubber pencil coil ends and that seems to provide a seal similar to what is available with the original leads. The automotive type of coil over plug arrangements typically use a bolt through the top to hold them in place, what about that? What about having one loosen up? What're you going to do about that? -
1990 Throttle Cable Broken
syscrusher replied to esitgreaves's topic in Venture and Venture Royale Tech Talk ('83 - '93)
I did mine recently, it seems that the number #3 cable is the weak link. You were lucky to be able to buy a "surplus" one. -
Run for it, it's the COPs!
syscrusher replied to flyday58's topic in Venture and Venture Royale Tech Talk ('83 - '93)
I've actually gotten around to working on this now. I was wondering what anyone has been doing to seal around the plug at the bottom the way the old plug wire boot did. I was thinking about whether I could transfer the rubber boot part between the two or if anyone has come up with a better idea? I guess I'll finish up my wiring, make sure it works, and then do some experimenting. -
Grommets
syscrusher replied to Big Auggie's topic in Venture and Venture Royale Tech Talk ('83 - '93)
I ordered the Cal-Hawk assortment from Amazon today for $8. I've been having trouble finding grommets large enough for the holes in the plastics that provide a tight (smaller) hole for the pin-tabs to fit snugly. The Cal-Hawk kit is said to be real, soft-ish rubber and it has several full "plugs" that I can punch my own hole in if I can't find one of the grommets that I like. https://www.amazon.com/gp/product/B002X4AFL0/ref=oh_aui_detailpage_o02_s00?ie=UTF8&psc=1 -
It's not really a piston, but I guess it serves that function. It's really poorly named though. What you'll get will be not much different from the "Metal, Slide 1" other than a small size difference and it's location on the assembly. Thanks for the update. Somewhere I had seen a list of what someone thought different weights were for ATF but I can't remember or easily find it. I do remember it was considered not necessarily totally accurate anyway. I just went for it and hoped to get lucky and I did to some degree. Basically it's good enough that it's not a high priority for me to change it till it's due or something happens. After my experiences I'm really just happy to not be seeping fork oil. Being able to add air with the CLASS system and keep it in is better than I thought I could hope for. I guess I should take some time to delve into the properties of the oils that I use in general to determine if I'm really making good choices or not but to do a good job of that will require more time than I feel I have available right now. It's nice at least that Valvoline provides a link on the page you provided that takes you to a summary of the properties.
-
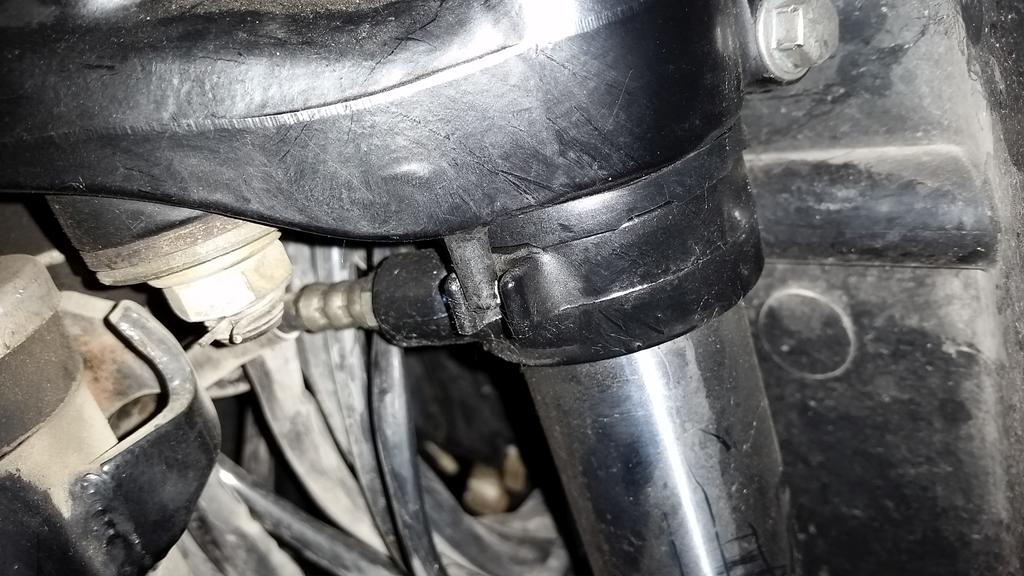
The link I provided in that earlier post gives the two bushing names. They are: Upper Bushing = Metal, Slide 1 Lower Bushing = Piston, front fork I am currently using ATF in my fork, partly because I wanted to be sure the seals were alright before spending $20 on fork oils. I'm just using some cheap Quaker State stuff or something. Which foreign car ATF is supposed to work well? What weight fork oil is it similar to? You'll find a lot of people around here talk as though the Progressive springs are all you need, nothing else matters. Myself I'm a little disappointed with just the ATF but it's just ATF, Progressives, and CLASS so it's got several variables. I also have my anti-dives blocked, but then I hedged and drilled a small channel to give the effect slightly bypassed anti-dives instead. Sometime I want to make larger bypass channels because with heavier fork oil my much smaller channels won't do anything. You'll ask so here's the skinny on Gen 1.2 anti-dives. In normal riding the anti-dive is an open channel. Under hard braking the solenoid closes this channel, restricting oil movement and making the fork stiffer. The solenoid(s) use significant power and are relatively fragile things sitting on the bottom of your fork. Break one and the fork oil will quickly be all over your engine, or maybe on the pavement under your tire. There are two approaches to eliminating them; blocking the holes off and an adjustable bypass. The bypass acts like a typical ordinary fork, blocking gives you a fork that is permanently in anti-dive mode. I do believe these approaches and their effects are reversed for Gen 1.1 forks.
-
Boats.net prices out favorably for Yamaha OEM, Partzilla is another portal to same ownership with not as good pricing somehow. I'd skip Ebay and just go with them. The Ebay link goes to Gen 1.1 fork parts but you have a Gen1.2 and there are differences. I'm not an expert on what those differences all are specifically but in your situation I'd steer clear of fork parts made for Gen 1.1 until you have the time to compare part numbers between fiches. Boats.net has the ability to search where any particular part number is used, lists all models and years, so that's a good place to poke around for info too. I have seen some posts here that talked about aftermarket fork seals that really sucked too so that's another reason to not mess around. You're replacing steering head bearings so I assume you have some movement there, like you can shake the front end when it's off the ground? You'lll have everything apart if you do that so this won't help you but you can replace seals and bushings, etc without taking the forks out of the trees if that makes any sense to you. Lot's of good info in the "Tech Library". If you do seals with forks in place slip a nitrile glove over the sharp edges where the bushings live and then slip the seal over that. The glove will protect the seal from damage. You're smart to be replacing dust seals too. I think it helps keep the fork slider in alignment so it doesn't allow the oil seal to leak.
-
Don't neglect to change the upper and lower fork bushings too. You'll be sorry if you don't...... Learn from my mistake(s): http://www.venturerider.org/forum/showthread.php?81910-My-fork-seal-seems-unrepairable-Help!
-
Look for "Arc to TIG conversion". Evidently the Lincoln "tombstone" stick welders are a good candidate to start with. Harbor Freight Tools offers a lower price TIG setup too. The first photo of this $200 one doesn't show a torch but the second one does: http://www.harborfreight.com/165-amp-dc-240-volt-inverter-tigstick-welder-61792.html This one is twice the price but might not be twice as nice? http://www.harborfreight.com/240-volt-inverter-arctig-welder-with-digital-readout-62486.html It takes skill and patience to weld thinner materials like a gas tank. I have never TIG welded myself, but have you considered brazing in the sections that you'll need? The gas is easier to control and you can use the heat to help form things as you go. Your joints won't rust either. HF sells small setups for $200 and you can lease tanks from the welding supply store. You may be able to lease a full setup. http://www.harborfreight.com/industrial-oxy-acetylene-welding-outfit-92496.html Lastly, have you gotten any bids from your local welding shops or have you considered just starting with a larger tank? Tell me about these parts that you won't be using.........
-
The article is discussing methods to join ABS plastic parts and the pros and cons of each. The interesting twist is that the reason for the discussion is a case study for a customer of the big 3D printer company Stratasys. This customer is building the first car ever to have the entire body prototyped using 3D printing. “We should want to own and drive a clean, energy-efficient car,” said Jim Kor, president and senior designer for the Winnipeg-based engineering group of KOR EcoLogic. His passion for the environment led him to design the principles of sustainability into a new car code–named Urbee, created with the production capabilities of Stratasys. The two–passenger Urbee, which stands for urban electric with ethanol as backup, was designed to use as little energy possible. It is capable of reaching more than 200 mpg on the highway and 100 mpg in the city. And now, it is the first prototype car ever to have its entire body printed with an additive process." http://www.stratasys.com/solutions/finishing-processes/bonding-and-gluing BTW, Where can I buy ABS rod preferably local and cheap? I need to replace a couple of the pencil sized knob nubs that hold side panels onto the Gen 1.2 models.