Search the Community
Showing results for tags 'boss'.
-
I was talking with my boss today about ST.Jude and told him i wa tring to figure out a way to make a good impact this year since its my first year to be involved. It turns out he know's all about St. Jude he had a friend who's child spent some time there. So he offered to allow me to have some cook out's at work like 1 a month during the spring and summer months. now along with this he has also offered to donate the hamburgers and hot dogs for me to do thisalong with our big grill. I work for an intermodal facility for the railroad those of you who never heard of that it is the import and export side of the rail road so we have truck drivers in and out of the place all day and they like us have eating disorders so im thinking this is going to work pretty well. I also found out today i can get a corprate donation based on the amount of hours i put into this with a max of $400 that will buy a few teddy bears.. just thought iwould share this good news with everyone. Ron
-
Hello to all, I have a few questions for anyone who can help. 1984 VR 1. How do you get the push rod, ball, and large push rod out of the center of the clutch boss? 2. How much free play (Rotational) should there be with the clutch boss (Housing?) itself? I have about 2 inches before it catches. Thanks in advance. MIKE
-
A few days ago I decided to stop watching the snow fall and I went out to my garage where my 2008 HD ultra classic is parked. I started waxing the already clean and waxed paint job. I decided to sit on the passenger seat to see how comfy it is, because of the weather the boss has not got to ride it yet. Anyhow I could not believe how tight and scrunched (if thats a real word) it felt. I'm only 5'6 and I felt like I was 6'5 setting on the back. My knees were higher then my backside, and my back was straight up with no room to recline, not even a little. I'm sure if the boss has the same problems I'll be back on a RSV. At least if I go back to the RSV I should'nt lost my shirt on the HD. I got $3,500 off the msrp when I bought it because it's a Peace Officer model. One things for sure I'm not going to go buy all those pretty chome goodies until the boss is happy.
-
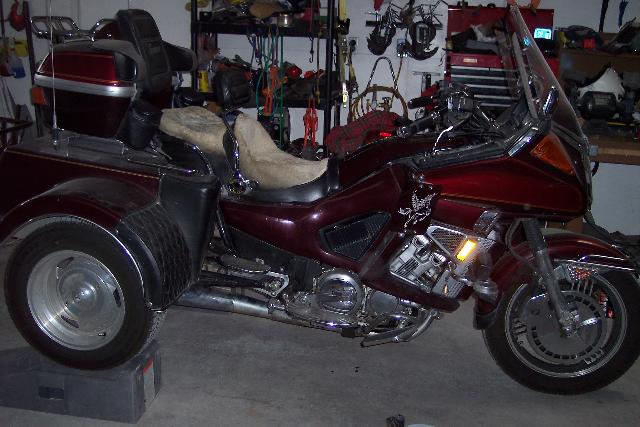
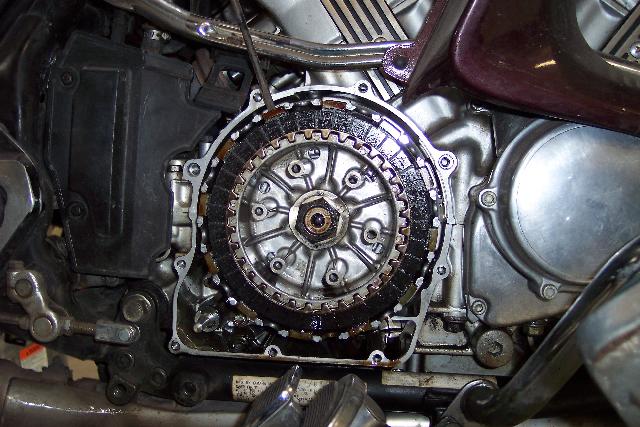
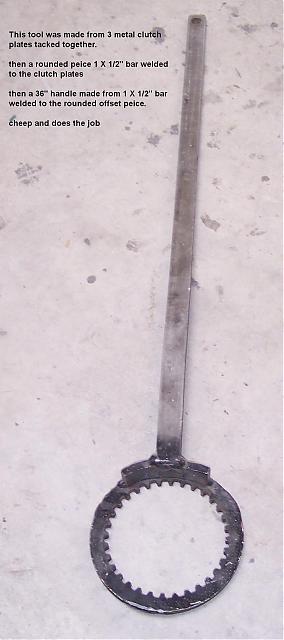
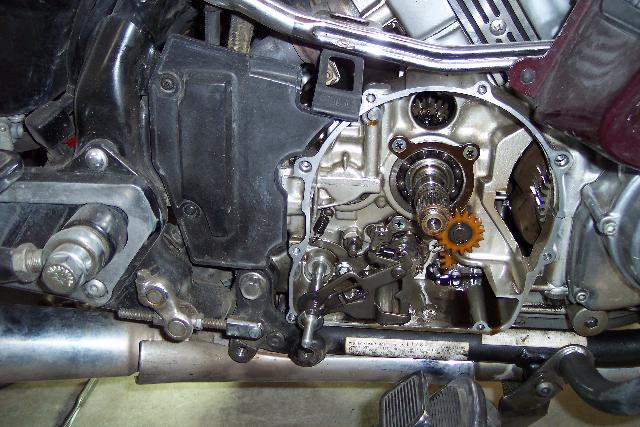
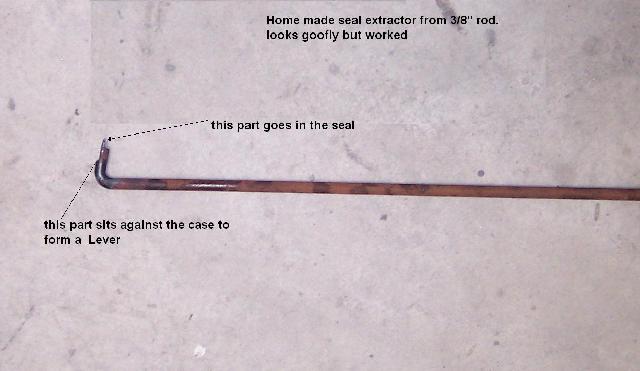
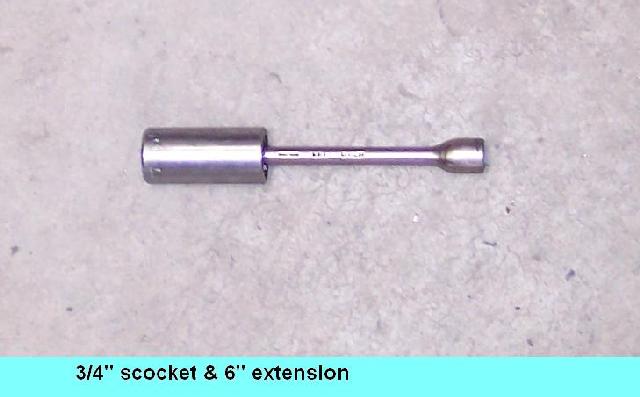
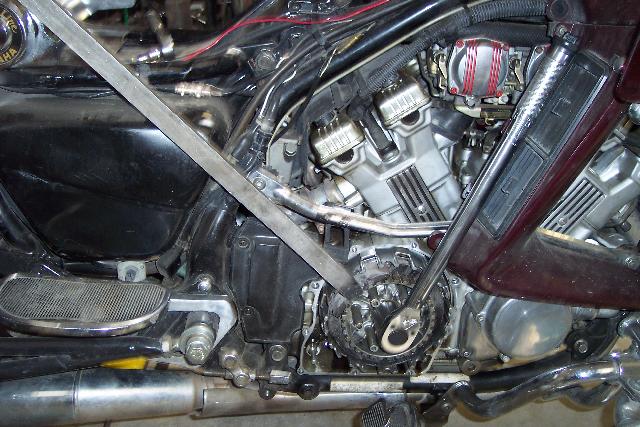
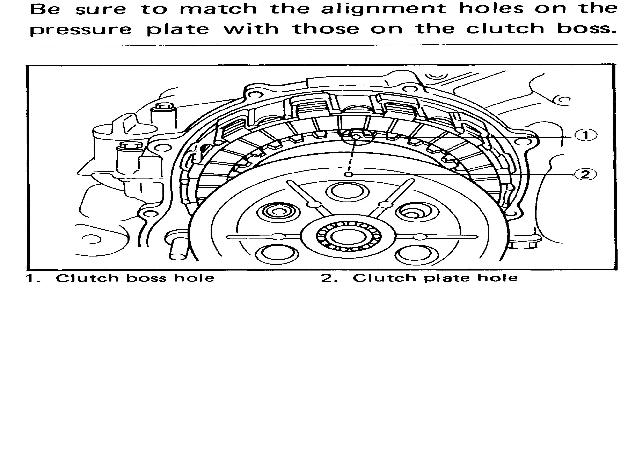
Is your Venture vying to look like an old Harley? Last year I developed a leak that I thought was the mid-cover gasket so when I repaired the stator that started to dye and the center bearing in the transmission, I replaced all the gaskets. Now that should have been that, but the leak is still there spotting the floor like a bad puppy. I have let the trike set for a long time (2 months) and noted that the leak was getting worse, so I took a look at the underside of the motor and found the culprit. It was the seal on the shift shaft at the rear of the motor and this was first time that I have had this seal leek. The fix Having a trike to work on will make this easier because I can put the trike on auto ramps that will make the oil go forward in the engine and not have much come out when the Mid-gear & clutch cover are removed. It also gives me an extra 6.5 inches of space under the bike that will make this job a lot easier. If you have a lift it would make this job easier also. 1) Remove seat, tank top, side covers. 2) Note the position of the clamp at the end of the shaft, mark the shaft so you can put it back in the same position. My shaft was marked. Remove the 10MM bolt & Spread the clamp with a blade screwdriver and remove the clamp with the screwdriver and leave it attached to the screwdriver. (See driver.jpg) 3) Place oil collectors under the case covers cuse it’s gonna leak. Now remove the foot pegs, clutch cover & mid-gear cover. 4) Remove the clutch spring (s) & pressure plate. Use a screwdriver to remove the clutch plates keeping them in order so they can be put back in the same position (yes it is important!). (see Rplates.jpg) You do not have to remove the clutch plate held in place with the wire. 5A) Bend the locking tab away from the nut & while holding the clutch boss with Yamaha or home made tool, use a 30MM socket and remove the nut, plunger and ball bearing. (See tool1.jpg) If you have an impact wrench go to 5B 5B) You can use an impact wrench to remove the nut, but you will need the tool to torque the nut when you reinstall the boss. 6) Remove the clutch boss, thrust washer and clutch basket. 7) Lift the claw on the shift mechanism and pull it out about 2” this will clear the seal. (See claw.jpg) 8) I had to make a tool to remove the old seal because I have did not have anything that would do the job. (see tool2.jpg) 9) Be sure to oil the new seal then Install the new seal by taping into place. I did this by using a ¾”socket with wheel bearing grease on the end & 6” extension inserted in the socket backwards. (See tool3.jpg) Now use the female end of the extension to seat the seal into place. 10) Now reinstall the shift shaft by lifting the claw into place on the shift barrel. 11) Install the basket, washer and boss on the shaft and tighten the nut to 50 FT LB holding the boss in place with the tool. Lock the nut in place with the locking tab. 11A If you don’t have a tool to hold the boss & because this shaft is part of the transmission, if you re-attach the bracket to the shift shaft and put the motor in 2ed or 3ed. Then it should be possible to hold the foot brake down and torque to 50 FT LB. I have not tried this but I can’t see why it would not work. 12) Install the clutch plates the way you found them. (See Iplates.jpg) 13) Now reinstall the clutch Ball bearing, plunger, presser and spring(s) torque bolts to 5.8 FT LB. plate (remember to align the dots on the presser plate & basket “See dots.jpg”) 14) Use the screwdriver to put the clamp back on the shaft & a pair of Forceps to put the bolt back in the clamp, tighten clamp with 10MM socket. 15) Put the case covers back on and torque the bolts to 7.2 FT LB 16) Replace foot pegs or the floorboards. 17 Replace any lost oil. [ATTACH]13770[/ATTACH][ATTACH]13771[/ATTACH][ATTACH]13772[/ATTACH][ATTACH]13773[/ATTACH][ATTACH]13774[/ATTACH][ATTACH]13775[/ATTACH][ATTACH]13776[/ATTACH][ATTACH]13777[/ATTACH] [ATTACH]13778[/ATTACH][ATTACH]13779[/ATTACH][ATTACH]13780[/ATTACH] This repair is not particularly difficult, but the space is very small to work in. I did have a problem in removing the old seal and had to make a tool. Fred
-
Is your Venture vying to look like an old Harley? Last year I developed a leak that I thought was the mid-cover gasket so when I repaired the stator that started to dye and the center bearing in the transmission, I replaced all the gaskets. Now that should have been that, but the leak is still there spotting the floor like a bad puppy. I have let the trike set for a long time (2 months) and noted that the leak was getting worse, so I took a look at the underside of the motor and found the culprit. It was the seal on the shift shaft at the rear of the motor and this was first time that I have had this seal leek. The fix Having a trike to work on will make this easier because I can put the trike on auto ramps that will make the oil go forward in the engine and not have much come out when the Mid-gear & clutch cover are removed. It also gives me an extra 6.5 inches of space under the bike that will make this job a lot easier. If you have a lift it would make this job easier also. 1) Remove seat, tank top, side covers. 2) Note the position of the clamp at the end of the shaft, mark the shaft so you can put it back in the same position. My shaft was marked. Remove the 10MM bolt & Spread the clamp with a blade screwdriver and remove the clamp with the screwdriver and leave it attached to the screwdriver. (See driver.jpg) 3) Place oil collectors under the case covers cuse it’s gonna leak. Now remove the foot pegs, clutch cover & mid-gear cover. 4) Remove the clutch spring (s) & pressure plate. Use a screwdriver to remove the clutch plates keeping them in order so they can be put back in the same position (yes it is important!). (see Rplates.jpg) You do not have to remove the clutch plate held in place with the wire. 5A) Bend the locking tab away from the nut & while holding the clutch boss with Yamaha or home made tool, use a 30MM socket and remove the nut, plunger and ball bearing. (See tool1.jpg) If you have an impact wrench go to 5B 5B) You can use an impact wrench to remove the nut, but you will need the tool to torque the nut when you reinstall the boss. 6) Remove the clutch boss, thrust washer and clutch basket. 7) Lift the claw on the shift mechanism and pull it out about 2” this will clear the seal. (See claw.jpg) 8) I had to make a tool to remove the old seal because I have did not have anything that would do the job. (see tool2.jpg) 9) Be sure to oil the new seal then Install the new seal by taping into place. I did this by using a ¾”socket with wheel bearing grease on the end & 6” extension inserted in the socket backwards. (See tool3.jpg) Now use the female end of the extension to seat the seal into place. 10) Now reinstall the shift shaft by lifting the claw into place on the shift barrel. 11) Install the basket, washer and boss on the shaft and tighten the nut to 50 FT LB holding the boss in place with the tool. Lock the nut in place with the locking tab. 11A If you don’t have a tool to hold the boss & because this shaft is part of the transmission, if you re-attach the bracket to the shift shaft and put the motor in 2ed or 3ed. Then it should be possible to hold the foot brake down and torque to 50 FT LB. I have not tried this but I can’t see why it would not work. 12) Install the clutch plates the way you found them. (See Iplates.jpg) 13) Now reinstall the clutch Ball bearing, plunger, presser and spring(s) torque bolts to 5.8 FT LB. plate (remember to align the dots on the presser plate & basket “See dots.jpg”) 14) Use the screwdriver to put the clamp back on the shaft & a pair of Forceps to put the bolt back in the clamp, tighten clamp with 10MM socket. 15) Put the case covers back on and torque the bolts to 7.2 FT LB 16) Replace foot pegs or the floorboards. 17 Replace any lost oil. This repair is not particularly difficult, but the space is very small to work in. I did have a problem in removing the old seal and had to make a tool. Fred

-
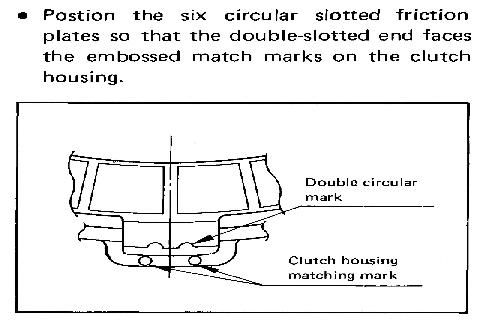
Clutch Hope this will explain all you will ever have to know about the clutch in your Venture, because sooner or later the tack will start going up faster then the speedometer when you punch it to pass. The one strange thing I have noticed about the Venture clutch is that you notice slippage in the higher gears not in first or second. The time it takes to inspect the clutch in your Venture before a long trip is well worth it. Things you will need before starting 5 mm Allen or hex socket, 6 new springs or diaphragm spring, a new clutch gasket, a 6 in ruler, a set of calipers or a 01 in micrometer. With the bike on the side stand the clutch cover can be removed with out loss of oil and if you start with a cold engine a novice should be able to complete the the inspection within two hours (one hr. at the Yamaha shop). After you have the cover off, remove the six bolts from the clutch and remove the driven plate (pressure plate), then remove the steel and fiber disks inspecting them for excessive wear and color. If the steel plates look blue or purple in spots or the knurling (diamond shaped indentations) are uneven replace them as they are warped. If they look good it might be a good idea to have them glass beaded or sand blasted to remove any glaze as they seem to cause slippage before the fiber plates are out of tolerance. You should now see the last metal plate held in with a long wire that goes all the way around the center of the clutch boss. This plate and the friction plate behind it need not be checked unless you intend to replace all of the metal plates. Have them de glazed if the clutch has been chattering, because they are, used as a damper. Now check the splines on the clutch boss for chafing where the plates run, as this can cause erratic operation. If the chafing (necks or grooves) are slight to moderate, you can carefully de-burr with a file or replace the boss. Now check all parts to see that they are within there ware limits listed. If the friction plates are ok it might be a good idea to de glaze them with a wire brush. I have listed the parts and there ware limits for both types of venture clutch. To reassemble start with one of the 6 friction plates that have the two round notches, alien the two notches with the two marks on the clutch housing, now place a metal plate on the clutch boss, repeat this until you have replaced the 6 plates then take the last plate with the large square notch and alien it with the two marks on the clutch housing . When you put the pressure plate on, alien the mark on the clutch boss with the hole or mark on the pressure plate then place the 6 springs or the diaphragm spring and retainer and tighten the 6 bolts evenly. replace the clutch cover and torque the 5 mm bolts to 8.7 ft-lb. most of the information in this article can be found in a Yamaha service manual that can be purchase through M.T.A. Remember to replace the hydraulic fluid with dot 3 once a year or if turns dark. Parts Standard clutch 1983-1985 6 springs #90501-24734-00 normal length 41.6 mm / 1.64 in minimum length 40.3 mm / 1.59 in replace if the springs are to short or you have over 30,000 miles on the clutch. 6 friction plates #26h-16307-00-00 1 friction plate #26h-16331-01-00 1 friction plate #26h-16321-00-00 thickness 2.9 to 3.1 mm / 0.1142 to 0.1220 minimum thickness 2.8 mm / 0.11 in 7 metal clutch plates #26h-16324-00-00 thickness 2.2 to 2.4 mm / 0.0866 to 0.0945 in no minimum listed warp limit 0.2 mm / 0.0079 in 1 clutch boss #26h-16371-00 1 gasket #26h-15462-00 1986-1991 venture / v-max diaphragm clutch 1 clutch spring #1fk-16334-00-00 6 friction plates #26h-16307-00-00* 1 friction plate #26h-16321-00-00* 1 friction plate #26h-16331-00-00* 7 metal clutch plates #26h-16324-00-00* 1 metal clutch plate #1fk-16352-00-00* 1 clutch boss #1fk-16371-00-00 1 gasket #26h-15462-00-00* *(parts are the same as 1983-85 clutch) Fred J. Vogt