Search the Community
Showing results for tags 'screw'.
-
Sending Unit Repair Thanks to Brian H. (6m459) for this excellent article. I measured my sender unit resistance and found it to be open circuit as was suggested by another member. I removed it from the tank to find that the wiper would loose contact with the resistance wire at the mid point, of the float travel, as the resistance wire substrate is warped. It made good contact at top and bottom but not in the middle. I found that there is a handy adjustment available that lets you re-tension the wiper quite easily. Undo the screw and slide the bushing closer to the resistance wire, against a compression leaf spring, then re-tighten the screw. All seems to work well again now but I'll be keeping a close eye on it for the next little while. Shown with cover removed. Note bend in resistor wire substrate. http://www.venturerider.org/sendingunit/1%20(Small).jpg The wire loses contact with the resistor midway. http://www.venturerider.org/sendingunit/2%20(Small).jpg Solution: Loosen screw, slide wiper closer, retighten. http://www.venturerider.org/sendingunit/3%20(Small).jpg Close up view. http://www.venturerider.org/sendingunit/4%20(Small).jpg
-
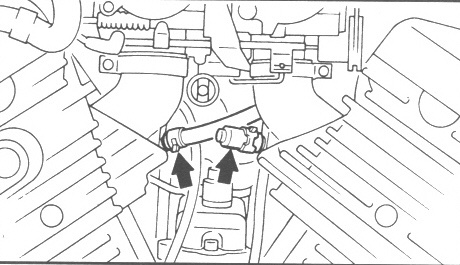
Have removed the coolant bypass valve by removing the phillips screw on the side. When I pulled the valve out, I dropped it so I'm not sure if I lost any parts. There is a small spring for the a/m screw. Any other loose parts that might be lying on the driveway somewhere that I need to look for? This is from an '87. Could use a quick response. Thanks
-
While at Vogal, I had my carbs synced by the professionals and it ran better and smoother on the hand grips. But, I knew my carbs needed to have the air mixture setting adjusted because at idle the richness would bring tears to your eyes. Without starting the bike, I started around the carbs and found two was about two turns out and one about one turn out. When I got to the front carb on the right side, I tried to turn it and it was pretty tight, but moved a little. When I bottomed out, it would not move and in the process of trying to make it move, I broke off the two raised edges that are on each side of the slot, therefore no more slot. I have another set of carbs I bought cheap off ebay, so I knew at worst, it would take pulling the carbs off and breaking them apart and cleaning them all and putting a spare on. So, if I really screwed the carb up on the bike, it would be ok. What I ended up doing was I used a drill bit that fit the hole with minimal slop and drilled a dimple in the head of the screw. I then used a small drill bit that fit the easyout, or screw extractor as some would know. I was able to drill deep enough to get a hole without drilling so deep that I drilled to where it shanked down to the step area. By tapping the easyout and seating it, I was able to unscrew the adjustment screw. I used a piece of rubber hose on my shopvac to pull out any debris. I was then able to put in one of the spare mixture screws from the other carbs and I was back in business. I then hooked up my son's carb syncing outfit and synced them myself. It took a few minutes, but I got them all the same. Now the bike is again running good and don't bring you to tears when idleing. randya
-
I remember seeing many months ago a list of screw on filters that fit first gen ventures. I am sick of messing with that o ring. Anybody know of a filter that will work?
-
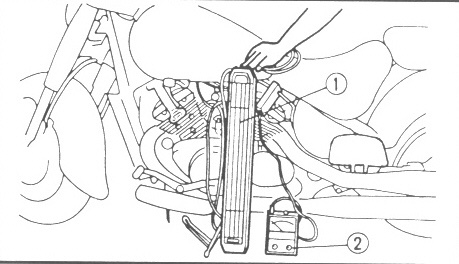
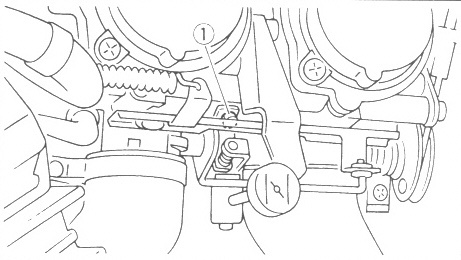
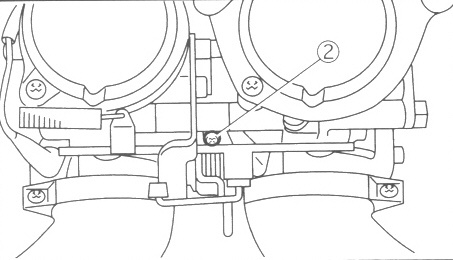
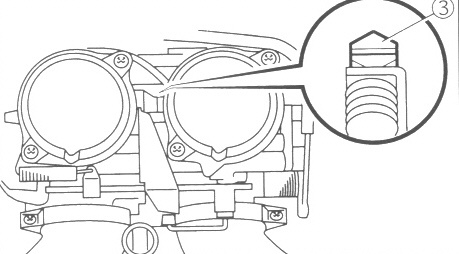
Synchronizing The Carburetors WARNING! Please be aware that the Yamaha Service Manual has the procedure for syncing the carburetors WRONG. The manual indicates that screw 1 is used to sync carb 1 to carb 2 and that screw 3 is used to sync carb 3 to carb 2. That is opposite of what it should be. The following is the correct procedure. NOTE: Prior to synchronizing the carburetors, the valve clearance and the engine idling speed should be properly adjusted and the ignition timing should be checked. 1. Stand the motorcycle on a level surface. NOTE: Place the motorcycle on a suitable stand. 2. Remove vacuum plugs. 3. Install: Adapters Vacuum gauge (Fig.2) Engine tachometer (Fig.2) to the spark plug lead of cyl. #1. Vacuum gauge: YU-08030-A, 90890-03094 (These are Yamaha part numbers. Any suitable mercury sticks, or other suitable gauges are just fine) Engine tachometer: YU-08036-A, 90890-03113 (Yamaha part numbers. Any suitable tachometer will work. A tachometer is not absolutely required 4. Start the engine and let it warm up for several minutes. 5. Check engine idling speed. If out of specification, adjust to 950 to 1050 RPM. Refer to "ADJUSTING THE ENGINE IDLING SPEED". in your service manual 6. Adjust carburetor synchronization. A. (Fig.3) Synchronize carburetor #1 to carburetor #2 by turning the synchronizing screw (3) in either direction until both gauges read the same. NOTE: After each step, rev the engine two or three times, each time for less than a second, and check the synchronization again. B.Synchronize carburetor #4 to carburetor #3 by turning the synchronizing screw (2) in either direction until both gauges read the same. NOTE: Turning screw clockwise raises carburetor #4 and lowers carburetor #3. C. Synchronize carburetor #2 to carburetor #3 by turning the synchronizing screw (1) in either direction until both gauges read the same. NOTE: Turning screw clockwise raises carburetor #3 and lowers carburetor #2. Vacuum pressure at engine idling speed is 37 kPa (280 mmHg). NOTE: The difference in vacuum pressure between two carburetors should not exceed 1.33 kPa (10.0 mmHg, 0.4 inHg). 7. Check engine idling speed. If out of specification, adjust. 8. Stop the engine and remove the measuring equipment. Yamaha then recommends the following. 9. Adjust: Throttle cable free play Refer to "ADJUSTING THE THROTTLE CABLE FREE PLAY". Throttle cable free play (at the flange of the throttle, grip) 4 - 6 mm (0.16 - 0.24 in) 10. Install vacuum plugs.

-
For the past few weeks my RSTD has been running a bit rough...I was getting a bit more vibration in my grips and floorboards...a few more backfires (I already plugged my AIS)...and so I ordered the Morgan Carbtune. Well it arrived last Friday...but alas...I fell off a ladder at home Saturday morning and have been crawling into work and around the house ever since. Well today on the way home from work I decided enough is enough. After I got home I got the Carbtune out...hooked it up...synched carbs 1 & 2, then 3 & 4, then 2 & 3 and guess what? Now it runs like a champ! The increased vibrations are gone...no more backfire...and she screams when I punch the throttle in overdrive once again. What a great tool...I highly recommend this to anyone with a Venture or RSTD...it truly is a piece of cake to do once you know where the three screws are and the number order of the carbs. The first two synchs (carb 1 to 2) and (carb 3 to 4) are adjusted with a phillips head screw driver from the right side of the bike (right side when when you are in the saddle). The last synch screw is a flat head screw that is accessed from the left side of the bike and is up to the right of the choke pull button on the left. I am sure someone will post pictures of these screws and this will help. The screw to synch carbs 1 and 2 is accessed on the right side of the bike but it is all the way on the left side of the bike...you have to go through the "V" to get to it...and it underneath the choke button on the left hand side...again...you can only get to this screw from the right hand side of the bike. Here I used a 20" Phillips #2 and had no trouble reaching it and then reading the carbtune gauge (which was attached to my right handlebar). The screw for the next synch (carb 3 and 4) is also on the right side of the bike and is found a little up above and to the right of the spring for the carbs. Here, believe it or not, I also used the long phillips screwdriver but my hands were on the metal shaft of the driver and not on the handle of the screwdriver. Again...had no problem finding, adjusting, or viewing the carbtune gauge. Finally...the last synch is betweed carbs 2 & 3...and that screw is accessed from the left hand side of the bike and is found above and to the right of the actual choke button. Here you need a flat head screwdriver. I already knew my idle was good...so I just jumped into the synching proceedure. When I took the bike out for a test run after she cooled down and I reattached everything...I simply could not believe the difference. What a tool...after 2 to 3 tuneups...I would have to say the tool will pay for itself. Later...
-
From a former article & thread; someone needs to properly claim the work, as I didn't save any names. Sorry. EDB I thought I'd share the Carb Synch Tool that I made for about $15.00. It uses 3/16 inch ID Vinyl tubing mounted to a board with coaxial antenna lead fasteners and is held upright by a tamping tool. It is charged with Transmission Fluid so that both lines are level with each other. Works just fine and is CHEAP to build. Those are two separate pieces of 3/16 inch ID vinyl tubing that I bought at a hardware store. I made the loops at the bottom as gentle as I could to prevent pinching. The ends of one hose connects to Carbs 1 & 2 and the other hose connects to carbs 3 & 4. I synch carb 1 to 2 while reading that hose, then 4 to 3 while reading the other hose, then carb 2 to 3 while reading those hoses. There is minimal pulsation (bounce). it is about 4 feet tall. The first time I tried it I used it on my Virago and the Synch was so far off that I had to keep killing the engine before the fluid was sucked into the carbs. I was finally able to get the Synch screw adjusted enough so that I could let the bike keep running while I finished the Synching. if a pair of carbs are so out of balance to each other, that one of them could initially try to suck the fluid out, so you would have to quickly kill the engine and make an adjustment, and then restart the engine to see if the adjustment helped or worsened the condition. The start-kill-adjust sequence may have to be repeated several times before you can let the engine stay running while you fine-tune the balance. Boilerman said that the hose he used for one loop was about 20'. After using 8' (4' x 2) for the board, that leaves 12' (6' on each end) to connect to the bike. About 2 1/2' gets it from the top of the board down to the carb level, then another 1 1/2' to the carb on the other side of the bike. I was happy to see your design for the carb synch tool! I work for a hospital. On my area of the hospital, they throw away oxygen hose all the time. A lot of it is 25 feet long. I took a walking stick I have, taped up the oxygen hose, which to my delight is 3/16 ID and filled about two feet of the hose with motor oil. It took a while to get all the bubbles out, but I had a slow pulling fluid that was easy to work with. I synched 1 and 2, then had a shock to see that 3 and 4 were so out compared to 2. I am slow, so it took me over an hour to get it all synched. Now the bike starts quickly and doesn't sound like a Cushman Scooter! THANK YOU for the picture example so I could copy the method. I will be reverting my walking stick back to it's original use! The money I saved helps me to afford the reason I bought the bike. I figure I have saved myself over 500 dollars with everything I have gleaned from this site in only 2 weeks. Okay I know I where glasses but these are for seeing distance and I do not wear bifocals. But where is the last screw for syncing cylinders 2 to 3. I found the others two but not this one. Do you have to lift the tank to get at it. ? I tried taking the rubber hoses off the other night to start this job but they are stuck on big time, so I would assume this has not been done in a while or at all. (looking forward to seeing the readings). Watched Don sync a 2nd Gen last year at Vogel and you don't have to remove anything. Screw is a little hard to locate. The left rear carb is # 1 Left front is #2 Right rear is #3 Right front is#4 as you are sitting on bike. Between 1 and 2 there is only one screw. You adjust these two first and then adjust 3 and 4 to them. So there are only three screws. I think it is kind of up under the edge of the tank. You have to bend over quite a bit to see it. I assume you found the one on the left side near the choke knob. The other two ore accessed from the right side. One is easy to get at between the two right side carbs (approximately the same location as the one on the left side). The last one is between the left two carbs, but points to the right. You need a LONG Phillips screwdriver to reach it from the right side. You will probably need to poke the screwdriver through the carb linkages just under the tank edge to get the right angle. The screw for 1 & 2 you need a long phillips screwdriver and acess from right side. 3 & 4 is also a phillips and is right between the carbs on right side of bike. The screw to sync left carbs to right carbs is just above the choke on left side and is a Slotted screw. Not an ice pick, but a flat blade screwdriver with a very thin head. Get the screwdriver between the end of the hose and the carb, and PUSH the hose. Which screw can't you find? Did you find the one that you get to from the left side, up above the choke knob? It has a hex head, with a slot for a flat blade screwdriver. The head is pointed down slightly, so you have to get your head below the level of the choke knob and look up. It's the only slotted hex head screw in that area. It syncs the left side to the right side. Or if you like, it syncs #1 and #2, to #3 and #4.