Patch
-
Posts
2,036 -
Joined
-
Last visited
-
Days Won
2
Content Type
Profiles
Forums
Gallery
Events
Store
Everything posted by Patch
-
 Glad to hear you're ready to join up, old bikes need their forums, and forums need members! If you are having problems hit the contact admin link, you get a quick response there! The information you provided regarding the vacuum is helpful, as is the fact that is cold. You will see it warm after running it for a while because of thermal transfer- and that is likely the only reason it warms at idle. I think you mentioned earlier, you have checked each for spark? Post 23 Oh, and all cylinders getting warm. Will re -start on choke immediately, 20 secs take off choke, and idles at 700 rpms. TO LOW! Start the bike and have a good screwdriver ready, within 1 minute of starting it turn the linkage screw to the right/tighten one turn (1 turn) JUST #1 carb! You should pick up RPM, Choke is off! Now if you have seen RPM rise then we're on the right track, read the temp, shut the engine, wait 15/20 minutes, start again and check the temp on 1 & 2, I use the exhaust casting flange for this and always at the same place for a more accurate reading! Let us know! Don't panic here if your revs go a little wild, we are just trying to see if #1 pilot circuit is off or blocked! Find smoke problem. Don't wont to over heat right rear cylinder. Have started 3 times and let run for a minute, until smoke starts, then shut off and cool again. Top two lights on left, on control panel, are on. Looking them up now. Thanks all!!!! THIS IS WRONG, the bike needs to get to operating temp! For a couple of reasons, it hasn't been run for a long time, there is seafoam............... PS. get a shop fan for working on the bike, aimed at the rad, keep it running except when reading exchaust temps
 -
83 venture wont start
Patch replied to MILES MACK's topic in Venture and Venture Royale Tech Talk ('83 - '93)
Miles, here's a thought- if you by a project for a $1.00 spend another $1.00 to complete it, sell it then for $2.00, for me its hard to believe you are only braking even? Most of us that take on project bikes do so as a hobby, a place to hang our thoughts, parking the pressures of the real world, trading one therapy for another more rewarding one. Is this a bike you want? Is this a project you want? Do you have the time for a project bike such as this one? What we have going for us with the Gen 1's is this forum, what ever the problem is, it has already been addressed right here- written out in detail with part #s and sources. That's a plus for any Venture any where in the world! Membership has it's privileges, I would start there- if it is a Venture you are looking for- then find one that best suites you. Now to this particular bike, the coils according to you are not delivering spark, but as I understand it, the bike is not in your possession, so how can we help you diagnose the problem? Can you check for power at the coils or the PCI, the red/white wire and get back to us? Patch -
Man I wouldn't be able to sleep not knowing compression results after assembly, of course only after breaking in the rings counts for a real reading.
-
Thanks Gary I followed through updating my profile, also Gary I read up in the site library came across you switch right ups well done, wish I'd known of them 2 years ago on my first time in them! Back on them as of yesterday as my cruise slide isn't as smooth operating as I'd like it. I agree with #4 , also I'll admit both my son and I were embarrassed by the results of this years engine tests results, and some of our comments made after taking the few rides we had her on! Really not like us to run our sport toys 1/2 up. So now after a couple hundred clicks (Canadian term for distance traveled in KLM) I am going through the bike again sorting through some miscellaneous stuff! I reset my carbs yesterday and managed to get the pilots sweet spots dialed in, also temp checked the pipes at the castings, always same spot all the way round, all withing 12* F, 208- 220 F, paying close attention to maintaining 1/3 up on the dash temp gauge, just as a bench mark eq results! Edit: I could eq the heat ranges before at all The sync had changed as expected! The engine now is as smooth, more smooth then I could have imagined, it's also quiet, all the way through, I love that, not a tap or stumble out of place! So worth the effort we spent on her, sorry but just got to say a real "Yah Baby" moment:) Out here we have in rural districts with H/W lights for bedroom community traffic, man can she ever leave a light behind for a large class tour er. Surprised my son as we never pull against each other (that would be bad parenting;)) he must of thought there was a semi comin up behind him when I let loose; he headed straight for the shoulder as I blew past! still LMAO Also I have to say at 950 we can here her silent power as she rolls through her cam lift, pretty nice setup Yamaha! I have had some time to experience the mod made to the windscreen, 1st there is almost no glare on the dash now, 2nd like the breeze and, I can easily cruise with my visor up at 130 no problem, most of the lift is still in play! You might not expect this but the blacked out area presents a subtle view from my riding position; all in all it worked out! Going to bite the bullet and re-solder the air control IC and this year started the fuel empty error. Patch
-
I Christen Thee....Mighty Mouse!
Patch replied to Patmac6075's topic in Venture and Venture Royale Tech Talk ('83 - '93)
Right On! -
Picking up the bikes!
Patch replied to moto_boy's topic in Venture and Venture Royale Tech Talk ('83 - '93)
Flyinfool, Would OP be able to pinpoint or confirm this by binning his ear to a driver against the cap while engaging the starter? -
Picking up the bikes!
Patch replied to moto_boy's topic in Venture and Venture Royale Tech Talk ('83 - '93)
Sorry about the KLM piece, not sure why I was thinking Canadian bike?? Found this PDF for the starter, I haven't needed to work around mine so not sure if this is the only or best way! http://www.venturerider.org/forum/showthread.php?80775-Starter-Replacement http://www.venturerider.org/forum/showthread.php?1060-Starter-Problems -
83 venture wont start
Patch replied to MILES MACK's topic in Venture and Venture Royale Tech Talk ('83 - '93)
You mentioned the fuse box is a mess: is there power to the coils? -
Wanted to ask this, have you noticed any bubbles in in the coolant? And after changing the rings how was the compression? Finger crossed for the Bars, hope it works for you.
-
Picking up the bikes!
Patch replied to moto_boy's topic in Venture and Venture Royale Tech Talk ('83 - '93)
Well agree with both of you, however the 88 with 40ish K and likely if a Can bike, means its in KLM -would be hard to comprehend that engine not ready to roar with some TLC! This year we pulled an engine off a super bike that we bought some years back out of QUE. it took 2 hours to get out and same to swap over, the prep work took a day, actually an overnight soak was it. The one we pulled was due to cam limit and stretch bolts, my boy wanted to ride asap so that was the goal. It will be a rebuild project over the snow months, his bike is set-up for him so swapping over made sense, although the other one is in nice condition! I mention this because we know you have that low mileage engine, and like I said earlier that's amazing to have! Still early though, your project is just getting started. -
Picking up the bikes!
Patch replied to moto_boy's topic in Venture and Venture Royale Tech Talk ('83 - '93)
Regarding the valves, either way you should do a compression test on both, and that could go a long ways in helping you decide which bike rides 1st! I've never used mystery oil but have heard good things about it!For general knowledge it is best to soak contact points, valve seats rings have a long history of sticky shut. A valve seat has give or take a 1mm seat after cutting, then lapping then mileage, so the more seat the more stick, the more pressure to free it, that's where the stem can be most at risk. Also and again generally speaking seats are a softer material so usually there is a benefit to pre soaking them. You'll know better after a compression test. The starter suggest it's been through hell, the fact that it seems to work fine with no load means it time to pull it. Still I wouldn't try starting either right now, if it were me: I would pull both sets of carbs pull both set of plugs poor you mystery oil down through the intakes let both soak for a day or so check the brakes clutch lights clean the electrical connections see if the suspension airs up clean one set of carb, the easy ones, get to know them Then disconnect the small plug on the side of the frame bend, about 6" above the fuel pump, I think its a 4 wire???? you will need to cut the tie wrap then pinch it and separate it, now the pump is inactive. Blow the cylinders out with compressed air and with WOT already there, because the carbs are bathing- test the compression Now here's the old guy in me preaching to you Dad, you don't want to put your Queen, on the back of a bike you haven't combed through, final dr has to be checked, torquing the axles, check out the steering, lots of work to do, so why rush the engine. That's my thoughts F -
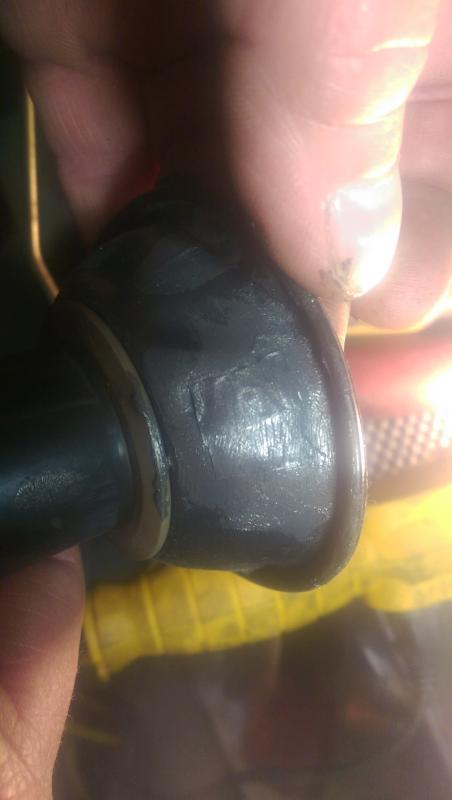
I did look at the pic, looks like what we see is gasket material or some stop leak that backed up to it?? The thing is, is for you follow through with one application! But the engine needs to reach operating temp, and often for more than one pressure cycle! The solids must too locate the "say fracture" so a pinhole will plug quickly, a hairline will need to fill completely, likely it will take longer for a fracture, as there are X parts per LT of particulate! Know what I mean; so how quick it will work depends on what the problem/fault is, for those that are inpatient -and add and add, well that makes its own- new problem. As for if you could find it you would do the right thing; I have no doubt, finding it- when it's internal, well now that I know is doubtful- and is why we use Bars! Remember we are talking because you have already opened it and changed all that needed changing!!!!!!!!!! Patch
-
In older aluminum engines rebuilt or not, it is common practice to use the Bars Leaks. This has been a persistent problem for you I guess, if a leak is what is happening, it could be from a hairline or threaded passage; lets say by some chance you find it, then what? Unless you missed sealing something or a rubber part is worn, and or like Marcarl suggest, over flow, then I would use the Bars! I prefer the old formula but its seems hard to find now, Bar's know what they're doing, have been make a good product forever. If you had a major leak then.... http://barsleaks.com/product/liquid-aluminum-cooling-system-stop-leak/ SG
-
Picking up the bikes!
Patch replied to moto_boy's topic in Venture and Venture Royale Tech Talk ('83 - '93)
Moto_Boy Here's some experience you can use or leave where you found it. 1st thing I would do is except that one bike will be a parts bike "for now" you will still have the parts to refurb when the riding season is over! I would start a log of which parts you are swapping over. I WOULD NOT rotate a water logged engine, PERIOD! I would soak it with your choice of solvent, my choice would be 50/50 seafoam & kerosene! This will speed what the kerosene will do on its own but would take a longer time! The rings will pay the price of working through cylinder wall corrosion, and you run the risk of packing the lands! You then will not be able to build compression! Also after the carbs are off I would fill the intake pipes to soak the seats and valves rust will seal them and rotating the engine can bend the stems. These projects move faster when we move slow and sure! Water in carbs equals water through and into cylinders! My experience says soak for 4 to 6 days while you go through the bikes! Even if the engine was not seized I would still do the above. Sg -
"its my mind and hands that I have trouble with !!! " Well, that's a crowded boat man;) time does that to fellow! Picking up tools is a mind set, first, no point placing a tool in our hands till we first make a plan. I should add this to my post, my Venture this time out rolled into our shop Monday noon, was on the road Friday morning with it. I too tend to split my time between riding and fixing, sometimes I'm told by my son; "let's just ride Dad" he's right Kinsmd there comes a time to just wipe the tools and spin the wheels! So adding more seafoam to the bowls, what's the plan, what are you looking for as a result? Have you thought about doing a compression test? I know you bled the clutch have you changed all the hydraulic fluids? Have you checked the brakes for proper operation? Have you checked the steering stem?
-
Miscellaneous stuff: yes there usually is a cup or 2 or so- extra in the crankcase when I idle it during these test. It serves me to keep it in there; I will also run through all the gears usually twice during the warm ups. Yes Fogging with Deep Creep can help avoid the above stuff if done yearly or regularly like before oil changes! Will this fix worn rings, or pitted valve seats? No it won’t. Can carbs sync to out of spec cylinders, won’t they work fine? Yes you can sync them, providing the carbs are in good working order and there is enough vacuum pressure at the range you are looking to sync them to. “Will they work fine” Can you be more specific please? LOL So as I mentioned this is for the good but neglected bike engine, regardless of size or brand name. If I had to choose between 150 or 190 PSI on this bike, I would choose 150 PSI. Standard on this engine is 171 PSI Limit is 143 PSI Think about it, that's a high limit for a minimum operation Maximum 199 PSI #4 was close because of what I found in part one How did I know I could achieve these results? There are clues we find, we mix with past experience, and we go for it! The results will vary engine to engine; beating the minimums should be the goal. How many times have you heard "I would be caught dead riding a motorcycle, to dangerous" yet we do, it is our sport, well this is another side to this sport! Bummer I forgot to mention the first ride: expect smoke for the first 20 minutes of highway, and the H/W is where you should run it for the first ride. Also as early as possible run the bike in 2nd gear to 4000 RPM then close the throttle fast, do this about 3 times no need for higher RPM this will apply a solid pressure action on the rings, as they are still damp from the soak they will likely displace carbon from the piston lands; best to do this right out of the barn! SG/Patch's This is a very pleasant forum by the way, I read till the wee hours yesterday, well managed and well supported! Old bikes need there forums to keep them up and running...

-
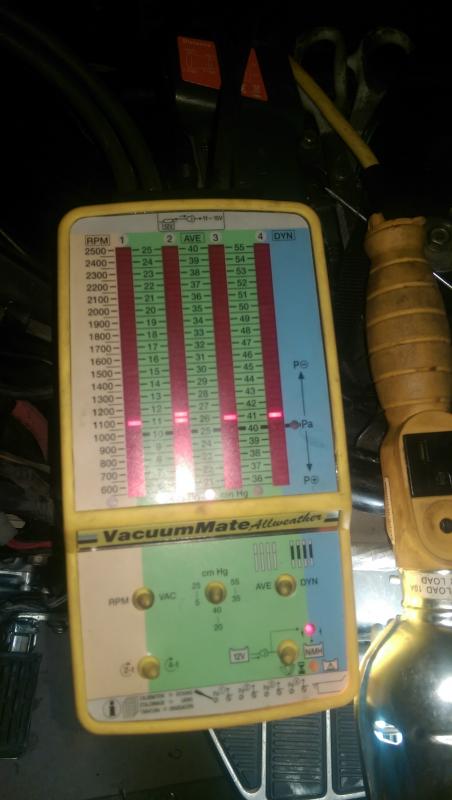
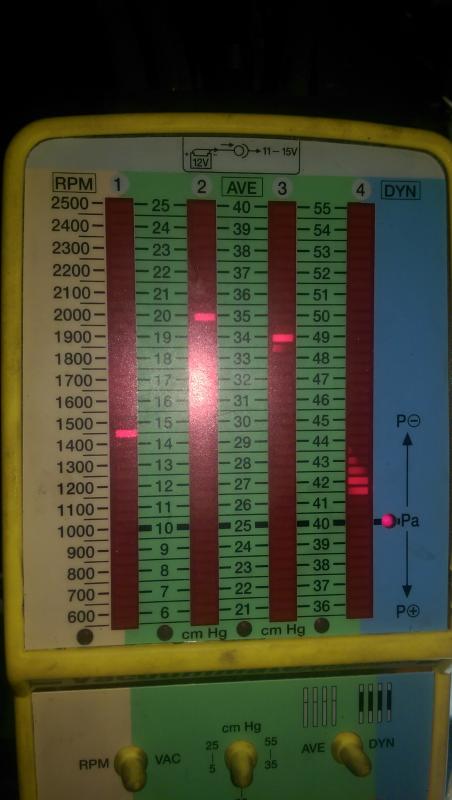
part 4/4 So not much left to do at this point except play time with my carbs! You can see below in the pics my carb tuning, the results are “funtastic” because- bringing these old bikes back is fun and also rewarding! One of the pics will be hard to read, it is a scope or dynamic mode of the combustion cycle base on manifold pressures, all I can say is that its as good as I’ve seen on any engine in a long time, very pleased! The other you see the spread on the sync, what you don’t see is I had to switch to 2-20 cmHg just to find them, then the final set was upscale 20-40 I think standard is 33? Anyways I traded sync low for 3000 RPM, overall this works best for me, at idle they are very close even cold, even with enricher slightly on. I am prone to WOT when cracking the whip, so a low sync for me is .......! Earlier I mentioned compression means nothing without the low pressure, I’d like to share this with you folks. Of course mechanics understand this but tuners live this, there is no tuning without balance, without balance an engine is a put-put (not sure that English)! Combustion: pressure, seating, heat, duration(s), timing(s), velocity, these are what I was after, this is what was corrected! So how or why does a simple yet time consuming soak address these issues most, don’t understand? It’s pretty simple and I will stay as short as I can: 1st the rings, they are actually spring rings and they float, they also need to rotate, how about cupping; an engine not properly stored will develop “stuck ring” issues! It will free itself! I can’t tell you how many times I’ve heard that? It may eventually, who knows, what we do know is that it’s not springing, not rotating and it certainly can’t cup or expand (design dependent) to lock in compression. Also it is not symmetrical as it travels up and the walls, so we are effectively wearing the wall out of cylindrical! 2nd valve seats, some of them have been clamped shoot for X years, they develop mild corrosion preventing proper seating, again you won’t be able to achieve good compression! Yet there is more to it, compression will slip past a seat when it builds to its near maximum, this means it moving fast,- up and out the wrong way, and when it is not suppose to move at all it stay put, squished tight in the combustion chamber, with resulting compression heat till ignition; now it moving past where it knocks against the throttle plate! Older Suzi’s cough when they are cold its excepted and understood, my bike was coughing warm at idle and it was steady and for the most part only on #1 ! There is no more cough, cold or warm, box or no box, period! 3rd we need velocity, that is why valve timing and duration is such that the valve opens after TDC. An engine will burn fuel even at 120 or 100 PSI With enough force to cycle the piston stroke, but it cannot do so efficiently with a CV carb; it will also negate most of the vortex, so mixing at or for “stoichi”, forget about it, it’s a put-put not a sports machine! My Venture is a fun ride now, it moves quick now, engine braking is spot on smooth and sure footed! Also I shifted into 5th at a 100 KLm and though surprised to be there (in traffic) I was able to pull out and accelerate without shifting? Also I can start out in 2nd it pulls out like my old 1st did!!! Please don’t read in to this as that, it is more than it was designed to be; I am merely saying overall I am happy with bringing it back to and experiencing the original specs! I hope this helps some of you wanting the challenge of getting your old bike back up on her legs; my Venture was the 3rd engine this year for us that went through this, the other, had even less millage then mine, one of which is a modified engine Suzi sport touring more R than F and a Suzi V twin. My Venture cost me this year, new oil and filter, I’ll also have 4 new boots whenever sock is available and 4 piolet screw, let’s say $160.00. Now bring this to a shop see what happens, most likely a chem down the tank? Good luck with your project, if I can help, ask. SG/Patch’s
-
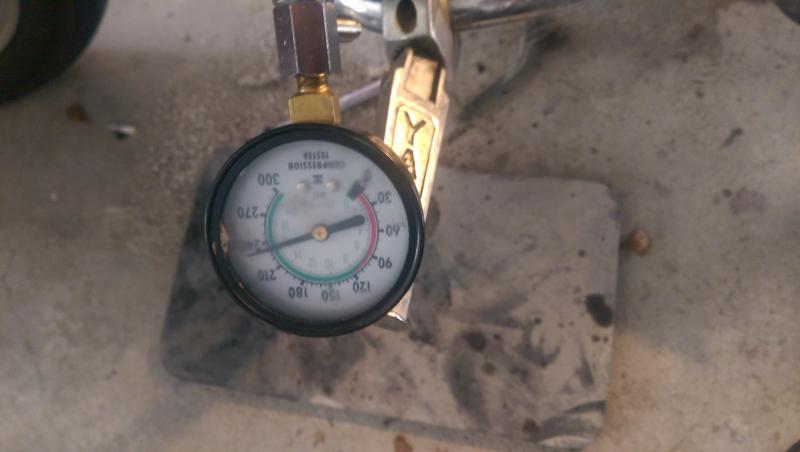
Part 3 Ok I have been through this many times and know what to do and want to share this with you! The 1st time I did this, I was 15, was on my Norton there have been many projects since those innocent days;) Time to soak the top ends, it’s that simple! Do this to your bike after a long storage as part of the process of getting the Bike’s back into proper shape, it will go a long ways to bringing back the power. The 1st soak for me is always Kerosene/lamp oil, let it soak for 12ish hours, after 4 hours just give it a quick blip with the starter, ZERO ROTATION: the idea is to crack it or shock it, so the fluid will continue to penetrate! Here is how the process goes: Also and throughout this I fill the intake ports- each soak includes these ports, very important! Remove spark plugs; do not re-install them at anytime - while you have – fluids - above a piston, never!! Using a funnel poor in the Kerosene one third -1/3- of a cup into each cylinder! Likely after 12 hours the fluid has seeped past and is now in the oil pan; if not, you can choose to blow it out or rotate the engine and it will pump out, catch it with rags! Using the starter you can now rotate the engine 4 or 5 time: no spark plugs install the cylinders they are free to vent! Now at this point I use Deep Creep, what a good versatile product this stuff has turned out to be! I spray for 4 seconds into each cylinder through the spark port, usually after 2 hours of soak this fluid creeps down. Now you are ready for another compression check, here’s how mine went: #1 = 230 I have a picture of the gauge I used below, this is why we never install a spark plug when soaking an engine! #2 = 230 #3 =160 better but not accurate yet also just being stubborn! #4 = 170 perfect and standard I installed the carbs after a bench sync I blew out #s 1,2,4 checked for fluid in #3 using a red 1/8 vacuum house, and just the bottom of the hose appeared wet; there was NO measurable level of fluid in #3 ! I brushed the plugs clean and ran it for 10 minutes @1000 rpm to raise engine temperature, pulled all the plugs again then gave them all another 4 second spurt of deep creep and let it sit overnight. Thursday morning I blew them all out did a compression check, and they were standard on 1, 2, 4, 160 still on #3 , bummer! Once again I installed the plugs and let it run for 10 minutes @1000 rpm except I let it cool for 20 minutes I ran it again for 20 minutes then pulled #3 plug let it soak for another 30 minutes with Deep Creep and then blew it out installed the plug and ran it again, this time till the cooling fan came on, I shut it off turn the shop fan on to cool it, pulled the plug checked the compression, and bingo #3 170 standard you can see the pic below however it caught the flash so... but it’s there! SG/Patch's
-
Venture Windshield
Patch replied to Patch's topic in Venture and Venture Royale Tech Talk ('83 - '93)
Well you did the right thing Clive! In the end we are a sum of our experiences! I do know what being blown of a highway is like. I also have had many bikes and many trips under my belt. Setting up a bike for the individual rider is different rider to rider. I don't think any bike any make any where, is a perfect set up for everyone, so I am particular to how a bike handles and have reason to change my windscreen, so I did this I took it out yesterday specifically went through a wind corridor in a bluff area. While it is always a sobering experience up there I thought it handle better in those wind gusts and to boot I enjoy the feeling of the air moving over my shoulders, I know I'm on a bike! 90% of my time riding is one up. As for the the paint scheme, that is my bike, not a show bike for original condition;) Cheers man -
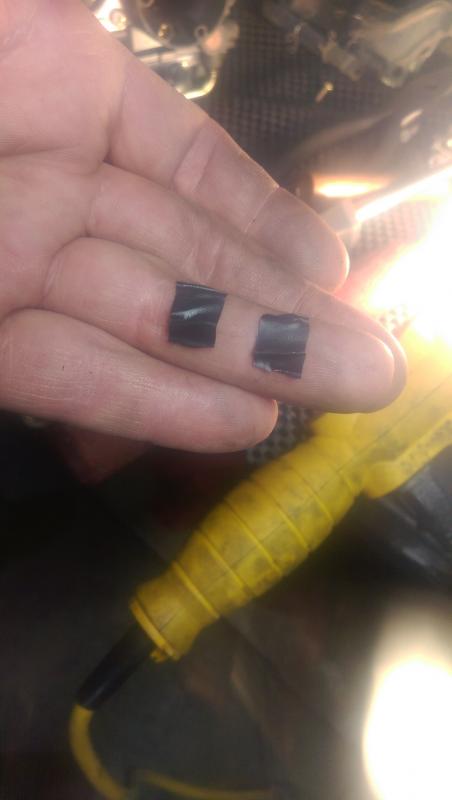
part 2 2014 no time to ride or for projects, bummer. This year after 4 projects rapped up this spring I pulled her in to the shop, here is what I found: A persistent cough on #1 Dripping gas from the main (needle/emulsion tube) #1 & 4 #3 slide consistent pulse? At 950 RPM Carb body very dirty I pulled the plugs 1, 2, 4 were in decadent shape #3 was nearly spotless? Checked for spark, excellent? Removed the carbs, a note that I know many of you know; remove the CPV hose completely, why fight or risk bending/cracking or breaking something you will only have to wait for in the mail. At the top of the carb is a small plate about 2 ½” X 1 ¼” with 4 screws I found this is easy to remove while the carbs are still secured, using an impact with a #2 Philips with the tip ground down OR a drywall Phillips bit works as well! Sliding the carbs out the left side you will have fair access to the linkage with a dental pick, at least this worked for me, I’m sure there are other ways. I soaked the carbs in lamp oil over night, usually this helps loosen old screws as well as soften the scum up, and then I soak them in a warm bath for 30ish minutes. Presoaking for us in our little shop helps keep the bath clean with less junk to filter out or through parts, also means we heat the bath less, so less evap! Anyways you’ll likely struggle with the bracket screws even with impact and #1 Phillips, be ready to drill, I use a punch type extractor, quick, easy and it’s a sure bet. The carbs inside were much nicer than expected, clean blows, no real varnish, gates were nice, (one thing we see often with stock pump system, verses constant gravity) what I did find was the O-rings for the tubes were finished, AND a missing Piolet jet screw, on #3 ! Also #4 was 7 ½ turns out, yikes! I replaced the O-rings and I had a set of piolets in stainless but the threads are shorter by a 1/3 so I replaced it and am waiting for new piolets! The slides, well the pistons are very good so are the needles, the boots are worn; I am waiting for an email regarding re-stocking I will replace all 4. In the meantime I patched them using ½’ X ¼” patches from my shop gloves; they work well for this with a thin coat of liquid gasket, the patch is placed on the outside of the boot and the liquid gasket is place on both sides, I’ve done this many times, never a failure –BUT the boots are old and tend to be slower, so, while many won’t notice this- it is still in play and will make a difference when cracking the whip! While the carbs were soaking I did the compression checks, here’s what I found: #1 = 150 not terrible and hopefully the worst of it #2 = 120 ok I have to admit I was feeling sheepish around about then #3 = 60 that’s sixty! Going to stop the ride for a minute; I want to stress this point with the hopeful members. It is far better to know this then not to know: only hover over a bike wondering why the heck you can’t keep up, hard to start, slow to get on her legs, can’t use 5th, and your gas mileage is pretty OK but it reeks! Here’s my trip, compression is a must- no doubt we need to keep this up –BUT compressing is nothing without the resulting LOW PRESSURE! Throttle response is all important, it will bear you down into a twisty, tweaking it through it will help you maintain knee drag, it will quickly lift you up and out of a twist, it will pull you through the buffering of a semi, up a hill, the only thing more important than throttle response, other than common-sense are properly working brakes! Let’s remember bike are sport machines they need to be run within design limits, period! #4 190 Because I have and use the shop manual I can clearly see the picture for this engine. I have only one cylinder within spec. Would any of you like to take a stab at which one it is and why, regardless of how many post go by? I think if you are willing to then you will gain from the mechanics here as they chime in with their experiences at the end! Sorry thought I had uploaded pics from my phone.... I'll add the patched boots tonight!
-
Part 1 of 4 ? Hi there, so this write-up is about our Venture Royal, the work behind it, what it took to not just get her back to running condition, but rather get her back to the responsive touring bike I’ve read (had yet to experience) she is! First things I did was try to ready it the 1st season for a short trip up and in BC with my boys. I went through the wiring one plug at a time; things seemed to be in pretty good shape! What I like about doing this with a “new to me bike” is that it formularises me with the systems and what might go wrong, where it is located and in a pinch if need be, I can sort through a problem quickly while on the road! Next I move on to the brakes and suspension, here is some of what I did: Drained ALL the hydraulic fluids- brakes, clutch, forks, and “fork air lines” Chained out the front springs with some I had from another project Changed the brake pads front and rear Change the dif oil, Changed steering stem bearings Disassembled the air control panel, cleaned with contact chemical Replaced burnt lights and fuses Replaced the tires Changed out the handle grips for 1” rubber/chrome type, I need the larger grips as my R/hand is a rebuilt unit. Some 30 years back I had a one on one with a hydrant;( You know they said it was my fault? Even though I assured them I wasn’t the fool that placed it there? Hydrants go on the inside of a bend! Not the outside of a bend!( Lubed the drive shaft spline with synthetic grease- I have come to respect the synthetic grease for each application where grease is called for; it stays put, stays bright in color, resists washing out- even when exposed to solvents, and in my experience maintains a cooler bearing, and also important is that it remains consistent- I add it to all my replacement bearings with an epoxy syringe! Took it for a ride, I found on the Mountain roads when the suspension was properly set and with 2 up and camping gear she could sweet talk a twist very well; however I was disappointed in the thrust! SG/Patch's
-
Read all the posts to your thread and must say, you have received some very good advice! Something I do a lot of is abandoned bikes, -next to my ear a vacuum gauge is my favorite tool! The vacuum gauge you describe is designed for use with a "plenum chamber" that is why you are seeing a difficult to read "readings"! You can not use this for syncing the carbs! However you can use this to read fuel pump pressure! Also if you spend the membership fee I will tell you the results of the vacuum gauge readings and how to come up with the two numbers nessary to move forward! SG
-
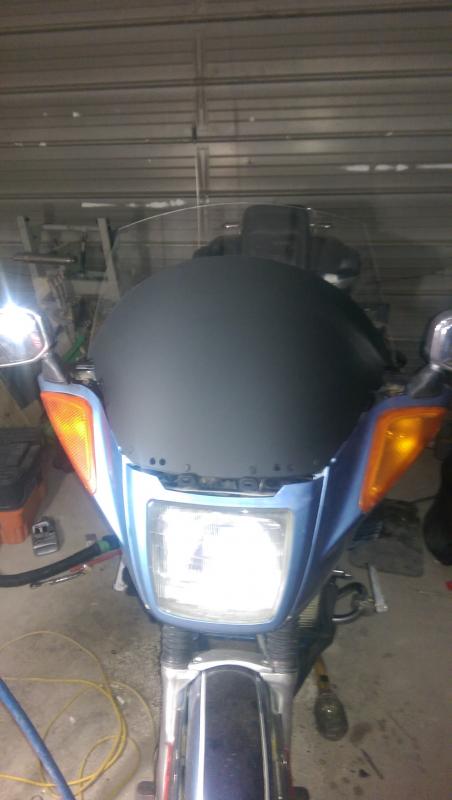
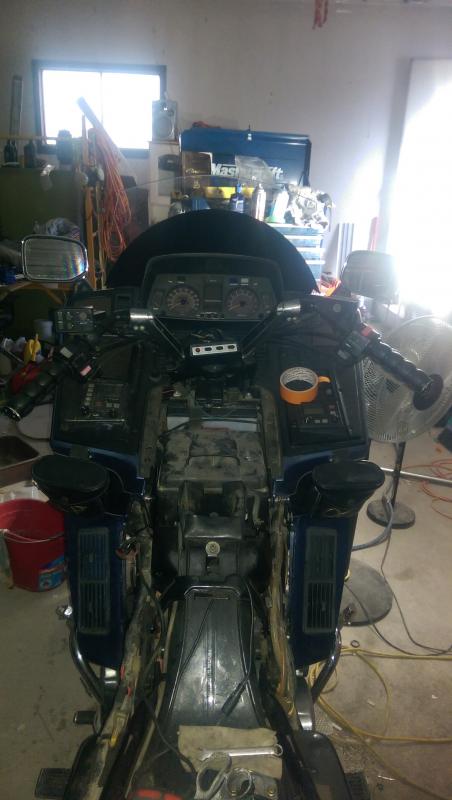
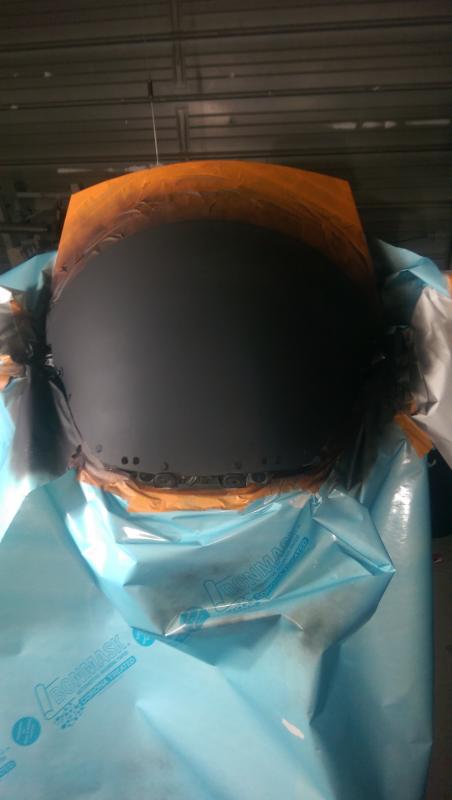
Hello fellow Venture owners. This is our 1st and only Yamaha, -and a bike that has always peeked my interest. I found this one 2 years back in a small town on the Northern edge of Alberta; a one owner bike 73K (klm), left in the yard for I think 4 or 7 years rarely run! My ride back was a tough one mainly due to weather, I left there late drove much of the night in a cold rain, prairie winds and on old tires. l I found that a steady wind on the beam was something this bike could handle well, providing the wind was steady, gusts or confused winds which we get plenty of, I found that the windshield and trunk seem to get pulled on:( unlike like my old Cade. By the time I got home I had a dislike for this windscreen! I seem to hunt for my line in a curve found this to be "un-relaxing" simply did not like all the opaque lines the eye finds looking through it, also that the factory height causes the flattish top to drag rather than lift flow over. So like many of you I am making changes to it- here’s pic's of the 1st change, likely by the time I finish tuning it, it will be close to the blacked out area. For the record I wear a full-face helmet, it hides my years;) and I also ride sport bikes so enjoy some draft! I have some interesting engine work I just completed which I'll post later, good information for someone getting their Venture ready for touring after a long park! SG
-
I found this suspension tuning guide/lingo I think many of you will like. http://www.mrcycles.com/custompage2.asp?pg=suspension S/G
-
Thinking if this is just a sudden event, I would compression test 1st, warm engine 5 rotations if that shows well or at least even Peder schedule is the way to go. S/G