Patch
-
Posts
2,036 -
Joined
-
Last visited
-
Days Won
2
Content Type
Profiles
Forums
Gallery
Events
Store
Everything posted by Patch
-

'84 vsx1200 popping out carbs
Patch replied to garyS-NJ's topic in Venture and Venture Royale Tech Talk ('83 - '93)
Also and I forgot to include this; the backfiring you described can, leave deposits on the valve guides, and lift the stems seals, trust me on that one -
'84 vsx1200 popping out carbs
Patch replied to garyS-NJ's topic in Venture and Venture Royale Tech Talk ('83 - '93)
Good questions: so for the intake seats, when the carbs are removed you fill through the intake, valves closed, yes it take a couple of timed rotations! As for worn valves, could be, all soaking can do is expose the mating surfaces cleaning contact points, The problem with contaminated seats again is a hard material slapping with pressure a softer material, that being the seat! Seat material can displace changing or adapting to the valve, mainly why we cut the seat only to 1mm. Why not the exhaust: if your pipes were off I would recommend you fill the ex port as well, none the less it will creep over and soften the build up as it also will soften any carbon or rust, via creep along the combustion chamber. Now the ex valve sees more pressure when cracking open then the intake, also we find that the carbon tends to build and level pitting, strangely enough. This by no means, means that exhaust valves are self mending, they operate under differant conditions and at higher heat range, they too are a different material! Some times the results achieved are not what we hope for, for example we had one recently where we started at 180 on all 4 ending up with 150 on all 4; a double edged sword! In that case we easily know the problem as carbon buildup, should we have left it? No, removing it was a better choice! I have on the bench a rare V4, I mentioned to AJ we should take pics to show the tolerances and what happens in a V config to an engine that hasn't run for many years and why the carbon can have such a negative effect! Moving past that, why I think a long soak is preferred: often we over look the fact that rings need to rotate, as do valves! Think it through and it'll click as to why. How the rings rotate is through a spec in honing, so it's a passive friction effective method, clutching through contaminates reduces this, I think you see the picture now, this means scoring and premature wear, a clean set is a good set; not a perfect set! Did you know the rings handle more than 45% of combustion heat transfer? In the end we each are the stewards of our bikes, the decisions we make are based on many factors. Forums are where we share experience, by no means is it the only or best way, only the fellow stuck knows what works for him. Hope that stuff helps, at least in general Patch -
'84 vsx1200 popping out carbs
Patch replied to garyS-NJ's topic in Venture and Venture Royale Tech Talk ('83 - '93)
A common overlooked problem is the seats. Picture the complete displacement chamber closed off to circulation, add condensation, add the years. The thing is the seats are a special spec material, not only do they seal but the cushion as well, try cutting a valve by hand, now try the seat, know what I mean? If you have a rust line on the valve and you operate the engine you are changing the seat geometry, the more this happens the more likely you will be finding out what cutting a seat requires! Yes operating it is fine--------But after you have dissolved the contaminates! Same for the rings! Just exercise patience, and the inexpensive solvents I described, that has worked for me many, many times! http://www.venturerider.org/forum/showthread.php?102387-Venture-Royal-refurbishing-back-to-touring-condition PS: don't put expensive engine oil in the engine till you have completely finished the soaking, its just wasted, after I use synthetic, depending on mileage and driving temps, will tell me which to use, 40 or 50, the lower the compression the higher the #, or noise might also play a role in my choice. Patch -
exhaust collector options
Patch replied to jimmyenglish's topic in Venture and Venture Royale Tech Talk ('83 - '93)
I understand what you are saying; but no, is the short answer. It's more about combustion heat, mixing- and the percussion of the exhaust valve,, slamming shut. Patch -
'84 vsx1200 popping out carbs
Patch replied to garyS-NJ's topic in Venture and Venture Royale Tech Talk ('83 - '93)
So carbs a side as we know they have to come off and gone through. Get a can of Deep Creep and spary some around the carb/intake mating area, wait an hour, remove the small plate on top of the carbs left side, you can now see the linkage and cables, remove the black tube completely between the carbs, running from the PCV ( mine was too stiff to bend and move, presto! What you describe is valve seats! The intake seats are leaking, the valves rusted, like the rings did, and it is wrong to force rings to free them, they should soak free, forcing them is like picking at a scab! The seats are not sealing pressure on the intake side, so -as the pressure builds during combustion it is slipping past and up through the carbs. 2 choices soak them as I mentioned in my post or remove the heads! You could also prove me wrong and do a, compression test, but and also, a leak down test would be the correct test for this! I seem to never have the right English to explain the air box, so I try to explain it this way: It serves as an air spring, it balances the air velocity and stream, it falls under tuning. Although different the exhaust system has a similar feature -we usually don't fallow or see it in the same light though, and that being back pressure! When I tune, with each step I add to the intake side of the carb, I look for a note that shows positive change, for example, extensions leading to the air box, the air box, the filter, the lid so on. It is harder to understand this then having a part number for a re jet, likely because it is not visible to us, so we don't see the importance of it. If I have popping on a warm engine, I missed somethin! Patch -
Anti dive bolts loose have leak
Patch replied to a topic in Venture and Venture Royale Tech Talk ('83 - '93)
Personally I would not ride the bike with a leak like you describe! If I don't have my bikes mixed up, I believe there are O-rings behind the unit? I would say if you are planning to change the springs, now is likely a good time. Patch -
Hi Droneh Got to thinking about your up coming trip and thought I'd offer you a quick patch for the leak. This doesn't replace the Bar's, it is temporary but effective, 1 level TBS of pepper through the rad cap, if you have any concerns about leakage on your trip. Like I said it's temporary and can be filtered out through a strainer, not unlike a windshield washer strainer you find on most car reservoirs. I'm not making this up' it's been around for ever, it's harmless.. Patch
-
I'm going to have to check the relay, I didn't know it had been tampered with? I left the class fuse original, I did open and inspect it, looks like I was the first in there. I only did a visual on the main, it's not what I am use to but now that you mention it I will open it and follow through. I combined both boxes but kept the split- as though they are still two units! It makes for a bit more wiring but after going through the schematics you forwarded , seeing how the ing system supports amps by combining circuits..... I thought I wouldn't attempt to rethink it! Why I changed it was because I noticed poor conduction at the fuse cradles and the old Boss fuses are hard to find on the road, when you need them most. I trust in your experience with these bikes so I will fallow through with the recommendations. I know the PO outside of oil had all the work done at the dealer, including the rear lighting. The bike is in very good condition for her age and has just 72,000 klm or 44,738 miles and with not much city driving. Thanks for the support and sorry I missed some of your post!
-
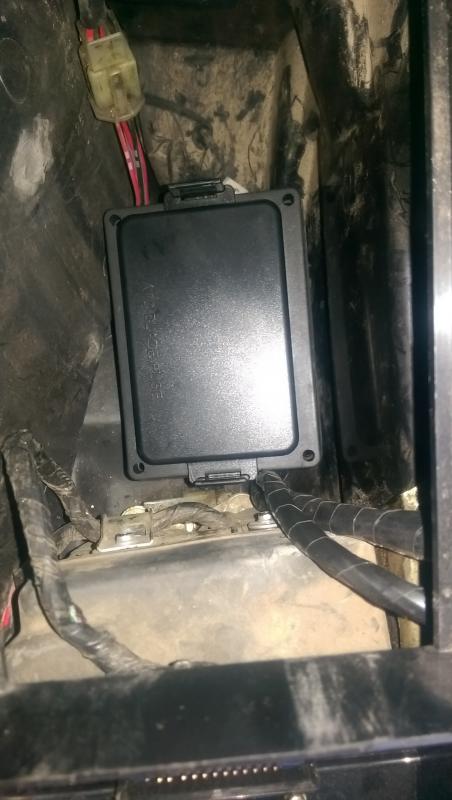
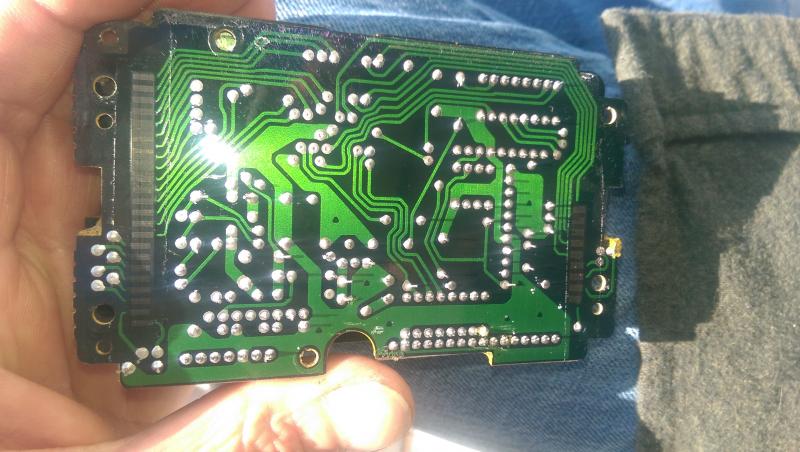
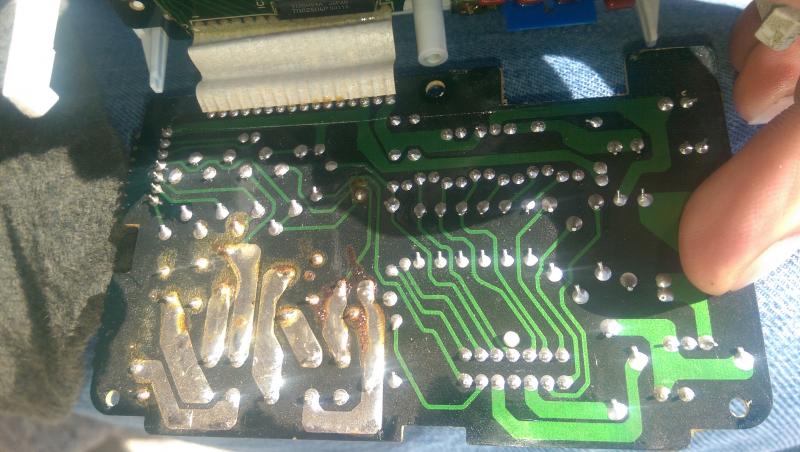
Keven not sure how I missed those pics of the board with jumpers? Thanks for posting them, knowing the problem saved me considerable time! Here are the pics of the fuse box, unfortunately the one that shows the view of a blow circuit lit up is 2.13 MB so it wont upload but you get the idea. I wired the harness extensions as it was originally and kept the fuses separate as though there were two boxes. This way if I need to troubleshoot in the future should be easy.

-
Share some thoughts with you. I looked through the rebuild posts but didn't see anything that refers to machining, so my comments are based on minimum machining. If I look at the test scores I think you did ok, I also think small budget. My guess from over here is honing? Also there was some very good advice given in one of the post,by (Doug?) I think, regarded looking for fractures, but again that would be part of the machining. That aside, I can say with some certainty, providing the leakage is outside of the compression area, below the rings or beyond the head chamber, the Bars should work; providing the head mating falls within spec! Also keep an eye out for white smoke, you will kill it if you run with that! All in all looks like the engine is running well within spec. Enjoy the ride and the season Patch
-
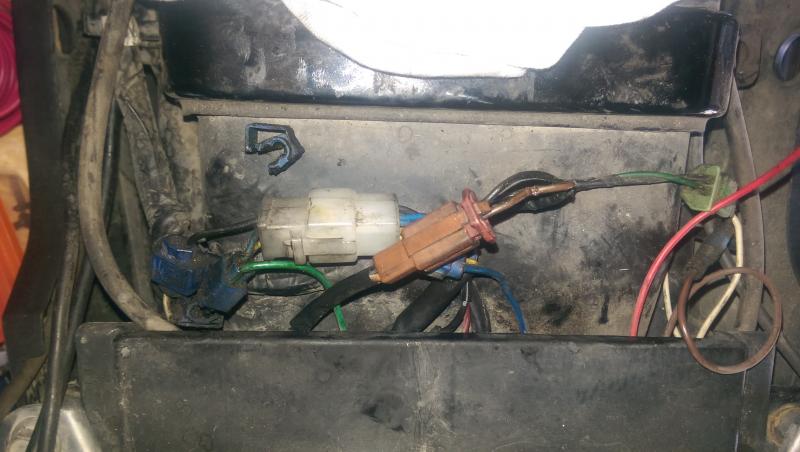
Yes sir, Mr. GW, bottom feeders, for sure! I did slip in to the shop to hang my thoughts Sunday and yesterday night, the fuse box all wired in. I ended up putting it in the radio compartment, good fit! I tested each circuit for draw, I did find 2 different items. 1st Prairiehammer is correct (again) there is a gremlin in the box and it was confusing at first while checking with a test light. Here's what I found: ACC has power after switched off, but the complete picture is how much and whats the load? From On to off we have Bat. voltage, after 3 minutes we fade slowly down to 6ish, if we short it, switch off, power gone 0 voltage At switch on to off measuring load, 0 load at 12V and so on.. So I think it's a bleed in the ing switch, likely old lube slightly conductive, maybe contact dust partials??? It seems to be a harmless ghost for the moment at least. Because there's no load, there is no real worry in my case, I stopped chasing it. Next was to figure what/where the load or short was on the tail circuit that messed up the reed/sw, here's what I found: 6A sw/on, brake on 6.3A most of the marker lights inactive. Twisting the large white connector, load would drop to 3 or 2.6A? Separated the connector, load down to 2.3A , not obvious but there was some darkened pins, cleaned them move on to the next one beside it, found that one to be in poor condition, cleaned it, load steady a 5A. I then removed all the blue spice taps, discounting years of patches, cleaned the remaining plugs and wires, repaired all the broken insulation. Load down to 3.1 - 3.2 -not sure why but likely a ground path, when I light the brake it actually drops 0.1 A, "what ever" Monitor working well now at least during testing. Better yet, my air system has no more EEEEEEEEEs. But I do have a question on that, please, why while on the center stand, does the valve open releasing the front shocks air in ACC, yet not the rear shock??? If I go straight to on doesn't. Next up the throttle handle was knocked off the bike during the ..... I had the switch off for repair, anyhow the seat housing for the cables broke off, bummer. I'll post pics tonight Patch
-
Well outside of the choke I can't think of any other setting that should be set to a max? For general knowledge I'll mention this, before syncing carbs it's important to do basics, like a tune-up checking for heat on the pipes to make sure each cylinder is firing. If we use vacuum to sync not knowing if a cylinder is firing we end up with what you describe. I assume you turned the correct screw? What you described it pilot? If it were me I would do the following: check compression to to get it out of the way and off the check list: then I would pull the carbs and open #1 remove the jet body/housing, (do not force it, if it doesn't lift off spray some penetrating oil and let it soak) remember to remove the large brass slotted screw first: when looking in there with a light, there is one passage you need to confirm is open, holding it flat side down, the small passage on the right, move your light to the corner away from you and to the right, look through the passage you should see light, not a lot of it but a pin hole., If it's blocked there it will likely also be blocked in the barrel. Wash it out, a twist tie from a garbage bags will help,(remove the rapping to just have the wire for about 2") but only use it if you believe it is blocked. Wash the barrel as well, now spray carb clean into each ports where the jet body sits, you will need a fine air gun tube attached to the compressor 90ish lbs. Now carefully blow air though each passage and,,,, make sure it is traveling through not just blowing back at you! Do not blow air at a float. You have of course by this time checked the float valve seat; so reassemble but this time do a bench sink, before re installing them. The heating you speak of at #1 is thermal passage transfer not what we need, it needs to achieve 150- 160 within 3 or 4 minutes without choke. Patch
-
Was working last night hoping to get the fuse box finished, I worked till just after 10 completing the wiring, then I closed the lights and locked up. We have some guest spending time with us and one said, the shop window is open?????? It didn't look bad at first kind of thought we were lucky, all I saw missing was my shop laptop, there goes the manuals and notes and photos of the older projects, but as far as I could see no tools missing although every door and drawer had been left open? Funny cartoonish thing is, while taking the laptop he must of tripped in the dark and kicked over a lt of oil, from that we could see every where he went, over to each bike the Venture had quite a bit of tools/meters.... stuff, took nothing? Mind you he wouldn't be able to exit a door he had to use the small window. I figured he/they will be back? So went out and built some grills installed, then came our tool truck........... bummer guys they took anything that looked new and there was plenty to take, last year was a retooling year for our 2 crews! They left behind on one of the tool boxes in the van a flashlight with head band and an old slotted driver I found in front of the tire, like from the 50s hard clear yellow with a green top, anyways the crime tech that was sent over, dusted, took pics of the foot prints, and smiled when we pointed the flashlight out to him! Well I received good service from our police force, see what comes of it. Get this the bleeping bleeper walked and climber over my plastics for one of the old bikes, he used the 2 side trunks to climb out, that's House Of Color blue marble...... So I'm on hold for a bit, be safe, talk soon Patch
-
Side Stand Question
Patch replied to Patmac6075's topic in Venture and Venture Royale Tech Talk ('83 - '93)
Wow good post! I'm a bit of an odd-ball with my bikes, for one I like to nap on them, don't know why, have even slept on them over night, this one really lends itself to that, and on the side stand as well. I have also seen the bike tip over with my GF still on, fortunately just the light skirt only, received damage. Now to add to my surprise, my GF picked it up before I reached her and it! Babe I said, if I ever misbehave -just remind me of this moment:) true story! Also this is the only big bike I've owned, I can use the center stand on, providing I air up. If I'm leaving the bike on the street I pull the right bar down, making it to uncomfortable for kids to sit on her. Eventually we are all going to weep the air in the forks, so the answer must be the springs. -
I know it is often on my mind, as to how short stops would be effected? Would you say front end dive changed for you- with regards to city driving? Thanks
-
Newbei question, from 86 up is there advantage to decoupling?
-
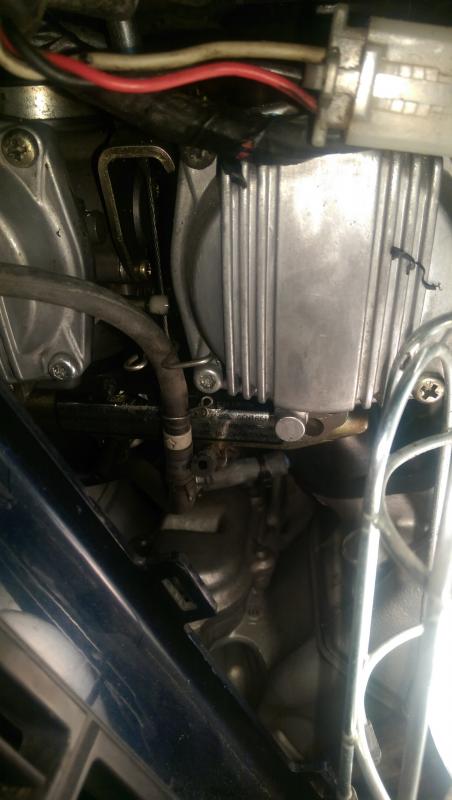
kneeling down on the left side of the bike, looking at the carb caps, move the small black vacuum tube by pulling it forward and out of the way- cast your eye past the stainless U-shaped clip, just to the right of the cable hub, you see a slotted screw! That is the screw you need to turn, 1 turn, then start the engine, let us know if there is a difference in the RPM and then the temp. See the pictures below:
-
A couple days back I used my Vacuummate for what you are describing, they are pricey but a very good tool, they double tap when between 50 lbs and Yamaha approved, whatever that means. Can some buddy please tell me how Pairiehammer knew? Patch
-
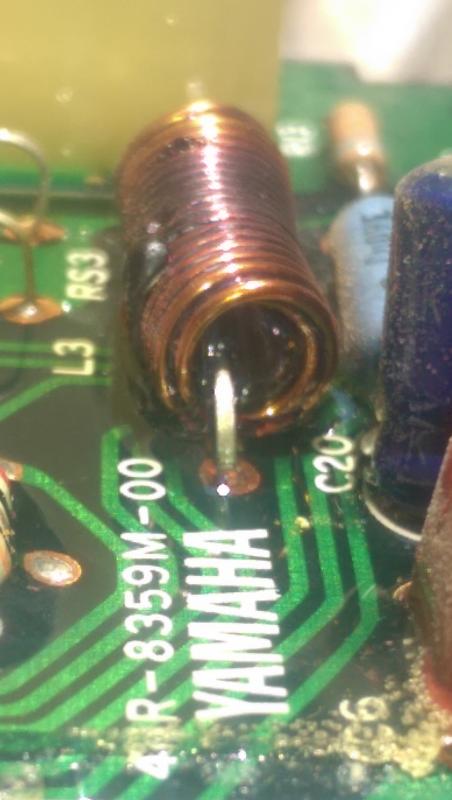
Mr. Pairiehammer, Boy was I pleased to see your post this morning! Yes I uploaded the 86-93 last night; man was I frustrated trying to find ---how you knew that Reed was for the tail! Where man- is it shown? Fork! Was thinking about removing the Reed and either cleaning it and dipping it ,or just making a new one; but if you think a jumper will do the trick, easy enough! I just took a look at your fuse box, I used the same one 4 years back, on my 11000F, it does have a solid bus which made a deference for our coil issues we were having! However the casing cracked so I replaced it this year with another that saves you from testing fusing, as circuit will light red when one blows. The one I picked up last night is not single bus type, I thought I'd stick to the existing format, but using the small ATC 's, it's large enough for me to get everything into one box. This box won't fit over the battery -so I started to fab up a small stainless bracket last night. The ground bock is a good idea and I should incorporate that into the bracket! Pairiehammer posted "It appears the Reed Switch (RS3) has a FUBARed coil. The coil when operated normally creates an electromagnetic field; that electromagnetic field opens or closes the reed switch. I think RS3 controls the tail light. IOW, it senses when the tailight bulb(s) are burned out and sends a signal to the CMS to warn you." Now, please, why do you know this??????????????????????????????????????????????????????????????????????????????????????????????????????????????????? Patch
-
Thank's again Kevin, I looked last night on the forum, searched for -repair manual, came up empty! Now I have a good PDF manual but the schematics are shaded, I'm on way over to download. I think I read the fuse as 14.7 so 5A high, hope that'll be the end of it??? After reading your reply to my OP I ran out like a mutt chasing a ball, LOL went to get a new fuse box, going to remove the extra back lighting and splices I've found around the tail and clean things up.
-
Right on man! I was going through the bike yesterday and found my tail was out, fuse blown! I could use a clearer wiring diagram than the ones I have! Thank's so much man I'm hunting down a short;) Well at least I know where to start Patch
-
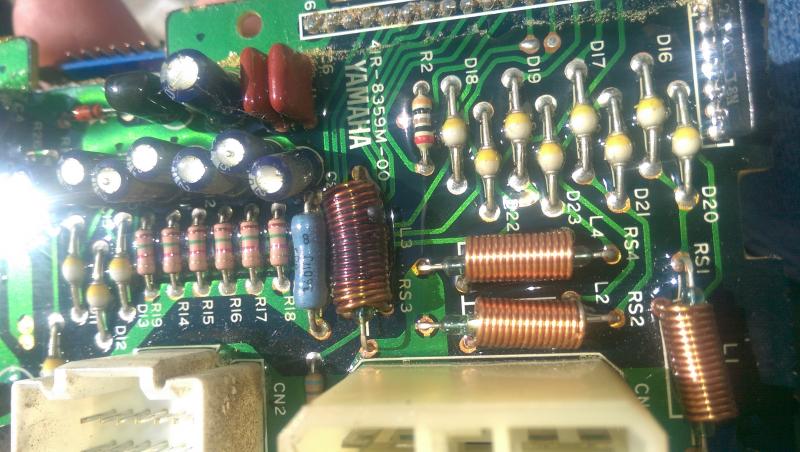
Any thoughts on what is seen in the pics below? I measured the coils they are all in at 0.1 I measured the resistors they are all just under 6K Thank's
-
Three Venture deal
Patch replied to Godlover's topic in Venture and Venture Royale Tech Talk ('83 - '93)
If you were planning on starting a parts supply, the inventory would have to be at a low enough upfront cost to handle and cover your time and storage. If you were thinking of repairing and flipping them, I don't think you'll see much if any return dollar value? What are your thought's in making the purchase? -
Not sure if I am the intended target to your question? I could look into to what it would involve; problem with me is I think fast, walk fast, ride faster, spell slow!
-
Perhaps a glossary like "proven Gen1 upgrades" where one can look up mods with a brief description of the benefits, with links to get started? Take the Vmax head mod for ex. at a glance what are the benefits, and where would we find the posts to get started? I know the answer, do a search