MiCarl
-
Posts
3,442 -
Joined
-
Last visited
Content Type
Profiles
Forums
Gallery
Events
Store
Everything posted by MiCarl
-
#3 - Homeowner is cheap It was dark and cold, so it didn't get a thorough inspection. It's got what sure looks like a pilot, with two narrow metal lines back to the gas valve. That's where I applied the bic, but the main burner lit right up so I didn't pay close attention - I just shut the panel and ran indoors. I assume it's spark light, didn't see any kind of surface to heat up, but I've never heard it ticking either. It wasn't displaying any kind of ignition sequence. When the thermostat called for heat the gas valve would click but nothing else. I stuck the lighter in then re-connected the thermostat assuming it would shut down if it didn't light pretty quick. After thinking about it though there was a gas smell around the cabinet and it might not have any smarts to shut down the pilot if it fails to light. (The furnace was installed in 1987). Anyhow, this morning it is working properly. If it hangs on for a few weeks I'll be able to work on it in much better conditions. I'll pull the documents out of the file and take them to the shop with me to look at today.
-
My goofy home has a roof top furnace/ac unit on a slab next to the house. There is a foot of snow all around it and it's fairly cold. The igniter has crapped out. I got the access panel off and was able to light it manually. I've cranked the temp up in the hopes that we'll pack in enough heat that we and the pipes don't freeze by morning. In the AM I'll light it again..... Given the conditions out there it's going to be tough to work on. I'm tempted to run a thin copper tube hooked up to the gas as a pilot light so the furnace will work. Then tackle the igniter when I don't have to crawl around in the snow. Any thoughts on my temp fix?
-
 It is possible that the master cylinder needs a rebuild. If it's leaking internally it'll reduce the clutch throw. Make sure of your bleed first though. It's also possible for the clutch steels to have some corrosion on them from sitting. That will cause it to drag a bit until it wears off.
 -
It is possible that the master cylinder needs a rebuild. If it's leaking internally it'll reduce the clutch throw.
-
I don't know that the Keysters are the wrong height. Just relayed what I knew about the XJs. In that case the height difference was making them difficult/impossible to set. I've never had to do needles/seats on a RS. If it were mine I'd be inclined to try the ones from K&L. If the needles have a rubber tip I wouldn't do the seats. Did you check to find if it's leaking at the needles or around the seats?
-
The K&L float needles and valves for the RS 1300 are from Keyster, not Mikuni. I know the folks in the XJ world have had some trouble with Keyster needles being too tall, but I suspect K&L cross references them wrong. Don't forget float bowl o-rings. The ones from K&L should be fine there.
-
GPS location and mount for 1st Gen
MiCarl replied to Donvito's topic in Venture and Venture Royale Tech Talk ('83 - '93)
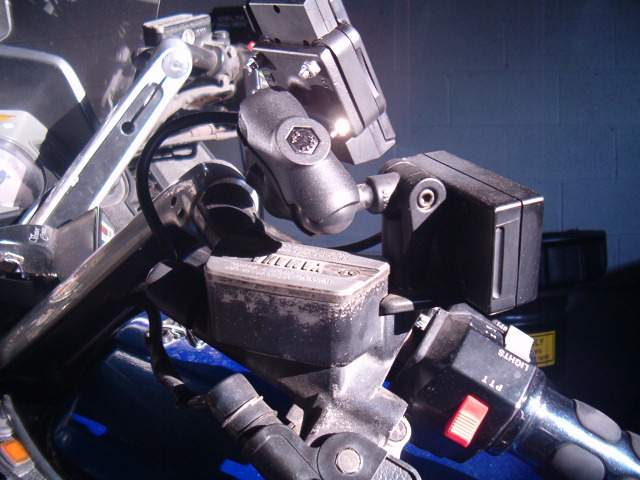
Ok, I remembered this when I got to the shop. My mount is a little different than the one I linked earlier. The type mount I have they don't seem to have outside their complete kits. Still, I think the one I showed you should work with the correct arm. Here are a couple pictures of my mount:
-
GPS location and mount for 1st Gen
MiCarl replied to Donvito's topic in Venture and Venture Royale Tech Talk ('83 - '93)
I just put a 765 on my 89. I replaced the bolt that holds the rider audio control to the clutch perch with a ball for my former GPS. That one was part of a kit, but similar to this: RAM M10 X 1.25 Pitch Male Thread with 1" Ball. The 10x1.25 thread is definitely correct. The 765 mounted right up to it. I had replaced my cassette deck with a hook up for MP3 player. I hooked that to the 765 to use the MP3 player. -
How did you get Hooked - Picture of your first motorcycle?
MiCarl replied to VanRiver's topic in Watering Hole
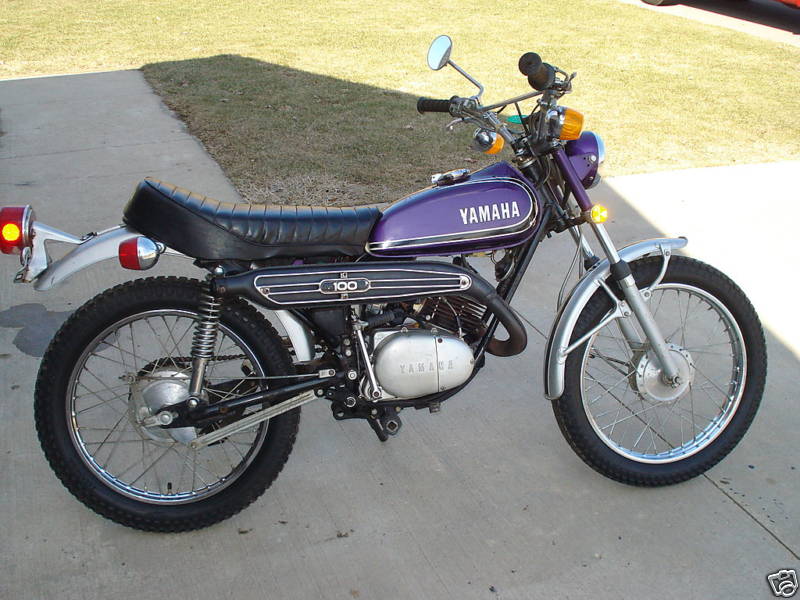
First bike was a 196x Honda MiniTrail 50 (see avatar). Second was an early 70s LT2 Unfortunately neither picture is mine. I know there is some old video of the MiniTrail but I don't think anything of the LT2.
-
Valve Adjusting Question
MiCarl replied to wannarsv's topic in Royal Star Venture Tech Talk ('99 - '13)
The problem is that as the valves wear in we all need thinner shims. The kit would quickly end up full of 270-305 shims and none of the 250-265 most people are going to need. -
Some (many) Maintanance questions
MiCarl replied to Motiv's topic in Royal Star Venture Tech Talk ('99 - '13)
Yamaha does not provide a float height for you to measure. They provide a fuel level you check with a clear tube on the drain nipple. If the level is in spec there is no need to remove the float bowls. -
Some (many) Maintanance questions
MiCarl replied to Motiv's topic in Royal Star Venture Tech Talk ('99 - '13)
When I posted I thought it said '09. My bad. Still, the internal stuff should be just fine so long as you don't disassemble. At that age I'd definitely do float bowl o-rings if I opened the bowls. -
Some (many) Maintanance questions
MiCarl replied to Motiv's topic in Royal Star Venture Tech Talk ('99 - '13)
I recommend not lubing head bearings too. Here is why: The labor involved to replace is the same as to lube them. In the scheme of things the bearings themselves are cheap. In school they taught us to replace when we lube for that reason - the incremental cost for new is small. For that reason I recommend to my customers they not lube, and just replace when there is a problem. Same with swing arm bearings. I haven't looked at the RSV service manual, but Yamaha typically recommends lithium soap based grease (general purpose) for head bearings. This type of grease will flow. That is fine in something like a wheel bearing that spins and redistributes it around. The problem on the steering head is they don't spin and the grease eventually works out of contact area - the exact same issue with drive shaft splines. That's why I use the moly grease (high impact) in steering bearings - it tends to stay put and you don't have to always be re-lubing them. -
Some (many) Maintanance questions
MiCarl replied to Motiv's topic in Royal Star Venture Tech Talk ('99 - '13)
Wow! Lots of questions. You don't open the carbs to check float levels. You check the fuel level. I would not open them unless I found the levels off. If I opened them I'd throw new bowl seals in to be safe, but wouldn't willy-nilly replace stuff on a bike that new. Not 100%sure on the RSV, but typically there is a dust seal on the lower bearing. If you're going in I'd put in a new set and pack them with a high impact grease rather than the lithium soap grease Yamaha specifies. There is not a shim kit sold retail - it would be a very pricey thing due to all the possible combinations it would need. I do believe there is some sort of kit floating around the membership but it won't necessarily have everything you might need. Going up in weight increases damping, not spring rate. It'll make the ride harsh but not do a lot for dive. Consider progressive fork springs. This motorcycle is practically brand new. I wouldn't touch them. You want to use a silicate free coolant, not sure if DEX-COOL meets that. Any motorcycle specific coolant will be silicate free. If you get Yamaha brand you pay a premium for the tuning fork label on the bottle. -
Valve Adjusting Question
MiCarl replied to wannarsv's topic in Royal Star Venture Tech Talk ('99 - '13)
Turning clockwise puts a lot of stress on the cam chain guide on the slack side (side with the chain tensioner) so you want to go counterclockwise. The problem comes if you've got to replace shims. Then you'll have to go clockwise to either get the tool in or out. Go slow and easy going clockwise and be careful not to damage the head with the heel of the tool. -
That main fuse box can look brand new, but the clips have hair line cracks and are weak. Replace it. (You probably had the same problem on the 550 max)
-
Speedo could be a simple as a broke cable too.
-
To elaborate on what Neil86 said: If it hasn't been upgraded the fuse panel is almost certain to be failing. It's under that cover you banged on, on top of the battery. It's very likely it's either bad or been poorly repaired previously.
-
I understand Canadian winters well. You export them South and East.
-
Spark Plug Mystery?
MiCarl replied to VanRiver's topic in Venture and Venture Royale Tech Talk ('83 - '93)
I've learned to never be surprised what some people will do. -
Rear Rotor Thickness
MiCarl replied to mralex714's topic in Venture and Venture Royale Tech Talk ('83 - '93)
Off hand, I do not know the minimum thickness. It should be in the service manual. The reason the pads are wearing unevenly is there are ruts worn into the front side of the caliper. Pads get caught in the rut and the fronts won't close. That's not good because some of the braking force is going into the rut instead of stopping the motorcycle. On mine, I completely disassembled the caliper and had a welder I know fill the ruts. I had planned to file them back flat but he had a slick little air-powered belt sander and did that too. -
$800.00 carb parts?
MiCarl replied to H2O's topic in Venture and Venture Royale Tech Talk ('83 - '93)
If you replace the slides make sure you get the old ones back. Someone with a broken slide will be thrilled to get one, pin holes and all. -
Another thing you could look for is nicks, scratches and dents in the bed and on the tail gate. These would be signs of a delivery vehicle.
-
$800.00 carb parts?
MiCarl replied to H2O's topic in Venture and Venture Royale Tech Talk ('83 - '93)
If diaphragms are the problem you might consider trying to get them to repair the slides with diaphragms from Sirius. You'd have to pay them extra labor but in the end it'd cost you less and they'd probably make more profit. Another option is to have them get slides from K&L Supply. Exact same Mikuni part, but about half the price. -
I agree to a point. When my stuff won't stay in or the rain won't stay out it's too much rust and time to replace. Of course on a vehicle without a full frame rust can be a structural issue too.