BlueChips84
-
Posts
41 -
Joined
-
Last visited
-
Days Won
1
Content Type
Profiles
Forums
Gallery
Events
Store
Everything posted by BlueChips84
-
Glad you made it out of that alive! Plan on making her whole again? My one regret is not getting around to riding my gen1 when I had it after restoring it. Ended up with a tour deluxe that took it's place ut I am sure if I rode both back to back I would still still have the gen1😁. Ride safe!
-
I honestly cannot recall the exact facing of the lobes but as long as the intake and exhaust lobes for the cylinder you are checking are either facing toward or away from each other, you should get a good measurement. I shimmed all of mine that were questionable to the top(larger) end of the tolerance as they can generally only get tighter as they seat themselves. If they are in tolerance, I would not bother unless they are right at the bottom of spec.
-
Definitely those are metric numbers but you have the decimal in the wrong place. I grabbed the above values from my Clymer manual. Divide the your numbers by 25.4 and you will get the imperial equivalents.
-
Small update on the leak: since torqueing the bolts to spec, no more oil weeping from the head gaskets at all. I'll make sure to check head bolt torque each time I do shims now since it is so easy to do through the camshaft caps. Now I am just hoping that I don't develop any leaks from the valve cover gasket over time.😒
-
I can confirm, .004 to .006 for intake and .006 to .006 for exhaust, as per my manual.
-
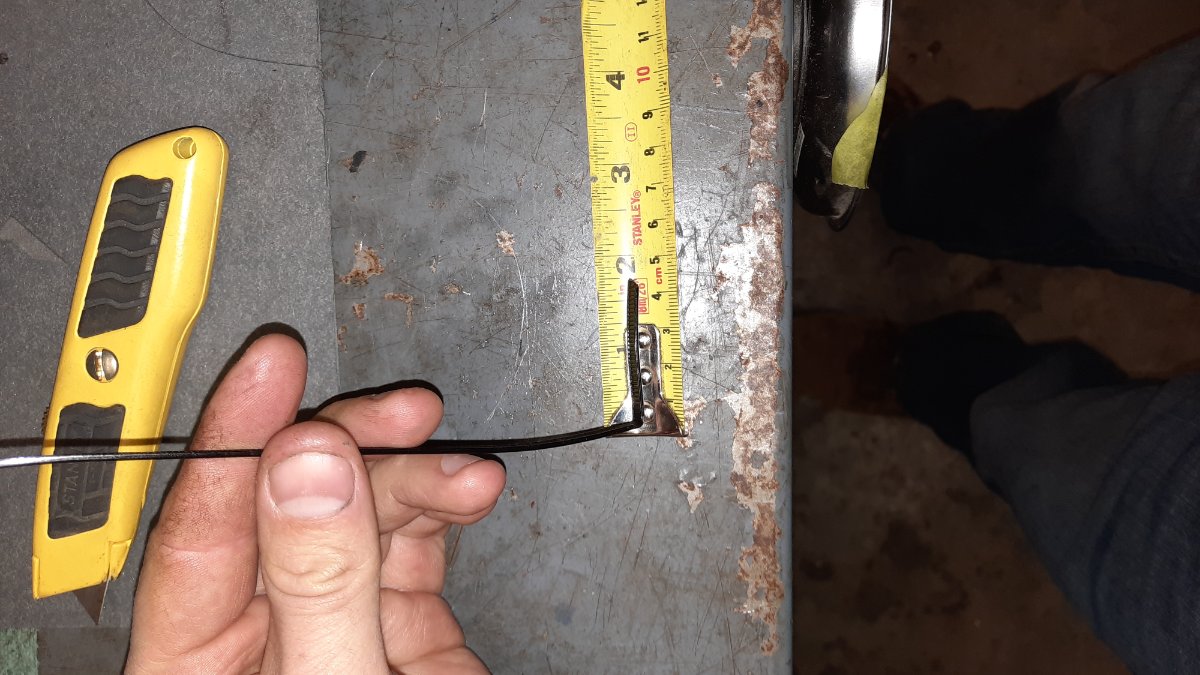
.008 is a pretty large shim and at the top of the tolerance for the exhaust if I remember right. You will want to get a feeler gauge that goes down to at least .0015" and check with that, make sure the timing is in the right position to get proper measurements.
-
Front Lights Replacement Advice
BlueChips84 replied to Coyote251's topic in Royal Star and Royal Star Tour Deluxe Tech Talk
I'm curious to know as well, always nice to have brighter lights without having to change the whole lamp. I can check the bulbs i have in later today if I remember, they give pretty good visibility on my 2007 RSTD. Will try to report back. Wish I could help a bit more regarding the LEDs. -
Going to look at a 87royal
BlueChips84 replied to Popsnana19655's topic in Royal Star and Royal Star Tour Deluxe Tech Talk
Probably have more luck the the forum for the gen 1's a couple tabs up. -
Seafoam & fluid film on sale at Princess Auto
BlueChips84 replied to saddlebum's topic in Watering Hole
Thanks for the heads-up! I try to run it through the tank every couple of months to keep any build up down. Have a few other things to grab from there for the shop anyhow. -
Always enjoy his videos, very well done. This one really had me eyeing a scout as a smaller, lighter move from my RSTD. Only down side is that the closest Indian dealers to Ottawa are in Toronto and Montreal...
-
Correct, it gets trapped between the backside(top) and the valve seat in the head, holding it open. Should I try and do a video or pictures of the process when my valve shims arrive?
-
I have seen this trick mentioned briefly when doing some researched but the replies were mostly along the lines of it being sketchy or difficult. In fact it works very well and I have used this trick on both my FJ600 and now my RSTD. Use a good thick ziptie and there is no risk of it getting cut by the valve. The method I use is this: 1) Bend a heavy(thick) zip tie to 90 degrees by pinching it with pliers, make sure that the short leg is 1-3/4" long to reach the valve. 2) Turn the engine over until the cams are pushing down the valves and insert the zip tie with the stem facing between the pair of valves you want to check. 3) turn the zip tie gently to one side until you feel light contact or about 20 degrees, then while holding it there, slowly turn over the engine until you feel the valve grab the zip tie. If you miss, try lowering the valve and try again. 4) If you caught it, properly, you can keep turning until you have enough room to pry out the shim from the bucket and grab it with a magnet as usual. 5) when do e, just turn the engine slowly backwards until it let's the zip tie go. Then you can wash, rinse and repeat for the remaining valves. Hope this helps the other cheap buggers like me who don't have the tool handy!

-
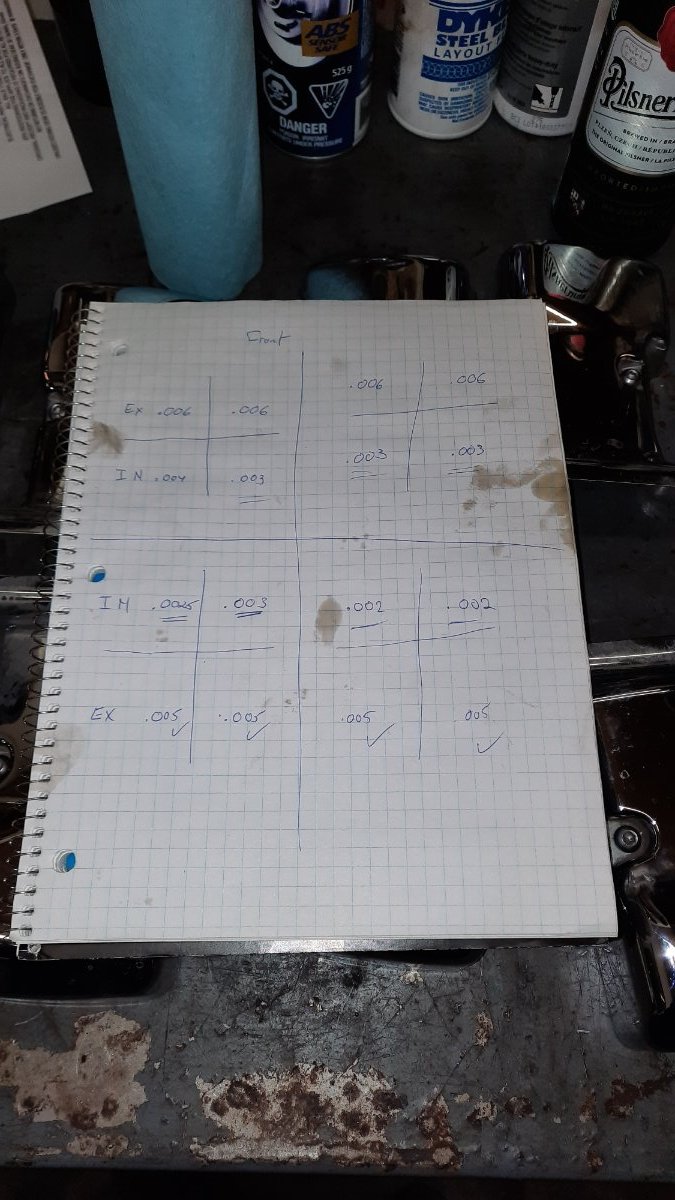
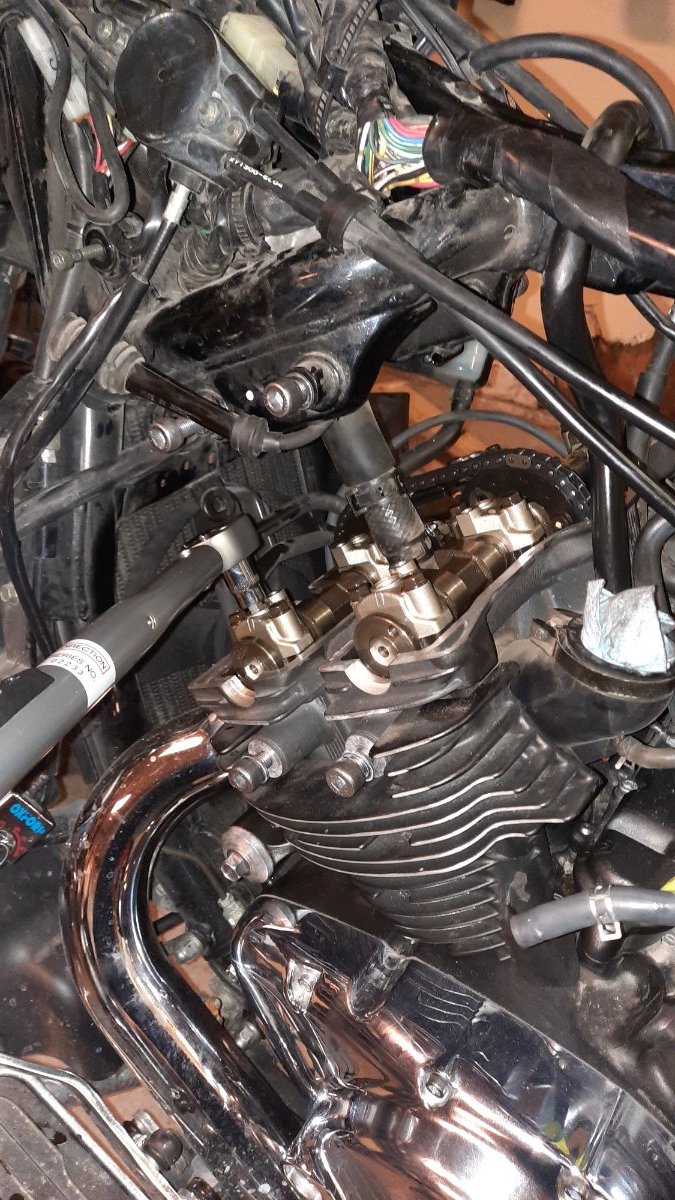
Little update, Turns out that the head bolts can be tightened with the cams in place. Figured this out AFTER pulling the rear cams🙄... Anyhow, pull the rubber plugs on top of the cam caps and then turn the engine slowly until the through holes in the cam shafts line up with the holes in the caps. At this point, you can pass a long 8mm Allen key bit through the hole and start torquing. You'll only be able to do the front or rear cam at a time, so to tighten evenly you should have to turn the engine over a few times by hand. I would say most of the bolts took about 1/4 turn before clicking over but at least 4 took over a half turn after unsticking a bit, I was worried they may be stripped but they did click eventually! Double checked all the bolts again and they all clicked at the proper torque now. Had some fun resetting the timing with all the valve springs fighting me(don't pull cams if you can help it!) But one I figured out the trick it wasn't too bad. Now the next step is to adjust pretty much ALL of my valve shims, I think previous owner set the tighter I stead of looser thinking it would be better. One shim was upside down so I am not thinking it was factory. Below are the measurements found.
-
2007 RSTD cam chain is tight while doing cam removal
BlueChips84 replied to BlueChips84's topic in General Tech Talk
Already had both of those out, still had the chain taught but figured it out. probably caused the initial problem though before I removed the rearmost one. -
2007 RSTD cam chain is tight while doing cam removal
BlueChips84 replied to BlueChips84's topic in General Tech Talk
Never mind, I figured it out! Combination of the valve springs pushing the cam shafts in opposite directions and the loosened chain folding over and binding down in the crank case. Backed if off a bit while taking out the slack and it moved freely after that. Something to be mindful of for anyone playing with the camshafts in the future. Cheers, Aric -
2007 RSTD cam chain is tight while doing cam removal
BlueChips84 posted a topic in General Tech Talk
Okay, bit of a conundrum here... I'm working on re torquing my my head bolts on my 2007 RSTD as there was an expired recall on this model year and I have been getting oil weeping from the head gasket but no coolant mixing. Turns out there are bolt clearance holes in the cams to tighten the heads so removal was unnecessary but nowhere in the manual or online mentio ed that... Anyhow, I had the cam chain tensioner out(the one in the middle of the engine on the front bank) and this gave me enough slack to lift the chain with my finger but as soon as I let it go, the chain popped and snapped tight! I took out the other tensioner on the back of the engine that was not mentioned in my Clymer manual and tried again, same thing: chain retightened! What is putting tension on the cam chain still? I managed to get the rear cams out and the chain is slack on the rear cylinders but still taught on the front two. I know when it snapped tight it threw off the front cam timing so I don't really want to turn it over anymore as I don't want the valves to hit the pistons. Any ideas? One thought I had is the valve springs pushing the cams in opposite directions and causing the tension but I'll have to take another look. Had enough for tonight and will try again tomorrow. -
Oh, I'll be leaning on you guys if I get in to trouble, that's for sure. I find the quickest way to learn is to get in a bit over your head from time to time.
-
I already have the gaskets ordered and will see what shims need replacing if any before making a move for the kit. May be able to make a deal with a mechanic down the road from me, have exchanged shims before. As for the tool, I'll take a look at the design and see if I can just machine one at work. I have lots of time since there are no students around at the university... anyone have a drawing?😉
-
Sadly, I am not talking about the valve cover bolts. This one particular year has a recall for head bolt torque being too low. Unfortunately it expired in 2017, so now it time for brain surgery on her. Worst part will be pulling the cams to get to the bolts and then re timing everything. So far, no other issues other than some oil weeping from the head gaskets. No oil in coolant or vise versa, although I will drain and replace both over the winter. Only had the bike a few months, love the power and comfort. Was thinking of selling it after trying out the cruiser thing but each time I posted, I pulled it down as I realized I liked her too much to let go yet! Oh, and to add: I'm a machinist and maintenance tech, so well aware of the value of a torque wrench😁👍.
-
Now that the weather is looking pretty consistently cold, I have the RSTD jacked up to start work on torqueing the head bolts. Hopefully this stops my oil leak. On the plus side, I'm hoping to get my 9yo son involved to get some father son time in!
-
Update on the recall: I got a response from Yamaha Canada confirming the recall but the rep said that the cutoff time was 2017. And even then, being a US bike it would have had to be done by a US dealer. So, I guess I get to learn how to pull cams to access the bolts. Ordered my new valve cover gaskets ahead of time, and going to measure valve shim clearances while I'm at it. If I need to order a kit, they are 25mm shims right?
-
Checked my VIN, came back as being covered by the recall. Big BUT though... I'm in Canada and the bike is apparently a US bike(explains the odo being in miles🙄) so the vin does not come up in the Yamaha Canada database, so dealer is unsure if work is covered. Sent an email to Yamaha Canada to see if the work can be covered here. Waiting on a response but not holding my breath on a 13 year old bike.
-
Thanks for the info, I will inquire next time I am by the dealer, maybe tomorrow. Is there a way to look up recalls or service bulletins on these bikes?
-
Carb help please
BlueChips84 replied to Icemanmatt's topic in Royal Star and Royal Star Tour Deluxe Tech Talk
My first thought would be a stuck float in a couple of the carbs. Don't turn over the engine with the plugs it or it may hydro lock and cause damage! Need to turn off the peacock, pull the plugs and turn it over to get the gas out of the cylinders, then start to get at the carbs. Are you sure the gas was flowing out of the exhaust or just running along it? If it was coming out the exhaust, it may indicate some valve clearance issues as well, but that's just a guess. -
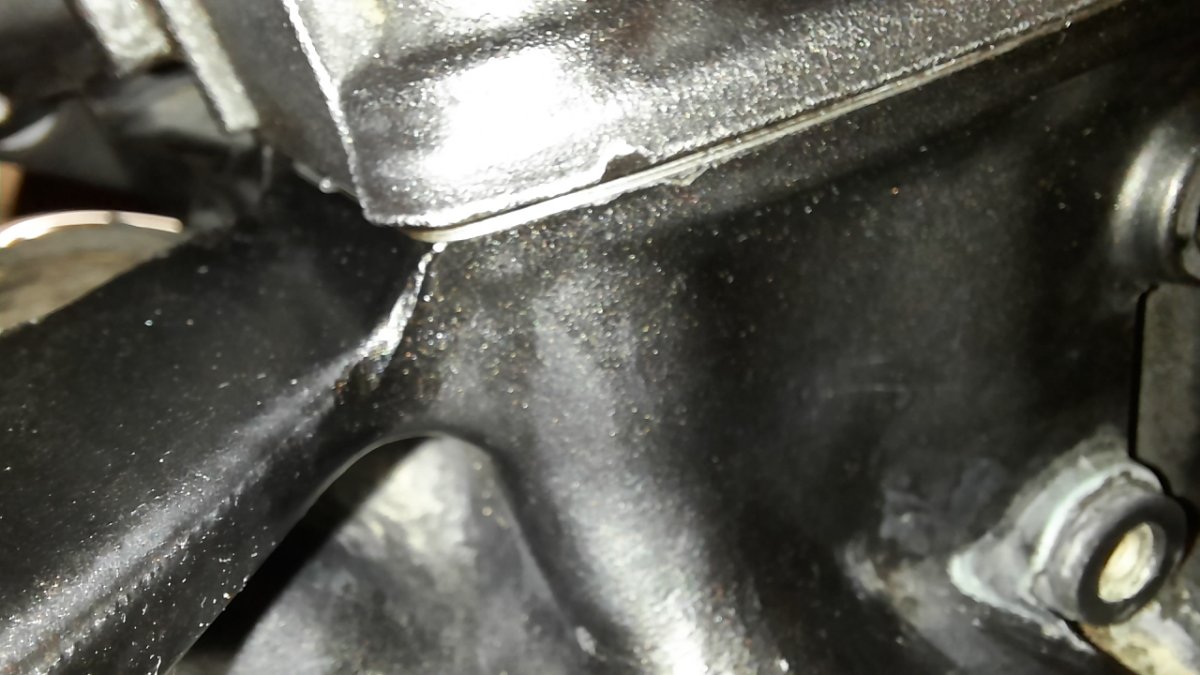
Okay, so I pulled the covers, cleaned everything up and then went for a test ride, about 8km. Pulled the covers and found oil weeping from the head gaskets at the front left cylinder corner and rear right cylinder, also at the corner. I can't really tell if it is leaking further inside the block on the other corners but it does not seem to be so far. So, I'm thinking(praying) that it is just improperly torqued head bolts as there is no evidence of coolant leaking so far. Going to pull the covers, then cams and torque the bolts once the bike is parked for the season. Might as well check the valve clearances while I am at it as well. Now, if it does turn out to that the head gaskets are shot, is it possible to pull both heads off with the engine still in the frame or do I have to pull the whole engine out? I know it would be tight but a quick glance looks like it may be possible. Aric