cimmer
-
Posts
977 -
Joined
-
Days Won
7
Content Type
Profiles
Forums
Gallery
Events
Store
Everything posted by cimmer
-
Here are the instruction sheets for the Passenger Footboard chrome overlay and for the Chrome sidecover rail. Rick F Passenger Floorboard Trim 86-93.pdf Side Cover Rails for 83-93.pdf
-
I cant say if it will or not but do a search in this section and see if there is any threads on this type of setup. I for one, havent done this conversion as I just rebuilt my calipers and install steel braided brake lines on my 89 VR. Rick F.
-
Just a note.. there is a bleeder valve at the Triple Tree and after you do the above routines, you should bleed the rear, then the left front and then the triple tree bleeder as that is the highest point in the system and should be bleed last. You could actually let the bike sit over night and bleed the triple tree bleeder to remove all the air.. I hope this helps. Rick F.
-
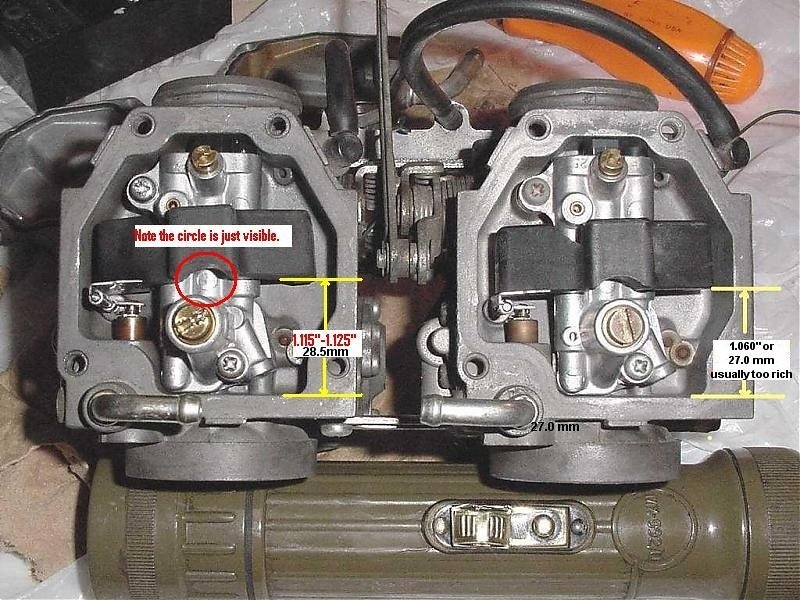
Here is a little cheat sheet on setting the floats with the float bowls off. Also check and make sure the rubber plugs in the bottom of the jet block are nice and tight so no gas gets by them when running. They should be very tight in the jet block. I hope that helps Rick F.

-
I would start checking fuel lines to see if the mice have chewed holes in them. That could explain the gas going everywhere. Did they chew any holes in the air cleaner themselves to where they would have access to the throat of the carbs? Good luck. Rick F.
-
1986 VR Fairing
cimmer replied to chrisraven4321's topic in Venture and Venture Royale Tech Talk ('83 - '93)
The tach is driven by the Gray wire connected from the TCI unit to what appears to be spark plug #2 coil. The tach is also power by a brown wire that supplies power to the tach and is fuse protected so you would want to check the fuse also to make sure it is ok. The Brown wire also supplies power to the brake switches. I hope this helps.. Rick F -
Manual air ride suspension
cimmer replied to Callaway Venture's topic in Venture and Venture Royale Tech Talk ('83 - '93)
Have you checked the owners manual to see what it recommends for air pressure in the rear shock? There should be one in the Library section of the forum on 1st Gens. Rick F. -
Mine was 13 years old and had lots of tread left on it but I just wasnt feeling comfortable with it being that old. The bike is stored inside when not being rode so there was no weather checking or splits in the tread or sidewalls. But I plan on a lot more riding and just wanted to be sure. One thing I do add to the tire is a product called Ride-0n. https://www.ride-on.com/ It helps to balance the tire and of course protect from nails and such. I do a lot of solo riding out in the middle of no where and just like the peace of mind it brings me. Rick F.
-
1986 VR Fairing
cimmer replied to chrisraven4321's topic in Venture and Venture Royale Tech Talk ('83 - '93)
Kick stand in the down position or a faulty switch maybe.. if I recall, low fuel also lights the Red light.. Rick F. -
1986 VR Fairing
cimmer replied to chrisraven4321's topic in Venture and Venture Royale Tech Talk ('83 - '93)
The headlight runs thru a reserve lighting unit that works in case a low beam or high beams burns out, it automatically switches to the other part of the bulb so you have a light. That would be when the reserve unit would turn on the dash warning. Sound like he bypassed the reserve unit with the toggle switch. How he wired this is worry. Does the high/low beam switch on the handlebar still function properly? There is a wiring troubleshooting section in the service manual and I would strongly suggest you download it from the tech library if you havent yet. The wiring diagram does show the colors of the wires also so that will help you with connecting the wires to the correct connectors. Good luck. Rick F -
I ended up getting a Dunlop Elite 4 120/90-18 for my new front tire. I have a Dunlop E3 for the rear so they should go well together. I removed an Avon Cobra M41 with a build date of 2309 on it. Tire looked good but I sure was about to trust it any longer with all the riding I am going to get in now that I am retired and have the time to ride. Rick F.
-
What I am finding in my research is there isnt a lot of choices available for the front tire. Less and less manufactures are making the 120/90-18s as a front tire. I plan on going to my local motorcycle shop and seeing what they can get me next week when I am have some time. Rick F.
-
1986 VR Fairing
cimmer replied to chrisraven4321's topic in Venture and Venture Royale Tech Talk ('83 - '93)
most of us just use a resistor to connect the sensor lead to a power source and that tricks the computer to not post an alarm and also lets you use a seal battery. I prefer an AGM battery myself as I had one that lasted 9 years.. Check out this link.. Hope this helps you.. Rick F. -
1986 VR Fairing
cimmer replied to chrisraven4321's topic in Venture and Venture Royale Tech Talk ('83 - '93)
There were footboards available for the Ventures but you will have to find them on the used market as they long sense been discontinued by Yamaha and the after market crowd. They occasionally show up on Ebay or some of the sights that sell used bike parts. The issued would be to make sure you have all the parts needed to install them properly on the bike. Your warning alarm could be that the battery is missing the cell sensor from the battery. The computer uses the small current the sensor detects to determine battery condition and if battery is lights up the battery indicator on the dash panel and lights the red alarm light. Getting a different wiring harness might be the better way to go about repairing the old harness as if it is so chopped up that the PO had a toggle switched to turn on the headlight that would worry be a lot about what else he chopped up. Good luck with this project. Rick F. -
Saw this on Facebook and thought I would share it here. Rick F.
-
1986 VR Fairing
cimmer replied to chrisraven4321's topic in Venture and Venture Royale Tech Talk ('83 - '93)
Hi Chris and welcome to the group. Go to Ebay and look there and see if you can find what you are looking for in the fairing as they show up there a lot and you might be able to find the same color as you have now. As for the wiring, that looks like a mess but I dont see the battery and wonder how much of that was connect to it. I for one would replace all the glass fuses by replacing the fuse block. SkyDoc_17 is a member here and sell a fuse block upgrade that uses the mini fuses. It is well worth the time and money to do as it gives you a more positive connection with the fuses. Above is a link to the forum where he talks about it and shows you the parts. Next if you havent yet, go and download the service manual for the bike. http://www.venturerider.org/manuals/1986-1993 Yamaha Venture Service Manual.pdf This will help you in all aspects of working on the Venture and includes wiring schematic and troubleshooting procedures also. And dont be afraid to ask questions here and look thru the Venture Tech Library 83-93 for more information as there is a lot of knowledge in there from the past. Good Luck... Rick F. -
HI all, I am in need of a new front tire as my current Avon Cobra tire is just too old to keep riding on. It has held up well but must be 10 years old or older and I was wondering what everyone is now using for front tires. I have notice the section is getting smaller and smaller it seem. I have replaced my rear Avon Cobra due to the tread splitting with a Dunlap Elite 4 I believe but that was a number of years ago also and no longer available it appears. I do keep the bike parked inside when not being road so I hope that helps a bit with keeping in usable shape but I do keep them filed with the proper amount of air pressure and that is checked before each ride. So let me know what you are running and how you like them. Thanks Rick F.
-
86 rear suspension
cimmer replied to racerguy36's topic in Venture and Venture Royale Tech Talk ('83 - '93)
I havent heard of anyone trying to do that in all the years I been here in the group. To be honest I am not even sure how the 2nd Gen rear suspension is set up. The mounts would be the big question and then if the shock has the right length to match the 1st Gen shock. What I did was to find a progressive replace rear spring already mounted on a shock and install that on my 89VR. I do add a little air pressure to it and it seems to work nicely for me. Progressive has long since discontinued the spring of course. All I can say is pick up a used shock and measure it against yours and see if it might work. Good luck Rick F. -
These engines always seem to sound good with open pipes.. Rick F.
-
Aftermarket TCI available!
cimmer replied to tvking63's topic in Venture and Venture Royale Tech Talk ('83 - '93)
Check out the website for the company that is making them. You will have to create a pigtail and add the map sensor yourself I believe. I have one on my 89VR and am very happy with it and I also did the COP upgrade for the coils. https://www.ignitech.cz/en/ceniky Rick F. -
Front caliper size
cimmer replied to Sajmon's topic in Venture and Venture Royale Tech Talk ('83 - '93)
Earl says.."Hej Sajmonie, Witamy na forum! Źle się czuję, bo nie umiem porozumiewać się w twoim języku! Ale tutaj jest odpowiedź na twoje pytanie. W motocyklach MKII VR (1986-1993) lewy przedni zacisk jest w rzeczywistości 32-milimetrowym zaciskiem tłokowym i jest „połączony” z tylnym zaciskiem hamulca (tylny zacisk ma również 34 mm), który jest aktywowany pedałem nożnym. Prawy przedni zacisk hamulca ma 34 mm i jest uruchamiany za pomocą dźwigni po prawej stronie kierownicy. Lewy przedni zacisk ma mniejsze tłoki, ponieważ działa w połączeniu z tylnym zaciskiem hamulca. Mam nadzieję, że to jest odpowiedź na Twoje pytanie. Przepraszam, że nie jestem w stanie wyrazić tego w zrozumiałym dla Ciebie języku. Hrabia. -
Front caliper size
cimmer replied to Sajmon's topic in Venture and Venture Royale Tech Talk ('83 - '93)
Hey Earl.. I used a translator to read and respond to his question. He is writing in Polish.. Rick F. -
Front caliper size
cimmer replied to Sajmon's topic in Venture and Venture Royale Tech Talk ('83 - '93)
-
Just want to mention that I see a number of Ventureline Chrome Brake Rotor Covers listed on ebay right now. Be aware that you also need the special wheel spacer, item #3 on the attached file, for this items to fit properly on your Venture. The new items came with this as part of the kits but a lot of times the used ones dont as all they remove is the covers and not the spacer. So if you plan on buying these, we sure to ask the seller if they include the proper wheel spacer that goes on the front axle. You can check out this file for information about installing the covers.. https://www.venturerider.org/forum/applications/core/interface/file/attachment.php?id=23976&key=935b195b892b11a362d0b39fb4e0f03e Hope this helps.. Rick F.
-
- 1
-

-
I am not sure who has the shim kit but I am sure someone will speak up soon about it. Rick F.