

dfitzbiz
-
Posts
339 -
Joined
-
Last visited
-
Days Won
1
Content Type
Profiles
Forums
Gallery
Events
Store
Posts posted by dfitzbiz
-
-
I'm here for you Brothers (and Sisters)!!Dang. You're a year late. Purchased a new OEM rear shock this time last year to replace my old bouncy one once it was getting dangerous to ride. Held onto the old shock for a few months and finally tossed it this spring. Nice to know that this is possible for future reference. Those rear shocks aren't cheap. -
Thanks to WIZ and K9kottage for the accolades. Glad the repairs are working out for you. I have a repaired unit to exchange for any paid member that would like to trade out a leaker. Just pay the round trip freight. Looking forward to helping out our members.
Ride smooth,
Fitz
-
Your right about the age thing, and there are a lot of products on the market to keep the prostrate under control. Super Beta is one that been around for quite a while and it's an over the counter Herbal concoction. I used to hear about it a lot on those Sunday morning health infomercials before giving up on AM radio. You know the ones where they give away free bottles of whatever they're pedaling just for shipping charges... And everyone touts their's as being the answer to what ails you. If I took them all I'd live forever... Then they get you hooked and prices start rising. I've been taking Tamsulosin, which is a prescription drug made to reduce the size of the prostate. I have no idea what's in it, but it seems to work. Miss a day and things start slowing down. Take it and it's like a cow pissin' on a flat rock... :-) The cost isn't that bad either. The one thing all of us O.F.'s need to do is get checked out by a Doc to make sure the enlargement isn't caused by Cancer. A simple PSA blood test will let you know if things are getting out of control. This is the bullet that super beta dodges. Guys don't know if the reason is caused by old age...or something else... My 2¢ IMHO
 I'm with you on that Condor, Tamsulosin has been a life changer, No more wet shoes:dancefool:I've taken it for about a month and I will monitor the side effects. Thanks to all who mentioned them. Be sure to see your urologist if you are having any problems and don't fear the finger!! Pee well my friends!!
 -
Be careful Puc, those cinders are hard on the teeth!
-
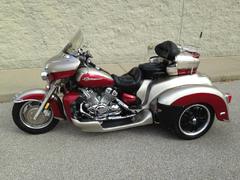
I ride a Yamaha Royal Star Venture, I don't need a pickup truck to haul MY motorcycle
-
Thanks for the reply. I think I may be shifting to soon. But that doesn’t explain the temp difference between the front and back banks. If I can ask where are you located? The site will not let me access your profile
I'm in Chambersburg, go ahead and sign up as a member of this great group. Best 12 bucks you'll ever spend. My contact info is in my profile. Ride safe!
-
I'm sure a carb sync will help but keep in mind these bikes LOVE RPM's. Don't let them lug, down shift and crank the throttle for the best performance. There is a built in rev. limiter, you won't hurt the engine. Some would say "Drive it like you stole it!" Not me, just be a little more aggressive with the throttle. I'm a couple of hours away but willing to help with a carb sync if you wish. Keep it cranked up!!!
-
That's a twin sister to my Princess. What a great machine. We made a lot of great memories together. She shows her love to WIZ now. I get to visit with her once in a while. CTFW on my '03 now. Thanks for sharing.
-
I went Hagon and it's sitting in the "spare parts" bucket, so it was really just and FYI question.
Was not leaking when I purchased the bike but definitely worn out and pogo-stick ride. Bike is a '99 and I purchases with 40k+miles, otherwise very well maintained bike. I had 20w on hand from my previous Harley shock rebuilds and only had the bike for 2 mo. with the "repaired" shock before I went to the Hagon. It was still loose and pogo'd even with 20w.
Sounds like that one is to far gone. Enjoy your Venture.
-
I'd assume once the Pogo has begun the internals have been damaged beyond "external" repair?
I purchased my bike with a damaged rear shock and did a 20w recharge to finish out the riding season. While it helped the bike was still a bit tail-happy until I put her up for winter repairs with a Haggon shock.
It may have damaged the oil friction shock inside but we could give it a try. 20w seems a little heavy to me. Might be slowing the rebound and making things to stiff causing tail-happiness. I don't know, just a guess. Was the shock leaking when you received the bike? How much 20w did you put in? Did it stay in or did it continue to leak? If you want to take a shot at a repair send me a PM. It will cost you a little freight, a bottle of oil and an o ring. This will be another learning experience if nothing else.
-
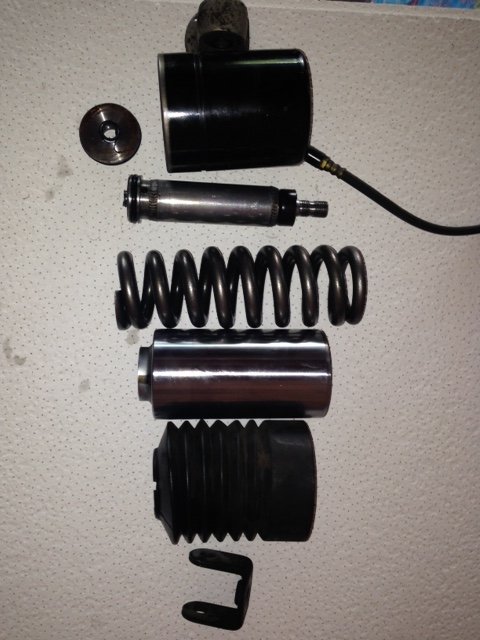
I would like to thank DaNetFlunky, thanks Mark, and Rbig1, thanks Rodney, for sending me their leaking shocks to work with. I disassembled both units, visually inspected them for damage, cleaned the internal surfaces, replaced the leaking o ring and recharged them with fresh shock oil. I tested each unit with 40lb. of air pressure for a couple to day to insure there was no oil or air leaks. I did notice some variation in air pressure, both up and down, and discovered it was from changing temperatures in my garage.
I experimented with a few types of oil looking for the best results. I used 5w Honda Shock Oil, 10w Honda Shock Oil and 15w Spectro Fork Oil. I found the best results using the 10w Honda Shock Oil. The response/rebound from the 5w seemed to fast and from the 15w to slow. A special note here: Not all of the original oil us removed from the unit during the repair process. Some oil is retained in the oil friction shock itself. Only the oil in the reservoir can be removed and replaced. I cycled the shock through several strokes and replaced the oil again to dilute the old oil as much as possible.
The oil that I removed from each unit was thin, appeared dirty and was black in color. I don’t believe that it was installed in the shock in this condition. I can only guess that it was effected by wear, being forced through the shock and from heat. It could be possible that the deteriorated oil causes the o ring to break down and leak. I’m thinking about changing the oil in my shock, at 20K miles, that has not begun to leak as preventive maintenance. More about this later.
After repair of the first unit I mounted it on my ’03 RSV and put on just over 1000 miles riding one up on a mixture of highway and secondary roads. Performance was similar to the stock shock. My wife and I attended the WNY Rally riding 2 up with a full load of gear. The performance was good and it survived 500 miles of mountain 2 lane, main roads and super highways at max load plus some. Added another 200 miles that weekend of 2 up and another 300 miles of one up since returning. A total of 2000 miles with no issues. I mounted unit number 2 on my RSV last week and with 250 miles the results are the same.
Now, back to changing the oil in your shock. This is easier that you might think. You may want to do this a couple of time to get as much old oil out of the system as possible. Once you are set up it’s pretty easy.
The tools required are:
- A valve stem tool to remove the air valve stem.
- An open end wrench to remove the air hose at the shock body. (10mm I think.)
- A measuring cup to catch the oil.
- A shop press or some way to compress the shock.
Here is how to remove the old oil:
- Remove the valve stem to relieve the air pressure in the unit.
- Remove the air hose at the shock body.
- Drain the old oil from the unit via the air inlet
- Catch and measure the oil so you know how much to replace.
- Use as narrow of a measuring cup as possible (more on this below).
To replace the oil:
- Remove the rubber accordion boot from the bottom of the unit (so it won’t be damaged in the press---don’t ask how I know this.)
- Reinstall the air hose with the valve stem removed.
- Discard the old oil noting how much was removed.
- Fill the measuring cup, the narrower the better, with fresh oil (as much as was removed)
- Compress the unit in the shop press, top end up. (edit) Support the shock by the clevis not the shock body to avoid pressing the shaft out of the bottom.
- Caution: Allow at least 1.5” of the bottom canister exposed. Compressing beyond that point may cause the internal shock to push the o ring beyond the housing (once again, don’t ask how I know this.)
- Place the end of the air hose in the oil and slowly release the shop press. The suction will pull the oil into the unit. Be patient, this may take a couple of minutes.
- Replace the valve stem.
- Cycle the unit a couple of times.
- Caution: Allow at least 1.5” of the bottom canister exposed. Compressing beyond that point may cause the internal shock to push the o ring beyond the housing.
- Replace the rubber boot, mount the shock and ride.
Thanks to the generosity of Mark and Rodney we now have a unit that I can exchange with any paid forum member. I’m not looking to make any money on this project but I will have some expenses such as parts, supplies, shipping and handling. This repair will work best with a shock that is leaking and has not yet begun to “pogo stick”. Keep an eye out for the tell-tale drops of oil under your RSV and I can get a unit on the way to you so we can limit your down time. PM me for details.
RIDE SAFE,
Fitz
- A valve stem tool to remove the air valve stem.
-
Just arrived a few minutes ago. Thanks. I'll keep you posted.should be about to you now shipped out Thursday. have fun with it. I don't want it back. -
well changed mine out today. Took longer to get jack setup under bike than replacing. The lower bushing sure needed lubed. dfitzbiz send me your info will donate shock so you will be able to have a exchange unit.
Thanks Rodney, PM sent!!
I've put 1500 mile on the first repaired shock with no leaks. 500 miles (to WNY and back) was fully loaded plus and with 2 up. Performed well. Looking forward to perfecting the process and documenting it for the forum. It will be great to have an exchange unit to send to folks with a leaker. -
Rose Mary and I made it home safely. What a great time. If you missed it you missed a great rally. Many thanks to the WNY Crew for all of their planning and hard work. [emoji106]to Pioneer for being wonderful hosts. And a special thanks to Craig (cecdoo) for guiding us efficiently to the venue.
If you didn't/couldn't make it this year please start planning for next year. It's the most fun you can legally have with your clothes on[emoji14]!! Hope to see you there.
Sent from my iPhone using Tapatalk
-
I've developed a process to repair a leaking Second Gen Shock. I completed the process last evening, recharged with shock oil and did an air test at 40psi overnight with no leakage. Put on 125 miles today with no leaks. Seems to ride pretty well. Used 5w shock oil. May experiment with 10w and 15w oil to slow the rebound. Total cost of repair---oring $1.64 + shock oil $2.00= $3.64 plus my time (about an hour). If anyone would like to me to take a shot at repairing their leaker send me a PM.
-
 1
1
-
-
I'm sure that you guys know this but for anybody who doesn't. There is a big difference between decorative chrome that you see on bumpers, handlebars, etc. and hard chrome that is used on machine and industrial parts. I'm sure that the chrome on the shock is hard chrome. Not just any chrome plating shop can do that.
You hit that one right on the head Freebird. I managed a hydraulic repair facility early in my career and in my position as a business advisor I've built relationships with several hydraulic cylinder manufacturers and repair facilities. I understand the show chrome/hard chrome difference. The repair process I'm developing won't require any re-chroming, just a simple "O" ring replacement as I mentioned above. I've only had an opportunity to dismantle one shock personally and I have only seen the cut away view of the inside of a shock posted by Rick Butler. I'm pretty sure the fix will work in the defects I saw in both cases. If a shaft is worn and pitted it won't work and I wouldn't even attempt it. Thanks for the input, keep it coming. The more info the better!
-
well i will be the first guy in line to buy your fix if you figure out a cost effective way to fix a factory shock.
i have had 5 fail over the last 230,000 miles and upon inspection of every one of them i found the poorly chromed shaft had worn through the chrome to bare steel and the bare steel rusted and the rust tore out the shaft seal.
but i would be happy to see your new found information after you dicect a 2nd gen shock or two. Let me know if you need another failed shock, i have a few.
EUSA1, Please take a look at the attached pic and let me know which part had the failed seal. I'm thinking it may have been number 4. In my case the shaft was perfect (until I put the vice grips on it to disassemble it, a step I didn't need to do to make the repair.). The opposite end is threaded and spun to keep the bottom clevis from being removed (only a temporary inconvenience to a talented fool). Thanks again for your input and keep it coming, the more info we can gather the more successful we can be. I will pm you with my contact info.
-
EUSA, thanks for asking. Yes, I do have a chrome plating shop that I work with on an occasional basis but the issue with a leaking shock isn't a leaking shaft seal. The canister of the shock assembly is simply an air adjustable cylinder and a reservoir that holds oil for the fluid friction shock absorber mounted inside the heavy coil spring. The shock absorber itself has 2 ports located near the bottom. These ports are for the intake and outlet of oil. When to much oil leaks from the assembly the shock sucks air and your Venture rides like a pogo stick. When the assembly leaks on your floor it's oil leaking from an "O" ring, not a seal on a chrome shaft. That's why I want to attempt to replace the "O" ring, seal the assembly, recharge with shock oil, cycle the assembly to recharge the shock and test for results. There is no guarantee that this will work but from what I found during the disassembly process I believe we will have a better than 50% chance of extending the life of most of our shocks. Only time will tell and I will keep all advised of my progress.so you have a way to put new chrome on the shaft that wears thin and takes out the oil seal??? -
Thanks to all who responded to my post. I'll be in contact with with those who have a shock to offer. I'll report my progress to the forum as we move forward. Looking forward to the challenge.
-
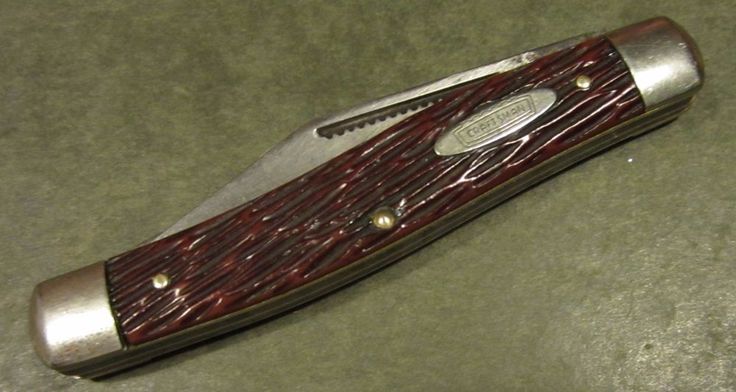
Freebird, I understand your attachment to your old friend the Fighting Rooster. I carried an old Craftsman like the one pictured below for more than 30 years. That old knife field dressed more than a hundred deer and never failed at a task I asked it to do. It had been sharpened so often that the blades were worn to about half the width they were when new. It was worn and beat up, just like your Rooster, but it was my constant companion. I lost my old friend last deer season between a kill site and the barn. I spent 3 days looking for it with no luck. It still brings a tear to my eyes thinking about. Now the good news---my daughter and favorite hunting companion presented me with a new Buck similar to the old Craftsman for Christmas. I guess when an old relationship ends a new one begins.
-
Being semi-retired has given me the time to work on some of the projects I’ve been thinking about for a few years. One of these projects is the RSV Shock Absorber Assembly. I have developed a procedure to disassemble the unit without damaging the external or internal parts. Upon examination of the internals I believe we can disassemble a leaking unit, repair the leak and successfully recharge the system with shock oil. I’m requesting the assistance of one (or more) of our members that may have a recently failed shock. If a member could provide me with a unit I would like to attempt to repair and recharge it for them. After my attempted repair I would like to test the unit on my RSV for a couple of weeks. If the failed shock wasn’t abused after it began to fail I’m pretty sure this repair will work. PM me for shipping information and any questions you may have. If you would like to donate a shock I would be happy to pay the freight. Thanks, Fitz
-
Print out the member list for the states you will be traveling through. If you have any issues help may be right around the corner, you know that we look out for each other.
-
I think I'm with you Bongobob, if what I have will last 25 more years I'll be happy. I told my Yamy dealer that if the new Venture was 4 cyl, water cooled and efi I would be in to put my money down, didn't happen. But then again if I found my old '74 RD400 I might have to re-think my position!!
-
dfitzbiz
I resemble your signature...............
Flyinfool, I had a meeting one day with a client and a representative of a software company. The software rep explained the system and the safeguards in place. The client said that makes it pretty much "Fool Proof!". In response the rep says "Nothing is fool proof to a talented fool!". I wish I had been the original author but I can't take credit but it sure does make sense! I'm happy to share it with you.
 I'm with you on that Condor, Tamsulosin has been a life changer,


 I've put 1500 mile on the first repaired shock with no leaks. 500 miles (to WNY and back) was fully loaded plus and with 2 up. Performed well. Looking forward to perfecting the process and documenting it for the forum. It will be great to have an exchange unit to send to folks with a leaker.
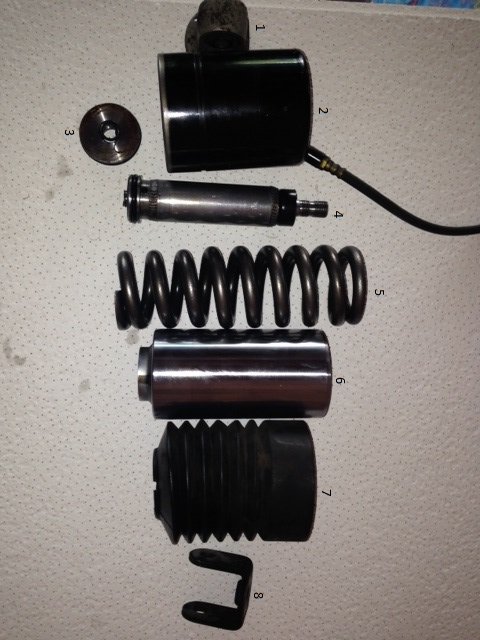


F 11 Top Coat
in Watering Hole
Posted
Found this on YouTube. Looks like a good comparison. Go to "Before you buy F11": https://video.search.yahoo.com/search/video?fr=yfp-t-s&p=f11+top+coat+reviews#id=4&vid=48923846126ccbc586f8b89b003592bc&action=click