zagger
-
Posts
558 -
Joined
-
Last visited
Content Type
Profiles
Forums
Gallery
Events
Store
Everything posted by zagger
-
Yup, tenting would be my plan. My Honda Sabre is set up pretty good for long trips - waterproof hard cases and extra gas tanks with a fuel pump. My venture is really just for local cruising although it is really comfortable - just too much cop-bait. Still haven't gotten a ticket for not having a horn, but maybe some sharp trooper will check it out. F'em. zag
-
I'll go. Probably take my touring bike instead of my venture chopper - the beast just attracts too much cop attention. About 850 miles from Madison, WI. zag
-
Well, that doesn't sound good. I've been planning to go to the Chicago show this weekend (just to scratch the mid-winter itch) but I guess I rather not drive all of the way there, pay stupid $ to park and stupid $ to get into the show, if there isn't anything interesting to look at. I've got enough leathers and wouldn't talk to a lawyer no matter what. I was kinda hoping to convince my riding friend to get a bike with a lower seat height and maybe seeing the choices would help him make the leap. He had a knee operation last fall and so I had to ride his bike to its winter storage spot - a very tall bike where it was hard to touch the ground. The winter blizzard conditions in Wisconsin seem to be dissipating, but the snow coming to Chicago is still in the forecast. I won't purposely drive into Chicago in a winter snowstorm! zag
-

Custom Gen 1 Build
zagger replied to coreyhill's topic in Venture and Venture Royale Tech Talk ('83 - '93)
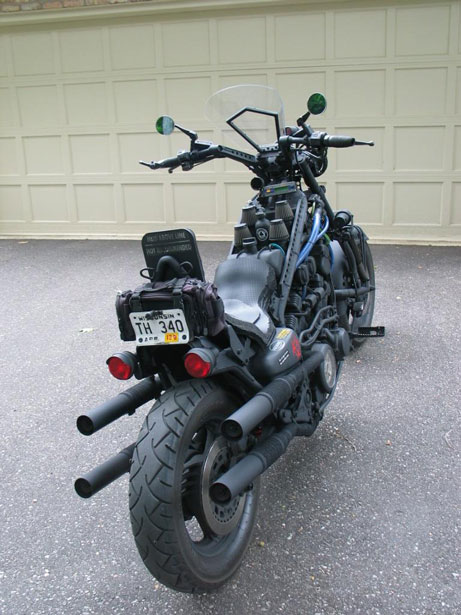
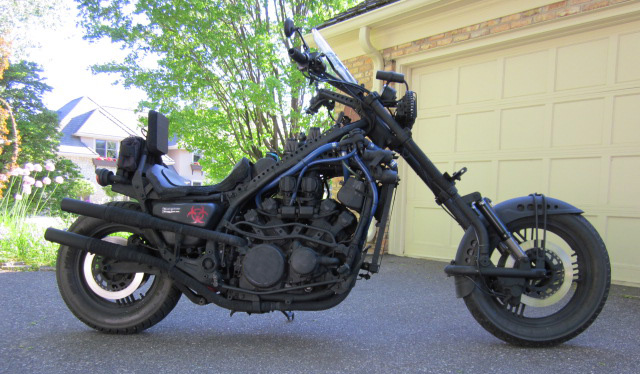
My Venture has 4 pipes, one for each cylinder. Each pipe has a muffler with baffles and a steel washer mounted on a shaft near the outlet so that the back pressure can be adjusted. Once you find a setting that seems to work well, the washer can just be left in position. I thought that it was interesting to have 4 exhaust pipes mostly because most people assume that the bike is a V-twin. When they see 4 exhaust pipes, they know for sure that it isn't a V-twin! So, I guess, I built the pipes mostly for the amusement factor! But they do sound good and the engine runs great. I also like not having a conventional gas tank. Most people cannot figure out where the heck the gas tank is since a tank under the seat is pretty unusual. I like the low position since it helps keep the center of gravity low on the bike and makes it feel much lighter than it really is. zag
-
Quetion For the Techs
zagger replied to coreyhill's topic in Venture and Venture Royale Tech Talk ('83 - '93)
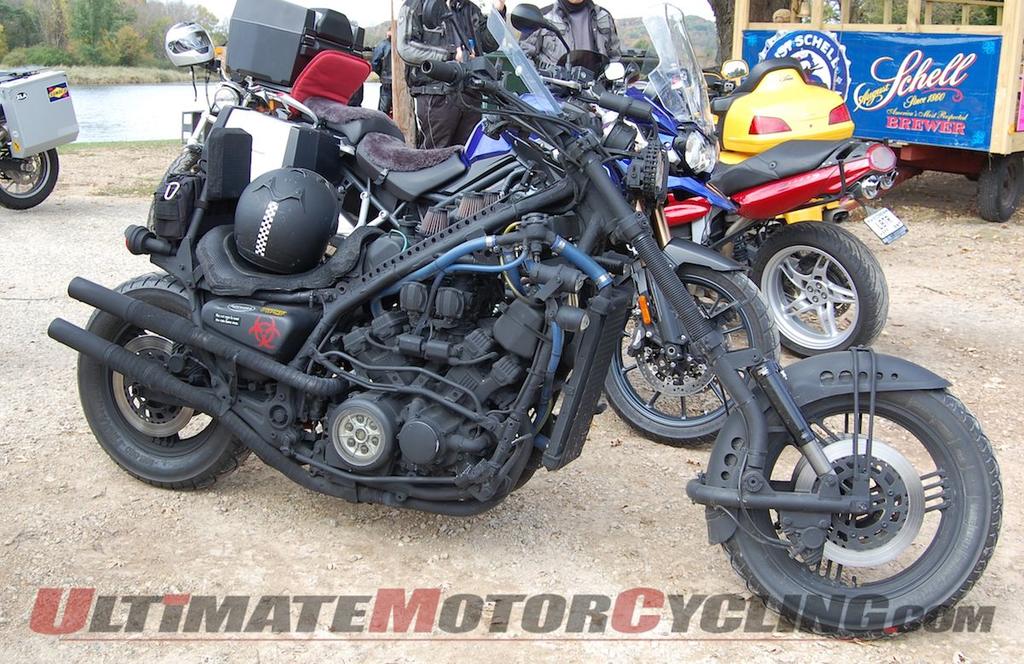
I used stock 1200 venture carbs with the Vmax boost valves (fully open, they allow each cylinder to pull from 2 carbs). Rather than trying to install some automatic operation of the valves, I simply operate the boost valves with a bicycle shift lever mounted on the end of the left handlebar grip. Since the shift lever has 5 positions between fully closed and fully open, it is possible to just leave it partially open if that seems to help the engine. My venture runs best when the boost valves are left open just one "click". Unless the engine rpm's are quite high, the venture motor cannot use all of the extra air and gas provided by the boost valving in the fully open position. Fully open all the time doesn't seem to produce any obvious negative effects, it just doesn't help performance. I'm really not sure if the engine could ever use the total output of the boost valving since I really don't spend much time with the engine at max rpm's. It is kinda fun to mess around with, however. For my venture, I installed three different things to tune the air/fuel performance of the engine: flow restrictors inside each pod filter (just a washer with a machined ID), variable restrictors on the exhaust outlets (just a disk which can be tipped inside each muffler), and the Vmax boost valves between the carbs and the engine. Overall, it runs great with excellent acceleration and gas mileage in the mid-forties. zag
-
Got my venture from a website: https://www.crashedtoys.com/ It had been rolled and a lot of the plastic was smashed. But since I planned to strip it down, I really didn't care much about the plastic bits. In the end, quite a few of them were ok and I sold them online. My venture proved to be a very fast bike which I've been riding for quite a few years. Some of the guys in the Slimey Cruds motorcycle gang liked it so much they asked me to join their bunch. Gonna head out to drink beer with them tonight. zag
-
Custom Gen 1 Build
zagger replied to coreyhill's topic in Venture and Venture Royale Tech Talk ('83 - '93)
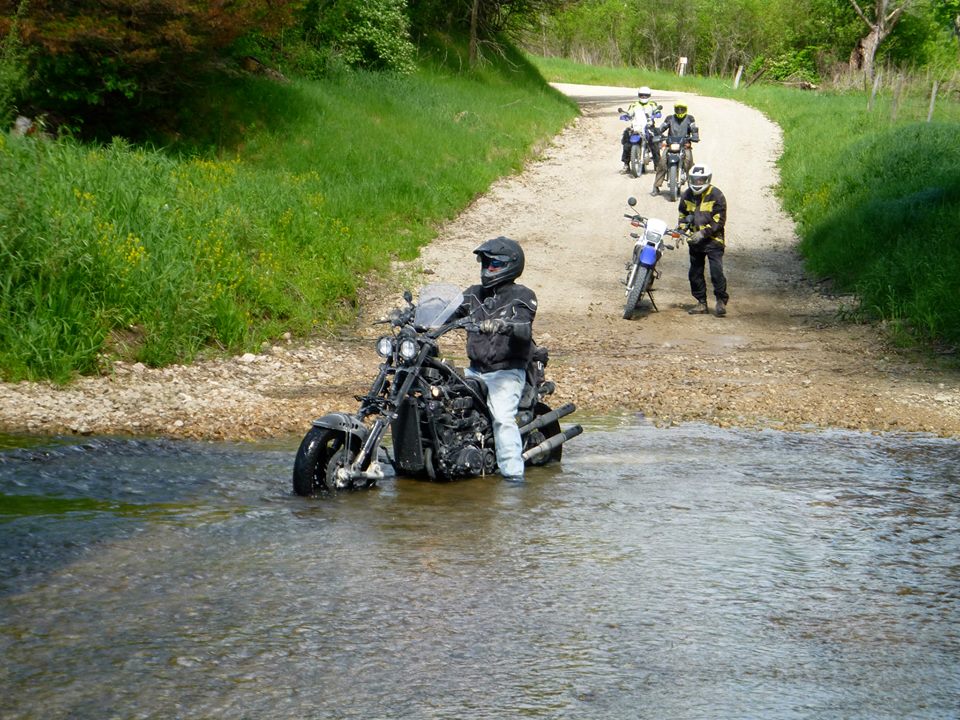
Hey Cowpuc, Not sure about "Franky". All of my biking friends started calling it the "Beast" and so I guess that is its name. zag Stuck on a rock in a river. At a local bike meetup.
-
Custom Gen 1 Build
zagger replied to coreyhill's topic in Venture and Venture Royale Tech Talk ('83 - '93)
Each cylinder has its own exhaust. I put baffles into each muffler section so the overall sound isn't overly loud. I don't remember where I got the baffles, but I made the final section of exhaust pipe so the baffles (roughly 18" long) would slide in. I put an air/fuel sensor into one of the exhaust lines so that I could actually see whether the engine was lean or rich under different power demands. It was running overly lean so I put an air restrictor into each of the air intakes (each carb has its own filter and inlet tubing). The restrictor was simply a large steel washer with a machined ID designed to produce a little flow resistance and keep the carbs happy. Looking at the air/fuel gauge, it was easy to see if the engine was operating in the proper zone. Without the gauge, I'm not sure how anyone could figure out what was going on. It is made by Innovate Motorsports. It does require a threaded port into the exhaust system, but once the tuning is done you can take out the sensor and cap off the threaded port. Each of the exhaust mufflers also has a disk clamped onto a steel shaft which goes across the exhaust outlet. The exhaust backpressure can be changed by tipping the disk a little bit. When everything is happy, the disks can just be left in place. zag -
Custom Gen 1 Build
zagger replied to coreyhill's topic in Venture and Venture Royale Tech Talk ('83 - '93)
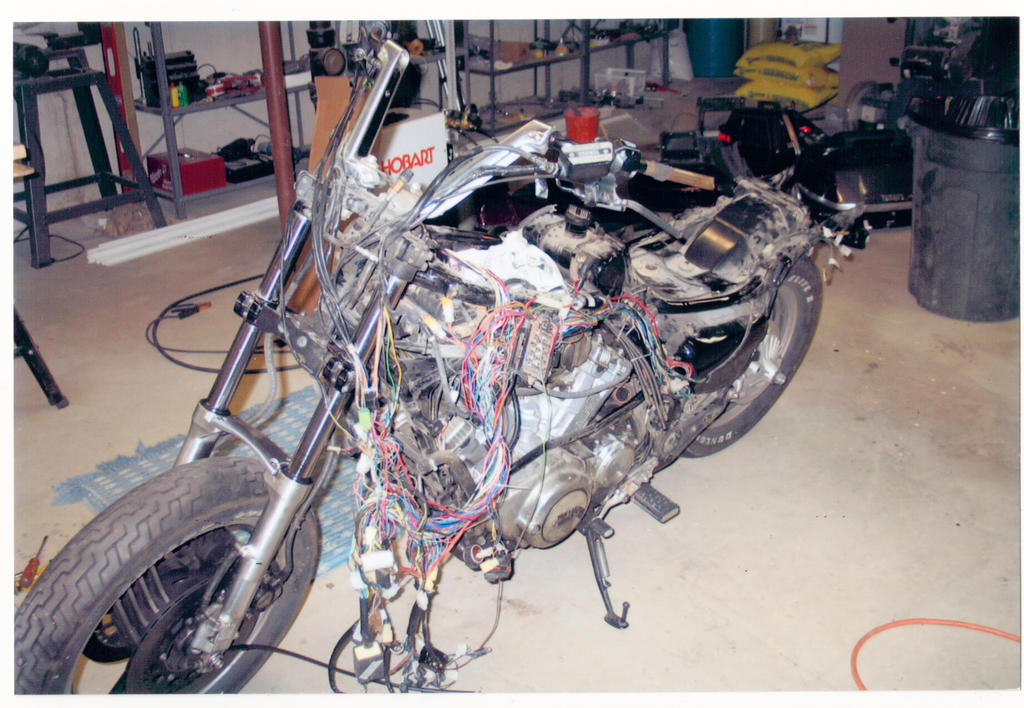
Geesh, pitch whatever safety things you find. I cannot even think what the heck they were, but I sure don't miss them. I eliminated all of the stock wiring and just put back what was needed. If you ditch the plastic fairings, then the stock wiring becomes exposed and needs a new home. My venture is very fast and feels quite light since all of the engine weight sits low. I'm sure that you will enjoy your bike after "remodeling". zag First winter's work - exposed stock wiring:
-
Thanks for the vid! I grew up in the UP very close to the lift bridge in your video. In fact, it looks like you were headed out into the woods where my mother still lives. Did you get a chance to ride up to the tip of the Keweenaw Peninsula? Although most of the UP has straight boring roads, Hwy 41 up to Copper Harbor is quite good on the last 20 miles or so. Lots of interesting scenery. zag
-
When the rage subsides...
zagger replied to s.tyler58's topic in Venture and Venture Royale Tech Talk ('83 - '93)
Good to talk with you on the phone. If I can ever help with anything, feel free to call me. Of course, posting your question gives me (and others) a chance to think about the answer before responding! It sure looks to me that you are on the final victory lap! I really think that you will be pleased with the final result. zag -
When the rage subsides...
zagger replied to s.tyler58's topic in Venture and Venture Royale Tech Talk ('83 - '93)
Nice! I saved the link in case I need to do wiring in the future. zag -
When the rage subsides...
zagger replied to s.tyler58's topic in Venture and Venture Royale Tech Talk ('83 - '93)
Just another thought: If you find yourself needing to crimp on wiring connectors, I would strongly suggest that every connector should be soldered after it is crimped to the wire. It does take a little more time, but the final connection is not going to be damaged by water. If you don't already own a decent soldering station, then this would be a good time to get one. A cheapo soldering iron that plugs into 110VAC power is not very easy to work with and produce good solder joints - usually they have a single tip which cannot be changed. A professional grade soldering iron has a small soldering iron with a selection of tips and a detached power supply that is the part that plugs into 110VAC power. This might be a good place to start: https://www.amazon.com/s/ref=nb_sb_noss_1?url=search-alias%3Delectronics&field-keywords=weller Weller is an excellent brand which has been around a long time, but I'm sure there are others that are also good. zag PS Just another thought about soldering. Bike wiring is usually VERY oxidized which means that solder won't "wet" the copper and create a good electrical connection. On my other bike, I recently had to solder 3 wires to replace a bad connector from the alternator. In order to get a decent solder joint, it is necessary to fan out the little individual wires inside the larger wire and scraped them with something (I use a knife blade) until it is obvious that the copper is exposed. Then use solder which has flux in it - or even use a bit plumbing flux to help create a good solder joint. Most solder is designed by folks who assume that the thing to be soldered is relatively clean. Copper wires that have been exposed to the elements for 30 years are not what they considered. However, it only takes a minute to scrape a copper wire clean enough to make a good solder connection. And a small tin of plumbing flux has enough extra mojo to help the situation. Just wipe off the excess melted flux after making a good solder joint and seal it up with heat shrink tubing. Hope this helps. -
When the rage subsides...
zagger replied to s.tyler58's topic in Venture and Venture Royale Tech Talk ('83 - '93)
It might be possible to buy new rubber boots to protect those connectors - but I wouldn't bet on it. Another type of protection is "fusion tape" which is a kind of stretchy rubber tape which only adheres to itself. https://www.mcmaster.com/#fusion-tape/=1b88gtu Pretty weird, I guess, but each surface of the tape is coated with some chemical which creates the bond. The only way to remove the tape is by tearing it or cutting it. It works well in a protected area where it doesn't get sunlight exposure. On the tapes that I have used, it seems that sunlight causes it to break down. Of course, take a minute to verify that the connector terminals look good before sealing them up! zag -
When the rage subsides...
zagger replied to s.tyler58's topic in Venture and Venture Royale Tech Talk ('83 - '93)
Since you are really digging into things on your bike, I'd suggest that an original yamaha service manual (not owners manual) would be a good investment. No point in getting an after market manual put together by some publisher when you can get the real thing. The one on ebay for $55 might be a good choice unless you can find the same thing someplace else for less cost. I do have the service manual as a pdf which I could email to you (would need your address) but, frankly, having a paper copy is much nicer when you are out in the garage working on something. zag -
When the rage subsides...
zagger replied to s.tyler58's topic in Venture and Venture Royale Tech Talk ('83 - '93)
If you cannot find an original connector, I would imagine that standard female spade connectors could be found at a hardware store which would work. Usually they are specified simply by the connector width (like 1/4") but recently I've found weird male spade connectors which are super thin metal and require some crunching down on the female spade to make a reliable connection. Of course, if you get to that point, saving the two connectors which look OK would be possible if you break apart the black connector housing and pull out the good ones. The stock plastic housing on the three connectors doesn't really do anything other than allow all three connectors to be attached as one. zag -
When the rage subsides...
zagger replied to s.tyler58's topic in Venture and Venture Royale Tech Talk ('83 - '93)
The widow looks like it was never connected to anything (very corroded terminals). Looking on the wiring schematic, I see a red/black wire labeled "Acc Terminal" (I'm assuming accessory terminal). I'd guess that red is +12V and black is ground (just a guess). By the way, do you have a complete yamaha service manual? If you don't, you should get one. Like this: https://www.ebay.com/itm/Yamaha-Original-1983-84-XVZ1200-Models-Factory-Service-Manual-Motorcycle-Repair/302603126205?hash=item46748d45bd:g:vsMAAOSw4GVYHrsY&vxp=mtr zag -
When the rage subsides...
zagger replied to s.tyler58's topic in Venture and Venture Royale Tech Talk ('83 - '93)
Well, that connector is junk. Time to solder in a new one. I wonder if a dealer would have that connector? I just looked on ebay and didn't find one. zag -
When the rage subsides...
zagger replied to s.tyler58's topic in Venture and Venture Royale Tech Talk ('83 - '93)
Looks to me that you have already taken care of most things that might give trouble. Not sure I'd worry much about the fuel gauge since the other fuel gauge, the odometer, works ok. I've never had a bike with an actual fuel gauge over the past 50 years of riding, and I haven't yet been stuck someplace after running out of fuel. I hope that you enjoy your 83 venture. My 83 is a great bike to ride and is very fast. Last summer on a back road, I came up on the tail end of a long line of harleys cruising along at the speed limit. After following them for awhile, I decided that I was tired of the pace and started passing. By the time I got to the front of the line I was going 120mph and left the nose to tail riders quickly. No idea what they thought when an old chopped venture passed them at more than twice their speed. zag -
Gasket question
zagger replied to s.tyler58's topic in Venture and Venture Royale Tech Talk ('83 - '93)
If you look at a normal gasket, it will completely circle every bolt hole. So - I would imagine that a crack in the outer edge of the aluminum surrounding a bolt should not have any effect. zag -
LETS SHARE '17 RIDE HIGHLITES!! Post em if ya got em!!
zagger replied to cowpuc's topic in Watering Hole
Riding in the mountains of N. Carolina with my friend. zag
-
Well, there are certainly a lot of wires. Here is a picture of my 83 with the wiring exposed. I removed all the stock wiring and put in new wires which fit my modified bike better. I would try to carefully inspect the routing of every wire in the areas where they worked on the bike. Of course, if you can figure out which wires connect to the fuse which is blowing, that would be the place to begin. Since you may have difficulty spotting the partial short without knowing which wires to look at, you might want to try identifying the wires which go to the fuse by connecting one lead of your ohmmeter to the fuse in question and touch the other ohmmeter lead to a standard pin (like for sewing) which you poke through each wire's insulation (to contact the copper conductor inside). Ain't gonna be easy, but eventually you should figure it out. I really doubt that any mechanic would take the time to do this. If you don't own an electrical meter that can measure ohms, this would be a good time to get one! Might want to see if you can get a meter that will beep when it makes electrical contact with the probe wires so you can keep your eyes on the wires that you are probing. This meter appears to have an audible beeper for locating electrical continuity: https://www.amazon.com/Etekcity-MSR-R500-Multimeters-Electronic-Multimeter/dp/B01N9QW620/ref=sr_1_6?ie=UTF8&qid=1516463438&sr=8-6&keywords=vom zag
-
Sounds like you need different mechanics - or dig into it yourself. Or maybe they assigned the new guy to work on your bike and you really need the experienced guy to fix your problems. A stock venture has lots of wires and it won't be easy to find the short that is blowing fuses. Disassembly while very carefully observing the wire routing is probably the only way to find the partial short. Not nice - and very easy to wiggle some wires and make the short disappear for awhile. Of course, having it reappear when you are riding on some remote road would be a real pain. If the shop actually has an experienced guy, then talking nice to the shop owner might be the best approach to get the experienced guy to dig into it. zag
-
New Tire Thread
zagger replied to SpencerPJ's topic in Venture and Venture Royale Tech Talk ('83 - '93)
I've been using Metzeler ME880 tires for a long time and they are still available. Years ago I tried using a variety of tire brands just to see if the cheaper ones worked ok. At the time, I found that tire life was significantly different between brands. Basically cheap tires didn't last as long and the cost of shipping and installation, never mind the hassle, of changing tires pretty much consumed the difference in initial cost. Have things changed recently? No idea, but I'm still using the Metzelers. zag -
Minus 10 this morning with a high temperature today predicted to be +4F (it is still -4F at noon). Our dogs head out the door with enthusiasm but within 2 minutes they were stuck out in the yard holding their paws up in the air. It takes lots of calling to get them to limp back to the house on three feet. Too freak'n cold to do anything outside or in the garage. It might only be Jan. 1, but I'm ready for spring! zag