Johnnycyclone
-
Posts
137 -
Joined
-
Last visited
-
Days Won
12
Content Type
Profiles
Forums
Gallery
Events
Store
Everything posted by Johnnycyclone
-
Dowel Pin(s)?
Johnnycyclone replied to Johnnycyclone's topic in Venture and Venture Royale Tech Talk ('83 - '93)
If I was to guess I would say it would be one. It looks like the bolts that go nearest to the crankshaft fit snug enough to alight the front. If that make any sense to anyone. -
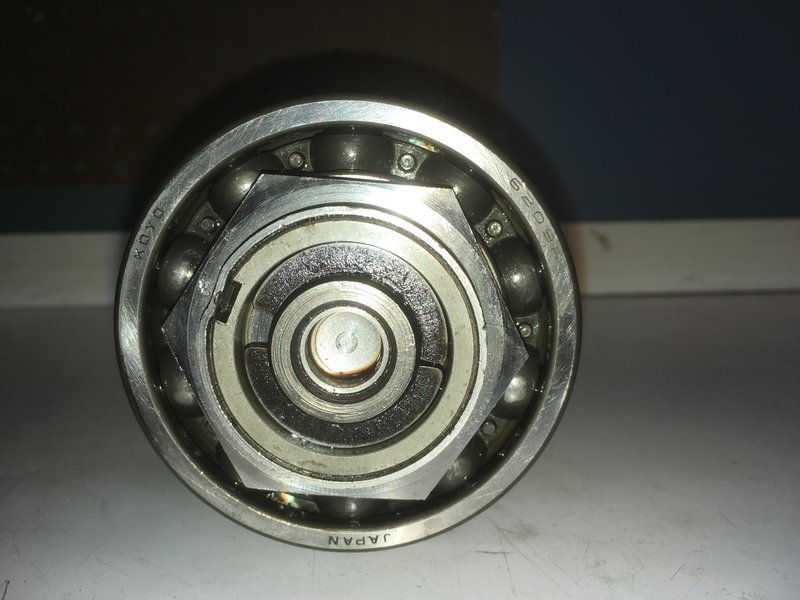
Getting ready to put the cases back together after the 2nd gear repair. I am a little confused on the number of dowel pins to align the two cases. I wasn't very careful during the tear down to make a note of how many there are. The service manual says "dowel pins" with an S indicating more than one. The parts book only shows the one located near the driveshaft, see pic. Can anyone confirm whether there is just the one, or are there more than one?

-
So it's not as easy as swapping out a complete transmission, including the drive and driven assemblies from the 87? I was hoping to drop in both assemblies from the 87 and sell the one's from the 83. I should have known it wouldn't be quite that easy. haha!
-
Found a used transmission out of an 87 model with just over 14,000 miles on it. Got a deal at $75 plus $20 to ship. Cheaper than fixing the one I have as long as there are no issues. Now I can sell mine, probably not for much, but any little bit helps with the budget.
-
That's the info I was looking for. I wasn't sure if the later models had the wider gear. Thanks for the suggestion and info!
-
I'm assuming that would need to be done by a machine shop? Would this just be for second gear, and would both the gear with the dogs and the gear it engages need to be cut? It would make sense that both gears would need to be cut so they match. Would it be cheaper and, or maybe better to purchase a set of gears from a newer model 86-93? I don't necessarily want to cut any corners, but looking at the overall project I need to save where I can and make smart choices. Thanks!
-
I wanted to thank everyone for their input, I appreciate any help I can get on the project. After thinking about this for the day and doing some research I decided to let the bank account make the decision. Yes it would be great to go all out and do a trans swap with the gen2 and the vmax rear hub upgrade. That is probably the best way to go if the funds are there, but realistically they aren't there. I don't want to have a half assembled bike waiting on the funds to finish it. So the smart choice although maybe not the best is to stick with the repair as Yamaha had specified in their bulletin and just go with the washer replacement. I'm a little let down, but the bike is low miles and I don't see any wear other than the thrust washer so I don't see why this will not meet my needs. I ride pretty easy and won't be abusing the trans so this repair should last for a long time. Thank again for the help.
-
Makes sense, thanks for the input, I appreciate it.
-
Makes perfect sense cowpuc, thanks for the clarification on the terms. I just wanted to make sure I am on the same page with everyone else.
-
Also just to be clear 1st gen is 83-93 and 2nd gen is 99-13? So when looking for a newer transmission I am still looking for a 1st gen bike but the later years 86-93 after this issue was fixed at the factory. Is this correct?
-
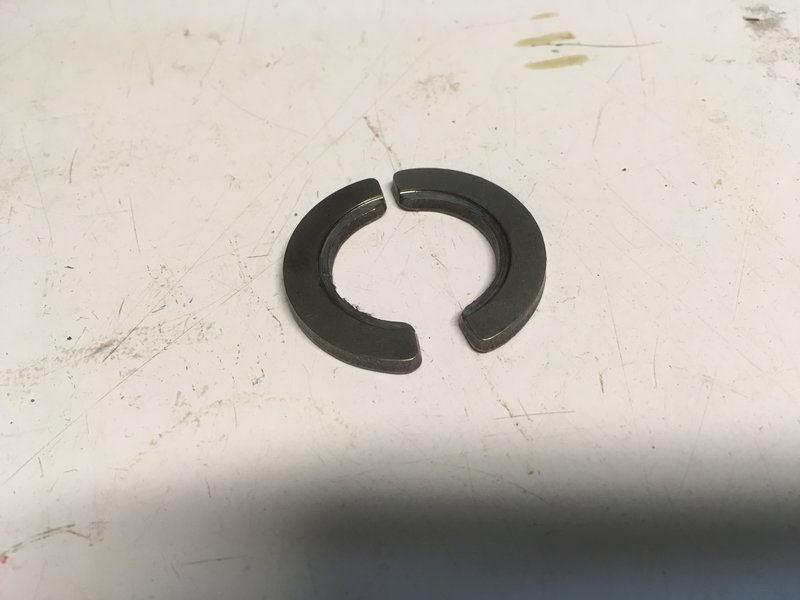
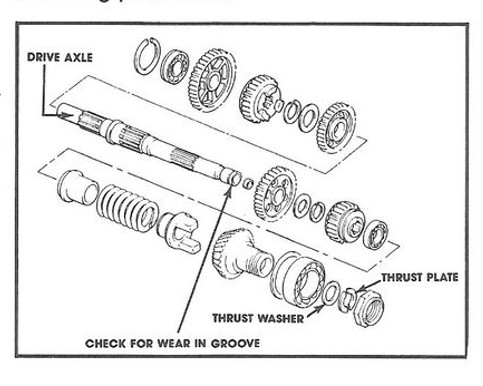
Correct me if I am wrong but the issue with the 2nd gear is wear with the thrust plate and not the washer? Also the grove in the shaft can wear. Is this correct. Here is a pic of my thrust plate showing some wear. The thrust washer doesn't show any signs of wear. Also all the gears and gear dogs look very good, no issues.
-
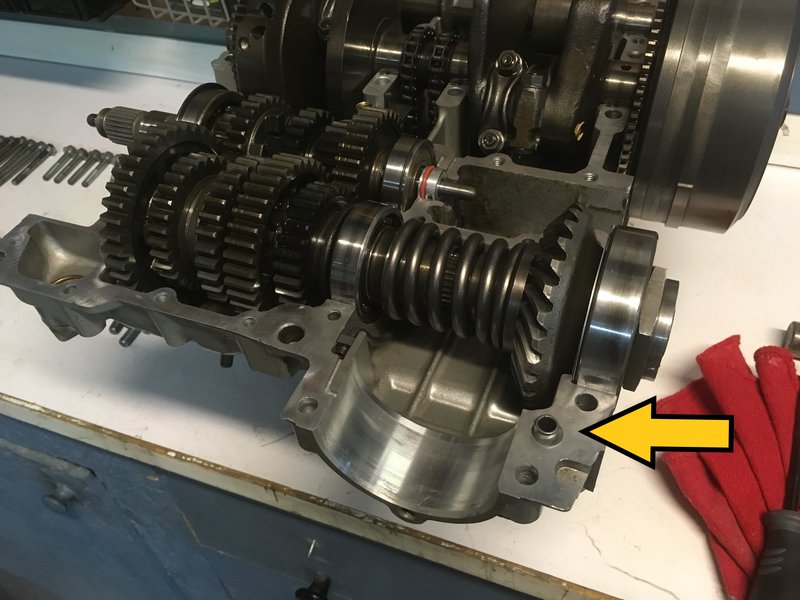
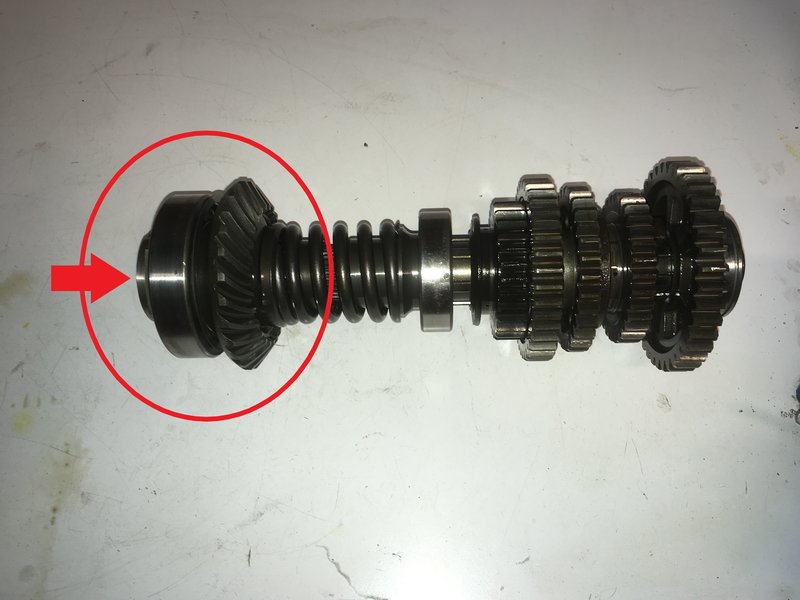
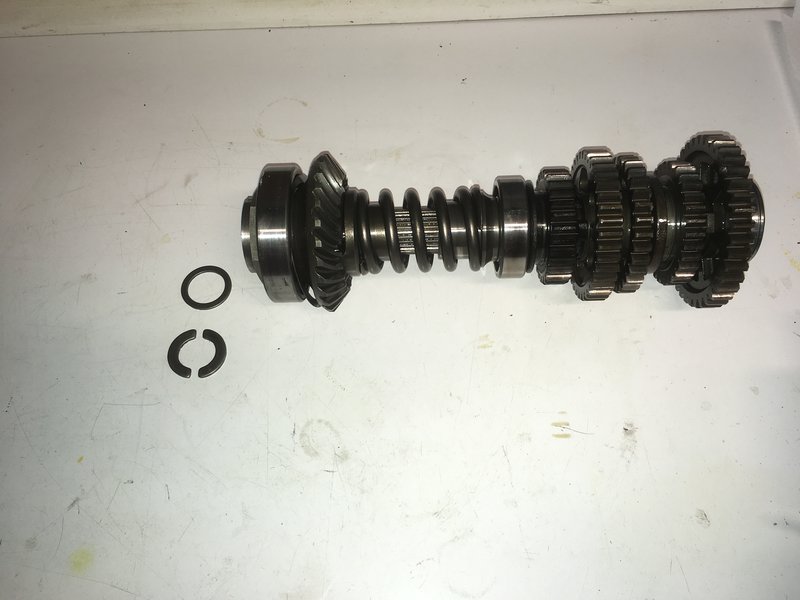
Here are a couple of pics showing the location of the thrust washer and the thrust plate (2 pieces). Also is the diagram showing the location. The first pic show the area of the washer, red circle with arrow. The second pic is taken from the end showing the thrust plate. Third pic is after the thrust washer and thrust plate have been removed.
-
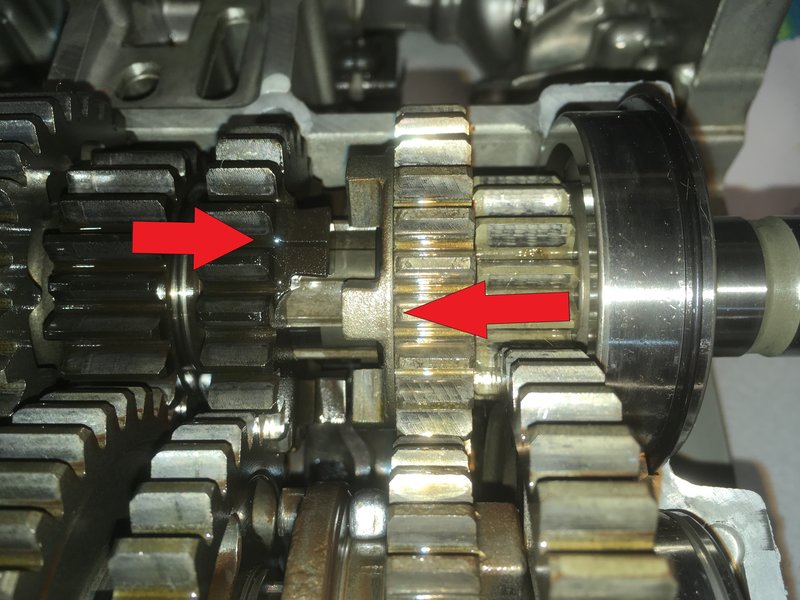
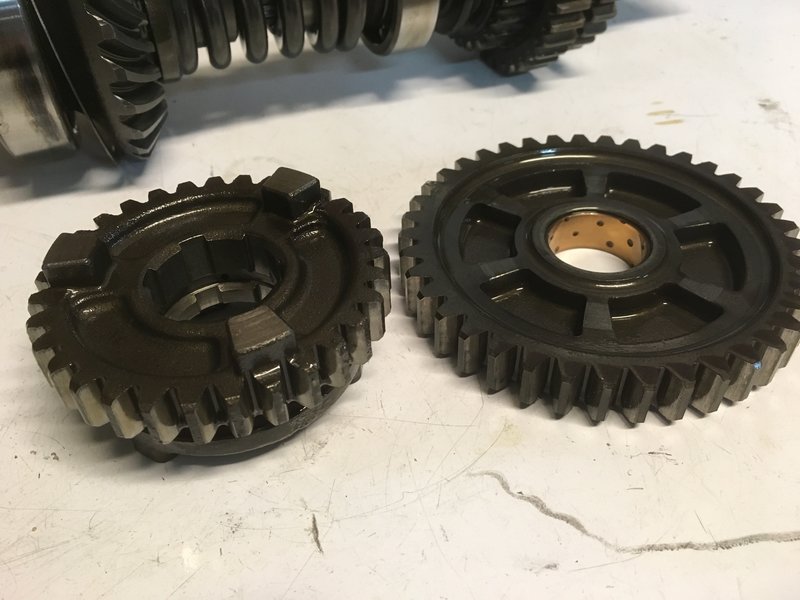
Here are a couple of pics of the gear dogs. The first pic shows two gears both with dogs. The red arrows point to the dogs. The darker gear to the left will slide to the right when shifting I believe into 4th and the gear dogs then mesh and make up the drive ratio. The second pic shows another set of gears, the one on the right has the gear dogs and the one on the left has cutouts where the dogs can engage the gear. Hope this helps.
-
Not sure how I missed this post, but I did. I was considering the swap with a newer trans but wasn't sure on the details and also the added cost. Never heard about the Vmax swap but that will need consideration also. I will do some more digging and see what I can come up with. If someone else has already done it, that makes it much easier. Probably just a matter of rounding up the parts. Thanks!
-
A picture is worth a thousand words, so when I get it apart I will post some pics of the dogs and the washer.
-
All good suggestions and so noted. The reason I tore it down this far was to specifically take a look at the 2nd gear issue. Right now I don't think there is an issue, but I also want to make sure there isn't an issue in the future. So I am planning on going a little further with the disassembly and then we can then look at the suspect parts. Any issues will be fixed. Like has been said, now is the time to make the repairs. I will update you when we get the gears apart. First I need to build a make shift press.
-
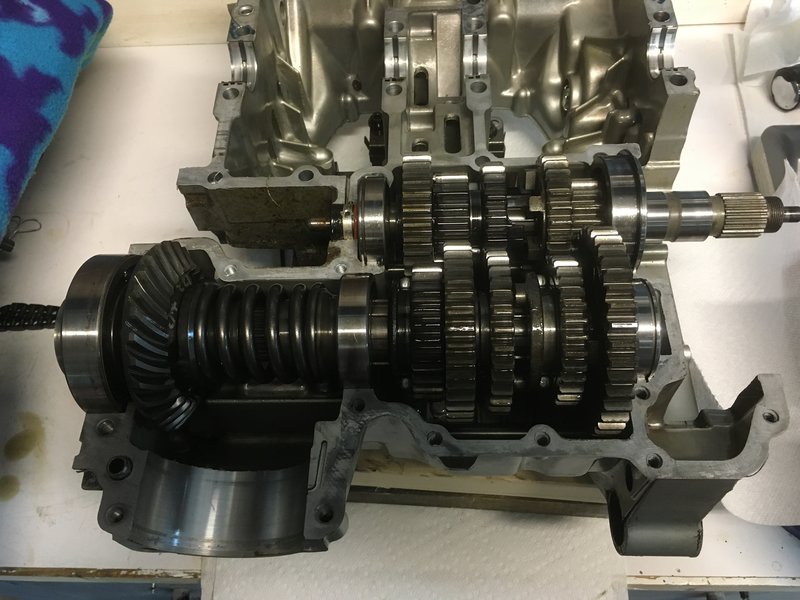
Got the engine tore down this week. Everything looks like new on the inside, very little wear. Transmission looks good, no issues that I can see, and 2nd gear engagement looks good also. It would be great to just put it back together and run it the way it is. The previous owner said there were no issue with shifting, so it's tempting to just reassemble as is. But with that said, since it's all torn down now is the time to fix an issue that could arise at a latter date. I think the best route is to buy a transmission from one of the newer models that already had the repair done. Money is a little tight so it may be a little while before we can source the parts. For now you can take a look at the transmission as it sits right now. More to come later.
-
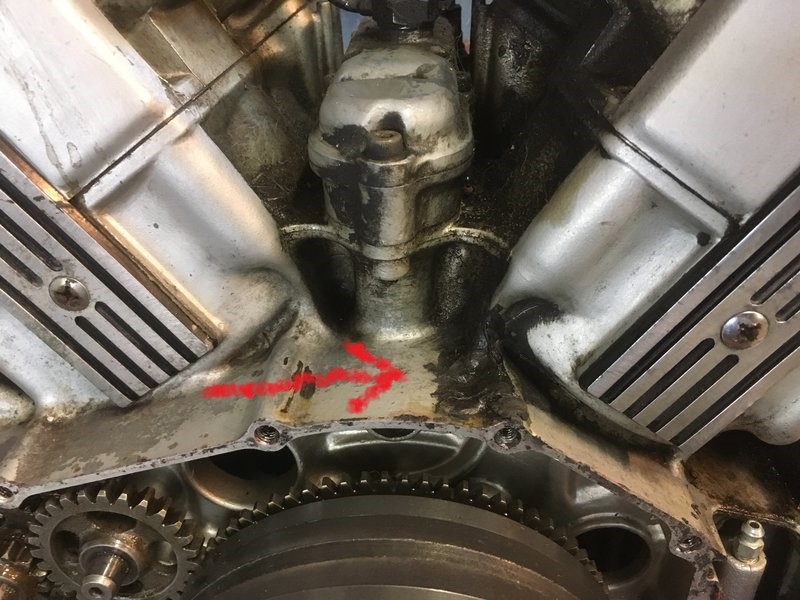
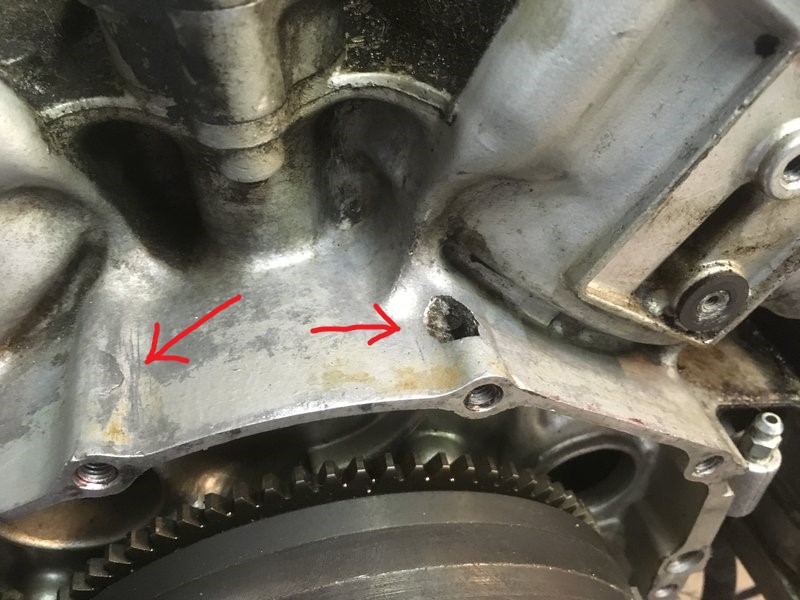
First is to start cleaning and see what we uncover. An area of interest was on the left side of the case. You can see an area where a lot of silicone was applied. Once removed it exposed a hole at the end where the bolt for the cover threads in. You can also see a crack on the one next to it. It appears they half filled them with silicon and when tightening the bolts the pressure cracked the case. We are going to finish cleaning and then tear it down a little further. Not sure how far yet, but will probably remove the heads and go with a complete new gasket set before re-assembly.
-
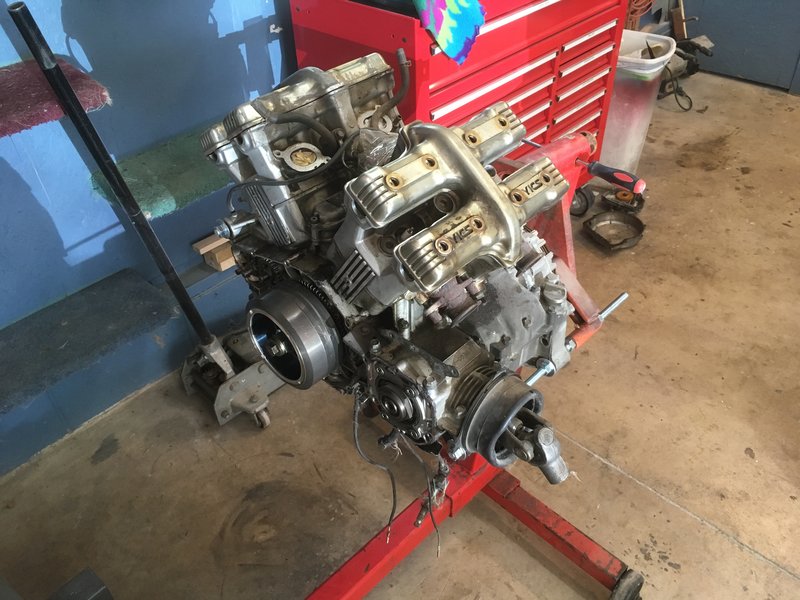
Been awhile since my last post, and not much has happened until this past week. As I mentioned before I have another big project I'm working on right now. It's a restoration of an 81 Corvette. Three years into the project and probably about 10 months to go. Anyway, getting itchy to get going on this one and tired of seeing the engine sitting on the garage floor. So hopefully I can start devoting some time each week to work on this. First step, getting the engine on a stand. More to come shortly.
-
Seat covers
Johnnycyclone replied to Johnnycyclone's topic in Venture and Venture Royale Tech Talk ('83 - '93)
Just noticed that it says at the bottom of the listing, if they don't make the cover you need they will make one for free. I am assuming you send them a good original cover that they can duplicate and they will send you a free one. May be an option for the later model years. Not saying anyone should do it, just pointing out what it says in the listing. -
Seat covers
Johnnycyclone replied to Johnnycyclone's topic in Venture and Venture Royale Tech Talk ('83 - '93)
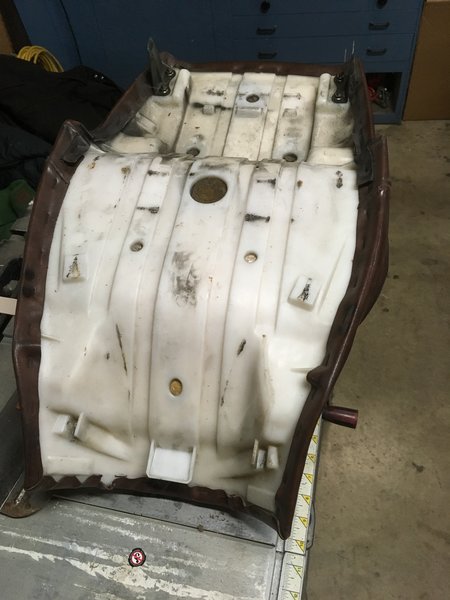
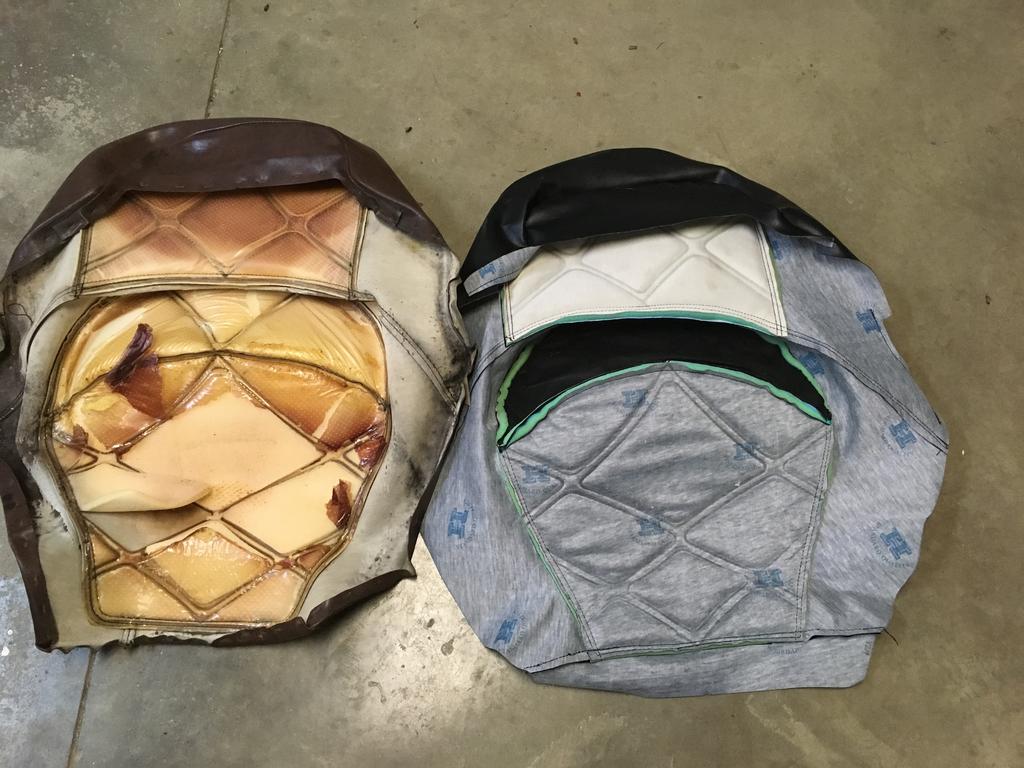
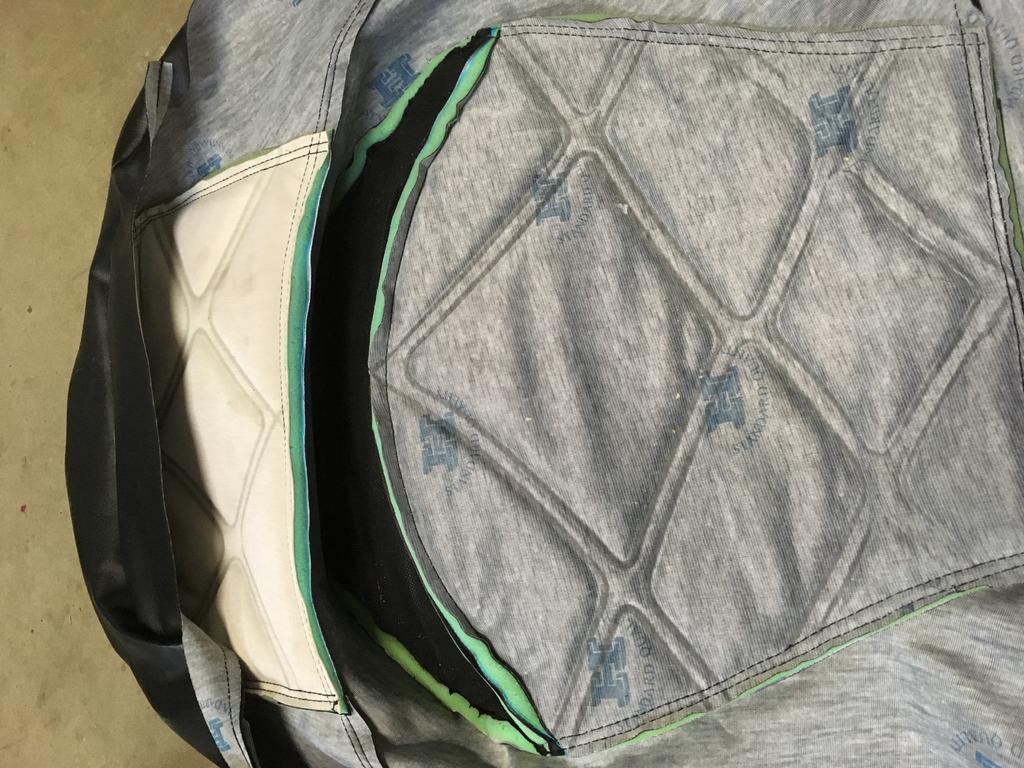
I would say any reshaping would have to be pretty minor. I took some measurements off of the new cover and compared it to the original and it is spot on, exact same size. They did a nice job of matching the original. So if you look at the underside of the seat (see pic) they don't have much overlap, probably around an inch or so. If you get crazy and start adding to much foam they may not stretch enough to staple them to the underside. I would think some added foam would be ok, but not sure how much you could add. If you start taking foam away like making the seating area deeper, it probably wouldn't fit very well either. The back rest area isn't going to let the seat area sit any lower, maybe a little but probably not much. I will know more when I attempt to put the cover on, and see how it fits. I hope to spend some time on it this weekend. Here is a pic of the underside of my seat before I removed the original so you can see the amount of material on the underside. Hope this helps.
-
Seat covers
Johnnycyclone replied to Johnnycyclone's topic in Venture and Venture Royale Tech Talk ('83 - '93)
Wasn't sure if that was allowed or not. They run $125 with free shipping. Black cover http://www.ebay.com/itm/YAMAHA-VENTURE-ROYALE-XVZ1200-XVZ-1200-1982-1985-SEAT-COVER-YRTVT-YRRPT-/181903675267?hash=item2a5a4dcf83:g:QU8AAOSwo6lWH5hJ&vxp=mtr Brown cover http://www.ebay.com/itm/YAMAHA-VENTURE-ROYALE-XVZ1200-XVZ-1200-1982-1985-SEAT-COVER-YRTVR-YRRPR-/172283884996?hash=item281ceb75c4:g:8WwAAOSwIgNXlmYB&vxp=mtr -
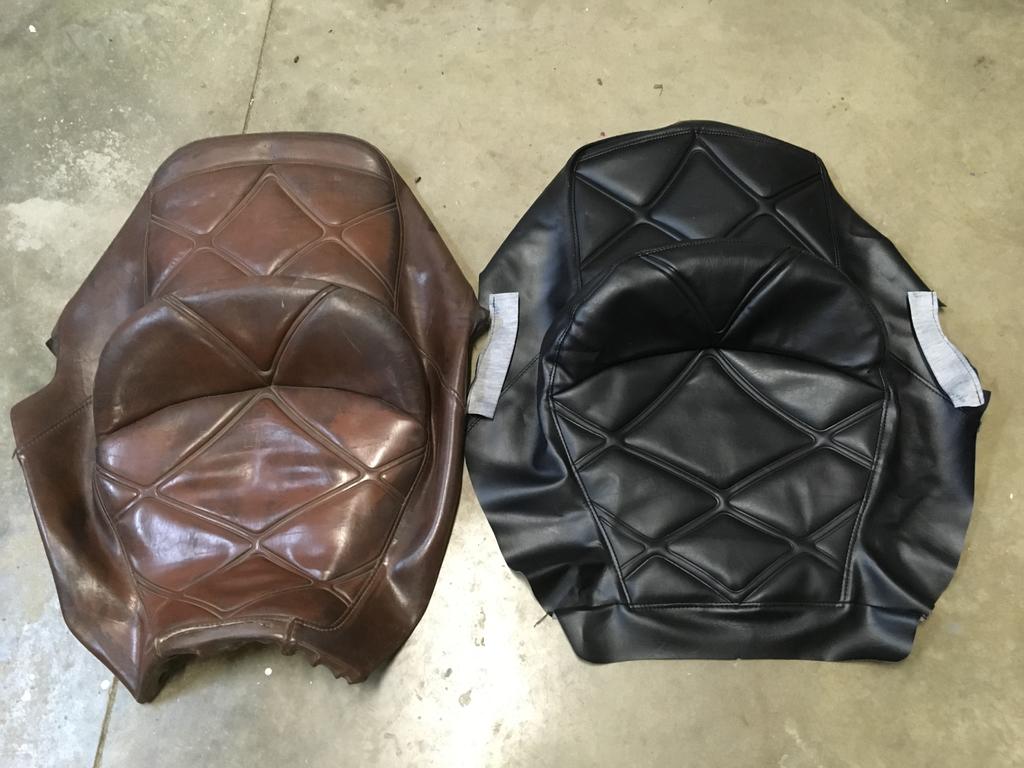
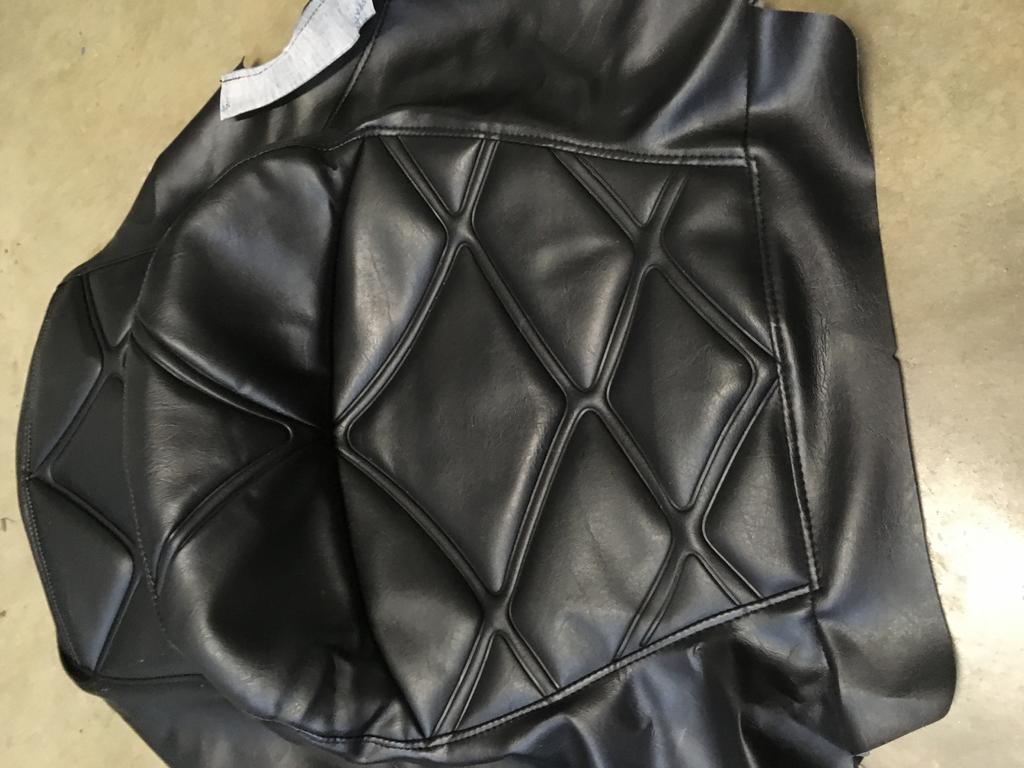
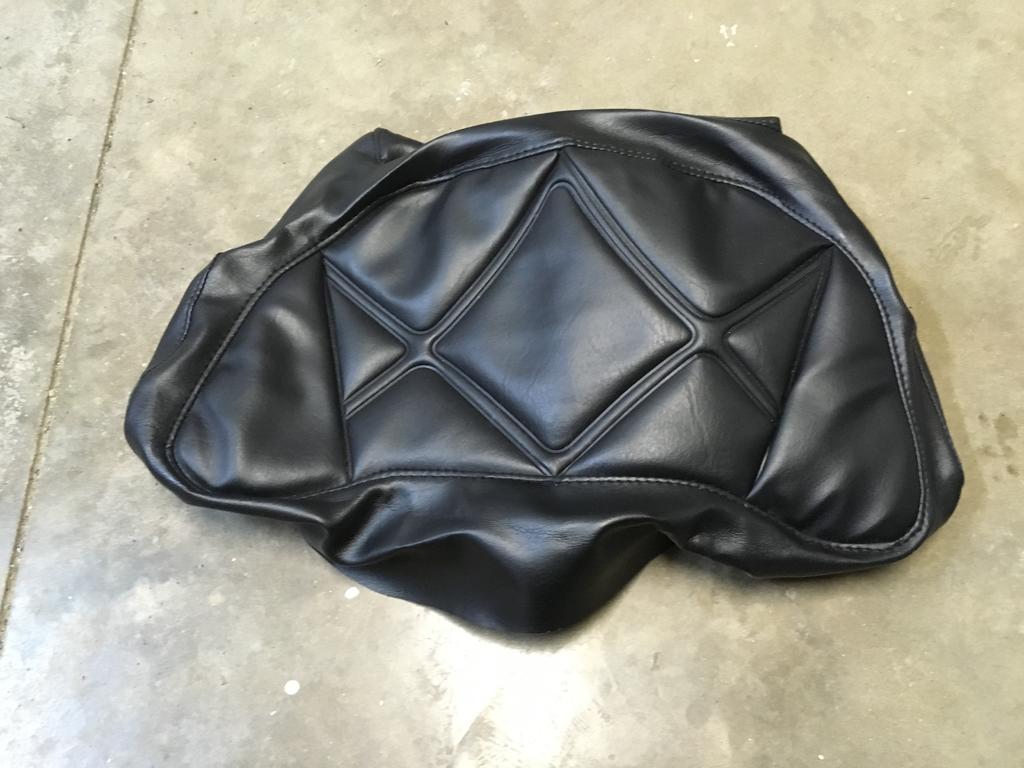
I don't know what everyone does about fixing their damaged or worn out seats, but I recently found a company selling reproduction seat covers on Ebay. I was planning on having mine recovered by an upholstery shop until I ran across this company. These are for the 83-85 model years and you can either get them in brown or black. I went with black since I will be changing the color of my bike when I paint it. Not trying to push the product, but the quality is so good I thought I would share in case anyone else is looking for a solution for their bike. These look pretty much exactly like the original including the heat boss pattern. It has the extra foam sewed into both seating areas like the original cover. Also included is the back rest cover. The company is in Cambodia, but they still shipped pretty fast. Here are a few pics, so you can take a look at the covers and make your own decision. I will post a few pics once I get the seat recovered, and comment on the fit. The test fit looked very good, so hopefully my skills are up to the challenge!
-
super brace
Johnnycyclone replied to adventurer 08's topic in Venture and Venture Royale Tech Talk ('83 - '93)
Bob, I'm interested in one of the braces you have left. I will send you a PM. Terre