Jcgfree
-
Posts
24 -
Joined
-
Last visited
-
I had placed my bike for sale in classified in second generation complete bike and it has seemed to disappear. What happened to it?
-
My points are just about shot on my 06 RSV. I know because I looked and one side is half gone and have had to take boot off a couple times to get it to work when starting. I want to replace the points. There is a link above for Universal Fuel Pump Point Switch Kit K&L. Is this the one recommended for my bike? http://www.powersportswarehouse.com/pages/Catalog/Product/158278?catalogID=15&categoryID=156&subCategoryID=10623
-
And here are some pics from the ride. <a href=http://i1248.photobucket.com/albums/hh492/jcgfree/RSV%20Rally%20Day%203%20cont/GOPR0305_zpsh9kbtgww.jpg' alt='GOPR0305_zpsh9kbtgww.jpg'> http://i1248.photobucket.com/albums/hh492/jcgfree/RSV%20Rally%20Day%203%20cont/GOPR0304_zpsrkmp9mkg.jpg http://i1248.photobucket.com/albums/hh492/jcgfree/RSV%20Rally%20Day%203%20cont/GOPR0302_zpszpd3lgxh.jpg http://i1248.photobucket.com/albums/hh492/jcgfree/RSV%20Rally%20Day%203%20cont/GOPR0301_zpshriitbuu.jpg http://i1248.photobucket.com/albums/hh492/jcgfree/RSV%20Rally%20Day%203%20cont/GOPR0300_zpszekvyfcj.jpg http://i1248.photobucket.com/albums/hh492/jcgfree/RSV%20Rally%20Day%203%20cont/GOPR0299_zpsufli4n65.jpg http://i1248.photobucket.com/albums/hh492/jcgfree/RSV%20Rally%20Day%203%20cont/GOPR0298_zpsn0bzqo6m.jpg http://i1248.photobucket.com/albums/hh492/jcgfree/RSV%20Rally%20Day%203%20cont/GOPR0297_zpsiqorhjqb.jpg http://i1248.photobucket.com/albums/hh492/jcgfree/RSV%20Rally%20Day%203%20cont/GOPR0294_zpslhx7710e.jpg http://i1248.photobucket.com/albums/hh492/jcgfree/RSV%20Rally%20Day%203%20cont/GOPR0293_zpstp38s7kf.jpg http://i1248.photobucket.com/albums/hh492/jcgfree/RSV%20Rally%20Day%203%20cont/GOPR0292_zpsvhyp3myv.jpg[/img]
-
Home safe. Had a great time and enjoyed meeting everyone in person. Orlin did a great job hosting with the help of his wife Sharon and Sherry and who ever else I left out. Thank you so much for all you did. Now to figure out how to post some pics so all can see without taking up too much space. <!--url{0}--> <!--url{1}-->[/img]</p><p> Day 2 Took some pics of the 83 Venture custom mod that everyone was checking out. Dale took a crashed 83 Venture and made this. </p><p> <img src= http://i1248.photobucket.com/albums/hh492/jcgfree/RSV%20Rally%20Day%202/IMG_0231_zpswmkkehlx.jpg http://i1248.photobucket.com/albums/hh492/jcgfree/RSV%20Rally%20Day%202/IMG_0230_zpskfy8xzgp.jpg http://i1248.photobucket.com/albums/hh492/jcgfree/RSV%20Rally%20Day%202/IMG_0227_zpslagzrbm1.jpg http://i1248.photobucket.com/albums/hh492/jcgfree/RSV%20Rally%20Day%202/IMG_0225_zpsnkocr5kl.jpg[/img] Day 3 Orlin took us for a scenic 100 mile ride in the hill country. <a href=http://i1248.photobucket.com/albums/hh492/jcgfree/RSV%20Rally%20Day%203/IMG_0254_zpsr2z1jtlz.jpg' alt='IMG_0254_zpsr2z1jtlz.jpg'> http://i1248.photobucket.com/albums/hh492/jcgfree/RSV%20Rally%20Day%203/IMG_0253_zpsc71ahkl7.jpg http://i1248.photobucket.com/albums/hh492/jcgfree/RSV%20Rally%20Day%203/IMG_0251_zpsclszu3sz.jpg http://i1248.photobucket.com/albums/hh492/jcgfree/RSV%20Rally%20Day%203/IMG_0250_zpsw25ntksg.jpg http://i1248.photobucket.com/albums/hh492/jcgfree/RSV%20Rally%20Day%203/IMG_0249_zpsco2s2cy3.jpg[/img]
-
So I was having trouble with the remote control for radio and CB. The LED was going in and out and I could not control any of the settings. I was stuck in AUX and could only control volume. Luckily I could still play music from my IPhone through the AUX. But after a while it would change the setting on me by turning on the CB and I could no longer control AUX volume as it was in CB mode. Or it would switch from speaker mode to headset mode. Either way I was stuck then because I couldn't change any modes. This would happen on longer rides after an hour or so. I would have to wait until the next day when I first started the bike to be able to switch any modes to fix the problem. I figured it was the remote control. Thought maybe something internal due to moisture or something since none of the buttons worked when pressed. Took it a part to find the inside was all encased in plastic. I didn't want to mess with that at the time. So now I had the time and decided to check the connectors at the amp first before I tackled taking remote completely apart. After using some brushes on the 4 different connectors the remote control works fine now. Very surprised it was such an easy fix. My question is what can I use as a cleaner and preservative on those connectors? Something tells me I should not use any lubricating oil or WD 40. Want to check here before I use anything. Thanks for any input.
-

Barnett Clutch Upgrade - With Pictures
Jcgfree replied to RedRider's topic in Royal Star Venture Tech Talk ('99 - '13)
This has been a very helpful and informative read. I have all ready installed the Barnett Spring Plate about 20,000 miles ago when the clutch started slipping back then. Now I am at about 50,000 miles and starting to slip again. So I have bought the Barnett friction and steel plates kit. I am figuring this is the problem or does the spring plate springs go bad? None the less I am going to replace the plates. I was reading and have just a couple other questions. I read that you can leave the wire out. Did I read this right? From what I have seen this is the most tedious part of installation. Second question is that there are no notches on the friction plates to line up. Is there a certain position the new friction plates have to go in? I appreciate any input please. -
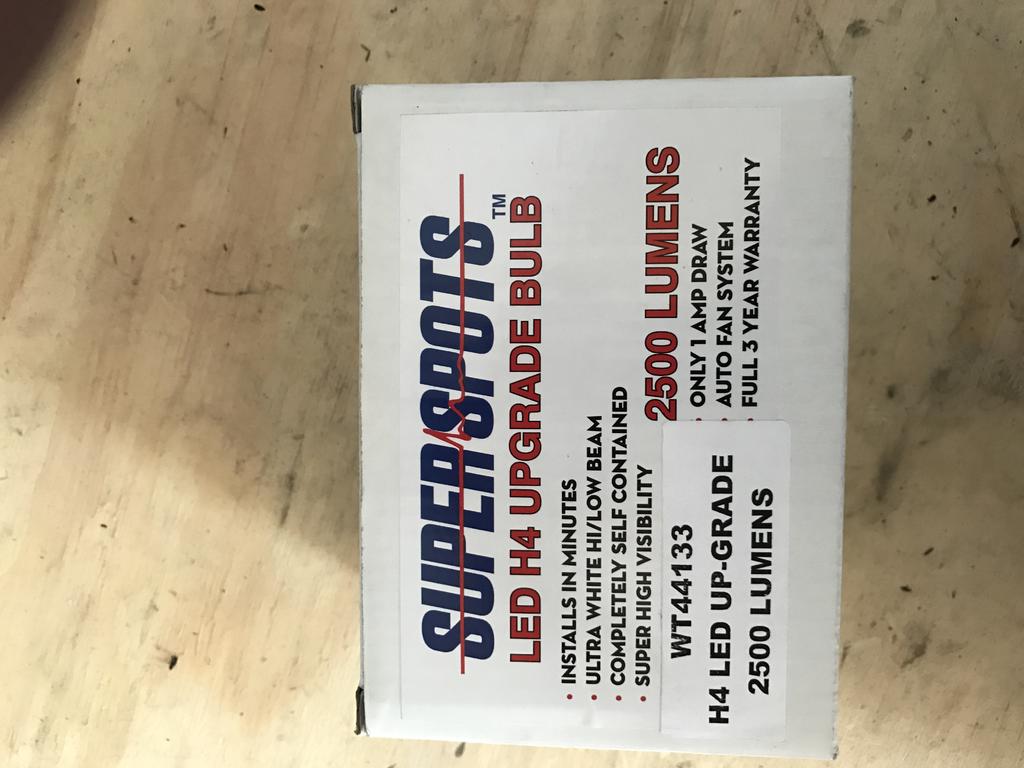
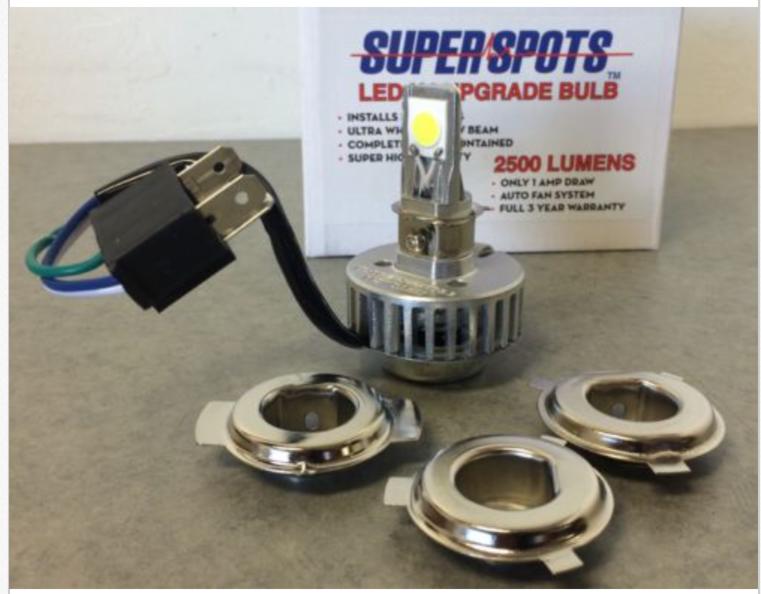
Yes David, both high and low beam work fine. I can't think of any downside except maybe the price. I didn't look around and price anything else since this was shown to me at the Yamaha Dealer. I didn't worry about it fitting like I would of trying to order one on the internet. Rode to Naples Florida and back to Houston putting 3200 miles with it and no problem. It was nice being able to see at night.
-
My mistake. I assumed that since the Commander II I had on the front was a 90 that the original Dunlop was also. Now I see that 150's come as 80's and 130's come as 90's. Thx for the response.
-
Was a good read on the tires and what everyone uses and their thoughts. Bought my 06 RSV in July 15 and it still had stock Dunlop's on it, so I replaced the rear with the same. Was not happy when I took a trip to Grand Canyon from Houston and got back 4000 miles later and had to replace the rear tire all ready. Found out that is what they get. So I asked around and got the Commander II since I do a lot of long trips. That one lasted 15,000 miles. A thousand or two more than I should of gone on that tire as the belts were beginning to show, but none the less happy with the tires handling and wear. Within that 15,000 miles I had noticed the front would start shaking a lot when I took a hand off the bars. Come to find out it was because the tire was worn and needed to be replaced. So I went with the Commander II. The good thing was that the shaking stopped and it was nothing but the tire. But now that same front tire has 25,000 miles on it and still has great tread but the steering starts to wobble at low speeds when you take a hand off the bars. It also has a shake at low speed in the turn. So my first question is, this is a Commander II 130/90 B, did something go wrong with the tire such as belts or balance, or is it just because of how many miles it has on it? My second question is, I have read and would like to try the Elite 3's. I have seen what size to get for back. What size did you get for the front? All I see is a 150/80. How much difference is there going from a 90 to an 80? Would this have an adverse affect on the leveling links? Third and final question is about the leveling links. I am interested in them and would like to try them. Where do I get them? I have looked on Diamond R Accessories page and don't see them. Any and all input is really appreciated. There are so many posts here about everything and they go way back, so it can be a little overwhelming for someone that doesn't frequent here as much as they probably should. I am hoping to meet some of you at the Rally in June. Thx.
-
Left fairing 12 volt plug...
Jcgfree replied to cwhite123174's topic in Royal Star Venture Tech Talk ('99 - '13)
I have the same problem as I plug my GPS in it. Rattles itself out enough to lose connection ever so often. I took a piece of this cardboard from a parts box and wedge it in there like a shim on the side of the plug when I plug in. -
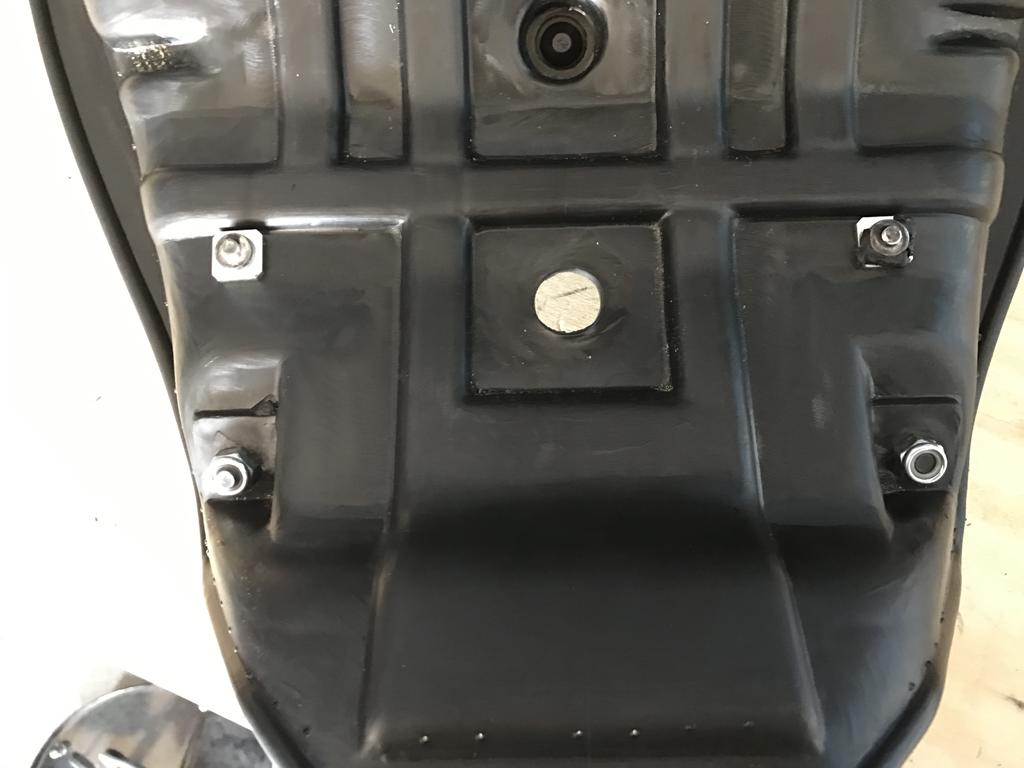
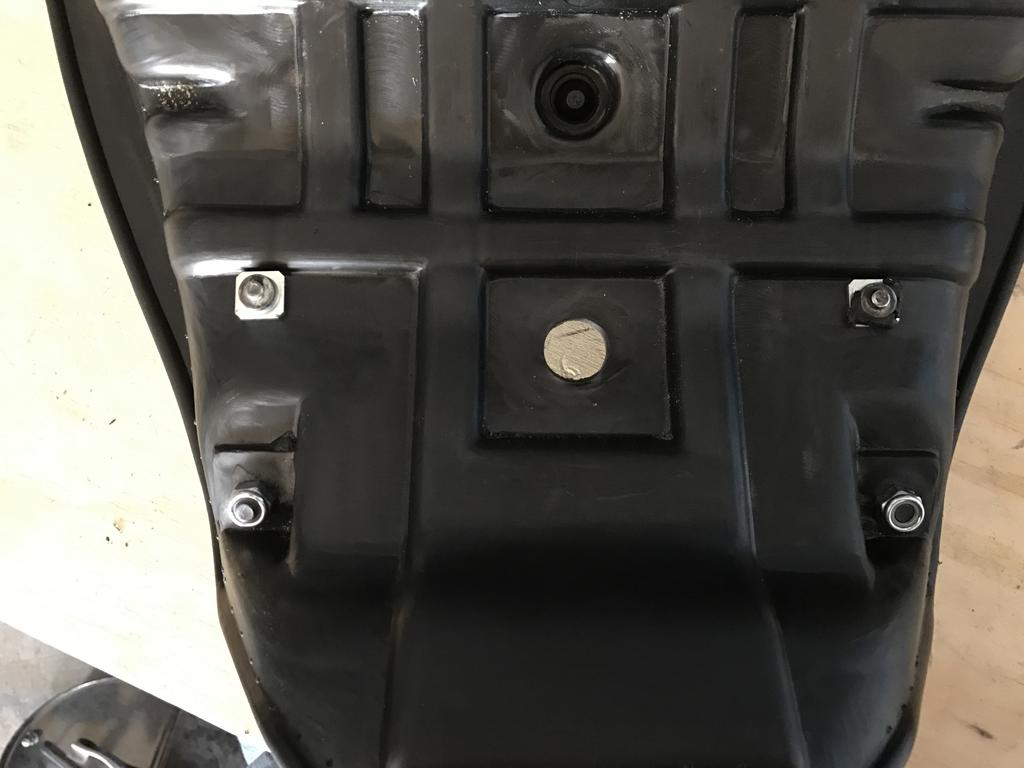
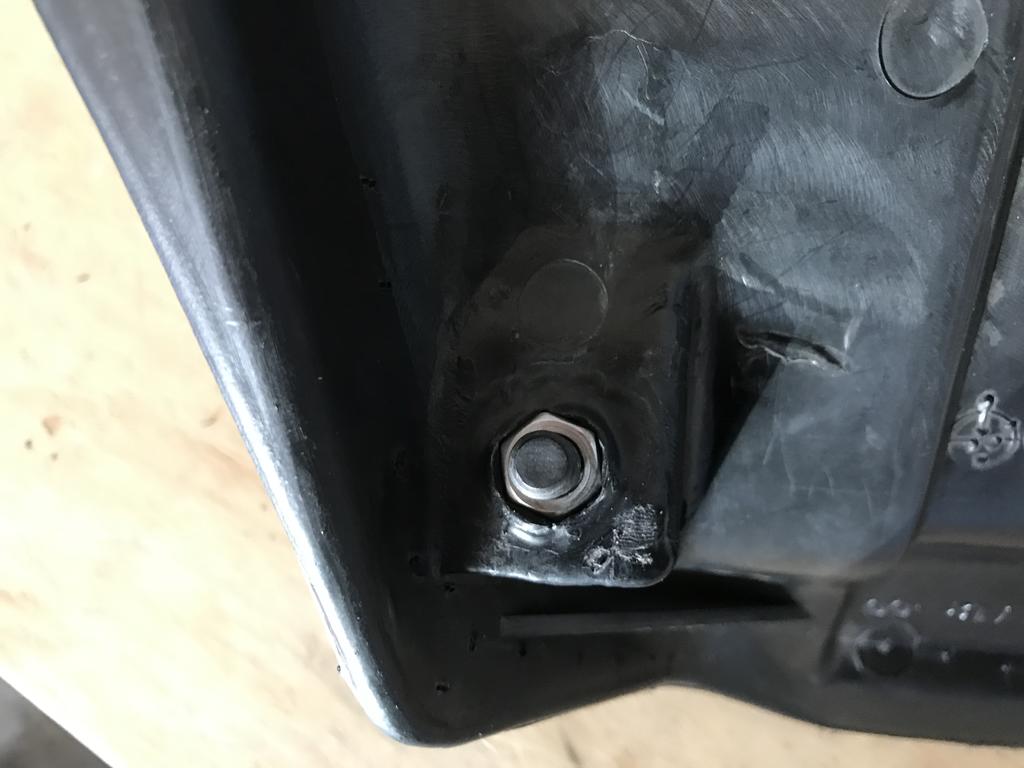
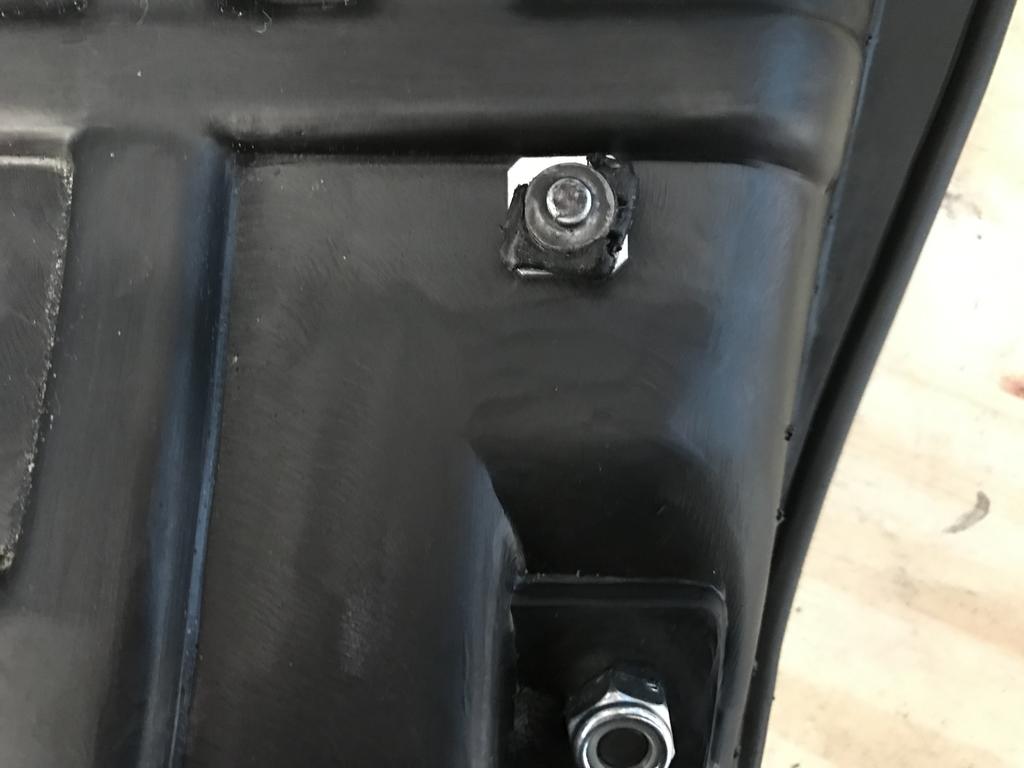
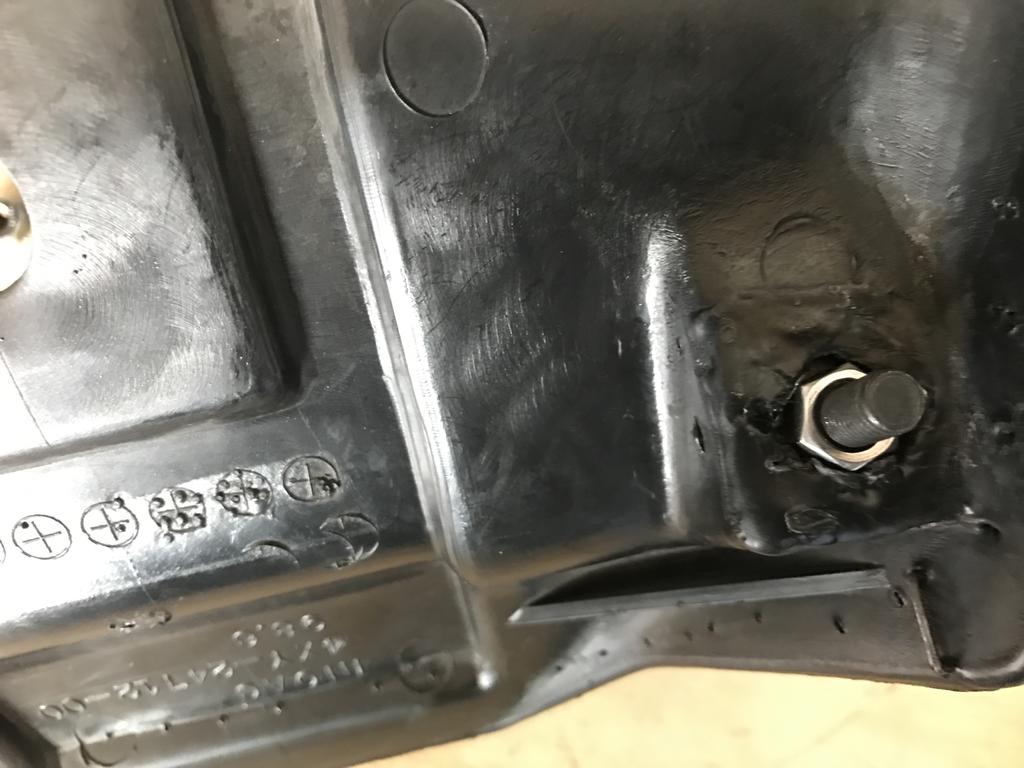
Well I torqued down too much and unevenly while tightening the barrel nut to secure the drivers seat down on both sides within a couple weeks and snapped the threaded studs off. Of course the threaded stud is inlayed in the plastic of the seat. Asked a dealer if there was a fix. They didn't have one except to replace the whole seat. Too expensive I thought. There has to be a way. So I took all the staples out and took the cover and padding off which was pretty easy. There is a hole on the opposite side of where the stud is. I tried punching it to see if it would come through some how. But that is when I discovered it is inlayed in the plastic. So my thought was to heat up the stud and maybe I could punch it out. So I got out a torch and proceeded to heat up the stud. Be careful because the plastic with start on fire real easy. I had to adjust the flame as low as the torch would go and it would still catch the plastic on fire a bit. I just kept blowing it out until I felt the stud was hot enough to try and punch out. I turned the seat over and it punched out pretty easily. Leave a bit of a hole but it is perfect for a nut to fit into. Next I bought a couple metric threaded studs. The old studs were 6mm. I bought 8mm studs because I wanted something stronger. I had to drill the hole open a bit on the seat so the 8mm stud would fit. I also had to drill the hole out just a little bit on the bike itself so the stud would fit through it. I then put a nut on the stud about half way. I then inserted the stud through the hole in the seat so just enough came through to put a lock nut on it. I had to put another regular nut on the other side so that I could tighten the lock nut down and it would pull the first regular nut into the hole where the stud came out. Make sure you get the right length threaded stud. It took me 2 trips to the hardware store because the first stud type I got was too long and it was the kind that didn't have thread in the center. Second trip I got a threaded stud a bit shorter and it was threaded the whole length. Once you secure one stud in the plastic you can put it on the bike to check the fit. I couldn't find a barrel nut like the one Yamaha uses and didn't really want to use one anyway, so I bought a few wing nuts to use to secure to the bike. Easier than having to use an allen wrench or socket. If you wanted to, you could use a 6mm threaded stud to do this. After it is all fitted right you can put the cushion and seat cover back on and staple the cover back to the plastic mold. FYI the cover and padding stay together so it is an easy uninstall and install. This was much cheaper than having to buy a new seat. The first 3 pics show the side of the seat that you sit on which is the side I used the lock nuts. I put the old studs in those pics just so you could see what they looked like. I actually punched them out the other side. The last pic is the side the stud is sticking out to attach to the bike with the wing nut.

-
Well I torqued down too much and unevenly while tightening the barrel nut to secure the drivers seat down on both sides within a couple weeks and snapped the threaded studs off. Of course the threaded stud is inlayed in the plastic of the seat. Asked a dealer if there was a fix. They didn't have one except to replace the whole seat. Too expensive I thought. There has to be a way. So I took all the staples out and took the cover and padding off which was pretty easy. There is a hole on the opposite side of where the stud is. I tried punching it to see if it would come through some how. But that is when I discovered it is inlayed in the plastic. So my thought was to heat up the stud and maybe I could punch it out. So I got out a torch and proceeded to heat up the stud. Be careful because the plastic with start on fire real easy. I had to adjust the flame as low as the torch would go and it would still catch the plastic on fire a bit. I just kept blowing it out until I felt the stud was hot enough to try and punch out. I turned the seat over and it punched out pretty easily. Leave a bit of a hole but it is perfect for a nut to fit into. Next I bought a couple metric threaded studs. The old studs were 6mm. I bought 8mm studs because I wanted something stronger. I had to drill the hole open a bit on the seat so the 8mm stud would fit. I also had to drill the hole out just a little bit on the bike itself so the stud would fit through it. I then put a nut on the stud about half way. I then inserted the stud through the hole in the seat so just enough came through to put a lock nut on it. I had to put another regular nut on the other side so that I could tighten the lock nut down and it would pull the first regular nut into the hole where the stud came out. Make sure you get the right length threaded stud. It took me 2 trips to the hardware store because the first stud type I got was too long and it was the kind that didn't have thread in the center. Second trip I got a threaded stud a bit shorter and it was threaded the whole length. Once you secure one stud in the plastic you can put it on the bike to check the fit. I couldn't find a barrel nut like the one Yamaha uses and didn't really want to use one anyway, so I bought a few wing nuts to use to secure to the bike. Easier than having to use an allen wrench or socket. If you wanted to, you could use a 6mm threaded stud to do this. After it is all fitted right you can put the cushion and seat cover back on and staple the cover back to the plastic mold. FYI the cover and padding stay together so it is an easy uninstall and install. This was much cheaper than having to buy a new seat. The first 3 pics show the side of the seat that you sit on which is the side I used the lock nuts. I put the old studs in those pics just so you could see what they looked like. I actually punched them out the other side. The last pic is the side the stud is sticking out to attach to the bike with the wing nut.
-
Here's what I just put on mine. Bought it at Yamaha Dealer near me, so not sure where you can get one at.
-
I like the way that headlight looks Alsbar. I bought this one from the Yamaha Dealer here. It was an easy install. You find the right adapter holder that comes with the kit and slide it in. The rubber boot from the stock bulb won't fit back on though. A little worried about that but it has worked fine. A big difference from the stock light. It was a little over $100.
-
Nice video. Did you know that you can take the rear end of a VMax and put it on a Royal Star Venture? Talked with a Yamaha mechanic in Tennessee who said he and other mechanics who went to a Yamaha class for updates were looking at it and said it looked like it could be done. So they did it. He said that Royal Star Venture ran much better in the hills of Tennessee.