made2care
-
Posts
389 -
Joined
-
Last visited
-
Days Won
3
Content Type
Profiles
Forums
Gallery
Events
Store
Everything posted by made2care
-

please help, what would you do?
made2care replied to made2care's topic in Venture and Venture Royale Tech Talk ('83 - '93)
This is very helpful information. My spirit is lifted and i have some hope. I will try this for sure. Thank you New filter and oil are in. 3.7 quarts. Higher octane gas. -
please help, what would you do?
made2care replied to made2care's topic in Venture and Venture Royale Tech Talk ('83 - '93)
The main issue here is that the readings are not within 14 of each other which in turn will cause my carbs to be out of wack. I just spent $800 on these carbs and am a little fearful to put any type of chemical in the gas. -
please help, what would you do?
made2care replied to made2care's topic in Venture and Venture Royale Tech Talk ('83 - '93)
My bike is an 83 , therefore compression readings are different. I really don't think i have a stuck ring , since it does crank over. I'm just guessing at this point. On the high readings it could be excessive carbon buildup, on the low readings maybe my valve clearances are too tight. Geesh !! Surely someone out there can chime in with additional info but I appreciate you responding with your thoughts. I'm at wits end !! -
please help, what would you do?
made2care replied to made2care's topic in Venture and Venture Royale Tech Talk ('83 - '93)
Here's a thought. My carb guy suggested I lower the valve clearances 1 to 2 thousands across the board, then take it out for a 20 mile ride , then recheck valve clearances and compression. The difference in readings of 120 and 180 will affect carberation. -
please help, what would you do?
made2care replied to made2care's topic in Venture and Venture Royale Tech Talk ('83 - '93)
Lesson learned. This will teach me. I ran a compression test with the engine cold. 1- 130 2- 160 3- 180 4- 120 I don't understand the higher numbers, bad rings? I also would like to know if I can run the engine to warm up and see if the numbers come into spec. I also read that if one puts a little oil in plug holes and the number goes up then its the rings. I truly cannot believe after all these years I have never done compression readings and the bikes i had ran like a charm. My first "off frame " resto and this happens !! I was surprised that #4 ( had rust on valves) was in spec. Any ideas? Please help, I really wanted to fire her up !! Actually, now i'm reading that if the compression reading is high, there might be some oil/liquid in there taking up space, so maybe i'm not doomed. -
please help, what would you do?
made2care replied to made2care's topic in Venture and Venture Royale Tech Talk ('83 - '93)
I'm going down to Autozone today to purchase a compression tester kit. plug hole size? Is there a thread on how to perform a compression test? Thanks -
please help, what would you do?
made2care replied to made2care's topic in Venture and Venture Royale Tech Talk ('83 - '93)
Not quite there yet. Yesterday i ground all plug wires, went ahead and put a little mm oil in each sp hole and started the bike. Good news is my new starter is working great! Will try to compression test. -
please help, what would you do?
made2care replied to made2care's topic in Venture and Venture Royale Tech Talk ('83 - '93)
Well, I was rushing a little today and decided to slow down and rethink things. I removed all the spark plugs and sprayed a little pb blaster in each. Will let sit overnight. Tomorrow if I have time i will ground plug wires and and start it, hoping to break free any rust left over. fingers crossed the valves are okay. After that will attempt to start. Can't promise all of that will be done tomorrow but will try. Thanks for your advice and lets hope these valves seat nicely. As you mentioned, valve could burn and if it does, i guess i have no choice but to pull the head. This will teach me a lesson, I should have looked over the valves and compression tested at the very beginning. Urghhhhhhhhh!!!!! -
please help, what would you do?
made2care replied to made2care's topic in Venture and Venture Royale Tech Talk ('83 - '93)
Before I placed the carbs in and after spraying PB blaster, i turned it over by hand watching the valves on #4 . When the valve closed, bubbles formed , so I think this might be leaking due to the rust ( the rust appears to be a little more than just surface but the valve does move freely). Right now, I don't want to remove the head and believe it or not, after all the years of working on bikes I have never done a compression test, therefore don't have the tools. What should I do? Option 1, fire her up anyway. Whats the worst that could happen if #4 is leaking. Option 2. remove carbs and try to clean valves best as I can without removing the head, if that's even possible ! Option 3. remove the head but I don't want to do that right now. -
please help, what would you do?
made2care replied to made2care's topic in Venture and Venture Royale Tech Talk ('83 - '93)
Carbs are in. Lots left to do before I fire her up. I'm hoping valves will clean up after running a while. They will have to. -
please help, what would you do?
made2care replied to made2care's topic in Venture and Venture Royale Tech Talk ('83 - '93)
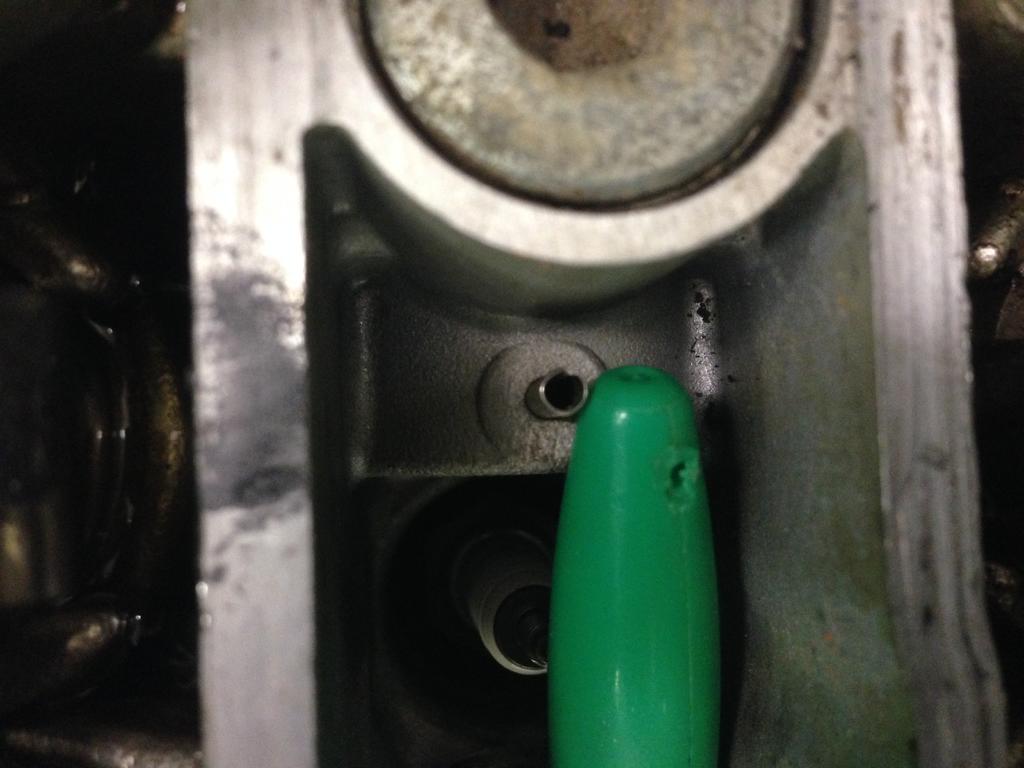
Second look. It's a pin of sorts. -
please help, what would you do?
made2care replied to made2care's topic in Venture and Venture Royale Tech Talk ('83 - '93)
Bad news, maybe. All this time my attention has been on fixing the 2nd gear. Upon Preparing to install carbs today I noticed some rust on #4 valves. I sprayed a little P b blaster on them, let it soak for 10 min then turned engine slowly by hand. Since I had no problems a few months ago adjusting valves I figured everything was good. Will this burn off? Shoot! I should have checked while engine was out !!! -
please help, what would you do?
made2care replied to made2care's topic in Venture and Venture Royale Tech Talk ('83 - '93)
I noticed this little metal tube right next to spark plug. Anyone know what it is and if anything connects to it?i set the green pen pointing at it.
-
please help, what would you do?
made2care replied to made2care's topic in Venture and Venture Royale Tech Talk ('83 - '93)
okay, will do. I still have some electrical to do so I'm hoping by Sunday it will happen!! -
please help, what would you do?
made2care replied to made2care's topic in Venture and Venture Royale Tech Talk ('83 - '93)
Thanks for helping. The only thing I did to the top end is adjust the valves. I just now removed the cam plugs and saw some traces of old oil. I can squirt some oil in , then put plugs back. Will squirt some oil on lobes too like you suggested . I will look in manual too. Thanks again and keep in touch, especially since im getting ready to fire her up😀 -
please help, what would you do?
made2care replied to made2care's topic in Venture and Venture Royale Tech Talk ('83 - '93)
So do I remove the valve covers and lube cams with oil? Not special lube? -
please help, what would you do?
made2care replied to made2care's topic in Venture and Venture Royale Tech Talk ('83 - '93)
I think I am going to remove the spark plugs, pour a little engine oil in and run the starter a few times to lube......just to be safe. -
please help, what would you do?
made2care replied to made2care's topic in Venture and Venture Royale Tech Talk ('83 - '93)
Carbs arrive tomorrow! Man, I'm excited! I have been working on the saddlebags and trunk while waiting on carbs. I think i did mention this earlier and here i go again. My ignition key fits the saddlebags and works great. Ignition key does not fit trunk. I removed the trunk lock but cant find a code. Any suggestions in getting a key for this trunk? Thanks guys. Why did I think getting a key made would be a challenge? Took lock down to locksmith and in 2 min i had a key -
please help, what would you do?
made2care replied to made2care's topic in Venture and Venture Royale Tech Talk ('83 - '93)
Any tips you guys have before I fire her up this weekend. Oil is in , along with antifreeze. Tank is clean with fresh gas. Installed in line fuel filter going to carbs. I'm a little nervous since this will be my first start after an off frame rebuild. I am concerned about getting oil through channels upon startup and someone suggested starting it first with spark plug wires disconnected to move oil through engine before firing. Will it be okay if I just start it up? Anyway, if I left anything out, please let me know. Thanks -
New '83 owner
made2care replied to loweamsel's topic in Venture and Venture Royale Tech Talk ('83 - '93)
Lots of great help on this forum. Check out my thread. I'm getting close to installing the carbs (cost me $700 for a professional rebuild) and firing this baby up. This would be my first off frame resto but I'm not restoring every little piece like some have. Mainly fixed 2nd gear, purchased new slave cylinder, starter, neutral switch, tires, battery and so on. If all goes well, I should attempt first start sometime this month. Good luck with your bike. 83 design is very unique. p.s. Forgot to mention the most important part, "the frame" it was severely cracked and I had to purchase a new one, then had it beefed up with extra welds and supports. You might check yours around the rear suspension. -
please help, what would you do?
made2care replied to made2care's topic in Venture and Venture Royale Tech Talk ('83 - '93)
Thanx for the info. I know with a few goldwing carbs, there is a distance you measure from bowl lip to point on the float and once you have bent the little tab to get that specific measurement, your floats are good to go. Okay, i just checekd with my carb guy and everyhting has been adjusted and checked. All i have to do is adjust the idle. -
please help, what would you do?
made2care replied to made2care's topic in Venture and Venture Royale Tech Talk ('83 - '93)
Okay, Carbs are completed and are in the air back to me. should receive mid week. I was reading over the manual and upon reassembly, it states you have to "level" the fuel?? I thought since the carbs have been professionally cleaned and rebuilt, synced and leak tested this wouldn't be necessary. thoughts? -
please help, what would you do?
made2care replied to made2care's topic in Venture and Venture Royale Tech Talk ('83 - '93)
I see. Another question. What symptoms do I look for if this one is not compatible enough? -
please help, what would you do?
made2care replied to made2care's topic in Venture and Venture Royale Tech Talk ('83 - '93)
Thank you sir. I will try that and let you know how things turn out. What year would this vmax unit be? -
please help, what would you do?
made2care replied to made2care's topic in Venture and Venture Royale Tech Talk ('83 - '93)
Okay, thanks for getting back with me. Would you try to go with a new aftermarket unit or keep the vmax and see how it runs?