Phishhead61
-
Posts
23 -
Joined
-
Last visited
Content Type
Profiles
Forums
Gallery
Events
Store
Everything posted by Phishhead61
-
Mustang Seat for My Royal Star??
Phishhead61 replied to mellco's topic in Royal Star and Royal Star Tour Deluxe Tech Talk
I had a Mustang seat on my 2000 Vulcan 800 and LOVED it! My current bike, 98 Royal Star Boulevard came with an Ultimate Driver & Passenger seat on it and a Corbin seat in a box of spare parts. I didn't like the shape of the Ultimate Driver's seat, but the passenger seat was extremely comfortable (larger, well shaped and padded). I put the solo Corbin seat on and never looked back. I hadn't ridden in about a year and spent almost 7 hours on my first ride with the Corbin and no pain or fatigue at all. If you like a firmer seat, Mustang &/or Corbin are the way to go! Rich PhishHead -
Steven, That would be great! I appreciate it. Rich PhishHead
-
While fiddling with this, I found the exhaust pipe for jug #2 is not nearly as hot as the other 3. I'm also getting a lot more "forceful" (for lack of better term) and cooler exhaust coming from jug #2 . I assume I will never get to the bottom of what's going on with the idle and any issues with the carb/sync until I determine what is going on with the #2 jug. I purchased a laser thermometer and in the next day or so will confirm (with out burning the crap out of my fingers) what the temps are on the header pipes and move forward with addressing the issues with that first. Thanks, Rich PhishHead
-
...Idle speed (sorry). I have a '98 Royal Star Boulevard with the 28mm carbs and the 4 into 4 exhaust. A PO installed 4 pod K&N filters, Nasty Boyz 4x4 exhaust, and rejetted. I installed baffles and had to rejet. I found the thread for the Big Foot mod, and I used the setting they recomended (the needle clip setting, 17.5 main jets, and I already had what they suggested for the pilot jets). It ran OK...I did notice a couple of issues though. It seemed like the rpms would hang before dropping back down. I read that was a sign of a lean running engine. I would also sometimes get a "gasp" when I would be coming to a stop, but then didn't need to and gave it some throtle. I checked the jug #1 plug and it seemed to be just a tad (barely noticibly) white. I thought I would try the next size up main jets. I figured if it was too rich, I would see it in the plugs. I was also concerned that the 4 pods might be letting through more air than the one big K&N filter, so it was concievable that it needed the bigger jet. After installing the bigger jets (I didn't open or touch the slides/diaphrams or needle settings this time), with the carbs back on the bike and a carb sync performed, I now have a new issue. The bike is idling at about 1200 rpm and I have the Idle Set Screw backed out so far it's not touching the carb. Nothing is caught up in the choke mechanism. I noticed when I screw the PMS in on jug 3 & 4 I can hear the engine bog down, but not so when I do it to jugs 1 & 2. The engine doesn't seem to hang when rpms are dropping. Any ideas as to what could be causing this?
-
I spent some time today doing some trouble shooting. I'm testing this with the pump still on the bike. I took the points off and was comparing them to the first set and found a very thin paper gasket on the back side of the original points, so I transfered it over to the new points and put them back on. While doing so I made sure I caught the "grove" in the plunger with the point set. I tested the wires from the bike at the connector to see if there was electricity coming through. This was difficult as you only have 5 seconds after turning on the "run" switch. After several unsuccessful attempts, I got my daughter to flip the switch for me and I didn't seem to have any electricity coming through the black/blue wire. I tried using the ground side of the connector and grounding it to the bike. I checked (and tested) the fuses in the fuse box and they were fine. I then tried a jumper at the connector to the pump. This would activate the plunger and pull it out. When I disconnected the electricity, the plunger went in. I plugged the connectors back together and when I hit the "run" button, the plunger pulls out and about 5 seconds later the plunger goes back in (although sometimes it only took 2 - 3 seconds, but most of the time it was 5 seconds), so apparently I am getting electricity through the connector on the blue/black wire and the points work. My understanding is the electricity to the pump should be a constant on (yes, 5 seconds until the bike is running, but constant after that). The pumping action is controlled by the points and the electromagnetic field going on and off, and not by the electricity to the pump going on and off (why would you need the points if that was the case?). So now I'm stumped. Rich PhishHead
-
I know there's lots of threads about fuel pumps...I've read most of them. I have a question that I haven't seen asked: When you take the points off to replace them, should you be able to push/pull the plunger stem that sticks out of the body of the pump? I have a '98 Royal Star Boulevard with 50K miles and had the usual symptoms of a bad fuel pump. I assumed it was the points and ordered a set. I changed them today, and when I opened up the cap/top of the pump, the points were fine. When I put the two sets of points next to each other, the new ones were silver in color, and the old ones were a coppery kind of color...that was the only difference. No corrosion...nothing. They may have been changed already by a PO. I went ahead and changed the points, but now I get no clackety-clack when I turn on the "run" switch, and it won't start (it tries to, but just can't quite "catch"). I did notice the plunger going into the body of the pump would not move. I didn't know if this is an issue or not. If it's not, I guess I will start trouble shooting the electrical going to the pump. Thanks for any and all input, Rich PhishHead
-
I have had headlight modulators on all my bikes. I think they are the # 1 safety feature you can add to a bike. I had one on my first cruiser, but I put it on at the same time I put on louder pipes, so I didn't know how effective the modulator itself was. People definitely stopped pulling out in front of me, but I wasn't sure if it was the pipes, the modulator, or a combination of the two. Then one day I was in my car and saw a bike with the headlight modulating and you couldn't help but see that bike. I've put one on every bike I've bought since then. PhishHead
-
Intake manifold boots
Phishhead61 replied to wrscomncents's topic in Royal Star Venture Tech Talk ('99 - '13)
I have to replace my boots also. I'm confused by the discussion about the "O" rings at the bottom of the boots. I have a '98 Royal Star Boulevard, but I looked at the parts diagrams for mine and a 2004 RSV and I don't see any additional "O" rings to order. I also looked at a picture of the boot and it appears to have an "O" ring built into the bottom of the boot. I don't want to pull it all apart again until the boots I ordered come in, but I don't want to wait on more parts after I pull it all apart, SO the question is, when you are discussing "O" rings, are they the ones that come on the boot, or are there additional "O" rings that need to be ordered (and if so, what are the part numbers...I can't find them in the spec sheets). My boots were cracked through at the tops and causing issues. They are 20 years old and after removing and replacing the carbs a couple of times they split through. Just as an FYI to anyone having the issue with the boots splitting at the top, I used a product called Seal-All on all the cracks. I followed the directions and put 2 coats of it on and it held for 3 days of riding. It's still holding as far as I can tell, but I will replace them as soon as the new boots get here. Rich PhishHead61 -
Update: it was the vent hose. I'll explain more when I get to the motel. Update: so I thought it was probably the vent hose, but I didn't bring my hex set with me. The vent on my bike is under a chrome cover that surrounds the tank mounted speedo. It's held on with 3 hex bolts. Long story short, I waited for about an hour until it was completely cooled down and rode it back to the gas station I had bought the gas at. The mechanic there took off the chrome cover and low and behold I couldn't blow through the vent hose. He gave me a piece of hose and I put it on and tucked in in out of the way and was on my way. My guess is I pinched that hose or someone that called me suggested the gas stirred up something that clogged it. Thanks to the several people that called me! Great people on this site! I posted in the watering hole also, but I have gas coming up from under the gas cap. The tank is not over filled. Every time I try to ride down the road gas comes squirting out from under the cap. I'm on the side of the road... Any help/advice would be greatly appreciated. Rich PhishHead61
-
Update: it was the vent hose. I'll explain more when I get to the motel. Update: so I thought it was probably the vent hose, but I didn't bring my hex set with me. The vent on my bike is under a chrome cover that surrounds the tank mounted speedo. It's held on with 3 hex bolts. Long story short, I waited for about an hour until it was completely cooled down and rode it back to the gas station I had bought the gas at. The mechanic there took off the chrome cover and low and behold I couldn't blow through the vent hose. He gave me a piece of hose and I put it on and tucked in in out of the way and was on my way. My guess is I pinched that hose or someone that called me suggested the gas stirred up something that clogged it. Thanks to the several people that called me! Great people on this site! The title says it all. I was on the highway for about 45 minutes, got off on a back road, road about 10 minutes and stopped to fill up. I didn't over fill it and even if I did, enough has poured out that it shouldn't be an issue. Got a half mile down the road and had gas coming up from under the gas cap. Stopped an took the cap off and the level in the tank rose up and poured out and then went down and it bubbled like air was being released, then it rose up again. It did this 2 or 3 more times and the I shut off the gas petcock and it stopped. I got back on and got 50ft down the road and it did it again. Went through the whole thing again. When it stopped I tried to ride it again and I got about another 50ft down the road again and gas came pouring out From under the gas cap again. I'm looking for answers in the tech area, but can't seem to find any thing. I have limited tools, but there are some houses around. I'm riding a 98 Royal Star Boulevard. Thanks, Rich PhishHead61
-
Any LED replacements for passing bulbs?
Phishhead61 replied to Wortheim's topic in Royal Star Venture Tech Talk ('99 - '13)
You've probably already found something by now, but in case you haven't, or to help someone else reading the post years from now, here's what I used: Fair warning...My bike came with the spot lights so I have no idea what brand they are. I tried the sealed beam replacement (not the exact bulb recommended above but very similar) and found it wasn't quite big enough to fit into the housing of the spot light. What I ended up using was this LED H3 bulb: https://www.amazon.com/gp/product/B01MXJAI6T/ref=oh_aui_search_detailpage?ie=UTF8&psc=1 Rich PhishHead61 -
Hey Gang, I have a '98 Royal Star Boulevard (XVZ13A) which a PO did a lot of work to. They installed K&N pod air filters, Nasty Boyz 4x4 exhaust, and re-jetted the carbs. I have added baffles to the exhaust due to how loud the aftermarket exhaust was. This is causing the bike to run VERY rich. I have to re-jet, but in order to do some calculations as to what to re-jet to, I need to know how big the exit hole in the back the stock muffler is. Could someone run out to their garage/shop/shed and measure the diameter of the exit hole in their stock 4x4 exhaust? Thank You! Rich PhishHead
-
Just a follow up on this thread. I made the ride Saturday! Here are some things I wanted to post here so if anybody in the future finds this thread they will be forwarned. There's 3 parts to the clutch hose; the upper hose that goes from the clutch lever to the right side of the bike just above the rear brake fluid reservoir (I won't be referring to this hose at all as I didn't replace it), and the lower hose that is split into an upper half (that connects from the upper hose to a connector behind the #2 cylinder exhaust pipe), and the lower half that connects from there to the clutch slave cylinder. The part number for the lower half of the clutch hose is the same part number for the '98 Royal Stars and the '07 (and probably all years, but I didn't check others), so I bought a used '07 rather than a used '99 I had found. I figured I should replace it with the newest part I could find. Even though it was the same part number, the '07 was shaped a little bit different. It fit, but did not run through brackets that secured it to the bottom of the engine correctly. For the rear most connection point the hose was running a little too high, so I secured it with a zip cord to the bracket. For the forward bracket, I probably could have connected it properly, but there was a plastic connector that crumbled to pieces when I removed it, so it got zip corded in place too. I found the upper half of the lower hose was a completely different shape, so I kept the one that was on the bike, since it wasn't leaking. I disconnected the upper and lower hoses at the connection point above the brake reservoir, disconnected the 2 clips holding the upper half of the lower hose. I did all this to give myself some slack in the hose because I ended up disconnecting the upper and lower halves of the lower hose in place on the bike. I wanted to pull the whole lower hose off and change out the lower half of the hose on the work bench, but I couldn't find a way to get the whole hose out in one piece. There was very limited space to work (behind the front left exhaust pipe), and it took many, many small incremental turns of the wrench to get them apart (and even more to get it back together again). Just go slow and easy...I also put shop towels over all the chrome in the area to limit the amount of damage a slipped wrench could do. Make sure when you start the job to order/get everything you need. I didn't think about the gasket and copper washer that needed to be replaced when removing the alternator/generator cover. I almost didn't get them in time since they are OEM parts (at least the gasket is). I did order banjo washers (after market) and brake fluid ahead of time. I got everything back together late Friday afternoon, took it for a test ride for an hour or so Friday evening, and made it to the ride Saturday morning and had no mishaps. Thanks for everyone's input and advice! Rich PhishHead
-
Much of that is on the list for this winter, including removing, cleaning and probably rejetting the carbs. I figure since I'm already going to have the carbs off, I might as well check the valves too. BUT...I'm trying to get this hose changed in time to make it to a charity ride this Saturday, so everything else is going to have to wait. After that, I don't care if the bike is down for the winter.
-
Condor, Thank you! I think it's beautiful! The hard bags are Mutazu. I don't think they were added in '98...I'm thinking probably in the last 3 to 5 years. Du-Ron, I see where I was confused. Your parts sheet was for the upper part of the (lower) hose, and I was looking at the (lower part of the) lower hose. Part #17 on your part sheet is the part that has to get snaked up behind the radiator. I'm still undecided as to if that part needs to be replaced. Once I get into it I'll have to decide. I had thought there was another connection spot on part #32 on my parts sheet (across from bolt #30 ), but I looked at the bike (and the parts sheet) again and it appears to be another spot that is "cushioned" to go through another mounting bracket on the bottom of the engine. So that was my original question...could I disconnect it there (across from bolt #30 ), but now that I've looked closer at the bottom of the bike, I see it can't be disconnected. My secondary question was do I need to remove/replace part #17 , and I'm still not sure on that. There's not a whole lot of space where the 2 hoses come together, so it may be easier to replace all of it rather than trying to take it apart at that connector. It's behind the front left exhaust and it's a really tight squeeze. Thanks for all the info. I kind of feel bad about wasting your time, but I do appreciate the help. Thank You! Rich PhishHead
-
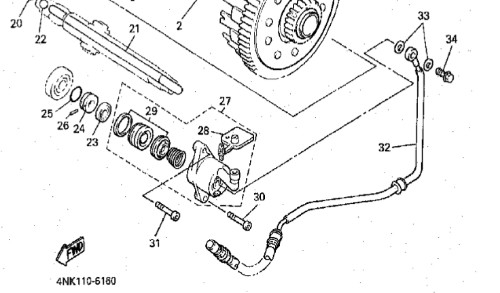
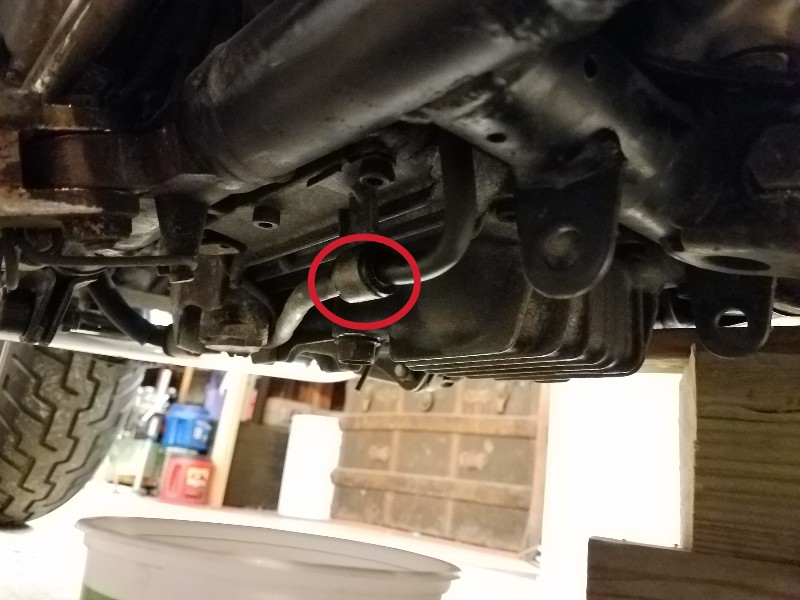
I'm still trying to figure out what a Royal Star Boulevard is myself...lol. You can see pictures of mine if you click on my User Gallery link. Apparently it is a stripped down version of the Royal Star line. It's a '98 so it has the 28mm carbs, 4x4 exhaust, but came with no bags or fairing. I don't believe it came with a windshield either. It's normally listed as a Royal Star XVZ13AK (sometimes with the K on the end, sometimes not). I was told by the PO the bags, fairing, and mufflers, etc. that are on it were added by the owner before him. What I'm showing in the picture is where the clutch hose is attached to the engine by the support bracket (and where it is leaking). It has a cushion (for lack of better term) around the hose where it is going through that mounting bracket. That may be why it looks so big. The parts sheet from Bike Bandit is attached below (it's part #32 ). You can see the cushion thing comes as part of the hose. I'm curious as to what year/bike the parts sheet Du-Ron is showing is for. It looks quite different from mine and the one shown at Bike Bandit for a '98 RSB. I'm leaning towards replacing the whole thing, as Du-Ron suggested. The rubber is almost 20 years old and if it's leaking in one spot it's only a matter of time before it leaks somewhere else. I've been looking at it some more and it may not be as difficult a task as I initially thought to weave it up through all the stuff behind the radiator. I just wanted to know if just changing the back half of this lower hose was an option. It looks like it is, but not the best option. Thanks, Rich PhishHead

-
I have a leak in my clutch hose (shown in the picture below). (this is looking forward on the bike - that's the front tire you see) There is a spot about halfway up/down the hose that looks like it has a fitting that can be unconnected/reconnected. It's behind the left front exhaust pipe. Has anybody just replaced the hose from this fitting back? It seems it might be easier to just replace the back half of the hose (the part with the actual leak) rather than trying to snake the hose up through all the stuff behind the radiator. Any input would be appreciated. Thanks, Rich PhishHead61
-
Do I need to drain the oil to remove the alternator cover? My clutch hose has developed a leak and in order to change it I have to remove the alternator cover. The book says I need to drain it, but it is also talking about taking the side cover off, so I wasn't sure if I am only removing the alternator cover if I need to drain the oil. I just changed it 3 rides ago. I know I can reuse it, but if I don't have to drain it, that would be even better. Thanks, Rich PhishHead61
-
Thanks for the info Gentlemen. You guys are right, I'm going to have to rejet (argh!). I spent an hour and a half trying to find a shop with a Dyno that would work on my bike in my area to no avail. I just wanted to get an estimate as to what it would cost to have them do it, but I guess I will be doing it myself. I'm not going to have time to start working on this until January. I'm thinking the first step is going to be pulling the carbs and seeing what's in there, compare that to what the stock settings should be, and go from there. Is there a video available showing the removal of the carbs on our bikes? It would be helpful. Earl...Is there a chart or something that will convert the size of one brand of jets to the other brands? Also, do you know what size/brand jets are stock for the 28mm carb? Are the jets for all 4 cylinders the same, or are some of them different? Thanks for your time. I'll probably be posting about this again in January. Hope you're still around for advise if needed. Rich PhishHead61
-
Thanks for the input everyone! I figured I was going to have to rejet, but I'm not going to have time to work on it until after the first of the year. Hope you're still around! My understanding is the sizing of the jets is based on air flow. At this point, with the baffles in, they seem to be the restricting factor in the equation. If the exhaust output size is the same as stock, even with the K&N filters, the jets should be the same as stock. This is my understanding...I'm not a carb (or engine) guy, so I could be, and probably am, missing something. If so, please let me know what I don't know...lol. Having said that, does anyone know the output size for a stock 4x4 exhaust? As I said, I've read a LOT, but have no real hands on experience. I'm sure I could handle this with proper info from you guys, but I'm in the dark as to where to start (sizing wise). On the other hand, does anyone know approximately how much it would cost to do as Earl suggested and send it out to a proper shop? Thanks, Rich PhishHead61
-
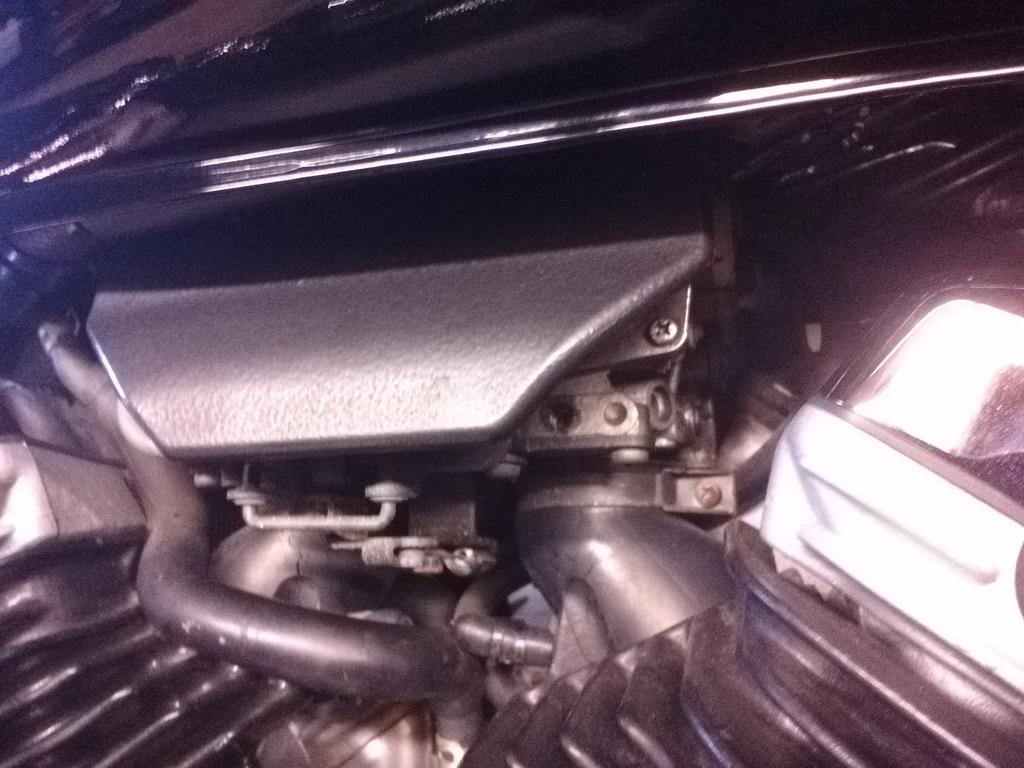
On the RSB, they are on the outside, under the diaphram assembly. It's shown as #8 (the plug) and #9 (the screw) in the carb shown at the bottom of the diagram: https://www.bikebandit.com/oem-parts/1998-yamaha-royal-star-xvz13ak-carburetor/o/m146104sch106609 In the first picture, the carbs are behind that "tab thing" pretty much right in the middle of the picture. That "thing" is what's in between me and getting a straight shot at the holes the pilot/idle mixture screws are seated down in. The second pic is from an angle to the right, and it's showing the actual hole the pilot screw is down in. It's that hole that's shown right next to the bottom right corner of the "tab thing". It's actually behind it, but because of the angle, you can see it. Thanks for the quick response! Rich PhishHead61
-
Hey Gang, I have a '98 Royal Star Boulevard (at least that's what the title says). A previous owner installed K&N Air filters (4), Barron's 4x4 Nasty Boyz exhaust, and rejetted the carbs, and presumably adjusted the Pilot/Idle mixture screws (as the caps are missing). It does have the 28mm carbs, so it's a completely different set up from the RSV's 32mm carbs. I found the pipes to be far too loud and have installed baffles that bring the exiting diameter of each pipe from 3" down to 1 1/2" or slightly more. This gave me a slightly quieter bike, a better sound note, and lots more low end torque. As you would imagine, the bike is running very rich. It's hard to start (but does!) and smells slightly like fuel when running. I'm not really a carb guy, but I thought at least for now, I could adjust the pilot/idle mixture screws to lean it out a little, at least in the low speed circuit of the throttle. After lots and lots of research, I finally found where the pilot/idle mixture screws are, but I can't readily access them as there is a metal "tab" (for lack of a better word) just like the RSV's have (see pics below). The second pic is taken at an angle. You can see the hole and I can confirm there is a slotted screw deep inside that hole. Unfortunately, there is not a straight shot at any of these screws so I can't get a screw driver down in there. Does anyone have any advise on how to adjust these? IIRC, those tab things are welded on (this may not be true, as I wasn't specifically looking at them when I had the tank off, but that's kind of what I remember). I had hoped to get a ColorTune and adjust the pilot/idle screws in real time, but I just can't see how that can be done. Any advice would be greatly appreciated. Thanks, Rich PhishHead61
-
Passenger floor boards
Phishhead61 replied to Rpatton's topic in Royal Star and Royal Star Tour Deluxe Tech Talk
I have a 1998 Royal Star Boulevard that had passenger floorboards on it when I bought it. It also has the aftermarket Barrons Nasty Boyz 4x4 exhaust. I don't know if it was an issue with the fitment of the aftermarket pipes (I doubt it), but in order to get the floor boards to fit they had to cut out a piece of the heat shield in the header pipe. The floor board sits very, very close to the inner pipe and I can only imagine it gets pretty hot. I remember seeing a post about there being 2 different styles of rear floorboards and supposedly one style "might" fit, but I have not found the other style when looking on ebay...all the one's I have found are shaped the same as the ones I have. Good Luck! Rich PhishHead61