VanRiver
-
Posts
456 -
Joined
-
Last visited
Content Type
Profiles
Forums
Gallery
Events
Store
Everything posted by VanRiver
-
 Thanks @Jamsie ! Yup my impeller is metal so thankfully one less thing to replace. I'll get the sand paper rig built and eliminated the fine scratches like you said. Cheers!
 -
Wow I learned something tonight.....Those Buco Jackets are worth a Pretty Penny (I know yours is priceless based on how you came to owning it). Looks like those Buco's are currently going for $1,000 to $3,000 range on eBay, and they are not even close to being as nice as the one you have. Here is one that appears to be similar to yours in design but was made by Buco for Sears in the 1950's. Guy wants $2300 for it. http://www.ebay.com/itm/1950s-VINTAGE-D-POCKET-STEERHIDE-MOTORCYCLE-JACKET-ROCKABILLY-HOTROD-CAR-CLUB-/301896822895?hash=item464a73f06f:g:tzMAAOxyOalTbE2Z Might want to get some extra house insurance to cover your new Vintage leathers!
-
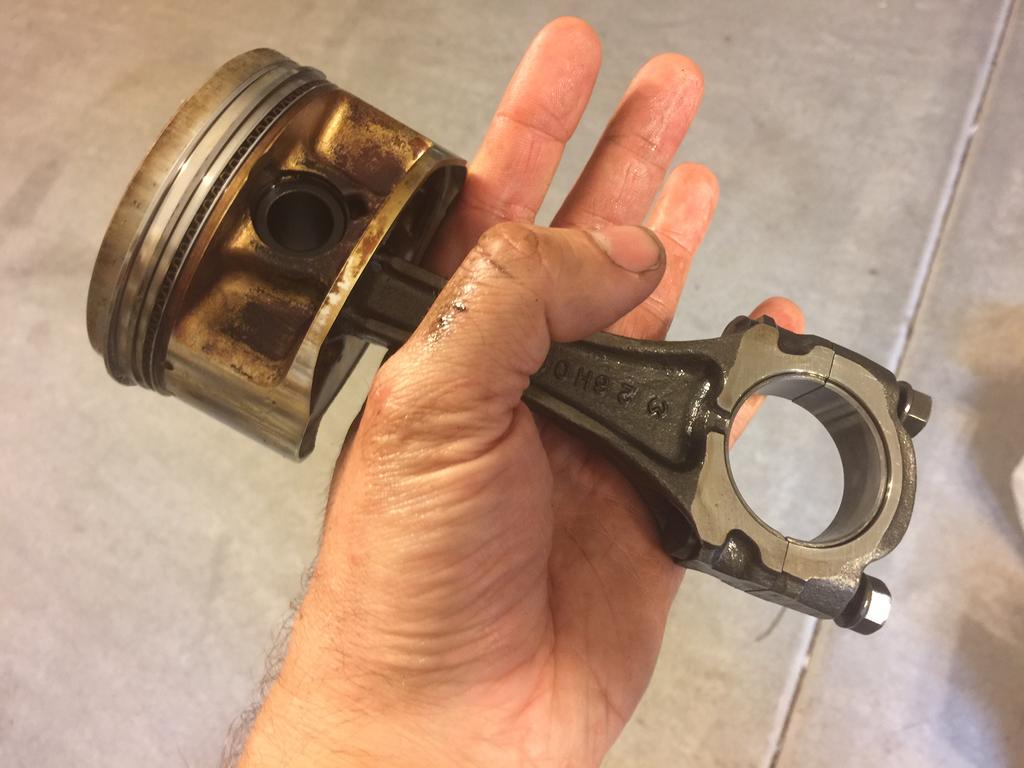
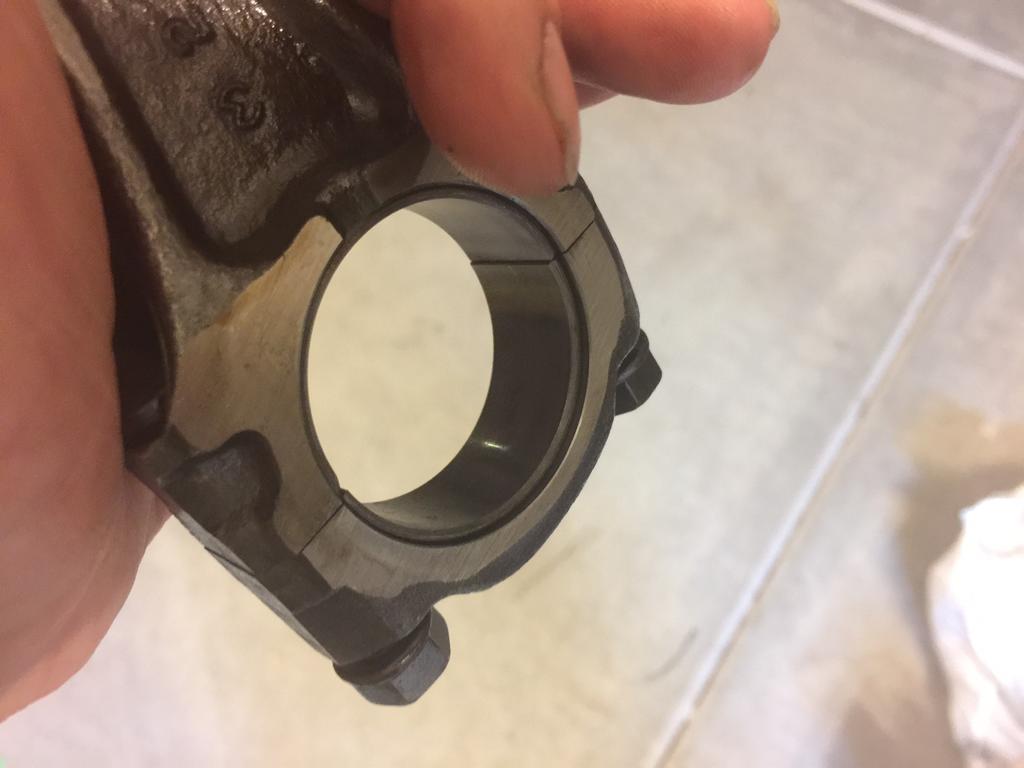
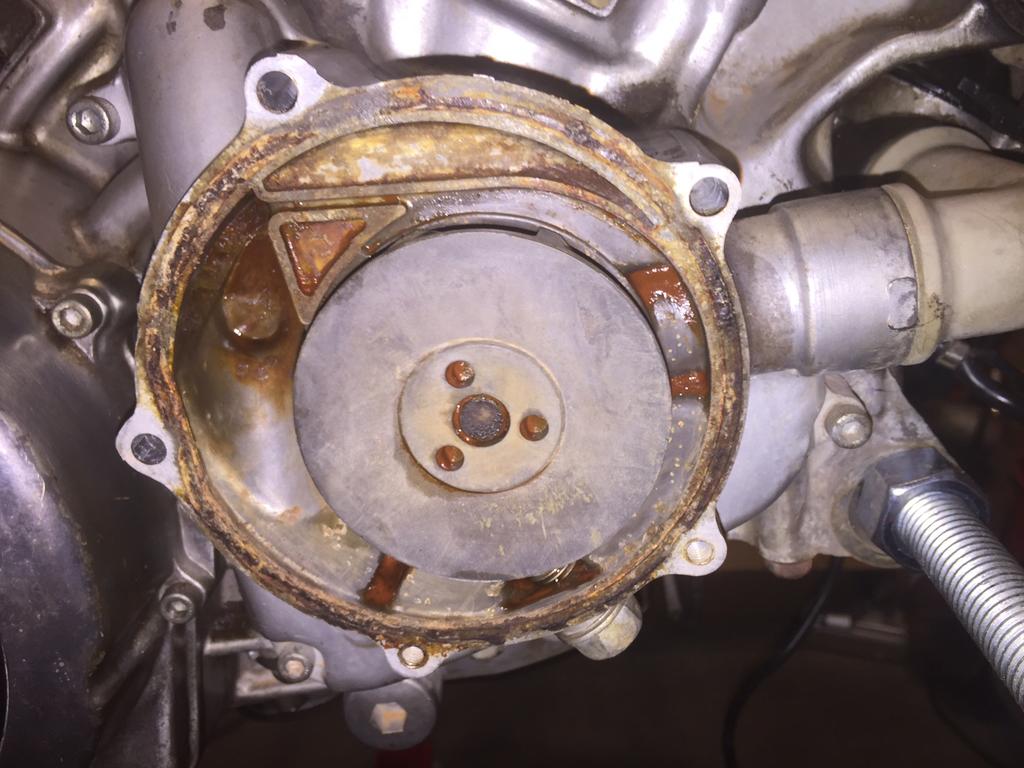
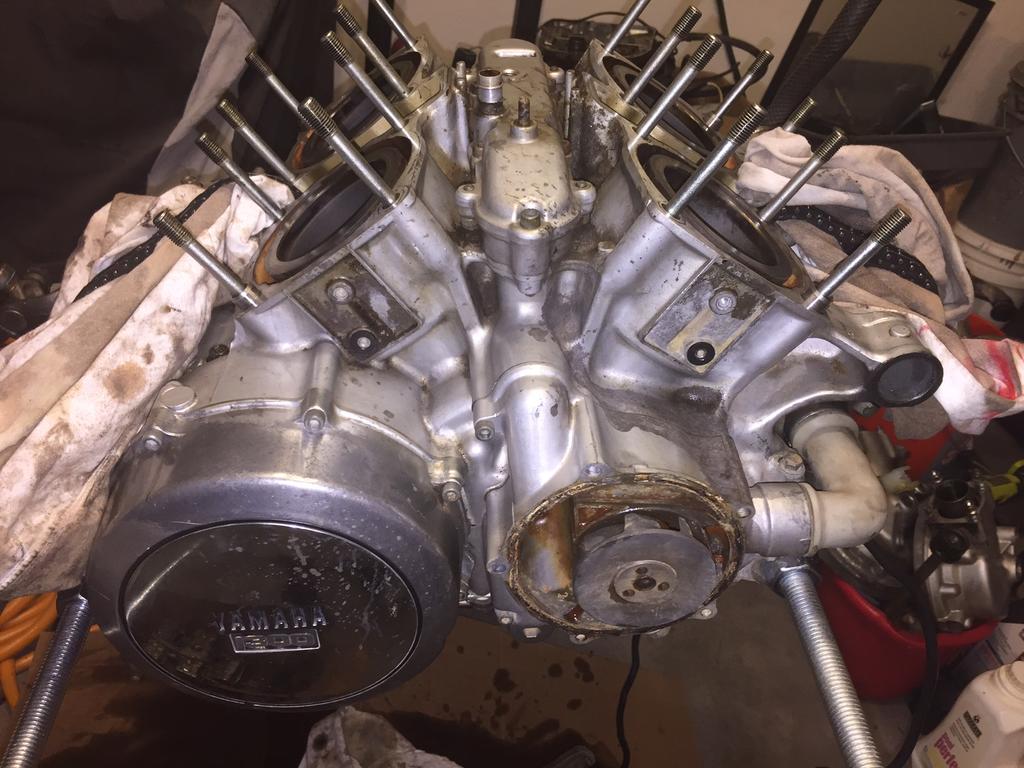
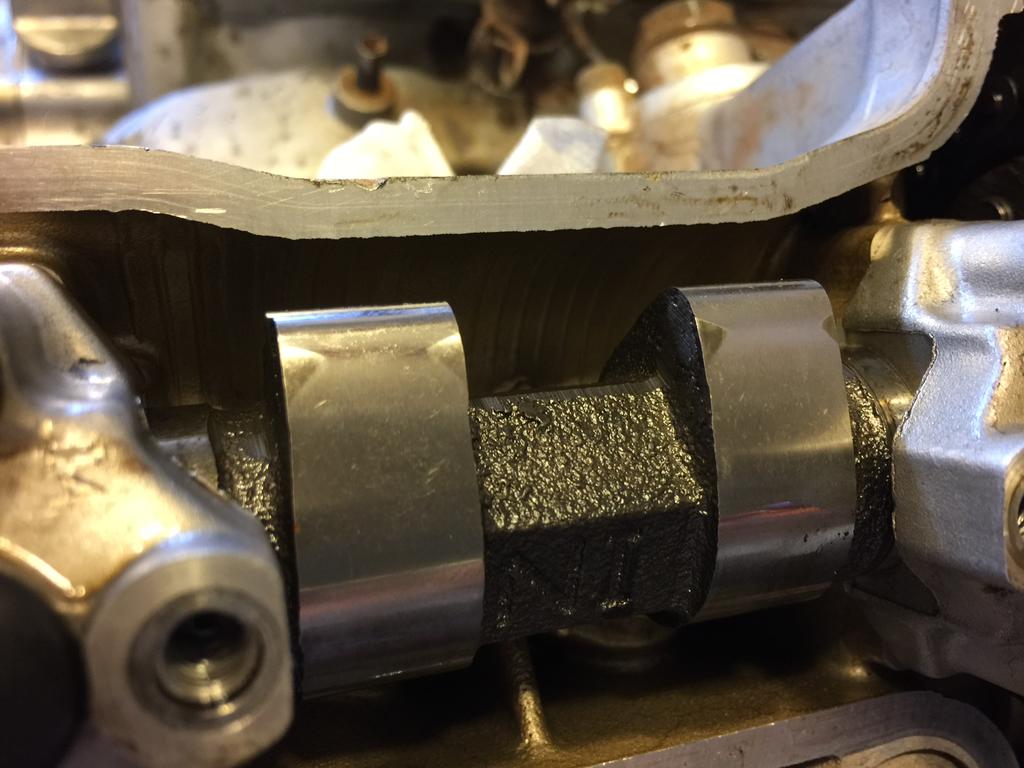
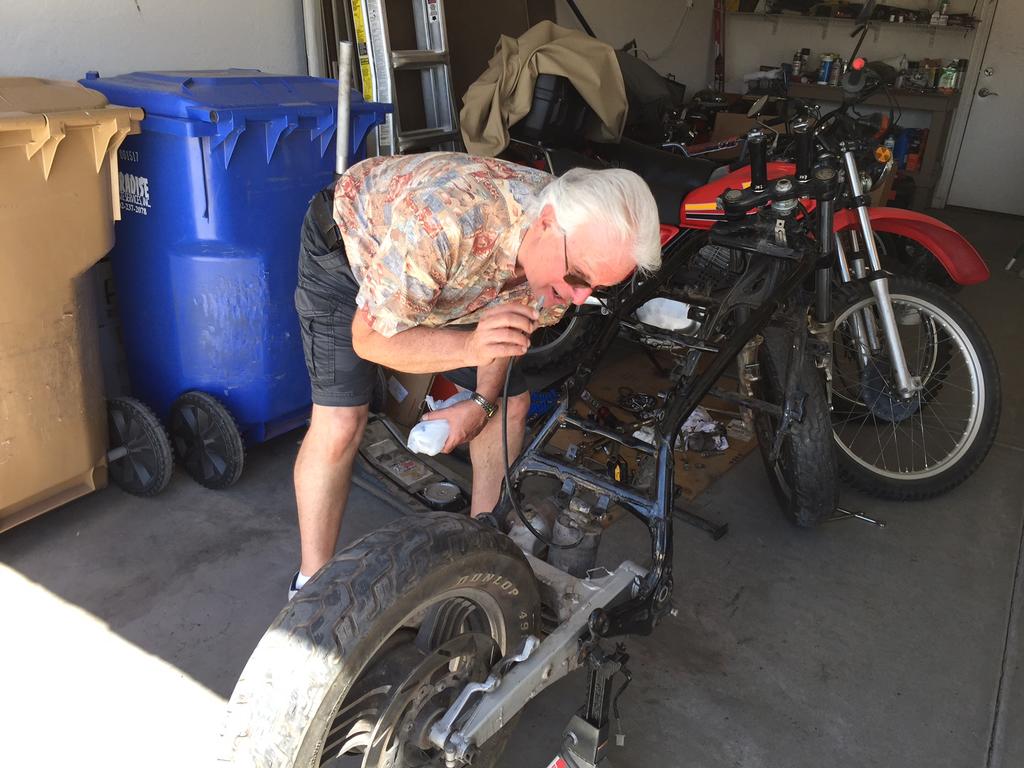
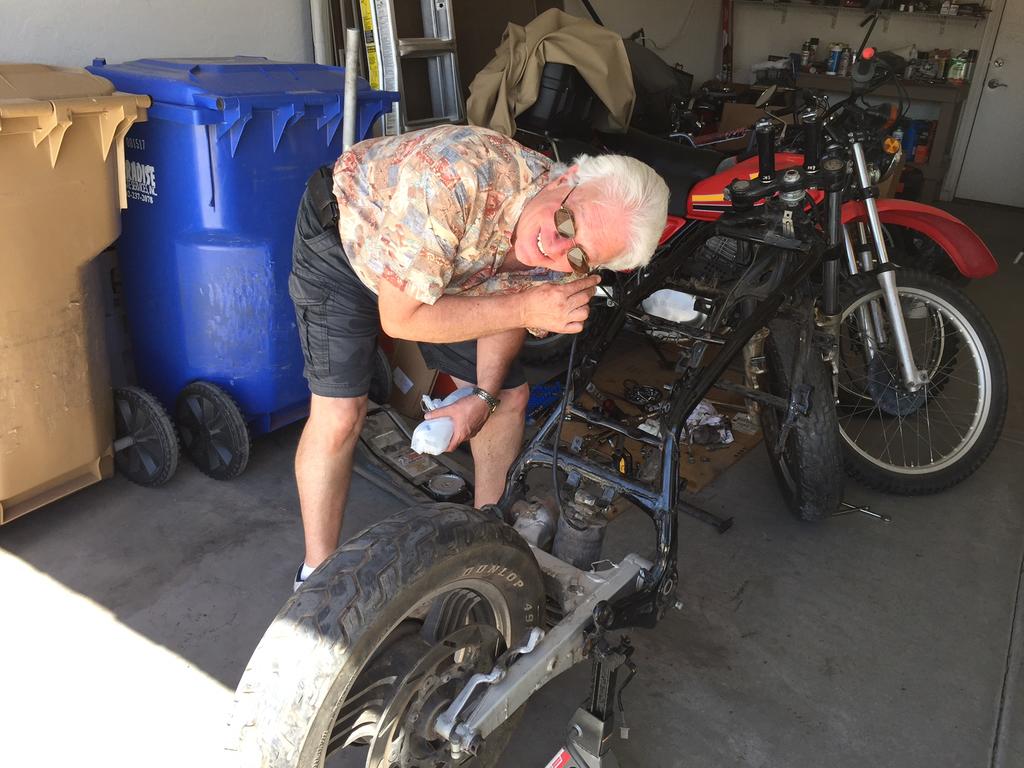
Well, here is todays wrench turning update. I pulled the pistons out today in preparation for honing the cylinders. Everything looks great, pistons rings, bearings all appear to be A-OK which substantiates the theory that water got into the cylinders while in storage and evaporated out in the hot Arizona sun, but not before leaving some corrosion behind. There is some evidence of bearing wear, but nothing abnormal for a motor with approx 57,000 documented miles (according to my novice eye). For the sake of cost and effort I will only be honing the cylinders and replacing the rings.....but will be using the existing rod bearings. So now the waiting game begins....I ordered the new Rings from Partzilla yesterday....plus a hone and ring compressor from Amazon. Looks like the stuff from Amazon will be here in 2 days but the Rings will be here in 4 days. Since my vacation time is running out and I'm an "instant gratification" type of guy I might check out one of the local auto parts stores that has a rental tool option, as I think I could probably rent a hone if I didn't want to wait for the one I ordered....we will see. I also disassembled one of the V-max heads and pulled the valves out in preparation for cleaning, lapping, and seat replacement tomorrow. By the way, I have a couple of question for you experts : 1. What is the best product and technique to use to remove any old gasket residue on the heads and block? 2. There are some light but visible scratches on the head surfaces from shipping and being moving around, nothing major but still visible. Should I give it a light sanding on a very flat surface like sandpaper glued to a thick flat sheet of glass just to clean them up? I have seen several videos on Youtube showing that procedure. I don't think they are major enough to need milling, but I don't want any head gasket leaks either! Your feedback is always welcome!!!! Here are some pics of my work today: Crank bearing surfaces look good: All Cylinders need to be cleaned up, here is the worst one with the most corrosion evidence: All Rods and pistons look A-OK, but some bearing wear but nothing abnormal from what I can tell: Removed the valves from 1 V-max head today using my $12 spring compressor...works great...thanks Amazon! Will be cleaning, lapping, and replacing valve guide seals tomorrow. Trying to clean out lots of rust and gunk out of the cooling system....check out the dirty water pump! and this pic was after me wiping and preliminary cleaning. Yuck! Poor Maxine the Donor engine ....she sure had a rough life over the past years wasting away, just sitting in a half disassembled state. Criminal what the previous owner did to her. Hopefully she will have a new lease on life once I'm done and hopefully I can figure out how all these parts go back together!!! Mother Yamaha always leaves some extra pieces in their engines....So having some extra bolts, pistons, gears, and gaskets left over is not a bad thing? Right?

-
A Fantastic story like that which goes along with the leathers really makes them SPECIAL!!!!! So glad they were passed on to you and a good home. If you get the pictures of "Grand Dad" please share them if you can! I would love to see the original owner using them for what they were made for. Back when "Men were Men" and "Motorcycles were Motorcycles"! If those leathers could talk, that would be a tail worth listening too.
-
Hi @Flyinfool you got it buddy! Let me know what you need and I will be happy to provide it while Maxine the Donor engine is cracked open to the world. My Vacation is unfortunately coming to an end on Saturday so no more fun and wrench turning on the AZZI project until probably Christmas vacation, so let me know before Saturday and I will send you whatever you need ASAP. Jeff, I would be honoured to be your first paying customer if you decide to make some of those brackets to sell.
-
Hey @cowpuc I opened her up because the "Garage Forman" (that is you by the way) planted the thought in my head and suggested it. You are the "Bad Influence" that gave me the confidence to crack her open! I love good advice!!! But, I have parts and pieces scattered all over the garage now! Hope I can put "Humpty back together again"! As for getting to Michigan in half the time, might need to build "AZZI-Jet" instead of "AZZI-Max" for that trip.....but hopefully I can partake in one of those legendary hotdogs someday with ya Buddy!!!!
-
Now that is some nice Leather apparel!!! Love the classic stuff! Where did you happen to stubble upon that? Or was it already hiding in your closet?
-
Hey @Flyinfool I love these type of super informative "Thread Hijacks".....feel free to do it ANYTIME in my threads! So I guess Mother Yamaha does make mistakes every now and then. That bracket looks like a pretty slick solution to beat the "battle of the bulge".
-
Wow that is a BEAST! All that V-8 goodness, but only 45HP.
-
Thanks @Flyinfool for the link! In all my research this is the first time I've heard about this problem! "9 out of 10 V-max engines have the bulging o-ring problem" according to the link.....so it looks like I'm part of the group rather then the exception. Wonder If I have that on my other Ventures too?
-
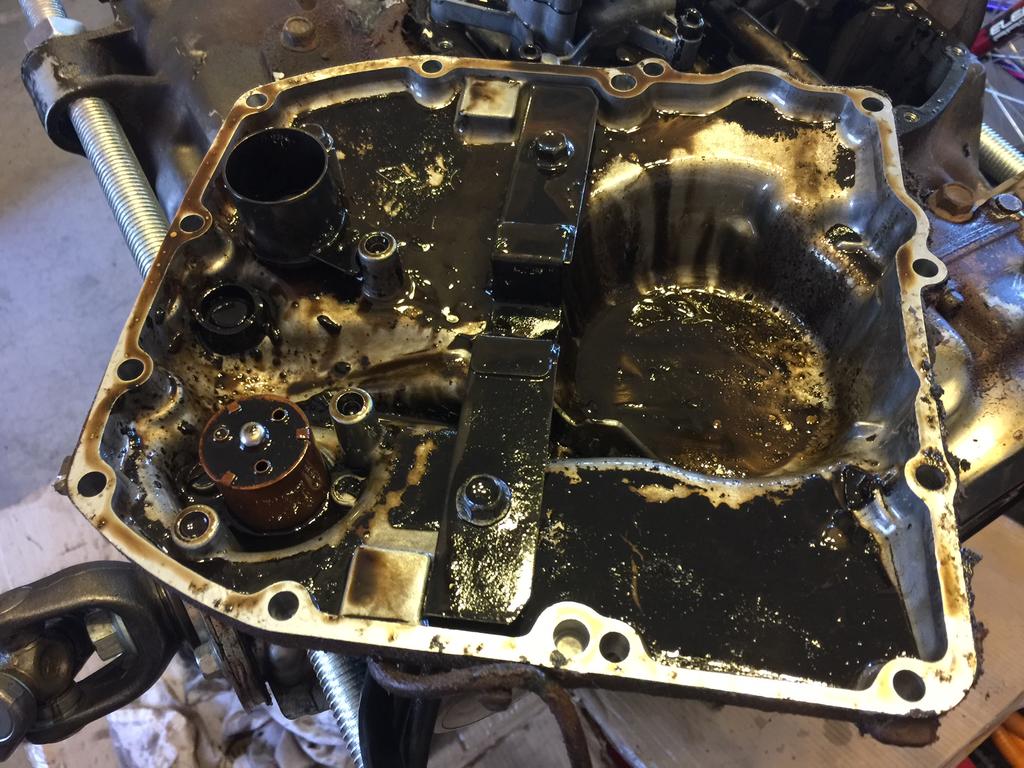
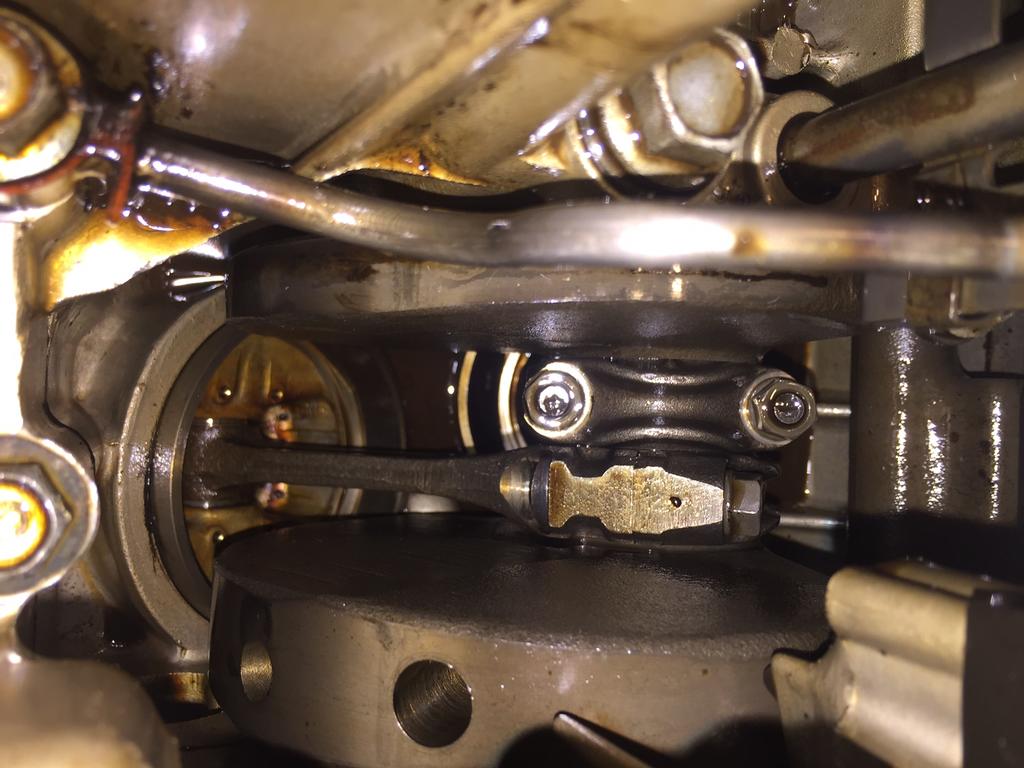
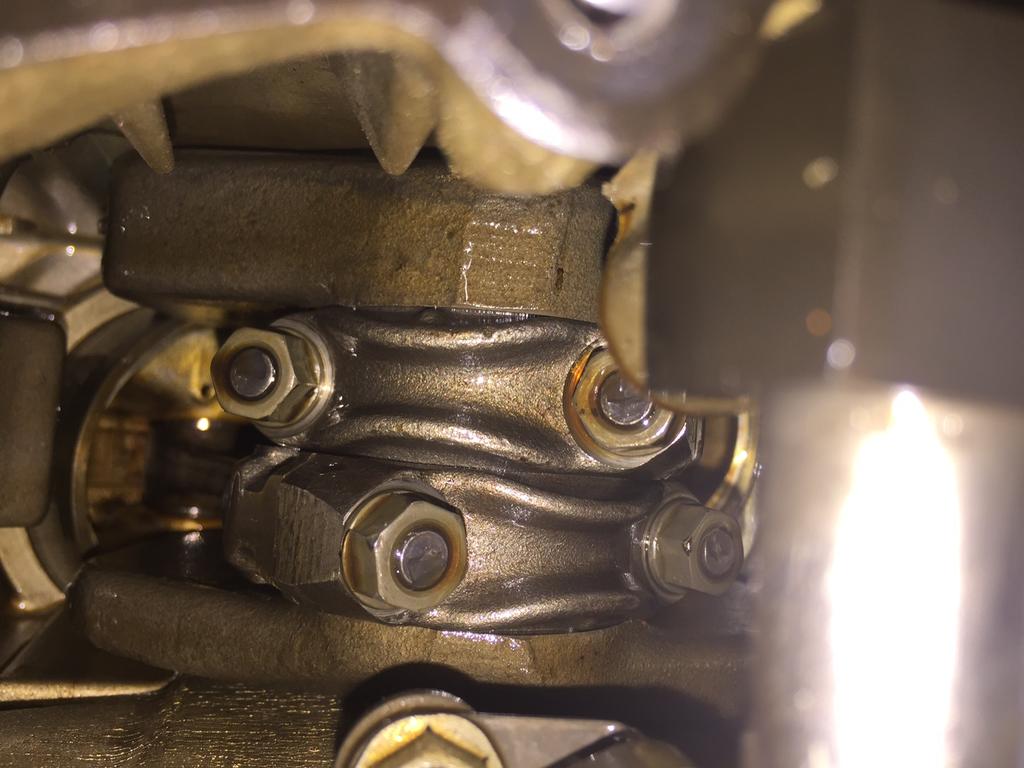
Thanks everyone for your fantastic insight and suggestions! And please don't get me wrong, as I'm not discouraged! I'm doing this project for the fun of it and to learn! If everything went smooth and perfect it would be totally boring, or I would simply send it out to professionals to do it form me! Plus, I haven't been this deep into a “big" motor like this before...and probably wouldn't have the courage to do this without my "Venture Support and Rehab group”! You guys/gals and this forum are the best!!! Sorry @Trader I'm not ready pack up the V-max parts and sending them to you just yet! OK todays update....family went to the mall for 2 hours so I ran to the garage to turn some wrenches. I really don't want to go down the path of splitting the block and redoing all the bearings etc.....I'm on a budget and it would really delay my project too (order all the parts up to Canada and then bringing them back to AZ for the next vacation trip). But on the flip side, I don't just want to slap it together and "hope for the best" either. So I proceeded to follow @Flyinfools and @cowpuc advice, and I focused on measuring to make sure there was no bent rods as well as I pulled the oil pan to take a look inside to see if the water and corrosion went deeper. Well @Flyinfool, good news! All measured the same so I think we are A-OK and no bent rod or Hydrolock history! Yippie! @cowpuc I pulled the oil pan and things look pretty good in there! There is no evidence of corrosion down there. The original oil in “Maxine" was sludgy and black but no evidence of any coolant or water in it when I originally drained it. And before I started to pull her all apart I put fresh oil with some marvels mastery oil added and then I cranked it with the starter and let it sit for a couple of days to help clean her out and drained it again when I started all my wrench turning. SO...my theory is that possibly this moister and corrosion in the 2 cylinders was probably caused by moisture entering while it was in storage with the carbs off....mayby stored outside and some rain got in rather then a coolant leak....The bike has been in pieces and in storage for almost 10 years according the previous owner. And if he stored it outside with just rags stuffed in the intake during a few Arizona monsoons then water probably found it’s way into the 2 high side cylinders. So although corrosion and water is bad, in this case I think it is the best of a bad situation and hopefully solved when I clean them up with a hone. So this is what I'm thinking of doing in the interest of trying to do the Job as "right" as I can while also taking the cheap skate route. 1. I think I'm going to pull the rods and pistons out. I can access them via the oil pan without the need to split the case. 2. I'm going to hone the cylinders (with Cylinders out) to see if I can remove the rough areas from the corrosion and glazed areas on the good cylinders. I know you guys suggested honing with the cylinders in, but I’m worried about doing that for the sake of marking my piston or creating a taper inside if the hone is not doing complete strokes of the full cylinder wall. 3. I think it is probably wise that I splurge and spend some cash and replace the rings. Even if the current ones are good the motor still had 57,000 documented miles on it so probably worth the extra $150 anyways…..do you agree? Here are a few pic’s of the inside via the oil pan. Looks pretty good from my novice perspective. Do you agree? The motor spins very free and smooth and shifts through all the gears nice and smooth on the stand. Here is a pic immediately after I took the oil pan off…..no bad coloured oil, just 10 years of storage sludge build up. Here are a couple of pics of the deep guts of the crank, rods, and back sides of the pistons: One weird thing I did see is that the o-ring on the Oil pipe coming from the Filter housing has budged out on one side.....wonder if that had any impact on oil flow or pressure? So what do you think? Look better now that you can see deeper inside?
-
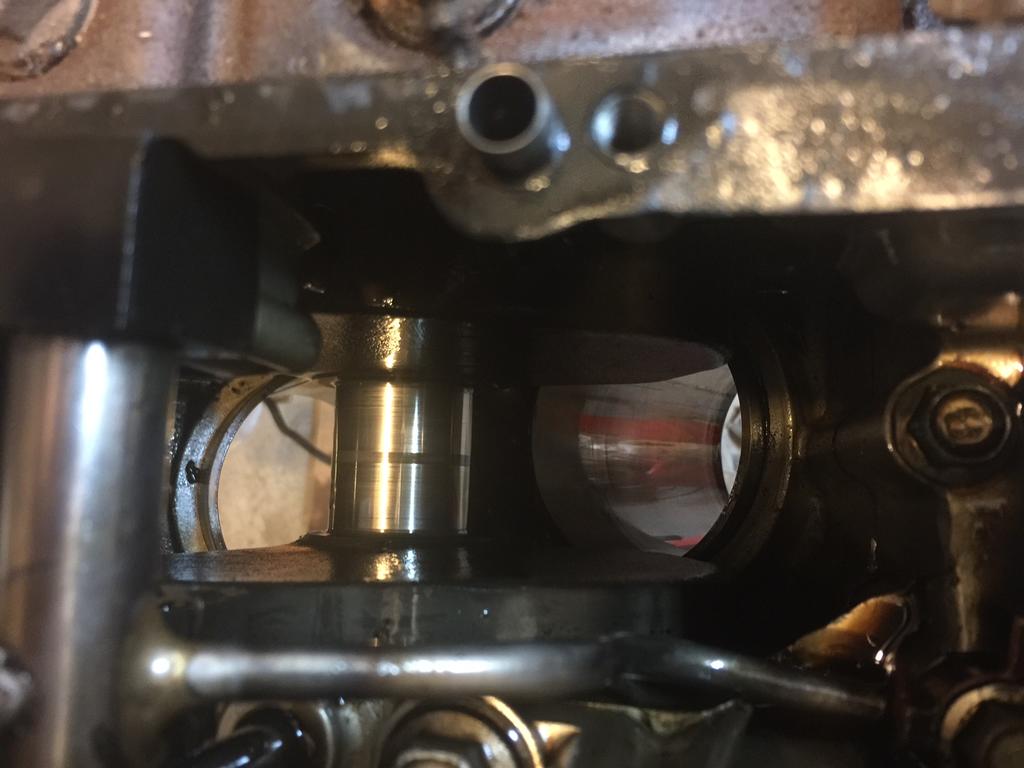
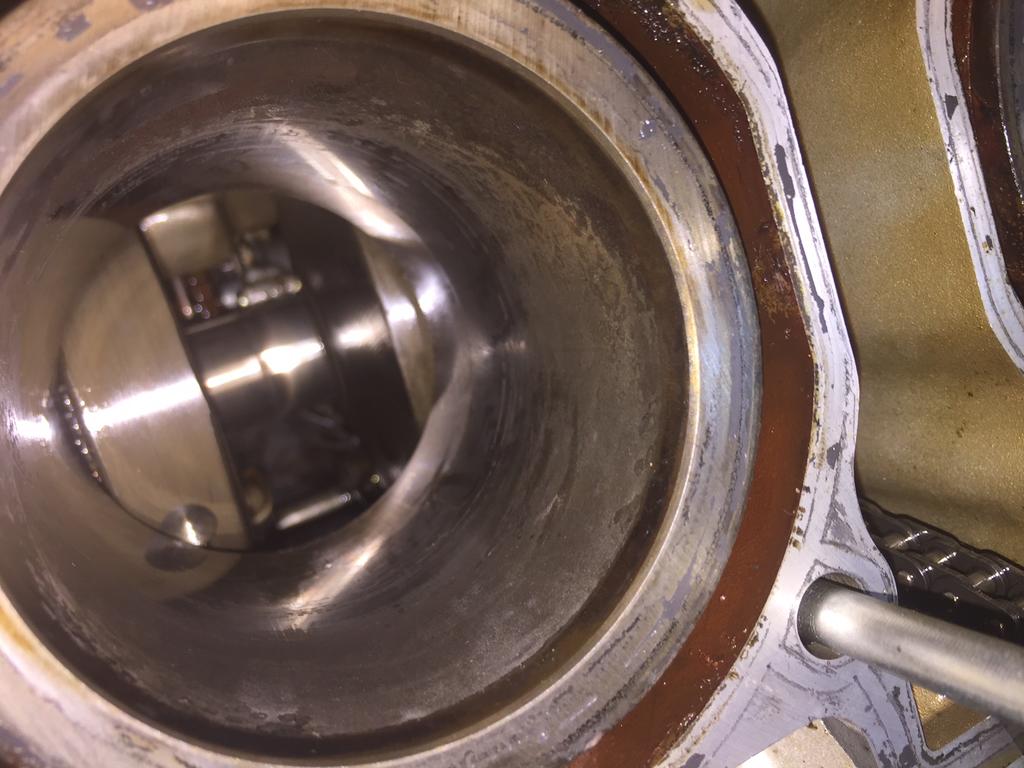
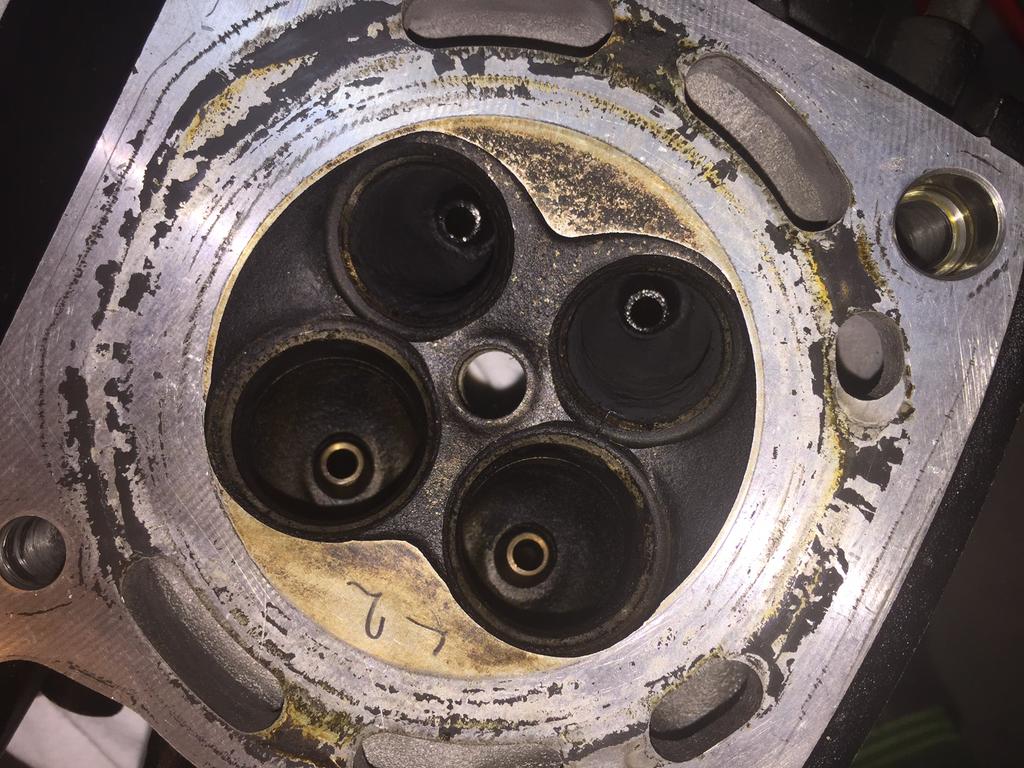
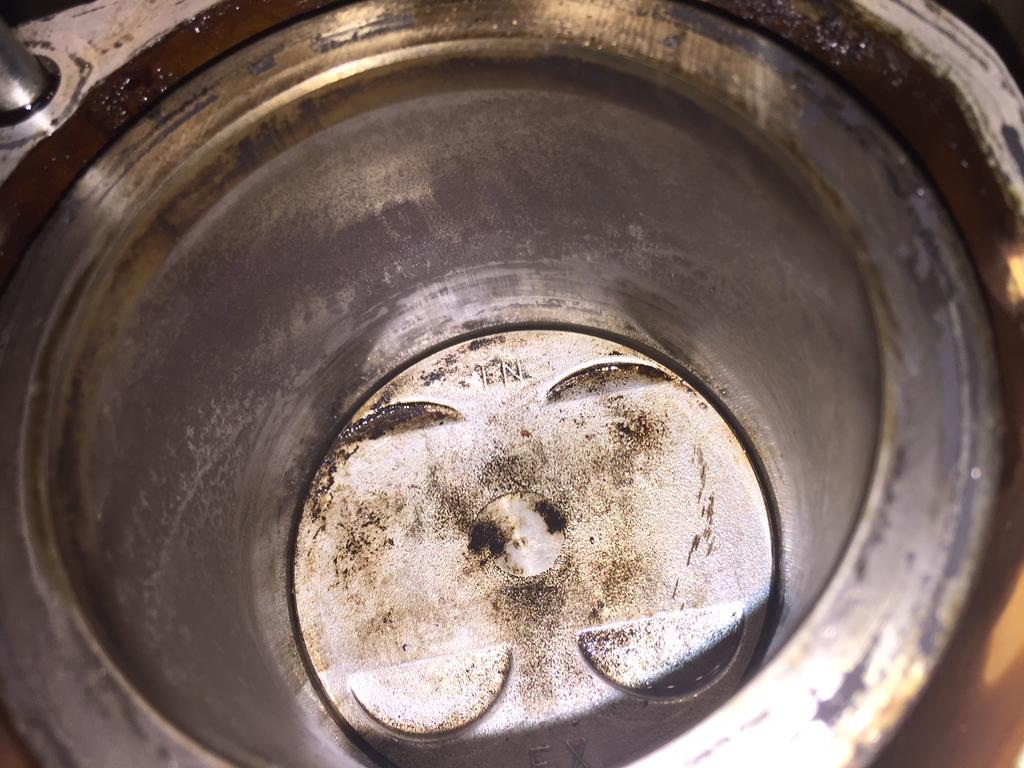
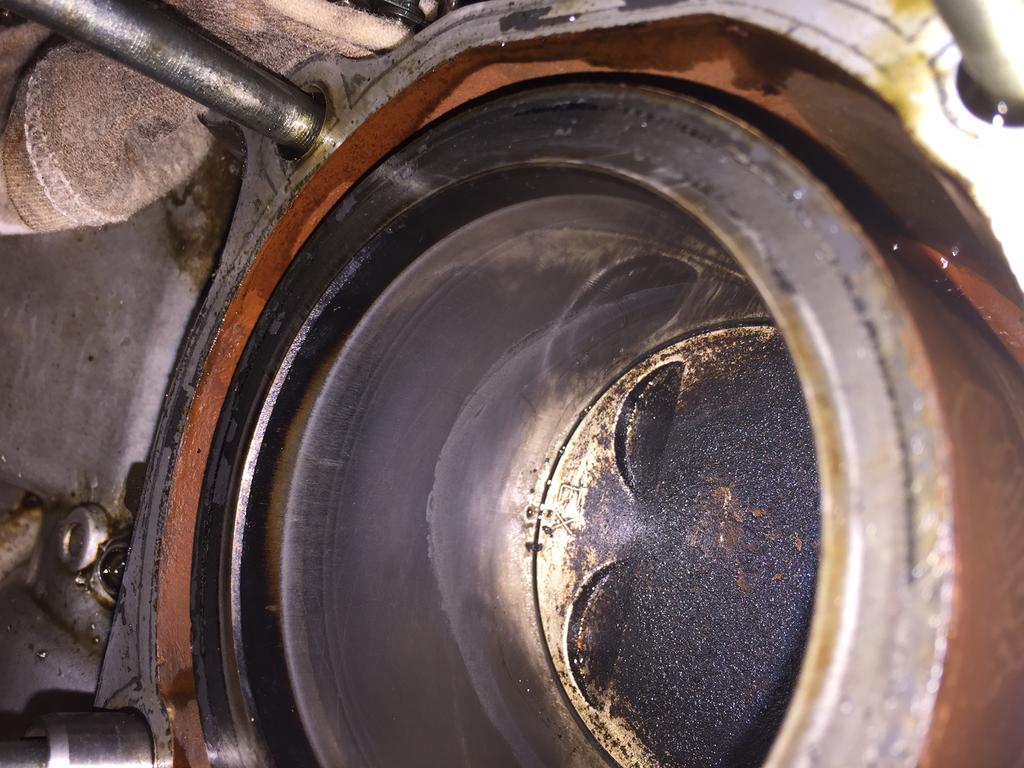
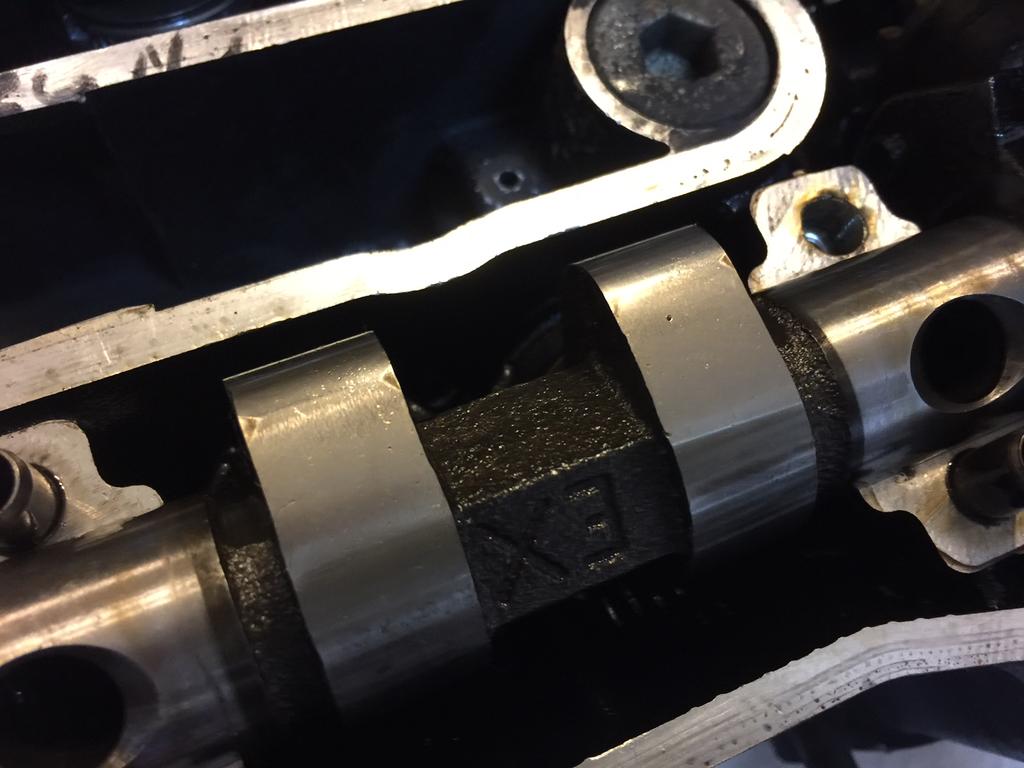
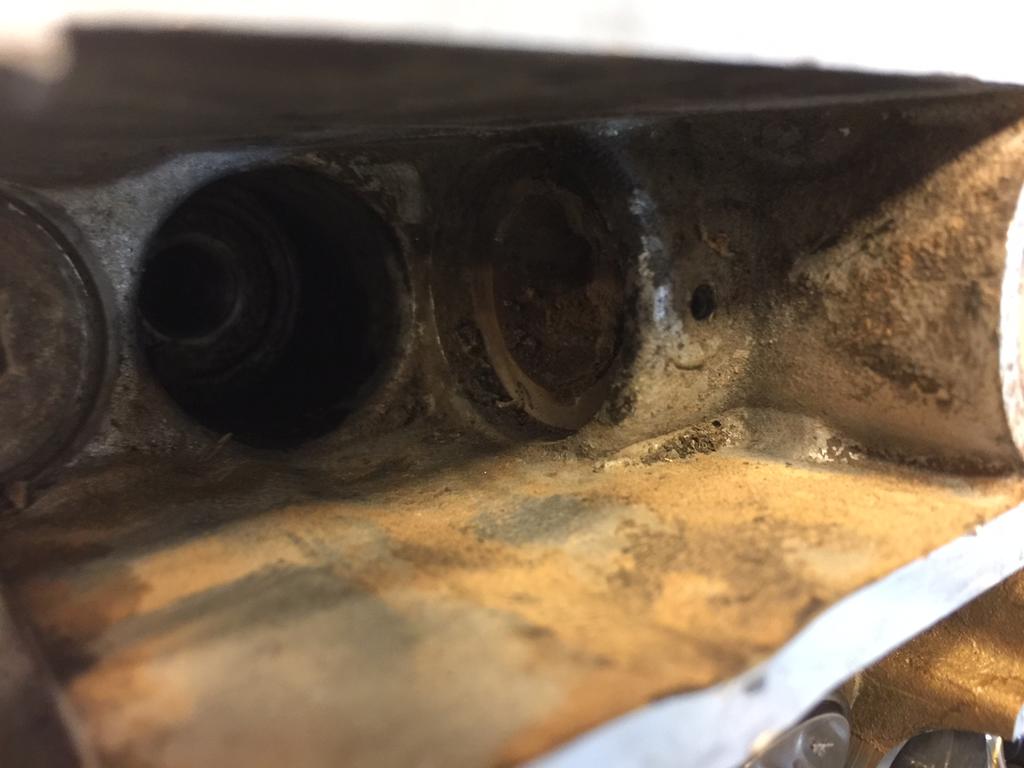
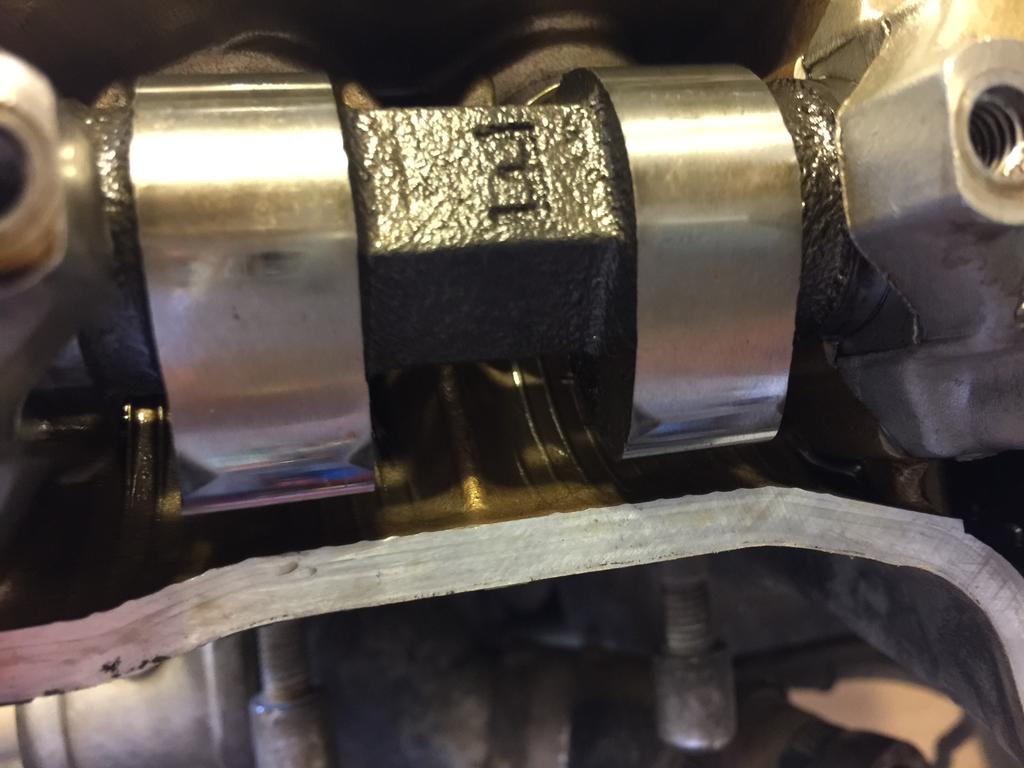
Well, today was a family day so I had to sneak away late tonight to turns some wrenches. So here is an update. Yup @cowpuc, those gosh darn plastic connector tubes that I was complaining about before are exactly like you said....only held in with a "Spring pin" and have 3 o-rings just like Mother Yamaha's book shows. Well, after 30 years of RPM's and heat those o-rings must have turned to glue and the plastic is so brittle that I had no other option then to use the good ol channel locks and break them out. Got some new ones with o-rings on order from Partzilla. Thanks @KIC for the offer on the parts! I'll keep that in mind if I break any further parts. Thanks again buddy for those Valve cover bolts....hope you have a use for that Venturerider.org Dome decal I sent your way via David (small token of my appreciation). I really think David could balance a full motor on the back of his 89...with a few bungee cords for safety of course! So back to my update.....I got the old heads off, Yippie!!! but I found some disappointing surprises under there. Looks like this bike had been sitting in storage for a very long time. And there appears to be some corrosion not only in the valves but also in the #3 and #4 cylinders...both just happen to be the high cylinders when the bike is on the side kick stand. There is a "rough area" and can feel a slight ridge midway up the stroke on cylinder #3 and "rough" areas on the #4 cylinder. Most likely these rough areas are where the pistons sat dry for may years while the bike was in storage. Also #4 piston had almost no carbon build up like the others which makes me think it was getting "steam cleaned" due to a head gasket leak letting water in during combustion. So I'm a little disheartened tonight as I was hoping to just slap the heads on and run, but now it looks like I need to split the case and hone the cylinders after all.... and probably do new rings too just to be on the safe side. What do you guys think? Or will the cylinders polish themselves? Here are a few pics, I currently have some seafoam in the cylinders loosening the carbon deposits to get them as clean as possible....plus it is a good leak test too to validate compression and ring fit. Here is a shot with the heads off and Cylinders 1 and 3 soaking in seafoam: Here is an inside shot of Cylinder #4 , can you see the "Rough" or "unpolished" spots in the cylinder? Here is Cylinder #3 , can you see the line where most likely the piston sat for many years and corrosion started?: So what do you guys think? Can I leave the cylinders as is and put the new heads on and check compression? Shall I split the case and Hone the cylinders? Can I remove the pistons and rods and use a honing tool myself without splitting the case? Do you think I need to replace the rings as well? Or should I dig a big hole in the back yard and bury "Maxine the Donor Engine" and all the V-max parts and forget this ever happened? Your input is much appreciated as always!
-
Great Video @Jamsie! But you're driving on the wrong side of the road...and so is everyone else!!!!! (Just joking!)
-
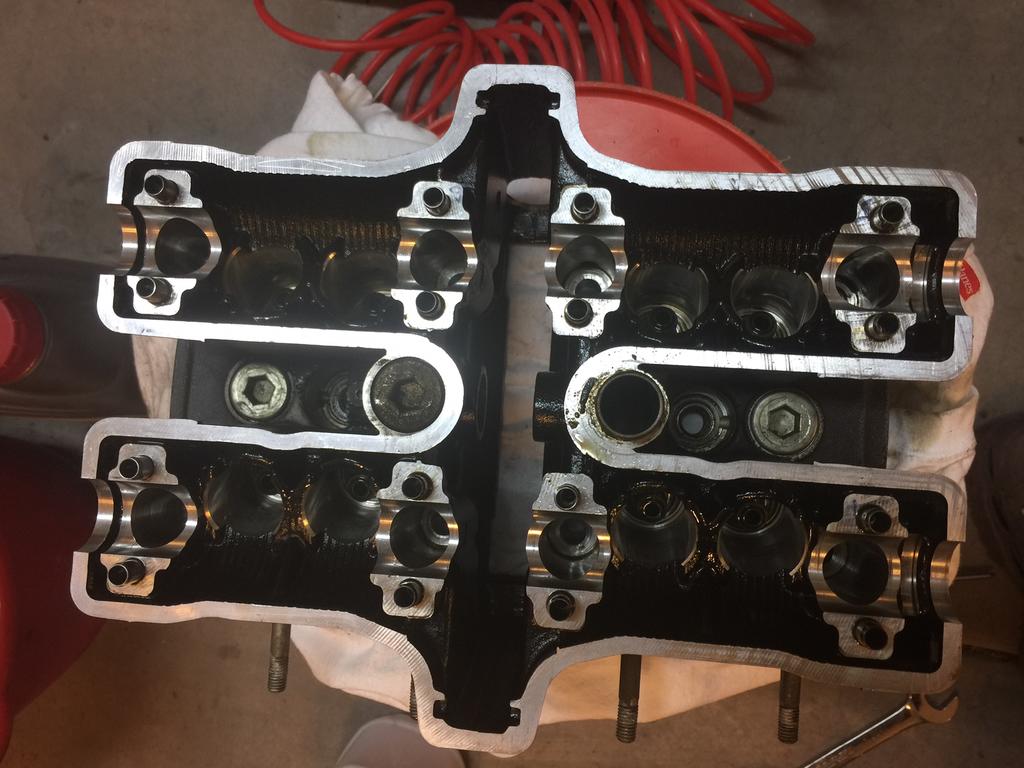
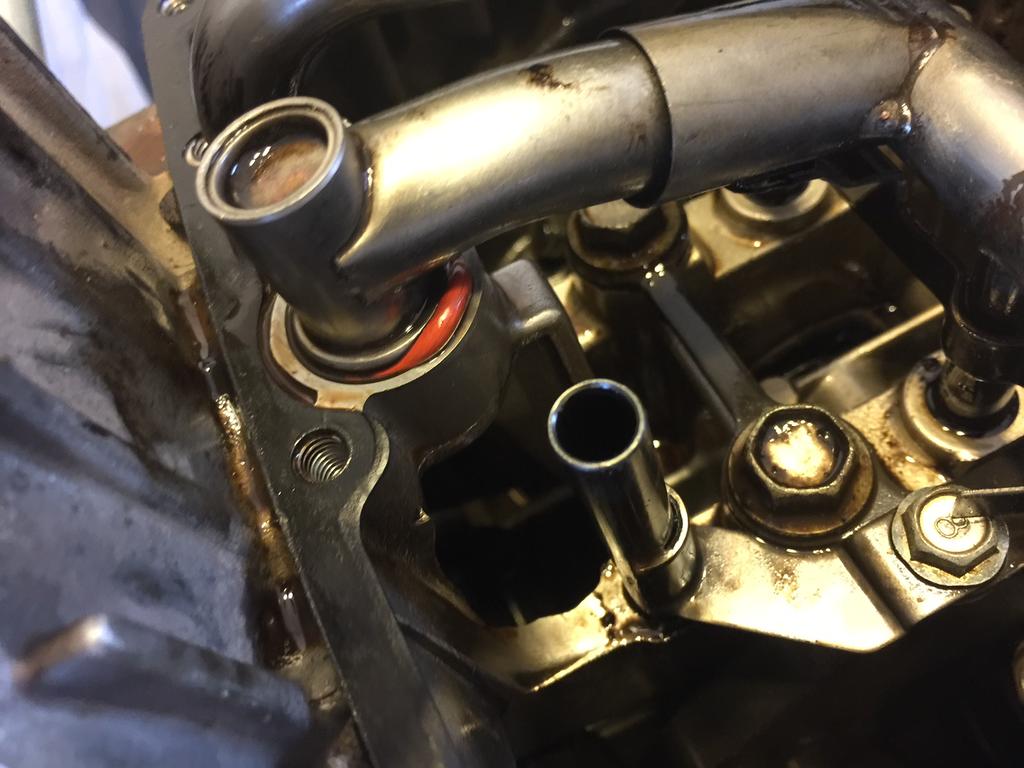
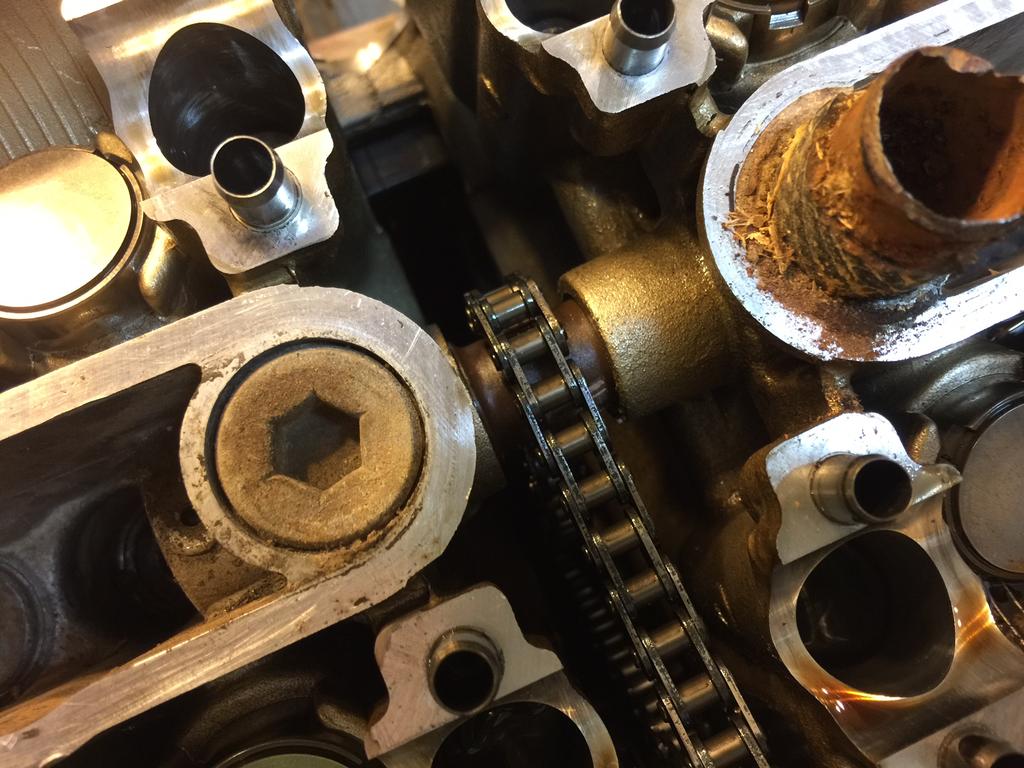
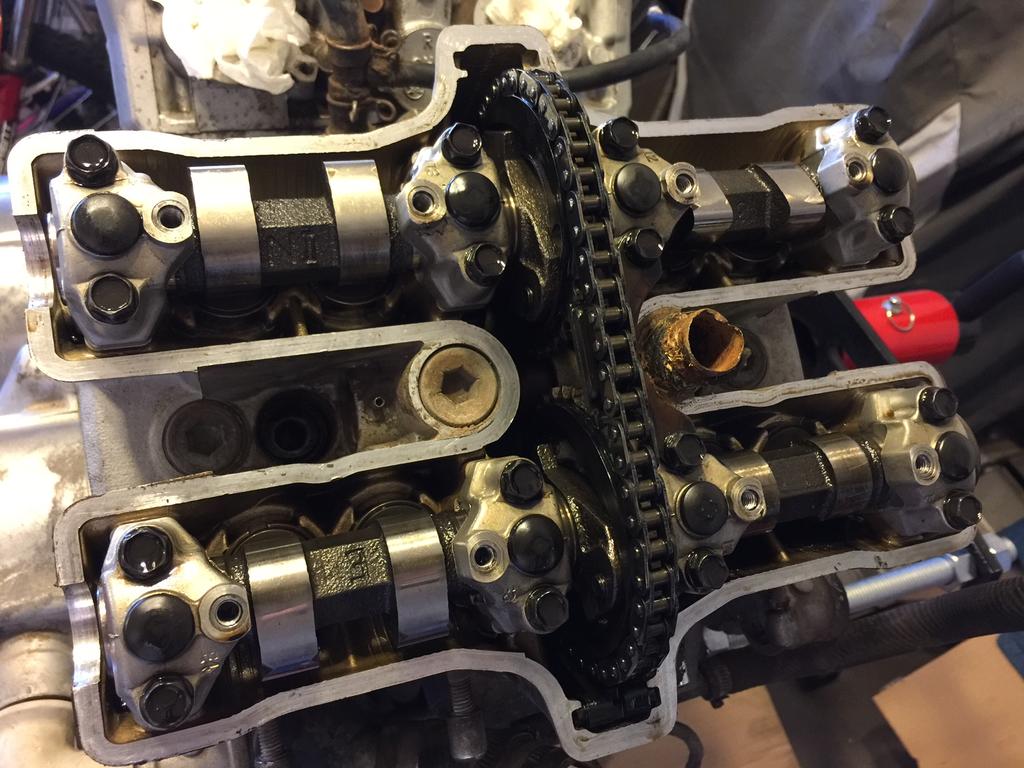
Well, I started to prep the V-Max heads late last night. They sure are pretty! And have A LOT less ware on them compared to "Maxine the Donor engine's" original Cams. I also started the removal process of the original head. I'm not that smart so I'm doing one head at a time so I don't get too confused or have too many little parts floating around on the work bench at one time. Everything is going well EXCEPT I'm having a heck of a time trying to remove the plastic coolant tube in the old head!!! I need to remove it so the cam chain will be free when I lift the old head off..I'm trying not to break the old brittle plastic as I don't want any pieces falling into the crank case. That sucker will not budge and must be baked in there!!! Any suggestions on how to remove it? Here are some pics of that pesky coolant tube....it is so brittle it breaks like my mothers bone china!
-
Hey @frankd glad to hear you got your 83 valve issue solved, and with only 140,000 she is barely broken in!. She has many more miles and trouble free years to go! Yes, these bikes were meant to be ridden and they don't like just sitting around doing nothing in the garage. But that is the reality of any recreation type vehicle, they spend more time sitting, corroding, and wasting away compared to getting enjoyed (that is how it works at my house anyway). Thanks for the heads up on the "Ring Free"! I'll have to take a look at that product...never used it before. Great tip about the "Open Throttle" when doing the compression test. Yes, testing with a free breathing engine is key to get accurate compression numbers. When I did my test on "Maxine the donor engine" she was sitting on the engine stand with the carbs already removed and the intakes were unobstructed, so she was breathing as free as she could possibly breath. Once I get the old Venture heads removed I'll try the gas leak test for curiosity sake. Thanks man for the great insight!
-
Hi @Trader, thanks for the clarification on the double springs! Yes it would be great to compare notes! If there is anything I can help with please let me know (you can learn from my mistakes!). I agree with you about the "time constraint" part. I'm currently on vacation so I have had the ability to sneak out to the garage a lot more then usual, but that is coming to an end soon. I'm hoping to get the heads swapped this week, then AZZI will need to wait until Christmas vacation until I can do all the carb work and hopefully install the upgraded engine into the bike. I'm told "Patience is a virtue".... unfortunately I'm more of an "instant gratification" type of guy! As for the video...You hit the nail on the head buddy! I have watched Damon Ferraiuolo's engine rebuild video several times now and have taken extensive notes. Great guy, he makes it look so easy!!! His videos are the reason for me even attempting this type of project. If I only had to go by Mother Yamaha's manual I don't think I would be going down this path on my own. Keep in touch buddy! Feel free to PM any time. And I look forward to seeing your posts about your upgrade project here on the forum. Take lots of picture too....everyone likes pictures, my good friend @cowpuc taught me that! Yes I was fortunate to get my V-max heads complete with valves and cams together.
-
Thanks @Jamsie for the suggestion and V-max manual link! I really appreciate it! I agree, it would be great to have all new internals, but like you said budget is the key here. I'm trying to keep this project on the cheap, and because AZZI will only be ridden maybe 1000km - 2000km per year (if I'm lucky) since she is located at our vacation home I'm doing this project more as a fun learning experience then for the purpose of building a killer machine. Plus I doubt that all my changes will help AZZI's resale value any since only you guys appreciate having the upgrades I'm doing compared to the average buyer in the market for an old touring bike. But to your very valid point I want those 1000km per year to be trouble free so I'm not always having to turn wrenches to enjoy a ride! I'm only out of pocket around $500 so far, $250 for AZZI (best motorcycle deal of my life)...$100 for the parts bike and motor...$150 assorted parts and tools.....so I guess I have room for some additional costs! Did I mention I'm cheap too?
-
Oh @cowpuc, I'm all ears.....what were you going to say about the Valve springs? Yes they are stiffer as I believe they have 2 springs (inner and outer) compared to the single that the ventures have. I'm planning to start to remove and lap the valves tomorrow if the Spring compressor I bought at the auto parts store today works for me on these Yamaha V-max heads.
-
Thanks @cowpuc, this is exactly the advice and helping hand I'm looking for! Will do on the chain inspection!!! Like you said, I only want to open this engine up once, so I would like to do it RIGHT the first time! I do like turning wrenches, but I like riding much much more on a reliable bike. Wish you were here to be "Garage Supervisor" and keep me on the straight and narrow for this build. Your insight is very MUCH appreciated! I'm always happy to share my steps along the way....hope I'm not boring people...and also adding value so others can learn from my steps and mistakes along the way.
-
Thanks @videoarizona and @cowpuc for the input and advice! Video, I agree I'm too curious to just move on without poking around a bit more with these old heads. Inquiring minds want to know! Puc you are just like Macgyver coming up with the drilled out spark plug and valve! That is a great idea! I did something similar but not as skilled or creative. I used the little rubber end piece from one of the attachments from the compression tester and put it on my compressor air blower attachment and then pushed it hard into he spark plug hole having the rubber make a seal and listened to where air came out. And guess what? On Cylinder #4 which had the lowest compression, air is escaping from the intake valve side at "Top Dead Centre". And on Cylinder #1 which was low but not as low as #4 , it is coming from the exhaust valves at TDC. So long story short, Puc I think you nailed it! Probably a combination of corrosion causing the most compression loss and probably valve adjustment causing some havoc too on the exhaust side. I think AZZI has hid my feeler gauge somewhere in the garage (her fault, not mine of course) so I can't measure until she fesses up and returns it or until I run to the store today and pick up a "spare"? Here is a pic of the cam lobes.....I'm a novice, but doesn't that look like a fair bit of wear on them?
-
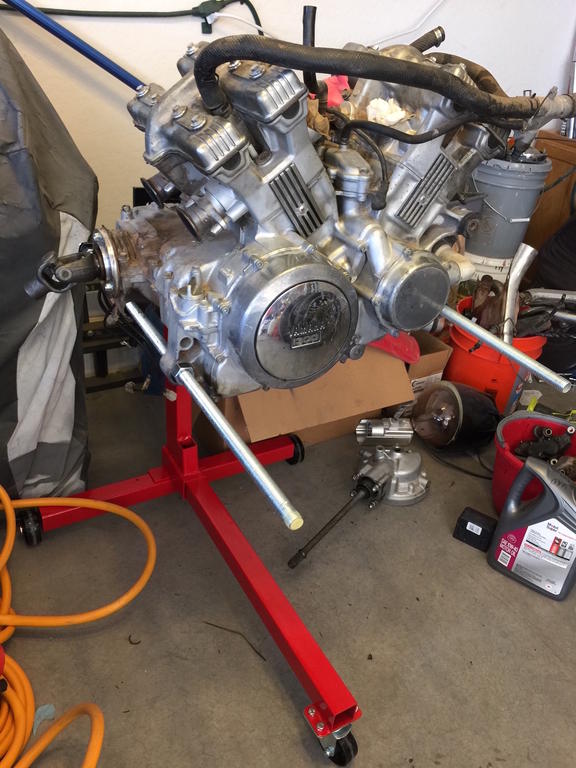
Well, started testing the Donor engine today to see what I have to work with, and make sure all is good when it comes to the bottom end of the motor which I will be using for this V-Max upgrade project. So I got some good news and some bad news: Good news is, she cranks over real easy and smooth. Has a good 4 brush starter already installed and no starter clutch issues, and cranks over nice and fast with a battery on the engine stand. No bad noises or hard rotation issues. Yippie! Bad news, looks like we have some compression issues on 2 Cylinders.....But I think they are Head and Valve related rather then Ring or Cylinder related which is cool since I'm replacing the heads anyway with the V-Max stuff. So this is what my cheap Harbor Freight Compressions tester told me: Cylinder #1 (Left Rear): Dry Test: 105psi Wet Test: 120psi Cylinder #2 (Left Front): Dry Test: 180psi Wet Test: 210psi Cylinder #3 (Right Rear): Dry Test: 170psi Wet Test: 210psi Cylinder #4 (Right Front): Dry Test: 60psi Wet Test: 75psi So based on my novice knowledge and the compression numbers from my cheap "made in china" tester done dry and wet (oil added to the piston and cylinder), my assumptions are: 1. NOT due to a head gasket failure as the 2 low compression cylinders are not sharing the same cylinder bank (aka are not connected to each other). 2. NOT due to a broken Ring or worn cylinder as the Wet test numbers increased basically at the same rate for all cylinders so the oil did not significantly help seal the compression leak. 3. IS most likely due to an intake or exhaust valve not sealing properly which is causing compression to be lost. I haven't taken the valve covers off yet, but this could even have to do with the Valve adjustment being significantly off rather something more major like a bent valve etc...I hope anyway since this engine supposedly only has 57,000 miles on it. Unfortunately I don't have a leak down tester here at my garage in Arizona to specifically pinpoint the assumed valve issue....but since I'm ditching the Venture heads all together anyway I don't think it would add much value trying to troubleshoot this any further. I think I should open this engine up and get the new V-max heads installed and see what numbers I get from there. Do you experts agree or have I possibly missed something in my evaluation?
-
Hey @videoarizona Thanks for the reminder, but I'm already one step ahead of ya..."Maxine's" details have already been sent over to Mr. Prariehammer and she is registered in the Database. Thanks again Buddy!
-
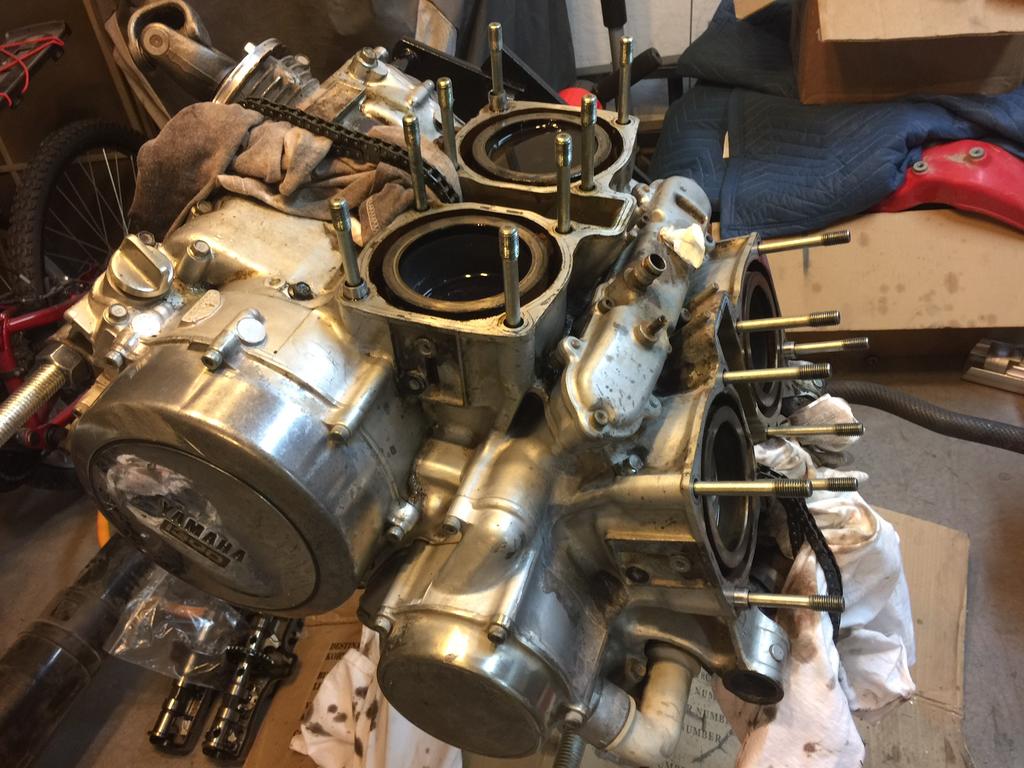
Well, I would like to request a moment of silence in memory of my parts bike "Maxine". She has left this world and gone to Mother Yamaha's big dealership in the sky. All parts have been stripped and the frame has been cut up and disposed of. The good news, her spirit will live on in the donor engine and many parts she will be contributing to AZZI. During the teardown I have 2 primary observations: 1. Darn those Venture motors are heavy beasts! Ever try to lift one all by yourself to get it on an engine stand? Well I have! Anyway, after a lot of rolling around on the floor I finally got it up on the stand (needed to use my brains rather then brawn since I'm too cheap to buy a hoist!). 2. Wow those frames are made of thin wall tubing, I was expecting heavy wall pipe to hold these highway tearing monsters together! It took only a couple of minutes with a sawzall and the frame was in bite size pieces! My hat is off to those Yamaha engineers and the men and women that welded those frames and assembled all those bits and pieces to make these bikes back in the 1980's. Well ladies and gentlemen let the motor teardown and V-Max head swap begin!!!
-
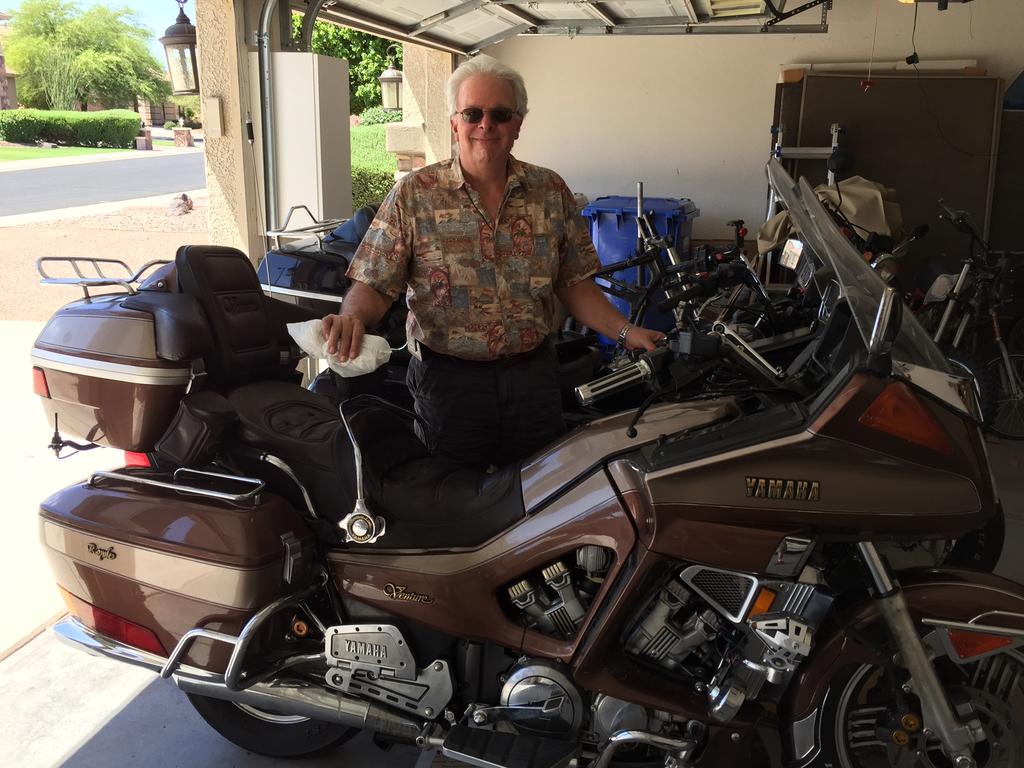
Hey @cowpuc, yup that is my pretty gal AZZI that David is standing behind...my $250 bike shined up pretty nice IMHO! @videoarizona has a beautiful Blue 1989 Venture Royale that I have yet to meet in person. Too hot here to ride long distances so I'm hoping AZZI can meet his 89 during the Christmas Arizona riding season! Hey @videoarizona, I forgot to ask, does your 89 have a name? I feel kind of awkward just calling it David's "89"....feels kind of disrespectful to the bike!. If not, Puc is one of the best bike namers in North America...maybe even the world!! By the way, my parts bike (although not long for this world) was officially named "Maxine".......as her motor will be the recipient of all your v-max upgrade parts......I know, not as creative as an official @cowpuc bike name, but still fitting for my parts bike! Put the 2 bikes together and you will have AZZI-Max!
-
Had a visitor to the garage today. Our good friend @videoarizona took some time out from deck build and other "Retirement" duties to come see AZZI and have a great chat over lunch. He also came bearing gifts too! Thanks David for the Windshields, much appreciated buddy! Here are some pics: Videoarizona is a real CLASS act! (only first gen Venture guys will get that joke!)