ActionJax Posted June 15, 2009 Share #1 Posted June 15, 2009 Ok, I'm very busy today with questions. LOL. I'm thinking about giving my old girl a new paint job. She is warn and wheatherd. I don't have the money to pay someone to do it, so I think I'll try my hand. I'd like to get some opinions and advice as I move forward. Any good sites that would be helpful? What's the best paint to use? Can I get a "nice" finish with a rattle can? Just starting in the planning stages, but I love a new project. Thanks, to MarCarl my scoot is running GREAT! Attending MD was the best thing I could have done! But now I'd like her to "look" good too! Thanks~ Link to comment Share on other sites More sharing options...
ActionJax Posted June 15, 2009 Author Share #2 Posted June 15, 2009 (edited) Kinda like this look and color. Is this anyones here on the board? http://i606.photobucket.com/albums/tt141/ActionJack101/blueventure1.jpg Check out the rest of the blog here: http://www.kloppenberg.us/ Edited June 15, 2009 by ActionJax Link to comment Share on other sites More sharing options...
mini-muffin Posted June 15, 2009 Share #3 Posted June 15, 2009 Here's a link to the yamaha paint codes if you want them. http://www.venturerider.org/forum/showthread.php?t=1404 Are you gonna keep you bags and trunk on it? If so I'd look at a contrasting color to go on as well to break up the blue a bit. I do like that color though. Rattle cans do give you a nice finish as long as you don't get any runs in it. Good luck. Margaret Link to comment Share on other sites More sharing options...
raceman62race Posted June 16, 2009 Share #4 Posted June 16, 2009 I use to work at a body shop and still remember how to do a little painting and here are my suggestions: 1. Don't use a spray can. Use a spray gun. It can be a cheap gun and it will give you a great finish. The cheaper guns won't last as long as the expensive ones (the nozzle wealrs out quicker) but for the most part, they will provide you with a great finish. 2. I would suggest using a base/clear coat paint because it is very forgiving 3. Any scratches, paint cracks....... will have to be sanded down to the metal or plastic and primed. I suggest using 2 part epoxy primer 4. Grind away all of the paint in and around dents and fill with body filler then sand with 80 grit sand paper, then go to 220 and finally 400 to a smooth finish. You must be able to rub your fingers over the area and not be able to feel when you go from metal to filler. You may have to repeat the process to get a good smooth feel. If you feel anything, it will be visible. Prime the repaired area. 5. Wet sand the entire surface to be painted with 400 grit sandpaper 6. Wash area to be painted with simple green and scrub with a scotch brite pad and rinse throughly 7. Mix base coat according to manufacturers instructions and spray on a light coat. Put on about 4 coats waiting about 15 minutes between coats. If you get trash in the paint, wait 24 hours and wet sand out the trash with 1000 grit sandpaper. You must also sand the entire painted surface with 1000 grit sandpaper if you don't apply the clear within a couple hours of spraying the base coat. If you don't get trash in the paint, spray on clear. 8. Mix clear according to manufacturer instructions. Spray on about 4 or 5 decent coats. 9. Allow clear to dry for a week. Wet sand out any trash with 1000 grit sandpaper and wet sand any dry spots you see in the clear. Buff with an electric buffer with med grit buffing compound. Finish buffing with finesse it buffing compound. Link to comment Share on other sites More sharing options...
Shamue Posted June 16, 2009 Share #5 Posted June 16, 2009 Do some research on the type of paint. I repainted an 81 GW many years ago and they had just come out with a paint for plastics and rubber that would flex and not chip or crack. Sorry can't remember the brand but a good automotive paint supplier will know. Plenty of color choises, I picked a burgandy that looked black in dim or low light and deep burgandy in the bright sun, very pretty color. To test the paint I painted a piece of abs plastic and after prepping it, I twised it in a tight circle without any paint cracking or chipping. Then put 3 coats of clear wet sanded each coat then buffed out the last coat. Use plenty of tack cloth and keep the dust and paint residue off. Came out very smooth and glassy. Still has the paint today and after years of had times it still looks great. Good luck and don't be in a hurry, beauty takes time and a lot of detail prep. Have fun, I did. But don't think I would do it again to a wing. Link to comment Share on other sites More sharing options...
ActionJax Posted June 16, 2009 Author Share #6 Posted June 16, 2009 Thanks guys and gal, that's just the kind of advice I'm looking for. I've got a nice air compressor. I think I'll look at Harbor Freight and see how much an paint gun would cost. I'll have to look around and see what color paint I want to work with. Will have to do some more research on that. If anyone else has any advice, or has tried this before, please let me know. Link to comment Share on other sites More sharing options...
LilBeaver Posted June 16, 2009 Share #7 Posted June 16, 2009 (edited) I know you said that you did not want to pay someone to do it but you are in Akron Ohio and there is a Maaco in your area. Tell [the owner -- I am pretty sure that he is the only one that works up front still] him that Steve from the Maaco in Garden City Michigan suggested that you stop in and see him about your bike. Bring your bike in for the estimate, and let him know that you will do the full dissassembly, etc. He should shoot you a reasonable price. (I didn't tell you this but it wouldn't hurt to suggest a cash job) DO NOT go with the Enamel [which is the lowest line paint offered] I would suggest either the Polyurethane with an integrated clear or a Base Clear. I am pretty sure that he has two levels of the base clear one is called the 'signature' service and the other is actually a factory finish. (the latter is not advertised) The ONLY difference is the clear coat. The clear coat that is used with the more expensive stuff makes it a little easier to get the correct texture match when you spray a panel that is adjacent to a panel that didn't get painted (ie for color and texture match on a spot job). If you go base clear, you will be fine with the signature series (as there is no difference in durrability, gloss retention, etc) I am sure he would be happy to show your some of the finished cars he has in his shop so you can see the difference between the polyurethane with integrated clear and the base clear. I know that some people may have a bad flavor about Maaco body shops or whatever but in the last several years Maaco has really been fighting with the franchisees that hadn't changed a thing since the 70's. I have seen some of the work that this Akron shop turnes out, and he does do real nice, quality work. I used to be a painter (among many other things) a the Maaco in Garden City. I painted a number of Motorcycle parts (as well as helmets too actually) and they ALWAYS got a great deal on it. So you should take the 10-15 minutes it'll take to have a conversation with them and I am guessing that you will find that it will be much more affordable than you think. Good luck friend! Edited May 25, 2010 by LilBeaver Link to comment Share on other sites More sharing options...
LilBeaver Posted June 16, 2009 Share #8 Posted June 16, 2009 Every once and a while Harbor Freight does have a few paint guns that go on sale for real cheap, and some of them are real quality guns. I found them to be the cheapest supplier for the quality that they provided. Link to comment Share on other sites More sharing options...
LilBeaver Posted June 16, 2009 Share #9 Posted June 16, 2009 I use to work at a body shop and still remember how to do a little painting and here are my suggestions: 1. Don't use a spray can. Use a spray gun. It can be a cheap gun and it will give you a great finish. The cheaper guns won't last as long as the expensive ones (the nozzle wears out quicker) but for the most part, they will provide you with a great finish.--Yup 2. I would suggest using a base/clear coat paint because it is very forgiving -- Yup 3. Any scratches, paint cracks....... will have to be sanded down to the metal or plastic and primed. I suggest using 2 part epoxy primer -- Yup 4. Grind away all of the paint in and around dents and fill with body filler then sand with 80 grit sand paper, then go to 220 and finally 400 to a smooth finish. You must be able to rub your fingers over the area and not be able to feel when you go from metal to filler. You may have to repeat the process to get a good smooth feel. If you feel anything, it will be visible. Prime the repaired area. -- ONLY ON THE METAL PARTS, if you try to do this on the plastic you will mess up the plastic part you grinded into, and when the piece flexes your body work will crack and fall out (this may be a process that occurs over time but IMO it is better to deal with a few blemishes in the plastic then to have to deal with cracked filler and then peeling paint) -- If you are deadset on fixing blemishes in the plastic you can get plastic filler that is a little more flexible than the typical body filler, but eventually you will have the same problem. 5. Wet sand the entire surface to be painted with 400 grit sandpaper Grit of the sandpaper will depend on what kind of paint you end up going with (more importantly if you are going to do a sealer coat or not) If you are going to change the color, a sealer would be a good idea. Usually with sealers, you do not need to do the wed sand process as long as you are even with your dry sanding. Make sure that when you sand you keep your hand flat against the panel (or have something between your hand and the panel) and that you DO NOT push too hard while sanding... All you need to do is scratch the surface enough so that the paint can bond to the surface. 6. Wash area to be painted with simple green and scrub with a scotch brite pad and rinse thoroughly This is step is crucial for a clean finish. 7. Mix base coat according to manufacturers instructions and spray on a light coat. Put on about 4 coats waiting about 15 minutes between coats. If you get trash in the paint, wait 24 hours and wet sand out the trash with 1000 grit sandpaper. You must also sand the entire painted surface with 1000 grit sandpaper if you don't apply the clear within a couple hours of spraying the base coat. If you don't get trash in the paint, spray on clear. Number of coats and flash time (time to wait between coats) depends on a number of different factors. First and foremost is temperature and ventilation, second is the paint itself, and I will stop there. What you are looking for with the flash time is that after you spray it on (it will go on very dull and do not worry about that, the clear is what will shine it up) is for it to have a 'dry/glazed' look to it. This is hard to describe, but when you put on your coat of color, it is important to spray it on moderately with a slight 'wet' look. After you are finished with a particular coat, keep an eye on it (step away for some fresh air and come back in a few minutes) and take a look at it again. What you want it to do is be dry enough so that when you spray the next coat the paint that is already there will stay put (if it doesn't then you end up with runs or sags etc) but you do not want to wait too long because if the base coat dries too much the next coat won't stick at all -- then you have to sand it down and start all over. I have never had to wait 15 minutes for the paint to flash, but I have only sprayed with DuPont paints in a well-ventilated paint booth... And yes, if you see something in the base coat that you don't like, don't waste any more paint on that part -- Let it dry completely, then sand it down and do it again. If it is a small piece of something that flies in (like a bug or whatever) I have had some luck with picking it out with tweezers and continuing the painting process -- depending on the color and size of the panel you are on it may go unnoticed. 8. Mix clear according to manufacturer instructions. Spray on about 4 or 5 decent coats. Also, spray in according to the manufacture instructions. More is NOT always better. Too much clear with yield clear peel, or result in a cloudy finish. I use a first really 'wet' coat, then a second that is not nearly as 'wet' and leave it with two coats. -- Again, stick with what the manufacture suggests. 9. Allow clear to dry for a week. Wet sand out any trash with 1000 grit sandpaper and wet sand any dry spots you see in the clear. Buff with an electric buffer with med grit buffing compound. Finish buffing with finesse it buffing compound. It will take much longer than a week for your paint to fully harden/cure since you will not be baking it. After I would bake a car (in a 150 degree oven with constant ventilation for about an hour, I would still have to let the car sit for a day before I could wet sand and buff anything necessary. A few tweaks to the suggestions above... One more thing -- Make sure that if you do this on your own you get yourself a REALLY GOOD respirator and try to ventilate your workspace as good as possible with out having moving air around your painting surface. I would suggest hanging thick plastic sheets around where you will actually be painting for two reasons. 1) Keep dust/junk/dirt out 2) to keep the paint in Link to comment Share on other sites More sharing options...
ActionJax Posted June 17, 2009 Author Share #10 Posted June 17, 2009 Lilbeaver, Thanks for all the great information. And I WILL stop in and speak with the owner at Macco. Thanks. I mean if the price is right, I'd be silly not to have a pro do the work and save me all the trouble and time of doing it myself. Especially having to set up a proper work area. (which I would WANT to do) I'll let you know what he says. Do you happen to know which Macco that is in Akron? Link to comment Share on other sites More sharing options...
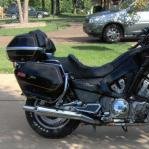
ActionJax Posted June 17, 2009 Author Share #11 Posted June 17, 2009 BTW, whats the opinion on painting the engine? Mine is pretty pitted up form the years, and I'd like to clean it and have it re-done as well, but I'm also thinking about just having it painted black like in the photo there. Is there any disadvantages to doing that? Link to comment Share on other sites More sharing options...
Guest seuadr Posted June 17, 2009 Share #12 Posted June 17, 2009 paint it black and then sand the tips of the fins so they are shiny, looks sharp as hell, imho Link to comment Share on other sites More sharing options...
MikeC Posted June 17, 2009 Share #13 Posted June 17, 2009 Also, if you end up painting it yourself, make sure you have a good air filter / water-oil separator on your compressor. It's a real pain to have that stuff come out of the gun halfway through a paint job. Link to comment Share on other sites More sharing options...
timgray Posted June 17, 2009 Share #14 Posted June 17, 2009 (edited) I painted my 83 this past winter, here's some tips... Sand until your arms fall off. You cant have ANY shiny spots. I wetsanded all surfaces with 1000 grit for 4 days straight AFTER I fixed all nicks and dings and cracks. Take off as much as you can, If it's not painted, it comes off, emblems, fixtures, everything. I was unable to get the aluminum trim at the openings of the luggage off and I had to mask them, the paint in that area looks bad and I need to put pinstripe on it to hide it. Be paranoid about cleanliness. I wiped everything down 3 times with painters prep and wax remover. Touched that panel's paint side with your bare hands? rub it down with painters prep. The Pinstripes on your 83 have contaminated your paint. If you are going to razor them off like I did and sand everything down smooth, your first primer/sealer needs to be an epoxy type that will not react with anything. I had to wetsand everything down again because of the glue in the pinstripes soaked into the metallic coat under the paint and made everything pucker that touches it. FIX every crack and tab first. Get the plastic fix-it stuff and spend 2 weeks doing that. Fix EVERYTHING even the tiny cracks. They will show up big and ugly under new paint. When you are all done. It's time to sand your arms off again. I start at 2000 grit and wetsand until all orange peel is gone, then I cut and polish. If you use the new polyurethanes for clear the paint will look incredible.. Mine looks wet even when dirty. And honestly, that is what you need to shoot. the 2 part polyurethanes they have today. the paint will last 20 years. I spent $260 on clear for my bike but I have 6 coats to bury metal flake. most bikes need only 1 and that cant get any cheaper than $130.00 for a full gallon. If you get a cheap color you are looking at around $350.00 for the color, $130 for the clear, and another $100 in catylist. DO NOT SHOOT THIS STUFF WITHOUT A CANISTER MASK. The wet paint and fumes are deadly in your lungs. Painting is the easy part. The prep and finish take a really long time and a lot of work. P.S. If you never shot paint before, use a solid color. A metallic is a incredibly difficult thing to shoot and get everything even and look great. slight runs in a metallic show up big time as the metal in it will run as well creating a forever visible run in the paint even if you sanded it perfectly smooth. Edited June 17, 2009 by timgray Link to comment Share on other sites More sharing options...
ActionJax Posted June 17, 2009 Author Share #15 Posted June 17, 2009 timgray, You make some very good points. Sounds like I've got ALOT of work a head of me, especially if I want to do it right. Now you mentioned "fixing" all the cracks. What is the recommened product and procedure to do that? And how do you exactly fix the broken holes that some of the tabs fit into? (if that's the given name for them) Link to comment Share on other sites More sharing options...
Shamue Posted June 17, 2009 Share #16 Posted June 17, 2009 I know you said that you did not want to pay someone to do it but you are in Akron Ohio and there is a Maaco in your area. Tell [the owner -- I am pretty sure that he is the only one that works up front still] him that Steve Mengyan (pronounced "Men-jin") from the Maaco in Garden City Michigan suggested that you stop in and see him about your bike. Bring your bike in for the estimate, and let him know that you will do the full dissassembly, etc. He should shoot you a reasonable price. (I didn't tell you this but it wouldn't hurt to suggest a cash job) DO NOT go with the Enamel [which is the lowest line paint offered] I would suggest either the Polyurethane with an integrated clear or a Base Clear. I am pretty sure that he has two levels of the base clear one is called the 'signature' service and the other is actually a factory finish. (the latter is not advertised) The ONLY difference is the clear coat. The clear coat that is used with the more expensive stuff makes it a little easier to get the correct texture match when you spray a panel that is adjacent to a panel that didn't get painted (ie for color and texture match on a spot job). If you go base clear, you will be fine with the signature series (as there is no difference in durrability, gloss retention, etc) I am sure he would be happy to show your some of the finished cars he has in his shop so you can see the difference between the polyurethane with integrated clear and the base clear. I know that some people may have a bad flavor about Maaco body shops or whatever but in the last several years Maaco has really been fighting with the franchisees that hadn't changed a thing since the 70's. I have seen some of the work that this Akron shop turnes out, and he does do real nice, quality work. I used to be a painter (among many other things) a the Maaco in Garden City. I painted a number of Motorcycle parts (as well as helmets too actually) and they ALWAYS got a great deal on it. So you should take the 10-15 minutes it'll take to have a conversation with them and I am guessing that you will find that it will be much more affordable than you think. Good luck friend! I would agree and forgot to mention it because I was thinking you wanted the experience of painting. But after I did my '81 wing, I decided if I ever had another bike painted someone else would do it. And sure enough a few years later I wanted my HD wide Glide painted. I took all the metal off, did the prep work and was able to work a deal with the local Macco shop here in Albuquerque to do the paint. I used a root beer poly and 3 coats of clear, I must say the job was excellent and people would also ask who did the paint and couldn't believe it was Macco. These guys work at a fast pace on car / trucks all day and it was a real treat for them to do something different and I found they went the extra mile to make it perfect. I would definitely use the Macco here in Albuquerque again. Very good experience. Both fenders, both tank halfs cost 250. they furnished the paint and clear. Link to comment Share on other sites More sharing options...
LilBeaver Posted June 17, 2009 Share #17 Posted June 17, 2009 Jack: You know, I do not remember which Maaco it was... I remember it was just off of the expressway, but I know that probably won't help much. And to make it worse, I cannot remember the guy's name either... Sorry, I know that isn't much help. I will see if I can find his number and figure out which one he is at. (He offered Steve a sales job a few months ago -- that is how I met him and saw his shop). At any rate, I am pretty sure that you would not be disappointed at either place. Lilbeaver, Thanks for all the great information. And I WILL stop in and speak with the owner at Macco. Thanks. I mean if the price is right, I'd be silly not to have a pro do the work and save me all the trouble and time of doing it myself. Especially having to set up a proper work area. (which I would WANT to do) I'll let you know what he says. Do you happen to know which Macco that is in Akron? Link to comment Share on other sites More sharing options...
raceman62race Posted June 18, 2009 Share #18 Posted June 18, 2009 Jack, Painting really does require a TON of work and a certain degree of skill. All of the work is in the preparation. There is a degree of skill in spraying the paint on the surface because you can end up with "dry spots" or runs. If you want to learn to paint, instead of painting the scoot first, I would suggest finding something small....maybe a child's wagon like they drag around the yard....and paint it with the same type of paint (not necessarily color) that you are going to use on your scoot. If it turns out nice, great! You can use that as a test to see if you are willing to go through the work of disassembling, preping, painting and assembling. If it doesn't turn out well, you will know not to touch your scoot. I don't work at a body shop any longer and on occasion I will paint a car in my shop and even as an experienced painter, I am constantly battling trash in the paint. I have filters in my air line....water separator, cartridge filter, toilet paper filter....and I hang plastic on each side of the car and use a very small vent fan. I wet the floor of the shop before I spray to keep down dust and still end up with some specs of trash in the paint that I have to sand out. There is a lot of things that you have to get just right. If you want to learn to paint, you have to start somewhere just be sure it's on something that's not a valuable to you as your scoot Link to comment Share on other sites More sharing options...

Recommended Posts
Create an account or sign in to comment
You need to be a member in order to leave a comment
Create an account
Sign up for a new account in our community. It's easy!
Register a new accountSign in
Already have an account? Sign in here.
Sign In Now