Midnight
-
Posts
131 -
Joined
-
Last visited
Content Type
Profiles
Forums
Gallery
Events
Store
Everything posted by Midnight
-
Still riding. 2007 venture. 90000 miles so far. Been an amazing machine. Sure appreciate all the threads and advise on this site. Jr
-
Thanks Don. I wondered that. Is there any stretch of it that's kind of nice and follows the lake? Can always deek down to the interstate.
-
Heading to the Rock and Roll Hall of Fame. Coming around from Detroit. Plan on riding Rte 6 along Lake Erie from Sandusky over to Cleveland. Has anyone ridden this? If so any suggestions on things to see or do or avoid. Thanks JR
-
Been working away at replacing bulbs with LEDs. I did the headlight and passing lights last week but its been so cold up here I cant ride to test it out. Plan on reporting back once I get a night ride in. I now am moving onto the signals and am hoping for some feedback and tips. I plan on using these for the front signals. https://www.superbrightleds.com/moreinfo/tail-brake-turn/1157-switchback-led-bulb-dual-function-60-smd-led-tower-a-type-bay15d-retrofit-car/1915/4479/ And these on the rear signals. https://www.superbrightleds.com/moreinfo/tail-brake-turn/7507-py21w-led-bulb-18-smd-led-tower-bau15s-retrofit-car/527/1703/ So my question is this. I was going to install two resistors shown below where everything plugs in for the front lights behind the fairing for right and left. Seems like a good spot to put them cuz there is room. Will these be sufficient to deal with the hyper flashing/self cancelling issue or do I need 2 more resistors at the back too? Resistors. https://www.superbrightleds.com/moreinfo/flashers-load-resistors/led-light-load-resistor-kit-led-turn-signal-hyper-flash-warning-fix/190/831/ Thoughts and advice appreciated. JR
-
Agreed Jeff. Dont want to compromise the heatsink in any way. I just had a chat with the Superbright LED rep who really had no opinion. They say the heatsink will get to 100 F. So its a personal choice. I think I will try to modify the boot so it covers the bulb where it goes in the housing but does not comprimise the heatsink. Dont want water in the headlight housing. Time will tell.
-
Thanks for all the input. Lots of us doing this upgrade so I appreciate the feedback. I look forward being able to have better lighting at night. Seems superbright in the daylight so hopefully cagers will see us coming too. There is no fan on this bulb. So melting the rubber maybe a concern. Don't want water getting in there either. I will contact the company and check what they have to say and update the post with pics. JR
-
Any LED replacements for passing bulbs?
Midnight replied to Wortheim's topic in Royal Star Venture Tech Talk ('99 - '13)
Just replaced mine with these in amber. Very bright. JR https://www.superbrightleds.com/moreinfo/led-spot-flood/weatherproof-par36-led-bulb-60-watt-equivalent-screw-pin-led-flood-light-bulb-670-lumens/3646/#tab/Reviews -
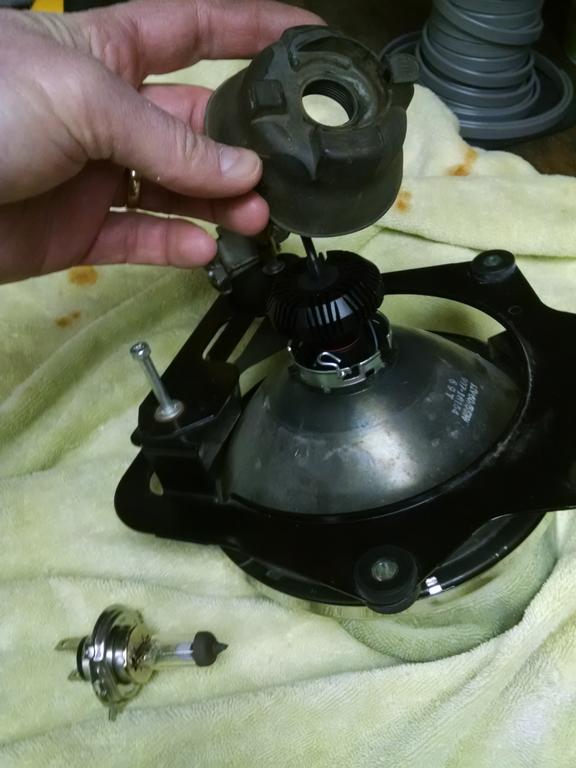
I'm upgrading to a new LED headlight bulb. Bulb fits fine but I am unable to get the rubber boot over the heatsink on the LED bulb. Has anyone else had similar issues when upgrading? Reviews on the vendors website indicate this bulb has been installed on a Venture successfully. Is the boot necessary or can it be left off? Suppose I could cut it to make it slip over. Picture attached showing new bulb in housing, old one removed, boot in hand. Any help or opinions would be appreciated. Thanks JR https://www.superbrightleds.com/moreinfo/motorcycle-high-beam-and-low-beam-headlight-bulb/motorcycle-led-headlight-conversion-kit-h4-led-headlight-bulb-conversion-kit-with-compact-heat-sink/3930/8566/#/tab/Reviews

-
Possible Christmas present for me from me. LOL. Does anyone have expereince with these LED replacements for there headlight and driving lights? Seem reasonably priced. https://www.superbrightleds.com/moreinfo/landscape-bulbs/weatherproof-par36-led-bulb-70-watt-equivalent-bi-pin-led-flood-bulb-lan/3647/ https://www.superbrightleds.com/moreinfo/front-inner-turn-signal-light-bulb/motorcycle-led-headlight-conversion-kit-h4-led-headlight-bulb-conversion-kit-with-flexible-tinned-copper-braid/2781/
-
How about a radar detector?
-
I'm sure other will weigh in to but here is my experience so far. I wouldn't be overly concerned about the tan color of the oil. Sound like the color of mine when I change it. I check to see if the magnetic drain plug has any filings on it. Nothing to speak of so far. I have also changed mine every year simply because it is such a small amount and easy to do. Fill it till it overflows. Currently have 75000 miles on bike most pulling a trailer with no rear end issues. I have also read the same info you have on the shaft connecting the yoke to the rear diff. I use Honda Moly 60 and grease the front splines. I agree that the gear on the diff side of the shaft gets oil from the rear diff through a small hole. Having said that I use a very small amount of Moly 60 on that gear if the shaft does pop out before reassembling. Also gives you a chance to inspect it to if you pull it out. Any Moly on that gear is just going to end up mixing with the rear diff oil which wont hurt it. Ive even heard of people adding moly to the gear oil. I dont do that cuz its so easy to change the oil and check the magnet every year for any evidence of filings, water,etc. Thats my 2 cents worth. Good luck. JR
-
Bell Mag 9 Helmet. Anybody using one? If so do you like it?
Midnight replied to Midnight's topic in Watering Hole
Im pretty much positive Garmin has given up on Xm. The XM radio incorporated into the Zumo is a great feature for us. I transfer it to my truck and car when not on the bike. Only one plan that way. The Zumo 665 was the last one with XM I believe and it is discontinued. The new Zumos have Pandora or something like that which I suspect would chew through data on a phone plan. Also living in Canada not sure we could even get it. I plan on nursing my zumo 550 along as long as possible. Garmin no longer refurbs them but there is a place n Minnesota that does. I have heard good things about them. http://www.palmdr.com/cart/repair-services-gps-repairs-c-31_32.html Wireless sounds great but has to integrate bluetooth wise with so many things. Intercom/music/GPS/phone. I keep reading and asking questions. It all started with looking at a helmet replacement. LOL -
Bell Mag 9 Helmet. Anybody using one? If so do you like it?
Midnight replied to Midnight's topic in Watering Hole
Thanks everybody for weighing in. I contacted Sierra Electronics as they sell the Bell Mag 9 and the JM audio systems. According to them the JM wired headsets will not fit on the Mag 9 only the SENA system. They indicated Bell is aware of this and plan on making some mods so the JM system will work. I have not tried a wireless system and am unaware of a setup that will duplicate what I have now. The JM wired system works so well with the venture and my Garmin Zumo 550/XM radio setup, along with the buddy rich cable and Mic mutes. Phone works well too. I don't see how a wireless system can improve on it much. Unfortunately Garmin no longer makes a XM setup for their new Zumo's so when my 550 packs it in I will have to explore new options. Has anyone had a similar setup to this and transitioned to wireless. Has it worked out? -
Bell Mag 9 Helmet. Anybody using one? If so do you like it?
Midnight posted a topic in Watering Hole
Thinking of buying some new helmets. Currently have HJC- AC3 which are 8 years old. Have the basic J and M Headsets as well. Both have functioned well but are getting dated. I have tried the Bell Mag 9 on and like it but haven't rode with it on yet.. I'm wondering if anyone else has this helmet and what their experience is? Good and Bad? A few reviews I have read indicate they are a bit noisy??? Also wondering if anyone has fitted them with a JM headset? Any input appreciated. Thanks Jim -
Where did you get the plate frame?
-
Kuryakyn Battery Meter location...
Midnight replied to Bert2006's topic in Royal Star Venture Tech Talk ('99 - '13)
I stuck mine on the yamaha emblem on top of the triple tree. Looks great like it belongs. Protected and easy to see. JR -
Thanks for the input. That's what I was thinking. I didn't want to damage the stator by experimenting and seeing if the charging system can keep up. I'm looking at LED headlight/passing light replacements as that will help a lot. Seems they make LED bulbs (MR16) for the new lights I bought, but I they may or may not fit the housing. My winter project is to upgrade as many lights as I can to LED provided they are not crazy $$ and reliable. Hopefully some folks will weigh in on that too. JR
-
I purchased these lights. http://www.walmart.com/ip/Optronics-55w-Pair-Driving-Light-Kit/16680058. I want to install them down by my footpegs/crashbar. They are 2x50W halogens and are bright for sure and fit perfectly down there. Just had to fab up a small bracket. What I am concerned about is at what point do I risk overloading the bikes stator/charging system. I already have the Yamaha passing lights installed using a relay and plan on doing the same with these. My wife has a heated vest as well that gets plugged in at times. We also pull the ALuma MCT trailer which is all LED lit. I have the Kuryakn voltmeter installed and so far all has been well. Always reading in the green. http://www.kuryakyn.com/products/872/led-battery-gauge Any thoughts or advise. Thanks JR
-
Hi Larry: I attached a pic in the previous post. Its a screw in the back of the horn body (shiny one in the pic just below the plug in.) With the key on and someone pushing the button adjust it a little bit one way or the other and see if it helps. JR
-
So I did some checks today to see if I could find where I am getting the 1V voltage drop per my original post causing the stock horns (one on the side and the other behind the fairing) to be weak. The plug that has burnt up on some members per the post below that leads into the main switch is in good shape and has no voltage loss through it. Plug connection was nice and tight as well. http://www.venturerider.org/forum/showthread.php?32359-Ignition-Switch-Wiring-Failure So I decided to clean all the connections from the battery on up to the main switch including the connections at the main terminal block. I also dismantled the main switch and checked the insides and all the soldered joints. I had actually drilled out all the break off bolts that hold the main switch together a while back to and replaced them with normal bolts so getting in to check the main key switch was was much easier. They were all in good shape with no signs of heat buildup or corrosion. When I put everything back together I was down to just 0.5 volts lost through the system from the battery through the main switch/ horn signal fuse and onto the horn plug itself. I also checked resistance through the same circuits and didn't have any unusual reading. I would think 0.5 volt loss to be acceptable. So I plugged both the horns back in and both still sounded weak. I had already removed both horns earlier and connected them directly to a 12V battery. They were definitely louder when I did that but still sound a bit weak to me. So I dismantled both horns and checked the internals and they looked to be clean and non corroded as well. When I had them apart I discovered a screw that was glued into position on the back of both the horns that looked to me that if adjusted would increase or decrease the space between the contacts inside the horn. So I adjusted the screw on both horns and low and behold they roared back to life. I will attach a pic at the bottom showing the screw. Its the chrome screw in the attached pic. Now I cant see anyplace in the shop manual that talked about being able to adjust the contacts within in the horns. But I can say for sure that it made quite a difference in the performance. I have no idea whether they will continue to work well or not or what in all I did made the differnce. Time will tell. PS: Now one thing I forgot to mention in my original thread was I have had a set of RIVCO Air Horns that I installed a number of years ago using a relay that was energized from the horn circuit. The relay in turn energizes the air horn compressor directly from the battery. I had unplugged the air horn compressor from the circuit when I did my checks and whether they are plugged in or not made no difference in the stock horn performance or voltage loss through the circuit. With the stock horns working better than ever and the Air Horns added it is deafening. Exactly what I need when someone isn't paying attention.
-
Thanks for the comments. I plan on doing voltage and resistance checks heading up to the main key switch and around the switch and go from there. Also sent djh3 an email about the relay and bypass switch he makes as that would compensate for the switch???
-
Hopefully this isn't to longwinded. I have a 2007 Venture with 72000 miles on it that I have owned since new. Bike has been an amazing machine. This site and its members have helped me so much in maintaining it and managing its quirks. I'm hoping the electrical experts can chime in and help me work through this. I have noticed for sometime that the factory horns didn't seem to be as loud as they once were and seemed very week. I removed the one on the side of the bike and hooked it directly to the battery. It works fine. So I started checking out a few things and stumbled onto this. What I discovered was I had 12.6 volts at the battery and 11.6 volts at the brown horn wire to ground when the key was selected on. When the engine is running I have 13.6 volts at the battery and 12.6 at the horn. So I am losing 1V somewhere in the system. The bike starts and run perfectly so I suspect the charging system is working fine. It seems that I have approx. 1V voltage drop somewhere between the battery and the horn load. So I checked voltage at the fuse block under the side cover with the key on bike not running. The headlight circuit is 12.6 V. The signal(horn) circuit is 11.6. And the ignition circuit is 11.6 as well. So I am losing 1V in more than one circuit. Looking at the the wiring diagram it is clear that all the load passes through the key switch. I have yet to remove the tank and check all the connections/voltages at the main/key switch but that seems to be a possibility of where the voltage is being lost. I plan on removing the tank and going there next. I have had the main key switch apart once and visually checked the tumbler, soldered joints and circuit in the key switch. It all appeared to be fine and there were no signs of overheating at the connections. That was about a year ago. So I'm wondering if anyone has any suggestions or experiences with this or something similar. Is the main key switch on its way out? I know there is a relay "plug in" system a member makes here and I plan on looking into that. I would like to track down and solve this voltage drop first. Many thanks to whomever wants to chime in. JR
-
I have the Tour King cover and that's pretty much what I've done. Afterwards it didn't repel water as well. So I went and bought a can of water proofing for tents and sprayed it. Has lasted for 5 years. JR
-
We will be travelling again to see family in Norfolk Va from Southern Ontario and hope to take the bike. We have visited there many times and have taken the bike crossing at Buffalo NY with routes through New York, West Virginia and Pennsylvania. Beautiful rides. We thought we would do something different this time and pass through central and southern Ohio after crossing the border at Port Huron Mi. Then into Eastern Kentucky and over into Southern Virginia. Any suggested routes or roads? Attraction's or things to see? We have been looking a bit at areas around Ashland, Moorehead and Pikeville KY to stop for a few days and do some riding. Thanks JR
-
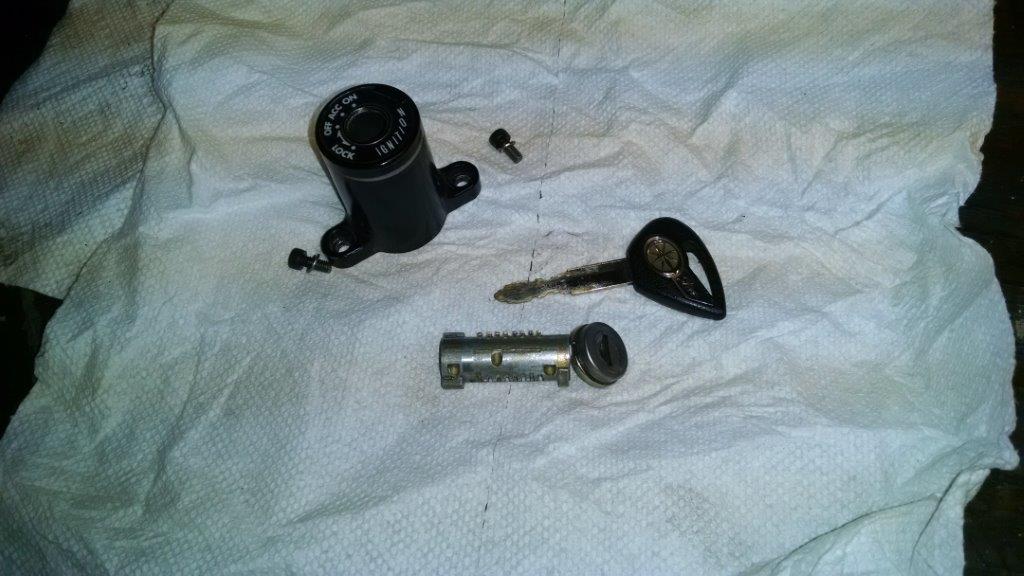
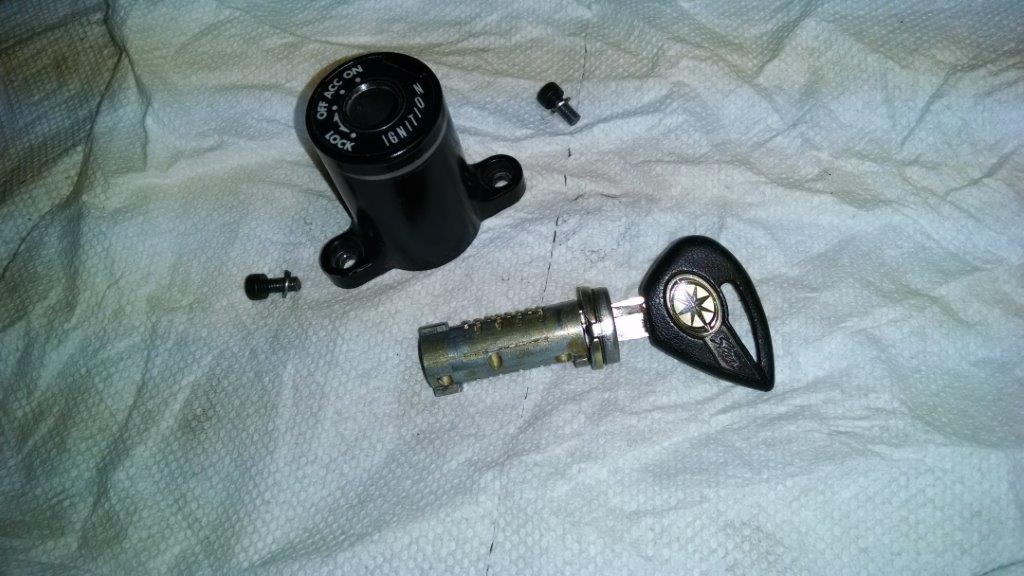
2007 Venture Ignition Key Cylinder (the thing the key goes into) wearing out. Need parts. A bit of background. Hopefully this will make sense and won’t be to longwinded. My Ignition key has been getting hard to turn from the off position. It finally wouldn’t turn at all so I took the whole thing apart and inspected it. It involved drilling out all those break off bolts Yamaha puts on and replacing them with allen head bolts. Once inside the thing it was pretty easy to inspect everything. • The electrical part of the switch is in good shape (many thanks to the members on this website suggesting I put my accessories on a relay). • Locking assembly good shape as well. • Problem is the “key ignition cylinder” is worn not letting key move the wafers (tumblers) so the key can turn inside the cylinder casing. If you push the key to one side it will realign the wafers and the key will then turn. Knowing what way to push the key will let me keep riding. I took the key/cylinder/wafer assembly to a locksmith to see what he could do. He cut a new key to the factory code (glad I kept that) in case it was the key that was worn. Didn’t make any difference. Locksmith agreed cylinder was worn and causing problem. It became much more obvious to me once he explained it. He can get parts for automotive ignition key cylinders but has no listings for bikes. He said it’s easy for me to transfer the wafers from my existing cylinder to a new or salvage cylinder if I could find one. Seemed like a good way to go as a new ignition switch from Yamaha costs dollars and the only problem with mine is a worn part that if I can find a supplier will likely cost very little. I suspect more folks have had the same problem and have replaced the whole switch and possibly rekeyed everything. If I find parts and it works out I will try to make a post showing the process on what to do when the cylinder wears out. I attached a couple of pics. One with the key in the ignition cylinder and one with it removed. Does anyone know a supplier for the ignition cylinders or have a salvage ignition switch where the key assembly works O/K that they are willing to part with? Any advice or experiences is always appreciated. JR