Papa Fred
-
Posts
113 -
Joined
-
Last visited
Content Type
Profiles
Forums
Gallery
Events
Store
Everything posted by Papa Fred
-
My wife & I are considering moving on from our RSV and I'm looking at a 2002 GL1800 as a possible next bike. It's got 119,000 miles on it but as usual, from what I've seen in my research so far, it's in beautiful shape. I've never ridden, never mind own one, so I went to Google and YouTube for information. The one BIG issue seems to be that in the 01 to 04 year range the new aluminum frames experienced frame cracks. As with any defect, some owners had no indications of cracks, others had them and had no problems getting them repaired, and still others who had the problem and had to fight with Honda to get them fixed. From what I understand of the eventual Honda recall, it seems that anyone with one of those year bikes can take it to a dealership for repair, or at least assessment, regardless of age. A dealer can check the bike's VIN to determine if the repair has been done. The bike we're looking at is in really nice shape, and because it's a "30th Anniversary" edition I guess it has a few more shiny bits. The asking price is reasonable in comparison to other 5th Gen bikes I can find, but the frame issue is concerning...especially since we plan to do a lot of miles and most of those would be pulling a trailer. (not a camper trailer, just an Aluma MCT with mostly light stuff). Can any 'wing owners out there help out with some information as to whether this cracking issue is as common as some of the Goldwing posts seem to suggest. We'll be taking the bike out on Monday for a decent length test-ride and would like to have some info at hand to get the right questions answered. Cheers...
-
Thought of this after I sent the last... On the engine case, behind the Left Rear Cyl (#1??) there is what appears to be a serial # of sorts cast into the case. My 2000 motor has P603E-003716. On the motor I was looking at the number was 4NK-017706. I noticed on a couple of other EBay offerings, their motors had the same P603E. I'm guessing that would be a "Venture" serial number string as opposed to the other earlier "Royal Star" serial...as in a way to confirm a GEN 2 engine?
-
Well, I was all High Hopes & Dreams there for a while, but your mention of the engine mounts, @cowpuc made me take a closer look at both mine and the donor. The donor doesn't have the "dogbone" upper engine mounts on the front cylinders, just clean, symmetrical fake fins. That's kinda critical, I think. 🤔 Would I be correct in thinking that the late 90's Royal Stars were a bit of a test bed for the upcoming Gen 2 Venture? Externally the engines look the same, but I guess the plain Star was a bit lighter than the Venture?? Guess I'll go back to writing the obituary for my RSV.
-
Good Evening, gang... While this is related to an earlier posting regarding my transmission bearing grief, things took a slight turn this afternoon that sent me down what appears to be a fairly optimistic path. An earlier whiff of a replacement engine turned out to be a better candidate for Yard Art, so I continued hunting and came across a very interesting offering in the way of a 1998 Royal Star engine. It came out of an insurance claim bike that had basically cosmetic damage to the windshield and light pods, but being a 24 year old bike the insurance company just wrote it off. The package is a 26,000 mile running engine with carbs...basically they unplugged the wiring from engine and carbs, unbolted the front frame tubes and cut the rear and pulled it from the bike. The rest of the bike is being parted out. I am not familiar with the Royal Star, other than the Venture, and was quite surprised when I googled a 1998 Royal Star and saw essentially a stripped-down early cousin to my Venture. The general layout as in engine, frame, even the fenders look the same. This looks nothing like a Gen 1 Venture, more like a preview of the 2nd Gen. Here's The Ask...Will a seemingly identical-looking engine out of a 1998 Royal Star swap into my 2000 Venture? Another unknown is the rear shock. Would the Royal Star have used the same type of shock set-up as the Venture. The rear shock being offered looks to have a different mount at the bottom, but I thought I'd ask. Based on what I've learned from a few sources today, I'll be spending many, many dollars just to get MY motor out, and tear it down to see what damage has been done, never mind start replacing bits. If this '98 ticker will fit, my bike will have a nearly new engine, and I'll have a lot of useable parts on the original engine. That's it for now...I look forward to any confirmation, denial, affirmation or suggestions. Thanks in advance... Cheers.
-
Fuel pump - rewiring Question
Papa Fred replied to M471MPY's topic in Royal Star Venture Tech Talk ('99 - '13)
Welcome aboard. Members here will freely share experience and tips, as I have found over the past 5 years. Here's a thought on the fuel pump..they are generally trouble free and from what I can tell, are regulated to deliver fuel only when needed. They are "on" when you turn the key on, and you will typically hear it pumping when initially powered up. The points in the pump have been known to act up, and some members have taken them apart to replace or freshen up the points. Another route to go is to replace the pump with either a similar pump, or an electronic pump (no points). I installed a Facet Electronic pump last year ( part #40178) and it works flawlessly. The thing to watch with whatever pump you use...other than OEM... is the fuel pressure the pump will deliver. I don't remember the PSI right now, but it's in the low single digit range. With a bit of creative plumbing, mine fit into the original pump location, is powered by the OEM wiring, and like the OEM delivers fuel as needed. Another fuel related suggestion is to get rid of the OEM fuel filter and install a see-through filter in a more visible location. Many have put it under the seat, between the battery box and the gas tank. The bike frame tubes widen out just behind the tank rear mounting bolt to form the cradle for the seat. There's a perfect filter-sized space there..much easier to check than the OEM filter location. A final hint...if you don't do this already, shut the fuel off under the tank whenever you aren't riding. If whatever pump you end up using has a failure which allows fuel past it into the carbs, you run the risk of filling up the cylinders with gas... hydrolocking. Bad expensive things happen when you hit the starter. Good luck with the project.- 1 reply
-
- 1
-

-
I owned and drove 5 different semis over nearly 25 years. I let the tire shop fill all 10 tires on one of my Large Cars with Nitrogen, wanting to see for myself their claimed decrease in pressure loss and cooler running temps. I had no way to verify the temperature claim, but I didn't notice any difference in pressure drops. I checked truck and trailer every morning before hitting the road, usually with a gauge, and hammer checked them several times during the day whenever I stopped. If a tire was over 5 lbs low I got out my 50 foot air line, and truck compressors don't pump nitrogen. When you drop over 4 grand for tires, you pay attention to air pressure. Just sayin'....🙂
-
You're right, Ron...I forgot to mention that bit about having the bike straight up. I've also marked each side of the oil sight glass with a black permanent marker at the midway point between the HI & LO marks on the engine case.
-
Someone earlier had mentioned the shift shat seal along with the Stator Wires. Definitely look at those wires. They come out of stator cover toward the rear of the cover...easy to find once you remove the rear (transmission)cover. Be careful with that trans cover as there is a small copper washer on the bottom bolt of that cover to help seal that bolt. ( check that one for leaking as well). With that cover out of the way, you can get at the shifter shaft seal to determine if there is any seepage there, but more importantly you can now see the 2 rubber grommets in the rear of the stator cover...upper one has 2 wires, lower has 3. When I replaced my stator a couple of years ago, one thing was pretty obvious right away. On the stator I removed (unsure if it was OEM or other) the 3 wires running thru that grommet were sealed tight into the grommet. On the new stator those 3 wires were loose in the grommet, being able to slide back and forth. Although I applied a fair bit of RTV to the grommet and around all the wires, I still had oil leaking out past those wires. I tried cleaning the case from the outside and applying more RTV, but the leak continued. It wasn't a lot of oil coming out, but after a couple of hours riding there would be oil blown back along the frame, the exhaust pipe and the kick stand., and when stopped for a while leaned over on the stand, the oil would collect along the bottom edge of the stator cover, or run down the stand, and also drip onto the ground from the kickstand safety switch (just ahead of the stand). Some of the oil might have been leaking from around the cover gasket, but the majority of it was coming from the wires. Not only would it drip from that side of the bike, but the oil would also travel down those wires into the bundle of wires zip-tied together in the centre of the bike just ahead of the shock...which gave the appearance of a leak from the back of the motor. Lots of brake clean, lots of cleaning rags, pulled the cover, cleaned the inside of the cover, removed all the old RTV and very carefully re-applied some quality hi temp oil resistant RTV (Yamabond or equivalent) into that grommet around all 3 wires, from the inside and the outside. I let the RTV cure overnight, applied a light smear of the same RTV to the gaskets as well as the engine and the covers, let them sit for a few minutes, then put the covers on, torqued the bolts and again let it sit overnight before adding oil and running the engine. For the first time in a couple of years the bike doesn't mark it's territory wherever it stops. Zero oil leakage. As stated in another post, the engine doesn't like being full to the high mark on the oil sight glass. That only leads to oil drips from unexpected places, including the collection of hoses that come out of the bottom of the frame just ahead of the rear shock. Good luck with the leak hunting.
-
Here's an update for everyone following this thread....alright alright... the 3 guys who stumbled on this by accident while looking for important stuff. Looks like I'm done for the year. That donor bike was a bust. Unknown year, unknown mileage and the bike hasn't been run in over 4 years, plus visible evidence of questionable storage since it was hit had me wondering about the internal condition of the engine, since the air box over the carbs was gone and 2 of the exhaust ports were open to the weather for an unknowable amount of time. Rather than spend money on an incomplete donor (which I don't have room for), which was missing a LOT of parts , I'll spend the money on mine, since I've spent the last 5 years getting to know how she wants me to treat her. My mechanic will take apart the engine and transmission, clean and inspect them, replace bearings and ?? as needed, and put it all back the way it should be...rather than me attempting the job in my limited space, using limited knowledge, realizing I haven't got a clue what I'm doing, and delivering to him a box of parts and a bike with a hole where the engine should be. He'll be much happier and I'll get a bike back that runs. The downside to this of course, is that he operates a very busy 2-man independent shop, and with the work he currently has he won't be able to get mine in till after the riding season ends around here...late October (yep...snow zone). It's a fitting end to what was a shorter-than-normal season this year. With the record ugly winter we had, I couldn't get the bike out til the first week of May. I feel that refreshing a bike I already know goes down a better road than spending money on an unknown headache in an attempt to get back on the road sooner. Thanks to all for tuning in and chipping in. Cheers...
-
Good to hear, Duey...Thanks. I'll be working on that later today. 👍
-
You are correct about the trailer. We don't use it a lot and by that I mean maybe 3 times a year for relatively short rides...2 - 300 miles. This was the first long haul with it (approx 1200 miles), and it was pretty much 3 days of steady riding. ( Old Fart Tour) Broad strokes...Winnipeg, MB to Kenora, ON, then down to International Falls, MN, south and east to Ely, MN, down to Lake Superior then West from Duluth to Grand Forks, ND and home to Winnipeg. A lot of that was in moderate hilly country and I don't generally cruise any quicker than 65 mph. The VMax rear puts the engine at 3500rpm, which seems to be a happy spot for the motor. All that to say this...The bike seemed to be working fine considering the all-in weight. I had some concerns about pulling a trailer before getting one, and thought I was moving in the right direction by going with that VMax rear after reading a few posts from members who had gone that route. As for "stirring the pot" 🙂..the one oddity I noticed when I got the bike up on my scissor jack.(besides that whole bearing thing) was there had been oil seeping out at the joint of the gear pumpkin and the drive shaft tube (those 4 acorn nuts). It wasn't dripping, more like oozing out then carried toward the rear by the wind. Not a lot of oil, but enough to catch dirt. Definitely a first. Wrapping up here, for now...I know a guy who has a wrecked 2nd Gen (unsure of year but I think it's newer than mine). The bike was written off after a front-end hit. Everything from the handlebars forward was damaged, but everything aft is good. If memory serves I think the rad was untouched, which to me suggests no engine damage other than the sudden stop. He says he will sell me the engine. As of this post, I have not been to see him to determine a price, or for that matter to confirm the motor does indeed run. Something I have to get my head around, since I don't have the ability or shop space to pull and disassemble a motor. This whole riding thing is fun tho...right?
-
Good morning, Carl... The following is due to lack of knowledge...if the pan will come out the bottom with the engine in place, what prevents it from going back in? Isn't the oil pump pickup the only thing hanging down into the pan? I'm going to drain the oil regardless of what else I find, since there was clear evidence of metal shavings and small pieces on my magnet fishing expedition, and I was thinking that by dropping the pan I would not only find those missing ballbearings but also be able to clean the screen on the oil pump. I guess all this is because I was hoping to get the bike running again myself...with help...without losing the rest of our short season waiting for a time-slot in my mechanic's shop (late fall at best). If the motor does indeed have to come out, I'm done for the year.
-
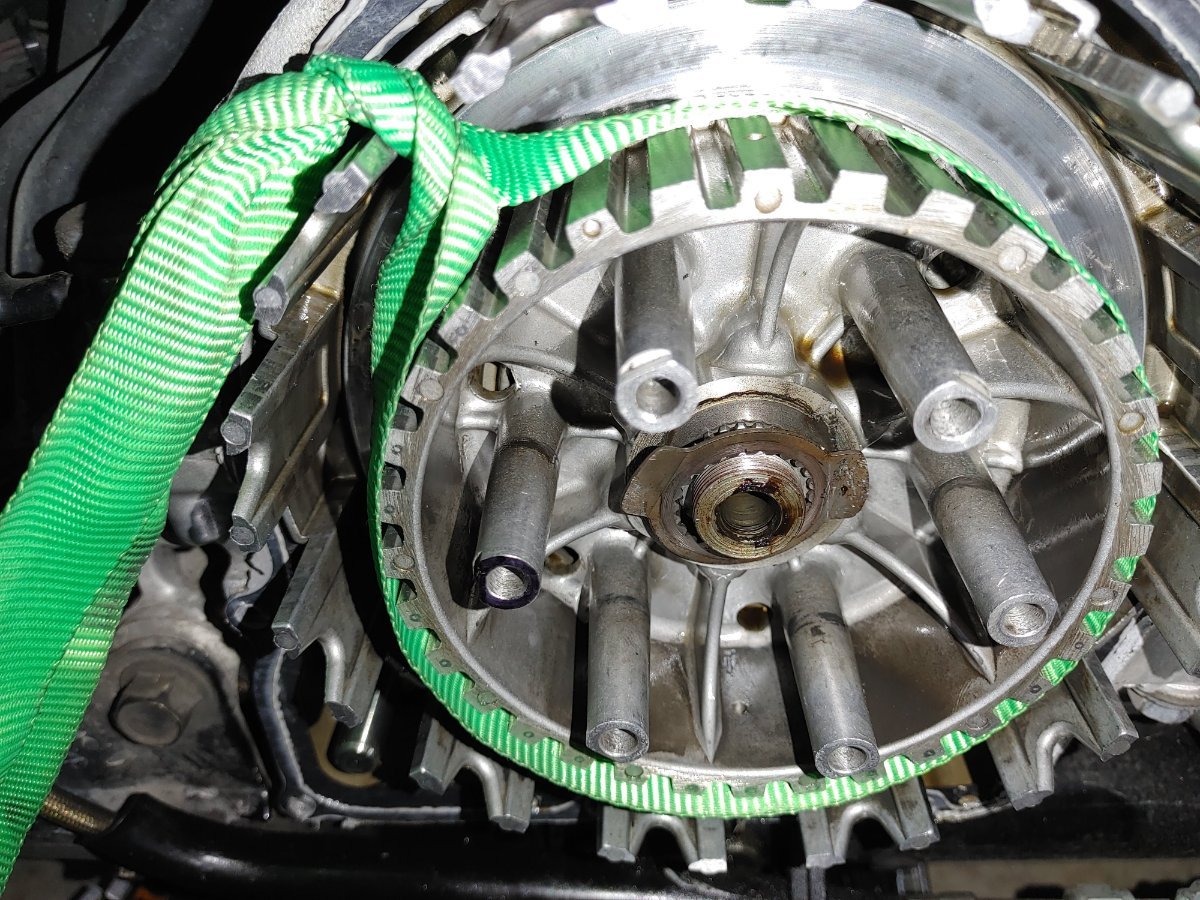
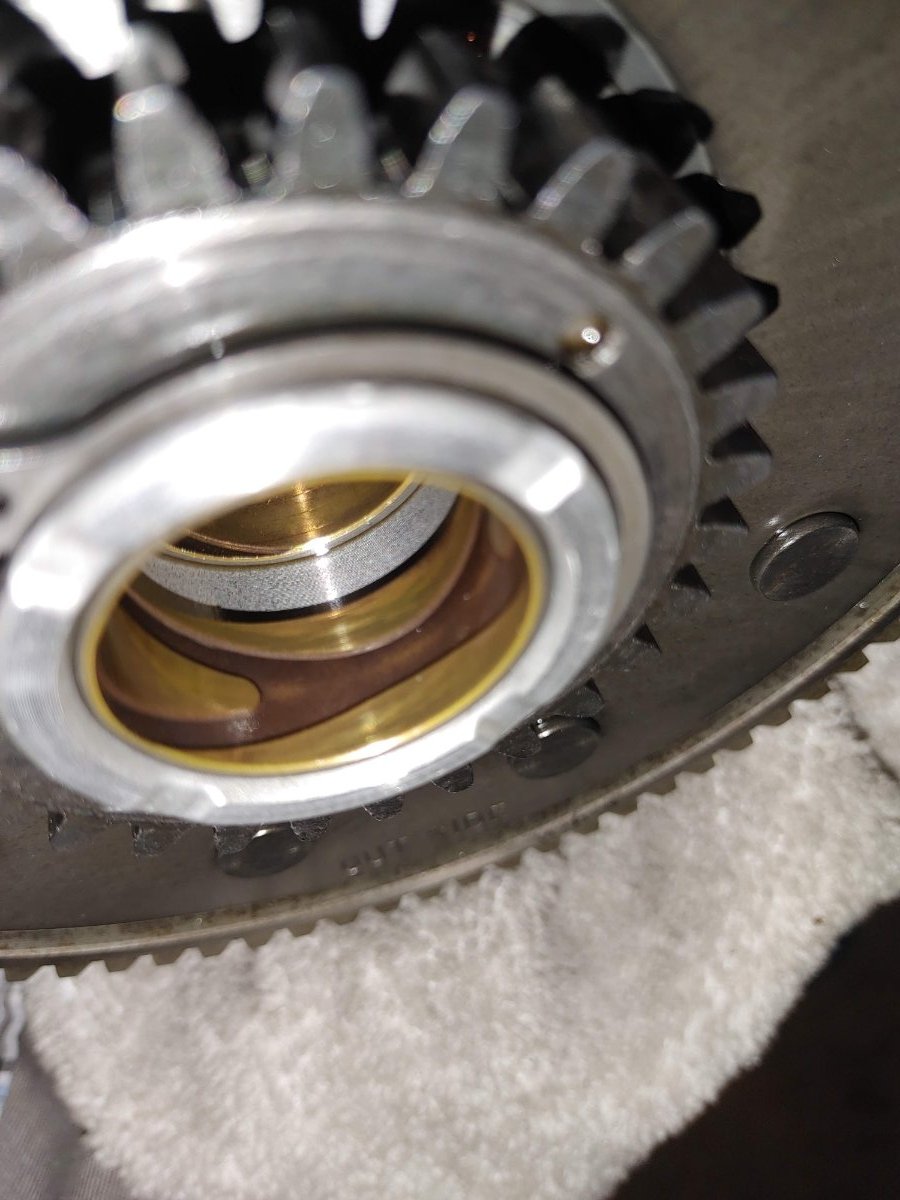
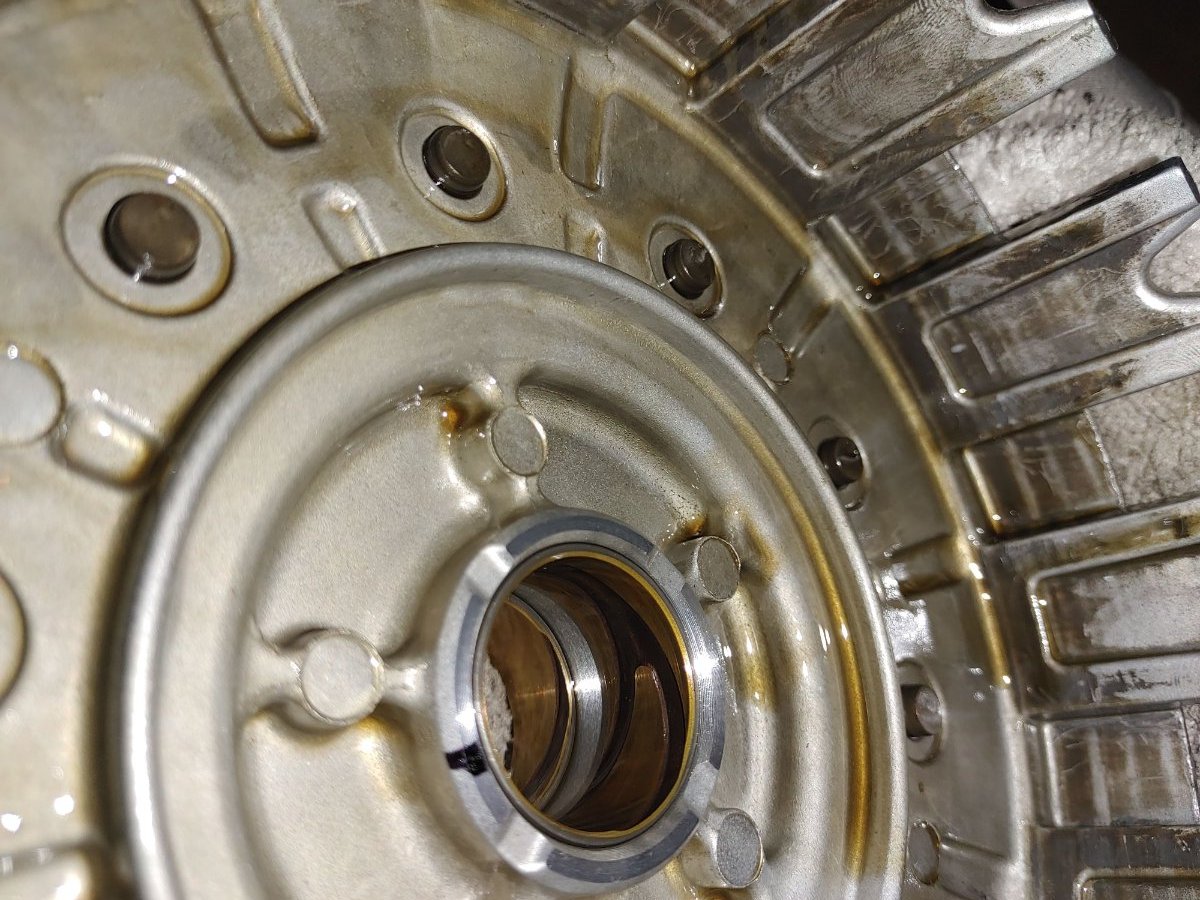
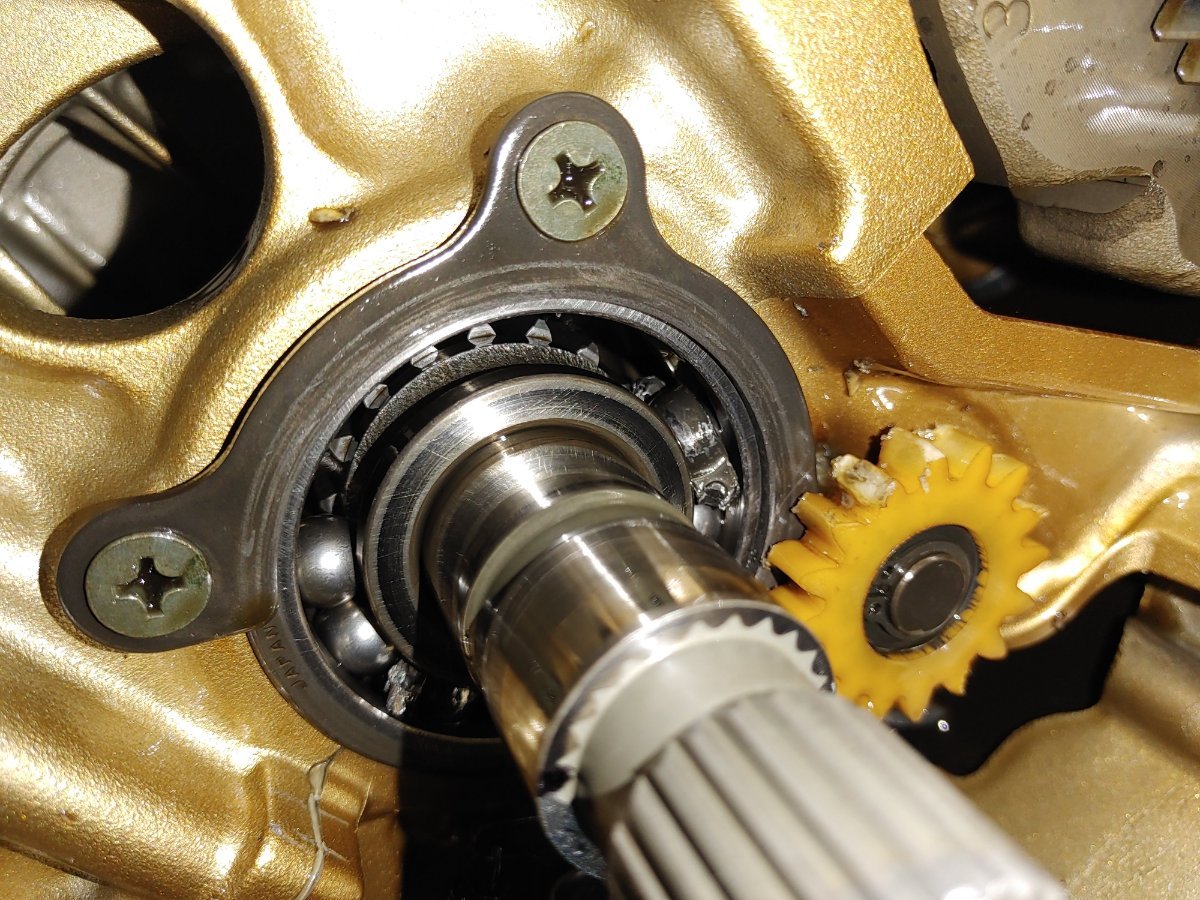
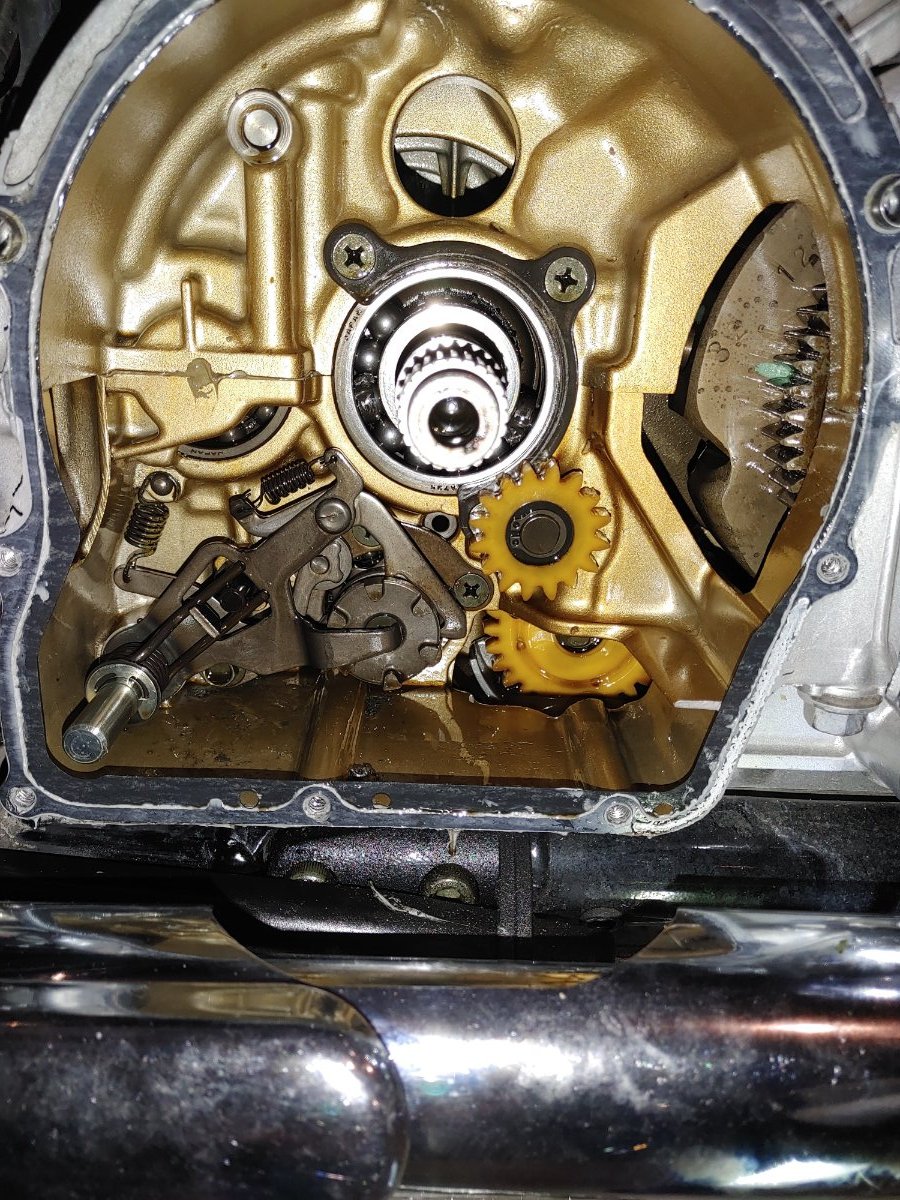
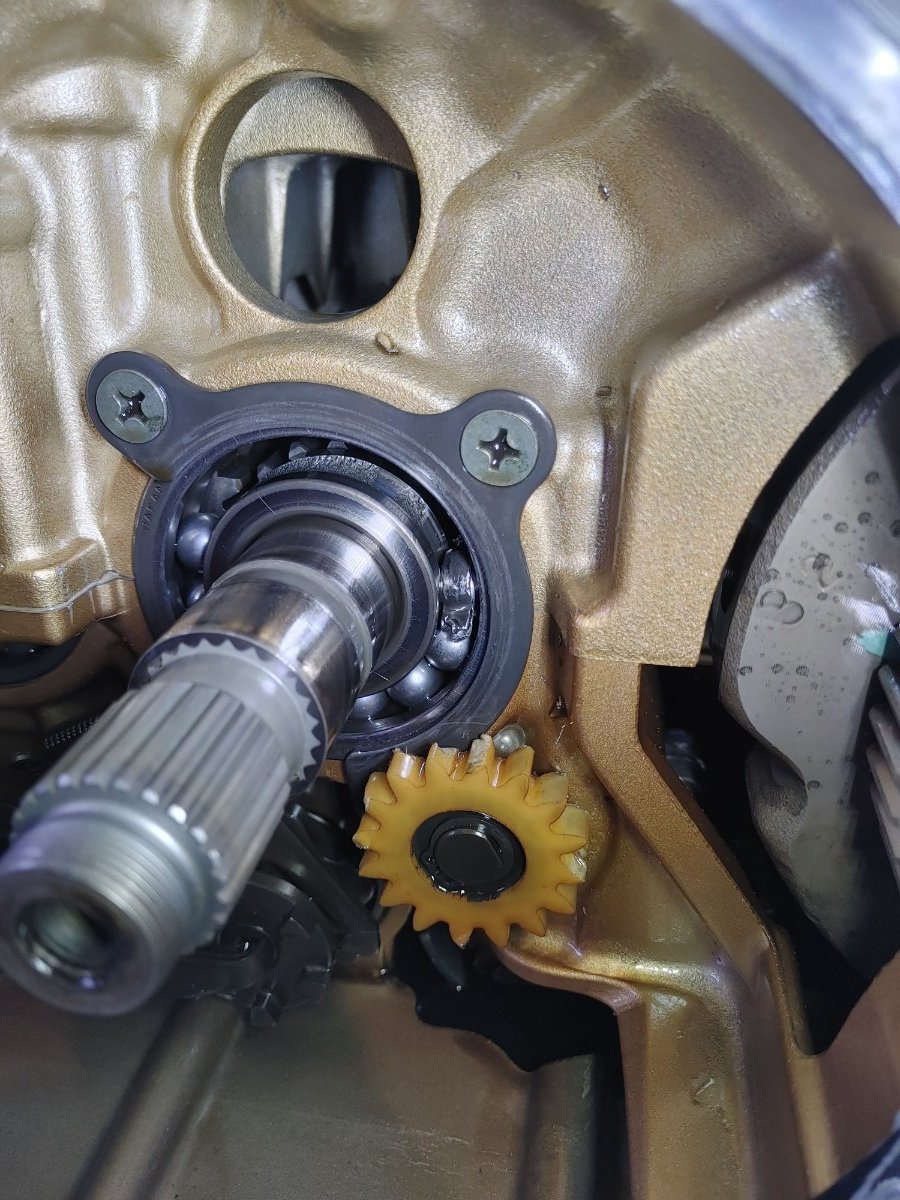
Good evening guys...If my thumbs worked, there should be 6 pictures attached to this msg. 2 quick points... 1- That oil pump idler was indeed the source of the yellow plastic bits in the case. Thanks for that, Carl. That idea of the timing chain blocks would have been a next place to look, Ben, but with the way that Idler is chewed up I think it was the source. 2- Puc..your suggestion of using a bike strap to hold the clutch drive was genius-level Use Whatcha Got thinking. Worked like a charm, and with less effort than I was expecting. I guess that center nut isn't really cranked on hard, given the lock washer holding it in place. As is clearly obvious in a couple of the pics...the missing ball bearings were the culprit as far as I can figure. They were obviously making all the noise while letting the basket move everywhere including in circles. A question or two here though. Is that 3-holed plate the only thing holding that bearing in place, or is it pressed onto the shaft as well? Is this something that can be removed from the outside ( meaning "by me"), or does the tranny need to be taken apart to get at the shaft...which of course means pulling the engine. Also, I can't find any reference pictures / diagrams in the Parts or Service PDFs that show that end of the shaft with the bearing and that hold-down plate. The way I'm reading the Parts pdf is that bearing is part # 93306-36401-00 attaching to the outboard end of the Main Axle which is closer to the front of the trans. One last issue...the elephant in the room as it were. The bearing is missing what looks to be about 6 balls. Since I didn't find any in the clutch area, and there is a fairly large opening below that area leading into the oil pan, I have to assume they are hopefully sitting at the bottom of the oil pan. I was able to fish some metallic bits out of both the clutch area and in the oil pan using a small magnet but the ball bearings might have rolled to the Down Side of the pan since the bike is over on the lean stand. According to the Service pdf, they say the engine has to come out to remove the pan and oil pump, but from what I could see, there is a dozen or so socket-head bolts holding the oil pan on and it looks like it would drop right out the bottom between the frame rails. I don't really want to try to coax the AWOL balls out of the oil drain hole, and they surely couldn't have disappeared. Believe me when I say...any input from those who have gone this route before is welcome. Once again, compadres...muchas gracias...Cheers

-
Thanks for that last bit of info @cowpuc...it addressed most of the questions I had...I'm sure more will pop up before long. I like that idea of using an old clutch "steel" as a hub lock. It just so happens I have a few steel plates from the clutch swap a while back, along with a buddy's Lincoln wire welder that he's in no hurry to get back. I might just give that a try, or possibly your strap grip method. Either way my 40 year old Craftsman Impact will be getting some exercise tonite. Don't worry about carryin' on with the replies..I was able to make sense of it and follow right along. Now I just have to transfer that "sense" to my hands and tools in the garage. 🤓 Cheers...
-
While I had the cover off, I was looking around the case beneath the clutch looking for more shrapnel and saw that plastic gear behind the clutch. It's where I suspected the piece was from, but on the part of the gear that I could see I there was no damage. I guess I could try bumping the motor on the starter to turn that gear, couldn't I? Sorry @cowpucand @Marcarl..I wasn't thinking that those pieces were engine related. I am truly hoping it's clutch or tranny, but my understanding from shop manual information is that the engine needs to be pulled to get at the trans. Naturally, I'm certainly hoping it's something I can get at from the outside. Regarding the basket removal. There is the lock washer and large nut to remove, but it looks like the clutch push rod..the short #1...has to come out first. Besides keeping track of that little ballbearing, should I be expecting that inner push rod to come flying out after pulling the small one? There seems to be a bit of outward pressure on that small rod and I'm wondering if I'm going to get a fluid bath once that first rod pops out. One more item that I just now saw looking at the parts manual (pdf). The exploded view shows a bearing (#93306-00304-00 or B6003C4) as being to the outside of the push rod , nut and lock washer..as in it comes out first, yet the service pdf makes no mention of that bearing, nor does it appear in any diagram of the clutch removal. Any thoughts? I have replaced the OEM clutch with a Barnett Spring & Pressure Plate Conversion, along with their fiber and steel discs The only bearing I can think of is the one in the center of the pressure plate, however I don't remember taking OUT a bearing from the OEM. Not saying I didn't...just don't remember. (geezer alert!!) I appreciate the info guys...both the hand-holding while I sob into my cold adult beverage, and the part # for that idler. I now have something to do this evening. I'll yank the clutch cover and take a shot at removing the basket to get eyes on what's back there. If I can figure out how to get pictures up here, I'll try to post a few. Visuals are usually more helpful than words.
-
Greetings, gang. Although I have been listed as Expired for the past week or so it seems as though I'm still here. (a serious brain-cramp on my part prevented me from getting the membership renewed on time.) This past Saturday wife & I got home from a 1200 mile adventure. Good weather, no rain, no wind to speak of, with enough turns and elevation changes to be interesting. We were pulling our Aluma MCT with a fairly light payload, and all-in with the bike, us and the trailer were probably in the 1200 lb range. The bike (2000 RSV) did well overall and as expected the VMax diff I put in a cpl of years back made it a bit easier to get going. Having said all that, the bike had been making a bit more noise this past year..seemed to be from the clutch area...and as this trip progressed the noise was becoming more prominent. It sounded alike it was clutch related as it would decrease/increase depending on clutch use. The bike had no issues once underway with respect to accelerating or pulling hills...no slipping. The bike got us home into the driveway, and in the short time it took to unload and unhook the trailer the clutch gave up being nice. I tried to back down the drive to take a short solo scoot and couldn't get the bike to roll backwards while in gear with the clutch lever pulled. When I DID get it onto the street, it sounded like a handful of gravel had been tossed into the clutch / trans. I put the bike in the garage for the night, not wanting to work on it in the heat. When I pulled the clutch cover Sunday, there were a few small pieces of something probably important laying in the bottom of the engine case below the clutch basket, along with a chip of yellow-ish plastic. The icing on this is that the clutch basket moves side to side along with the center shaft. I found no damage to the friction or steel clutch plates when I removed them, so I suspect there is a bearing behind the clutch basket that is no longer intact. Several mechanically savvy people have indicated that the engine has to come out of the bike for the repair...if that is indeed the problem. Although I have tackled a number of jobs on the bike over the past few years, I have neither the expertise nor the space to attempt that level of work. If anyone has had a similar issue, I'd be curious to hear what the problem was and, more importantly, the outcome. Given the overall reputation of rock solid, trouble-free life expectancy, I gotta say this is quite a letdown. While I get that it's a soon to be 23 year old toy, it hasn't been abused by me or the original owner, and with my mechanic unable to get into it til September-ish, my riding season just got a whole lot shorter. Respectfully submitted ( with a small amount of *@$*!!).. Fred
-
No problem, but thanks for looking. I can always learn about it the same way I have in the past....tear it apart. Being unable to ride it is a good motivator to figure it out. 😎
-
By the way @BratmanXj...did you do the front end yourself or have it done in a shop? I'm curious about the proceedure.
-
I rode with a guy yesterday who has a CT on his Victory(don't know the model, but wasn't the Full Bags & Trunk spaceship looking model...still large bike tho). I couldn't see what make of tire he had and he didn't offer to roll it forward a couple of inches to see the name. He loves the CT on his bike, which was what got me looking at his tire. What I DID notice was that it was a much wider tire than the Nexen and was a lower profile as well with sidewalls that were well over an inch less than the Nexen. Those two items, by their very nature, would make the tire feel a lot more stable under the bike...a bit more tire side to side and less sidewall to flex or squirm. Those of you who run CTs on the RSV know that the driveshaft tube side of the swingarm really limits the width of the tire. Having said that, I might pull the Nexen off that spare wheel and take it to a tire shop in search of a similar width tire but with a lower profile. I think I read about some guys running a BFG, with the comment that it is a smaller circumference, effectively changing the overall gear ratio to be "quicker". Since I'm already running a VMax diff I was hoping to stay close to the OEM tire circumference ( The Avons and the Metz are a tick over 80 inches around). If I absolutely HAVE to I'll switch back to my stock diff to accommodate a smaller tire but at this point I'm feeling mentally lazy, and I really like the way the bike gets up and dances with that VMax drive. It's five o'clock somewhere... Cheers.
-
All good points to worry...uh..think about. I haven't pulled the forks apart to check the bearing condition, @RDawson. My brain starts to hurt when I think about the steps involved in gutting the front end. I've read a number of comments on progressive springs for the forks, and I should really consider those along with the new neck bearings. My hesitation on taking that apart is probably a twin brother to my hesitation on pulling the carbs out for a re-build. I've never had ANY carb apart, and the thought of screwing up four of them is frightening. On the other hand we learn by doing, right? This bike has taught me how to install a clutch, a stator, an electronic fuel pump and a new rear diff. How hard could the forks be....😬 You're correct @cowpuc, I should pick Earl's brain on detailing that rear end. In the meantime... GEEZERS UNITE!!!👴 Cheers....
-
Thanks for the axle alignment suggestion, Carl. I believe the axle is running fairly true because during the tire/wheel swap I took note of how the axle came out, and after the axle nut was removed but before starting to pull the axle I was able to rotate the axle very easily...nearly with just my fingers. As I was removing the axle by slightly rotating it side to side, it remained loose until it pulled clear of the drive-side of the wheel. A couple of years back when I installed the VMax rear end, I loosened the 4 acorn nuts, set the axle in the swingarm without the wheel, jiggled the whole thing until the axle turned freely, tightened the axle pinch bolt, snugged up the acorn nuts, released the pinch bolt and pulled the axle. This past wheel removal, I didn't touch the acorn nuts, just pulled the axle. It seemed to be where I had left it on the rearend swap. If the alignment was in question, wouldn't that squirm be present in the MC tire as well? I don't get any feeling of uncertainty at all with either the present Metz or the previous 2 Avon Cobras. At the other end of the horse, I tried out Cowpuc's method of testing the front end. I seem to remember reading somewhere on the VR site about a method of checking the front end by getting the front wheel up off the ground and bumping the bars right or left. The goal was to have the bars swing freely to the limit without rebounding. This may have been 3-ish years ago, and at the time I think the bars were pretty loose. They would swing to the stops and bounce back easily. I recall trying to tighten them up then, and maybe improved it but not enough. When I checked them this time they seemed fairly loose based on the pull Puc suggested, but after loosening the 27mm nut, and working a flat screwdriver into those 2 locknuts on the steering shaft, I was only able to snug them up a small amount. The "pull" on the bars is now a bit more than before....I can get about 3 lbs on my little luggage scale.... not quite the 5-7 lbs Puc had mentioned. I'll be riding this afternoon and will take note of any change..good or otherwise. Cheers....
-
Just got back to my laptop and saw your post, Cj. That squirrely feeling you mention is about the best way I could describe my experience with the CT, only I was getting that uneasy feeling at any speed, from parking lots to hiway. The softer sidewall on the CT was introducing some squirming in the direction I thought I wanted to go, enough to have me make a few steering inputs at unwelcome times. At high speed, the bike just felt twitchy. A good friend of mine down the street is beginning his journey with a CT on his Goldwing. So far he likes it, although besides the differences in our bikes, he has a different make of CT on, he rides solo only and virtually all his miles are on the hiway. Most of my riding is with my wife with about a 75/25 hiway/city split. I re-installed the Metzeler 888 I had on before the CT experiment, and went for a little 60 mile scoot. The bike is back to being predictable, both at high speed and around town. When I bend it into a corner, it tracks just where I point it....I'm not having to "work" the bike all the time. The bottom line is Happy Papa....which means Happy Mama....which means Happy Papa. Cheers....
-
Hey guys, thanks for that input. Regarding tire checks...one of the most important things I learned from nearly 25 years as a Long Haul owner/operator was the last line of defense keeping you out of the ditch, or someone else's grill, was the tires, and paying several thousand dollars for 10 new tires will (or should) motivate a person to learn how to use a tire pressure gauge and to use it often. With the bike I check the tires before every ride before it moves out of the garage. My problem with this experiment on the rear tire was that I completely ignored that one basic rule of tires...whatever you run be it bias, belted or radial, run them on all axles. (with the exception as noted by Ben). I got myself convinced that I should try something new, but (call me over-cautious if you like) I'm not comfortable running a tire at 10+ psi over what the max pressure states on the tire, put there by the people who made the tire. Rather than spend a lot of time trying to get the CT do what I want, my next work on the bike will be to re-install my original wheel with the Metzeler. The couple hundred extra lbs of load capacity of the CT isn't worth playing with, and since my wife depends on me to get us back from wherever we go, I'll get us there with the tire that makes me comfortable. By the way Puc...thanks for that tip on testing the bar. The simplicity of "Old School" is far too often overlooked. 👍 Thanks to all who weighed in on this adventure, again proving that the VR family is a good bunch to visit with. Cheers...
-
Thanks Ben, Earl & Puc for the input. Here's what I observed today with tire pressure adjustments. I did a quick run with 42 psi in the rear (Nexen) and 36 psi in the front (Metzeler). It didn't feel too bad getting out to the hiway, but once up to speed...as in excess of 60 mph approaching 70...the bike was a handful. It had a tendency to wobble, not a handlebar tankslapper kind of wobble, more like I was moving my butt on the seat side to side quickly which transmitted up to the bars...enough to really focus your attention. A bit more info on the three tires: Last month I pulled both wheels off and had one of the local bike shops install Metzeler ME 888 Marathon Ultras in the OEM sizes...150/80-16 fr, 150/90-B15 r. Right off I noticed the Metzs' gave a bit stiffer ride and the bike was a bit more twitchy in general...not dangerous just quicker response to any inputs by me or externally (wind or road). The tires seem to be constructed a bit stiffer than my previous Avon Cobras..again not bad just different. The front Metz is a 4 ply with 3 polyester + 1 nylon belt in both tread and sidewall. The rear has 3 polyester + 2 Polyamide belts in the tread and 3 polyester belts in the sidewall and feels quite stiff which , to me, allows for the high load ability. The rear is rated for 992 lbs @ 50 psi, with the front at 761 lbs @ 42. I was running them at 42 rear and 38 front. The Nexen, as stated is rated for 1201 @ 36 psi, and being a radial, has built in shock absorbers in the sidewalls. I'm going to explore running higher psi in the rear with a constant 38 psi in the front in an effort to find a pressure that will calm the bike down at higher speeds. (Note here that most of my riding is at hiway speeds, generally between 60 - 65 mph.) One thought that crossed my mind was that mixing a radial tire with a belted tire on a bike will give unusual handling. I wonder if running the Nexen at much higher than rated psi is just making the tire harder to disguise the difference. ?? With respect to the steering head bearings and swingarm... I haven't had the forks off to physically check or replace the bearings, but with the front end off the ground and the bars centered, a slight nudge will roll the bar left or right fairly easily to the limits and remain at that limit...no rebound or bounce. Grabbing the front wheel and trying to lever the forks up and down didn't seem to produce any odd movement. At the back end, when I had the wheels off for the tire replacement I removed the shock and the swingarm to check and re-grease the various bushings and bearings. The swingarm bearings were in excellent shape...no pitting or grinding..so I cleaned, repacked and re-installed them. Before removing the swingarm and with the shock removed I tried moving the swingarm side to side. Zero movement laterally and free movement up & down. Same result after installation. I'm a bit hesitant to run that Nexen substantially over the 36 psi rating, but that might be simply my not understanding. I was under the assumption that the manufacturer states the "whatever" pressure number on the sidewall as the maximum pressure that tire can be safely run at. Having said that, many on this and other sites routinely run whatever pressure gives the desired results. While I haven't given up on this yet, I gotta say the early results are unsettling. I'll continue to tweak the psi for a few days and continue to monitor the VR Gods (welcome back Puc). The good news in all this is that I'm getting REALLY good at removing all the bags and rails to get at the tire. Cheers...
-
I appreciate the reply, Ron...it prompted me to go back thru the Darksiders forum (yep...shuda done that first) and found a few ideas about air pressure. Looks like my experiment with bumping up the rear pressure might be on track. Thanks.