brummers
-
Posts
25 -
Joined
-
Last visited
Content Type
Profiles
Forums
Gallery
Events
Store
Everything posted by brummers
-
good call on the other fluids. If I do his tires, Ill flush it then.
-
A buddy has a 98 Honda Shadow Spirit with about 60K on it. Complaining about no power at 70mph or so. He had already come to the conclusion that he needed new clutch plates and bought the kit. I rode the bike from his apartment to my house, suspension felt squirrely, but the clutch seemed to be working fine. Put the front wheel up against the back wall of the garage and slowly let out the clutch in 1st gear. Engine bogged down and stalled just as it should. Checked out the bike and found: 1. Mufflers were dangling off the headers, the mounting bracket had broken. The header heat shields were literally holding them on somehow. 2. both tires were about 10 psi 3. other various loose parts. I got it fixed up (and changed the clutch plates). He was happy with the performance. Amazing what 40psi in the tires will do! A few days later I get a call, he is about an hour away and the bike overheated. It has cooled down, it cranks, but won't start. Back in the garage, i found he checked the coolant level at the radiator fill after the overheating event. While doing this he knocked off a wire from the front cylinder coil. Now it can run. Drained the coolant and it was pure rust. The thermostat worked fine and I flushed out the system. I dont know how it ran as long as it did with the cooling system like it was!

-
No problem with the zip tie method, its easy to use spoons, too. Be sure to either remove your brake rotors or use a couple of 4x4's to support the rim and keep the rotors off the ground. The rotors will bend/warp very easily. I only looked up Michelin for my new Commander II's WRT balance beads and the like. You know if the tire ends up being defective, the tire manufacturer will certainly blame any 3rd party product, and Michelin states that very clearly. Also, if the RideOn works as advertised, you may be riding around with a puncture and not even know it! http://motorcycle.michelinman.com/advice/faq/about-the-purchase-and-use-of-my-tires [h=3]WHAT ABOUT BALANCING BEADS OR LIQUIDS?[/h]Michelin does not recommend the use of dry or liquid balancers/sealers or any other balancing materials. Tires and Tubes into which these have been injected will not be covered under warranty.
-
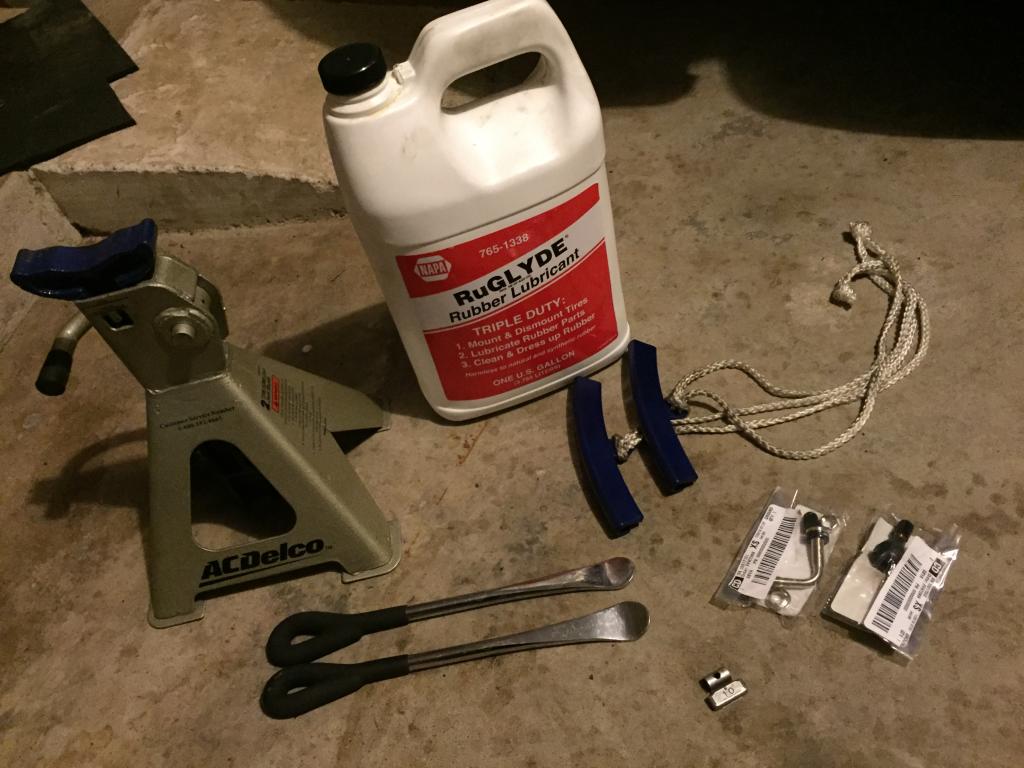
Just did my tires, here is what you need: 1. RuGLYDE from NAPA 1 gallon will last forever if you are just doing MC tires. 2. Rim protectors 3. Good tire spoons (the HF 24" tire irons are too thick) 4. New valves 5. (2) jack stands to static balance using the axle 6. wheel weights Remove the front brake calipers and use some 2x's to support the wheel on an off. makes lining up the axle super easy. I'd also stay away from the tire sealant, it will probably void any warranty from the tire manufacturer. Use the axle to static balance between two jackstands. Very easy to do and works quite well. You can also put a 90 degree valve on the front just like the rear.
-
I must have a 1.5 Gen then.
-
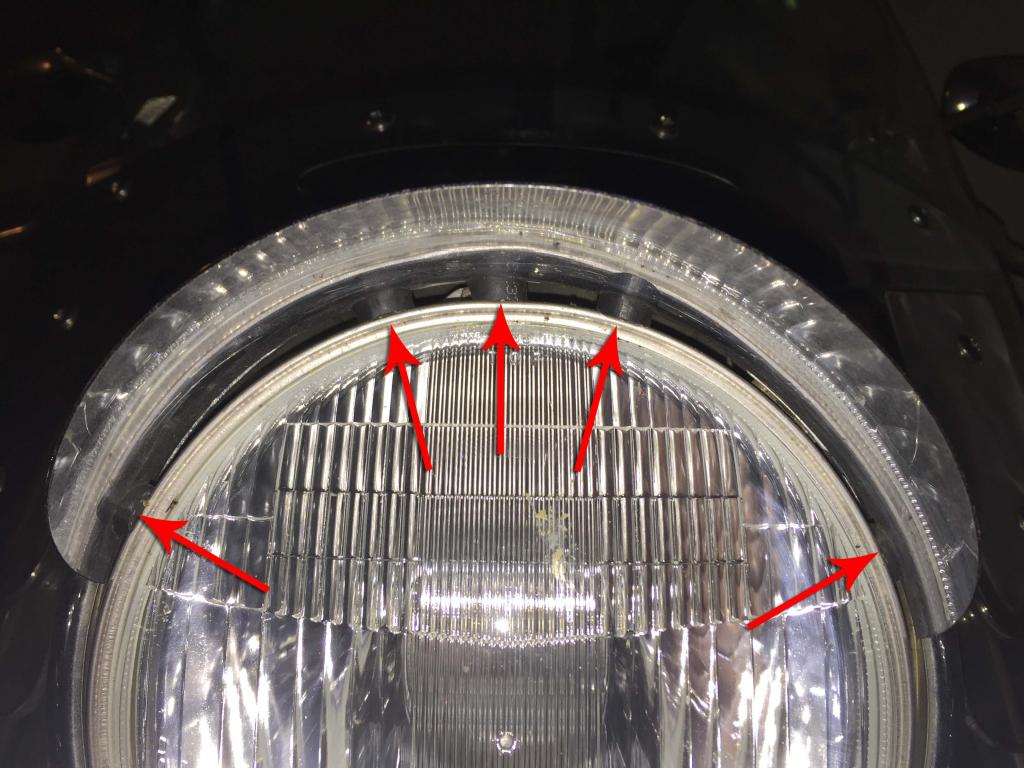
My headlight visor was very loose as well. PO used some foam, but it wasn't doing the job. I cut 5 spacers from a piece of thick wall fuel line to fill in the gap. Its been working great. My gap was not uniform, bigger at the top than at the sides, so I needed to cut several different thicknesses from the fuel line to find a nice tight fit.
-

Got a Royal Star Tour Classic! :)
brummers replied to michaelclaw's topic in Royal Star and Royal Star Tour Deluxe Tech Talk
Hold onto the 4 into 4 header pipes and slash cuts. I'd be interested in them for my '97 RSTD. -
Are the tires new or did this develop recently? You won't accidentally break the bead free from the rim. It requires a significant amount of force, but even if you do, inflating the tire will reseat the bead. I dont think there is much you can do without removing the tire from the rim and cleaning it all up.
-
Just did some carb work on my 1997 with 28mm Mikuni's. Here is my parts list. These carbs are almost identical to the Vstar 650, so many of the rebuild parts work. Mikuni 28mm Carb rebuild OEM (Partzilla.com) 3KW-14105-00-00 PILOT SCREW SET $6.33 each (mainly bought for the O-ring you needed as well.) 36Y-14147-00-00 O-RING (Yamaha Motor) $5.03 each (8 needed for the fuel nipple between the carbs. I tried some from autozone, but they leaked) eBay: YAMAHA K&L CARB CARBURETOR FLOAT BOWL CHAMBER O-RING 18-8996 K&L Supply Float Needle 5pk 18-8944
-
1997 RS Hard to start after carb cleaning
brummers replied to brummers's topic in Royal Star Venture Tech Talk ('99 - '13)
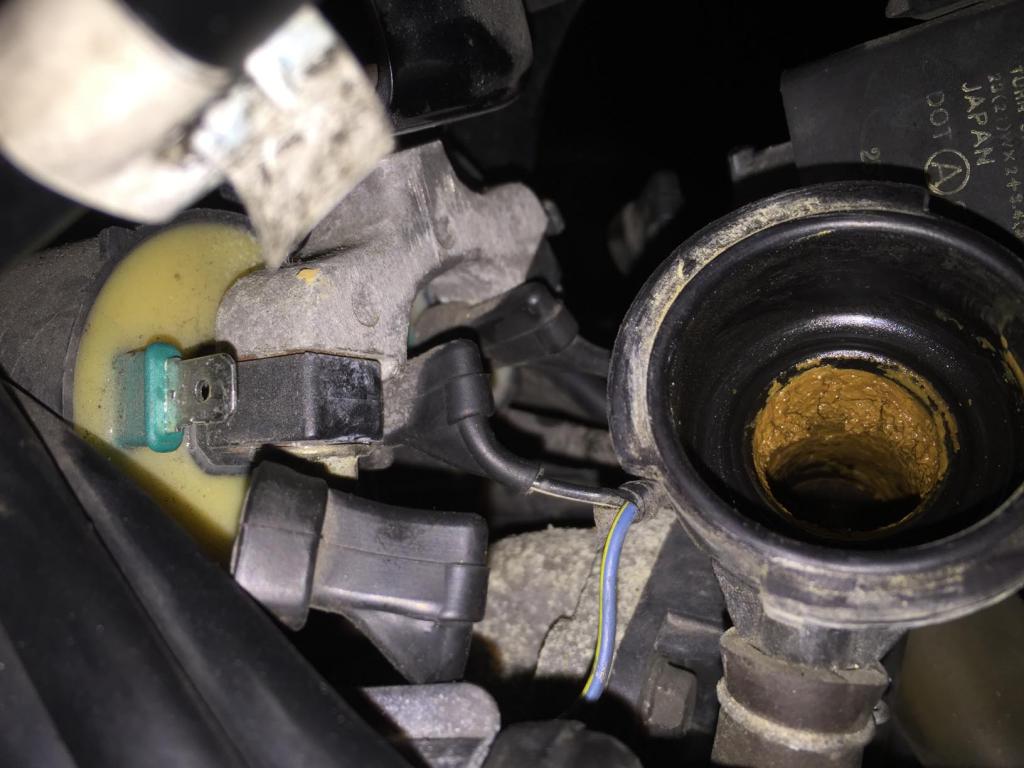
In the end, leaving the enrichment valves in the carb bodies hindered flushing those ports of the Chem-Dip. I found that in 3 of the 4 carbs, the ports from the fuel bowl to the enrichment valve was completely plugged. I got them all cleaned and she started right up. I still have some popping on decel. I was able to use some spray carb cleaner and/or propane to verify I am leaking in air on my intake manifolds. #2 and #4 are the worst, but I am having trouble determining exactly where the leak is. I get an increase in revs if I hold some propane near the bottom the carb AND near the bottom of the intake boot. Propane is heavier than air, so I think my leak is at the bottom of the boot. I used a little silicone grease and the carbs popped on nicely. I tightened all 4 bands and triple checked them. The synch ports all have new plugs. What is the experience with where the intake boots leak? Do they loosen up over the years and just need to be removed cleaned and reseated? Thanks for all the help so far. -
I just sold my 2001 XVS650 Custom with windscreen. 23,000 miles and well maintained. $1,800. I bought it in 2013 with 8,500 miles for $2,000 but it needed tires and some TLC. At $3000, you should be able to find good 1100, maybe a few years older or consider an early 2000's sportster.
-
1997 RS Hard to start after carb cleaning
brummers replied to brummers's topic in Royal Star Venture Tech Talk ('99 - '13)
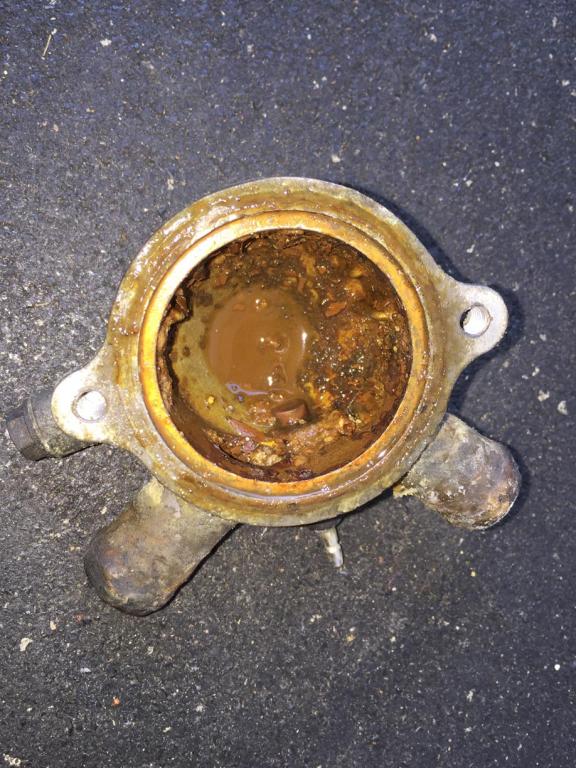
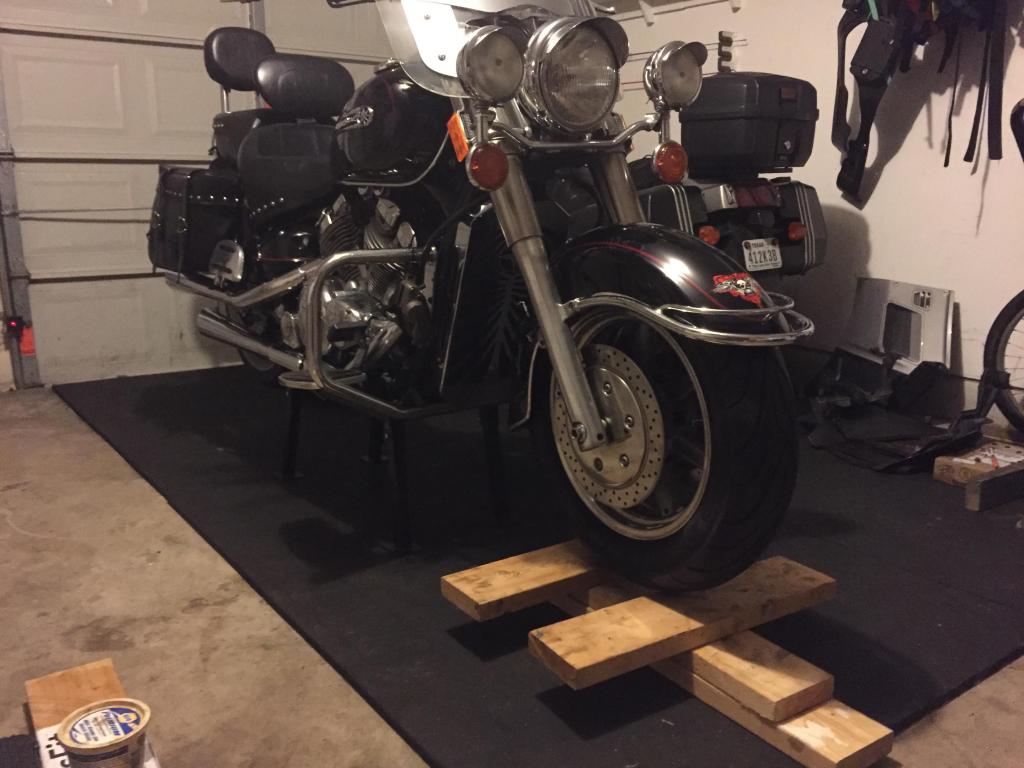
I plan to check the float height, thanks for the video and instruction, tazmocycle. As promised here are a few pictures of the Chem-Dip carnage. I've learned my lesson for sure! Carb cleaner and compressed air from now on. They could probably be cleaned up and salvaged, but I have new ones on the way. I just can't trust the rubber after the chemical bath/attack.
-
1997 RS Hard to start after carb cleaning
brummers replied to brummers's topic in Royal Star Venture Tech Talk ('99 - '13)
I've confirmed the piston arms are being pulled out on all 4 carbs. I'll remove and inspect the enrichment pistons this week and share some pictures of their condition. Thanks for the input. -
1997 RS Hard to start after carb cleaning
brummers replied to brummers's topic in Royal Star Venture Tech Talk ('99 - '13)
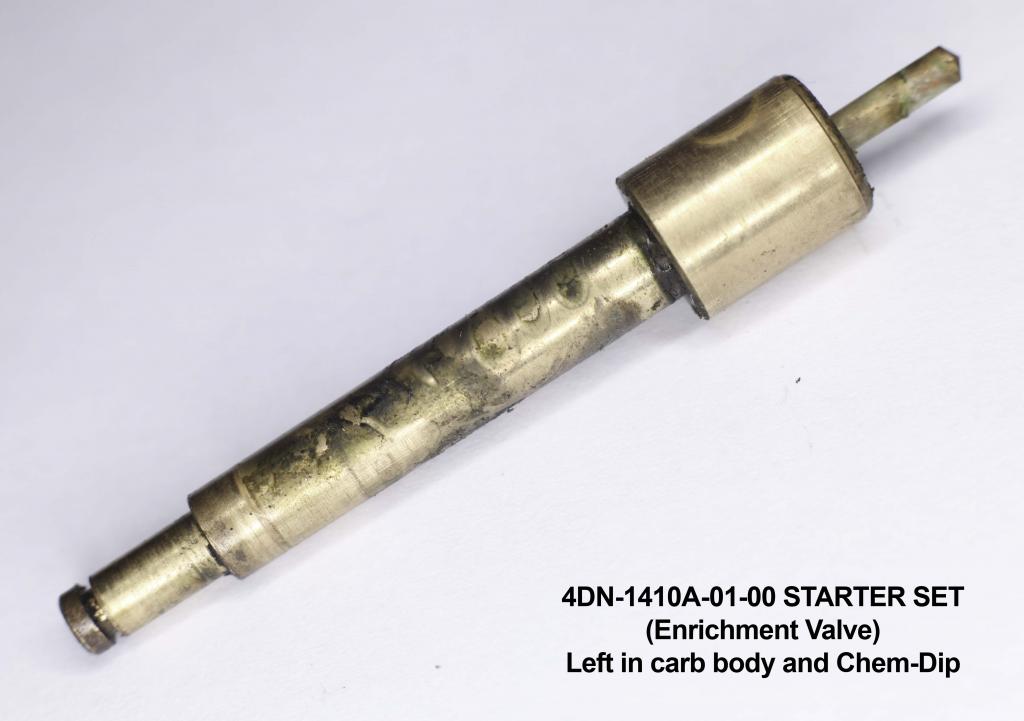
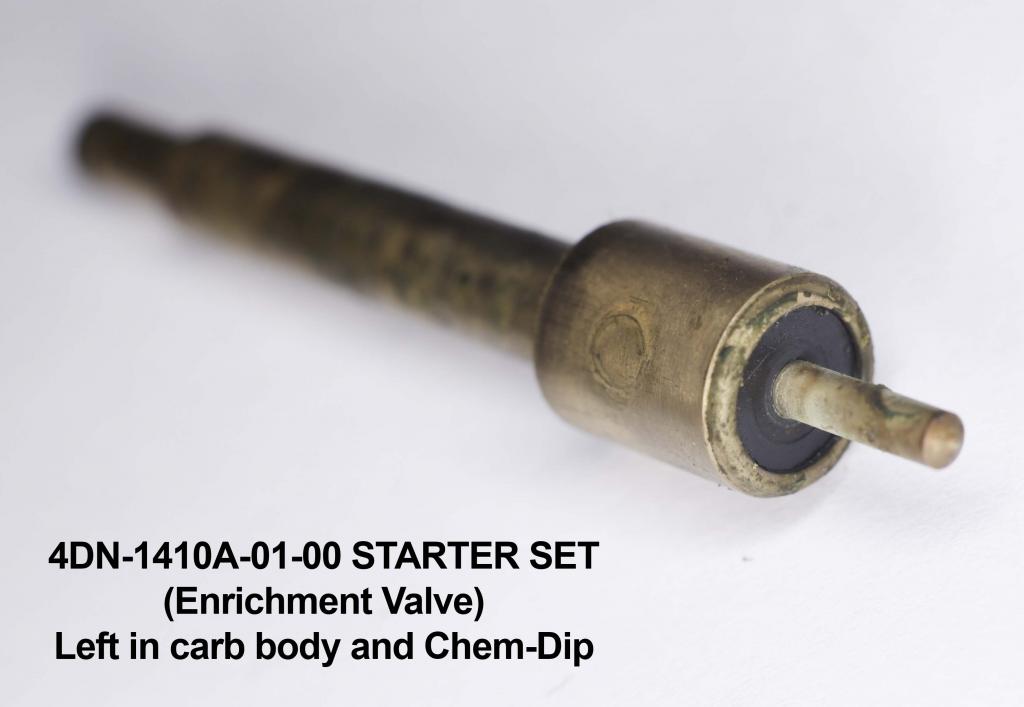
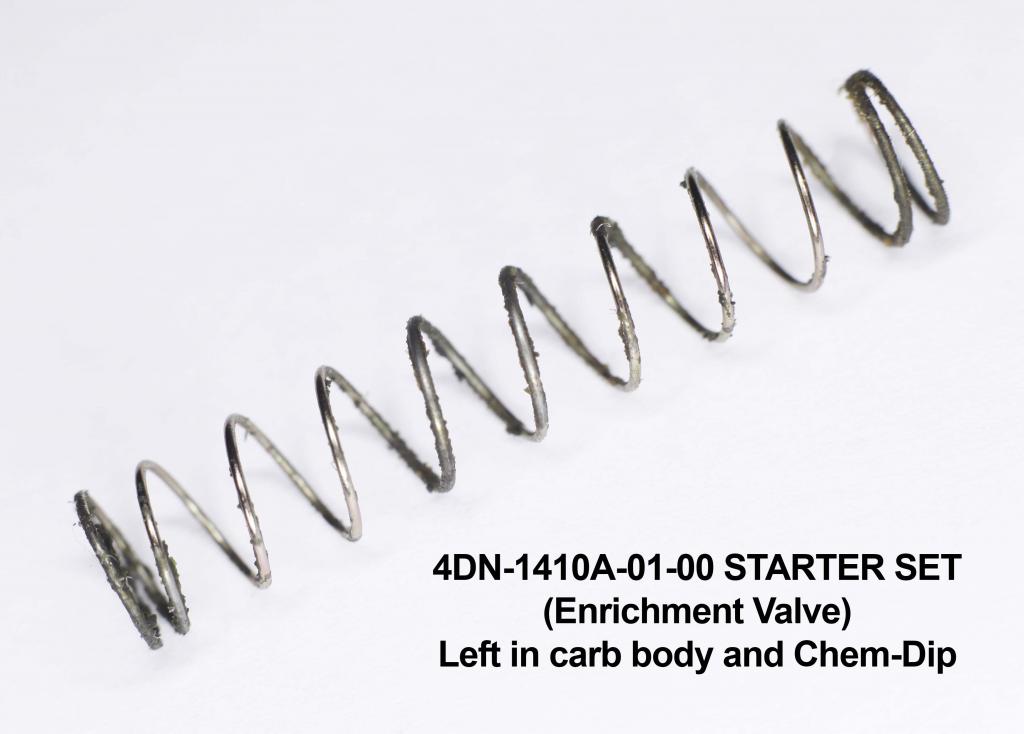
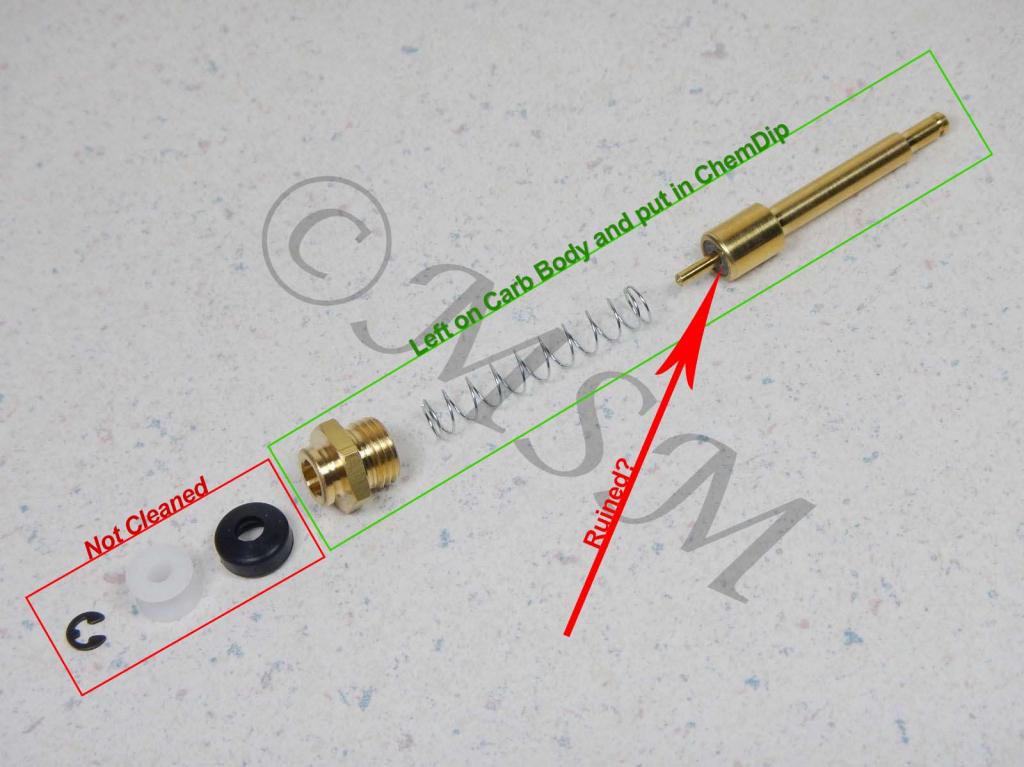
This is the best photo I could find of the starter for the 28mm carbs on my '97. I've marked what I left in the carb body and was subject to the Berryman's Chem-Dip cleaner. It appears there is a non metallic bushing or sealing surface on that piston. Can anyone confirm this? Does the enrichment valve add more fuel for starting or lessen the air?
-
1997 RS Hard to start after carb cleaning
brummers replied to brummers's topic in Royal Star Venture Tech Talk ('99 - '13)
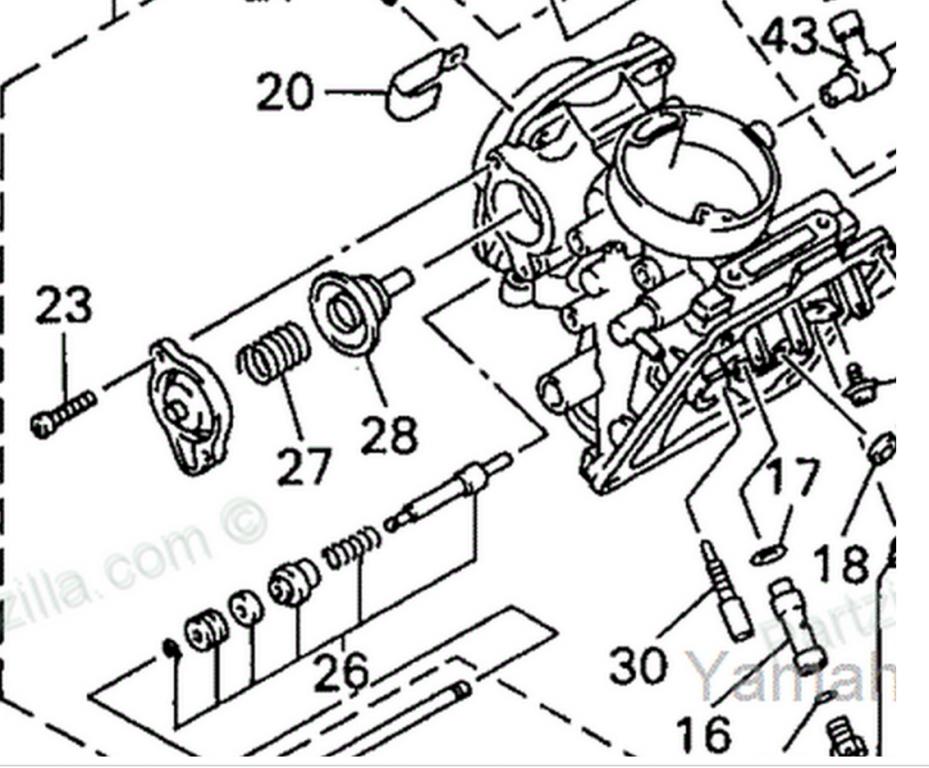
OK, after warmed up with a little throttle I was at 13.8V, so probably OK. Im just racking my brain to think of what I could have done while cleaning the carbs to make it so hard to start, but runs fine once warm. I didnt adjust the floats, left them as is. Could I be flooding out right away? (I did one carb at a time so I didnt mix up any parts). I put the carb body in the Berryman's Chemdip with almost everything removed except the enricher plungers and butterfly valves. I didnt have a thinwall socket to fit the enricher nut to remove the plunger, but I figured there were no o-rings or plastics in there that would be harmed by the Chemdip. Time in Chemdip was 25 minutes. I think thats my next steps, float height adjustment, & inspect enricher plunger (Item #26 in attached picture). I left the plunger, spring, and retainer (rightmost 3 components of #26) in the carb body while in the Chemdip. TIA for any advice/experience.
-
1997 RS Hard to start after carb cleaning
brummers replied to brummers's topic in Royal Star Venture Tech Talk ('99 - '13)
I got it started this morning, and the lights were pulsing and flickering. So I thought this was a fuel or air problem but it may be spark related. I was able to measure the voltage at the battery terminals while it was idling and got 12.8V:( -
1997 RS with custom exhaust, everything else is stock. Removed carbs to clean them, they have the stock jets. Put the TPS back in the original position, did not do resistance checks. Put Idle mixture screws at 2-1/2 turns out. Synched the carbs. Very hard to start when cold now. The enricher/choke does not seem to make a difference when starting. Once the engine is warm it starts up right away with no choke as it should.
-
My experience at the 2015 Watermelon Run for the Fallen in Hempstead, TX. http://sugarland.smugmug.com/Events/20150815-Watermelon-Run-for-the/ This was an amazing ride by the Patriot Guard Riders, escorted by law enforcement, The Thin Blue Line MC, and an an Apache and Blackhawk helo. After the ride and opening ceremonies, we manned the flags to create a tunnel for the finish line.
-
Clutch issue
brummers replied to cwoody08's topic in Royal Star and Royal Star Tour Deluxe Tech Talk
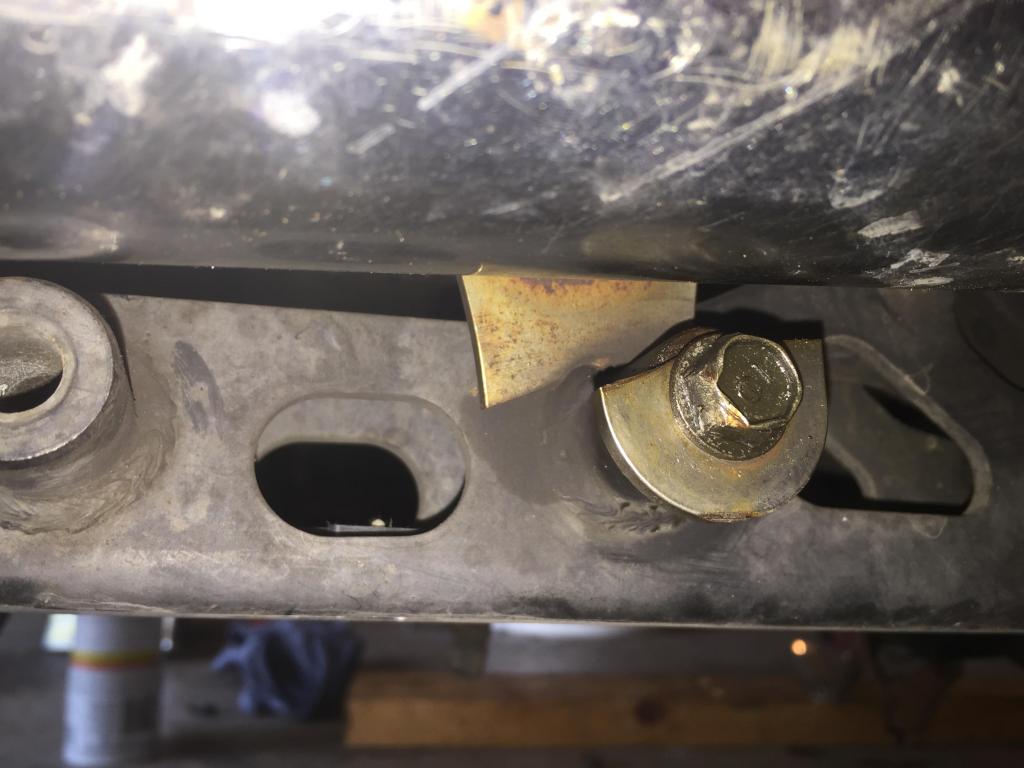
I just did this job over the weekend, this should be the kit you need: http://www.partzilla.com/parts/detail/yamaha/YP-3GM-W0099-00-00.html Here is the diagram: http://www.partzilla.com/parts/search/Yamaha/Motorcycle/2003/ROYAL+STAR+VENTURE+-+XVZ1300TFR/FRONT+MASTER+CYLINDER+2/parts.html The only tricky part is getting the C-clip out. It is recessed about 1/4 inch. I had a flimsy pair of snap ring pliers from harbor freight, but managed to get it eventually. I would do the master cylinder rebuild first, and see if that fixes the problem. The clutch release (slave cylinder) requires draining the oil, removing the crankcase cover and shift cover. You'll need new gaskets for those covers as well. My ultimate problem was that the boot for the push rod on the master cylinder had disintegrated and was allowing dirt into the reservoir. -
improving front brakes,01 rsv
brummers replied to cruiserlover's topic in Royal Star Venture Tech Talk ('99 - '13)
I just rebuilt my clutch master cylinder because the fluid was dark. I found some sludge inside the reservoir. It turns out the dust cover/boot on the push rod had disintegrated allowing dirt into the otherwise closed hydraulic system. So if your fluid is dark, look for possible points of contamination. I had to clean out the Master Cylinder and found that Lime-Away did a fantastic job getting the crud out and cleaning the inside of the sight glass. Here is how i removed the master cylinder from the bike: 0. Cover the bike with some old blankets to keep any spilled brake fluid off the paint. 1. Loosen the Master from the handlebars and make it level as possible. If its full it will spill. 2. Remove the top cover. 3. Sop up fluid from reservoir, or use a turkey baster. 4. Remove the banjo bolt and wire the brake line to the handlebar. (I got fluid from the master cylinder, but not from the brake line). 5. Remove the master cylinder from the handlebars. If you're just replacing the fluid, stop after step 3 and fill with clean DOT4 fluid and bleed through the calipers until the fluid is clear again. Attach a clear hose to the bleeder valve and run into a water bottle with some brake fluid in the bottom. Be sure to bleed both L and R calipers. -
Carb Synch/idle adjustment in Houston - help
brummers replied to brummers's topic in General Tech Talk
Big thanks to Squidley for getting me adjusted today and showing me around these 4 carbs. I didn't expect it, but Squidley even had a replacement for my burnt out passing lamps! Above and beyond! Got the carbs synched up and the idle set properly. The PO had the idle pretty low, maybe for more of a V-twin rumble, but it was bogging me down in first gear. The overall performance and riding experience is now much improved. No more hesitation and the popping is about 10% of what it was when decelerating. (have some old aftermarket slipons that are probably leaking a bit.) Thanks again, -
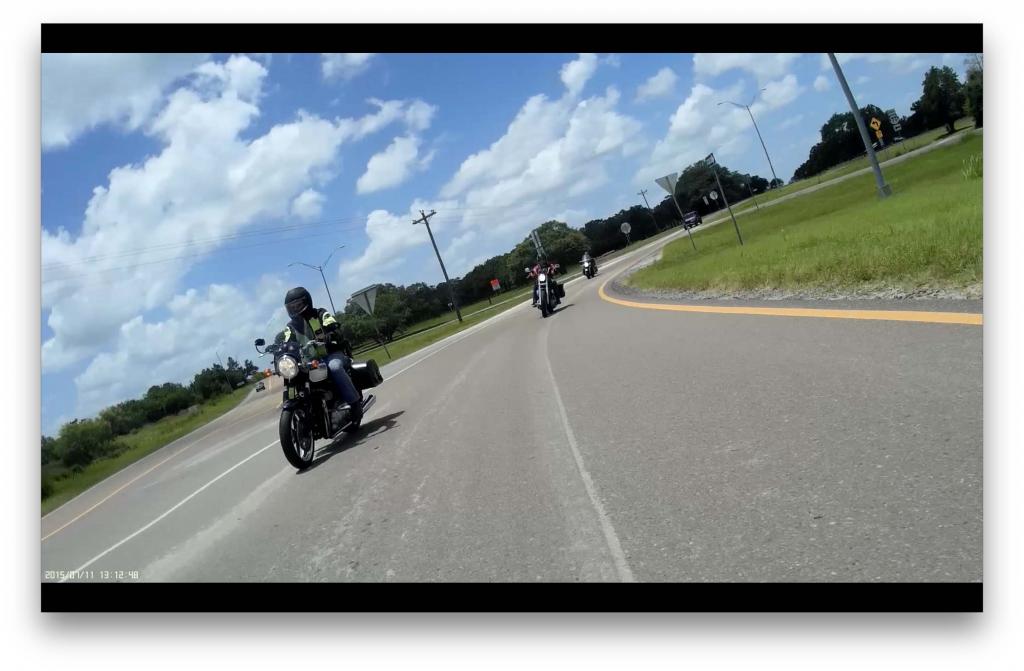
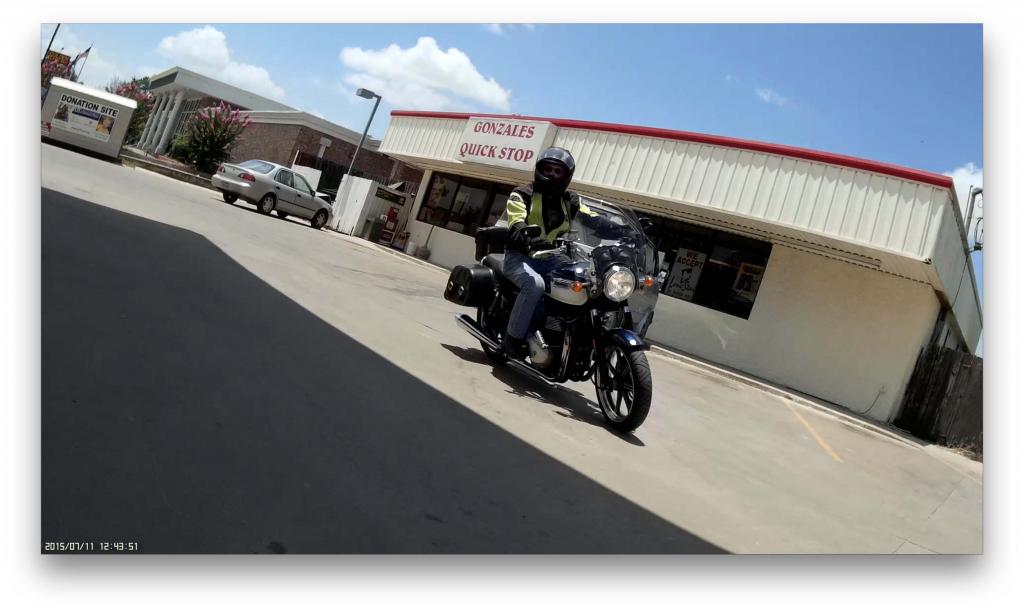
*Disclaimer* The action photos do not contain any RS/RSV's. They were taken from a RS. Instead of installing a forward facing or awkward looking helmet cam, I placed a cam facing aft, 180 degrees relative. Right now its a hard mounted bracket, so I get a lot of vibration on the video. It works well for grabbing screenshots from group rides so far. These are from 7/11/15 trip from Houston, TX to Shiner and Gonzalez. Camera is a Mobius action cam with the "A" lens (90 deg field of view).
-
Recently purchased 97 RS has been sitting a couple of years. ive put several tanks of fresh gas through her, but still hesitating in 1st , a little in 2nd, especially when cold. Runs fine at highway speeds in 3,4,5 and after its warmed up. Im in Houston, can drive the bike to someone willing to help me do my first synch.
-
wooble with hard brakeing
brummers replied to mike042's topic in Venture and Venture Royale Tech Talk ('83 - '93)
Replaced the left rotor and bled the front brakes and working quite well. Have new kevlar pads on the way. I found two different brands of pads on the right and left sides. The rotor had marring from a screwdriver. I figure this was a brake job gone bad and a screwdriver or similar tool was used in an attempt to push in the caliper cylinders. VStar front rotors are the same as the RS. I borrowed one off my 2001 650 Vstar Custom, but also checked a friends 1100 Vstar and a roadstar. All these front rotors are exactly the same. Roadstars also have the hub covers. Good to know for ebay hunters. Not sure about the rear rotors. -
wooble with hard brakeing
brummers replied to mike042's topic in Venture and Venture Royale Tech Talk ('83 - '93)
I just confirmed I had a warped left front rotor on my newly purchased 1997 RS. I would describe the feeling as pulsing, not wobbling. First I inspected both rotors. The left side had a few marks and obvious shiny and dull spots. The right side looked uniform. I took off the left caliper and slid a speed square inbetween the pads. Zip tied it all inplace with a terry cloth towel for padding and hung it from my left passing light. Tested down the street and the pulsing was completely gone. So now to find a good used rotor. I think V-stars rotors will fit, too. My remaining issue is that I can bear down on the front brake (with just the right caliper) and just glide to a stop. I know the stopping power is half with just the right side, but I'm not even compressing the forks. The brake hand lever moves less than half way. It feels super firm and I really cant squeeze it any harder. So I'm thinking I should rebuild the calipers and maybe the master cylinder as well. Any thoughts? ErikB