Leaderboard


Popular Content
Showing content with the highest reputation on 02/25/2022 in Posts
-
5-6 drops sounds a little light. I usually use an oil can with a trigger pump and give it two to three squirts. The idea is that the oil will make up for worn rings so if the compression is low and then increases with the oil, the rings are worn. If there is no change then there can be leakage at the valves3 points
-
Lapping the valves may be all that is needed if the valves are a problem. I would put a lot of seafoam or gumout in the gas and see what that does.1 point
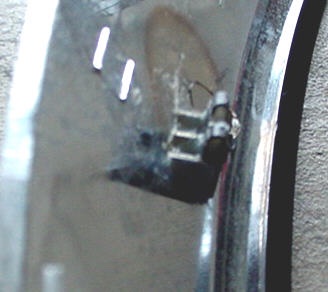
-
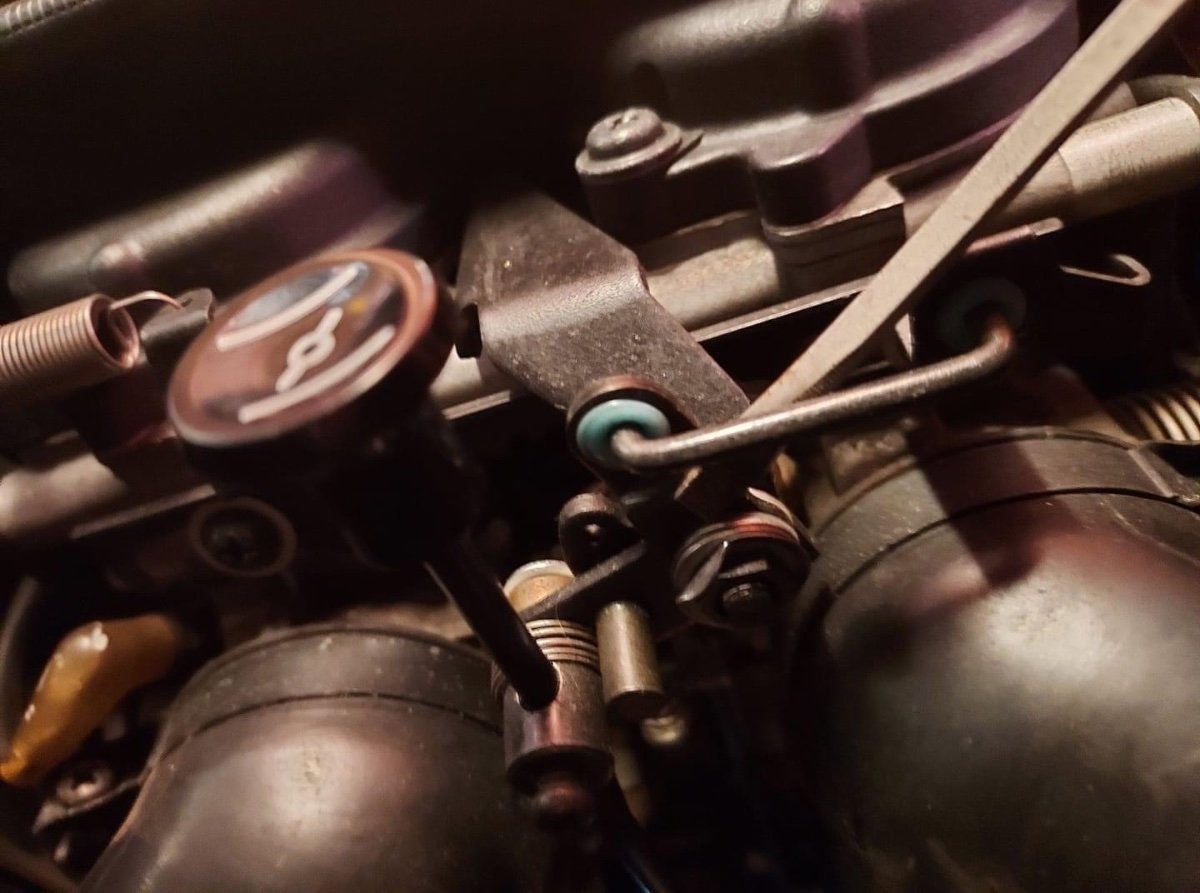
Mine would not stay out when I got it back at the end of summer. One of the guys told me do tighten the nut and it would fix it. There is a washer that the side is folded down that will keep it from turning. I folded that back up and tightened it and then folded it back down and it worked great after that and still does. Here is a picture to help
 1 point
 -
I'vs heard of eye transplants but that would not be an option for me for a couple of reasons. First of all, my first bout with this cancer the tumor was around the optic nerve which was destroyed by the radiation. The second thing is that I believe that there are plenty of people who are totally blind that would be better served. Two people could be given site from a pair of eyes and I would never want to be the cause of a person being blind when I still have a good eye. I've been blind in this eye since about a year after the first treatment 13 years ago and am accustomed to it. As long as I can retain the vision in my one good eye, I'll be happy.1 point
-
Well, this weekend feels like it has gone on forever but this is the last day of this misery. To be honest, it hasn't been as bad as I expected but certainly not pleasant. I've not had to take any of the pills that they gave me for nausea and I've managed to get by with only Tylenol and only a couple of times for that. I haven't even opened the bottle of Oxycodein that they prescribed and I knew that I wouldn't. I just refuse to take that stuff. I'm ok as long as I don't accidentally try to open that eye. It's all patched up and has a disk sewn to it anyway so it would do no good even if I could open it, beside the fact that I'm blind in that eye from the last time I had this mess. Sometimes when you open the good eye though you just automatically try to open them both at the same time, Since they have my eyelid sewn shut also, it doesn't open just just pulls the stitches., I'm getting better about not trying that, Anyway, this is the last day and tonorrow morning I go in for surgery again to have this all undone., I can't wait for that to be over with, All in all, it hasn't been too terrible. I've been through worse pain and this too will pass,1 point
-
Yesterday went OK. Had CT Scans of almost my entire body I guess. I have a meeting today with an Oncologist but have received the test results and gone over them. I was actually scared to death to look at the results when they came and in fact, thought about it for a while before even looking. From what I can tell though, there is nothing terrible. There is only one thing listed as possibly abnormal but I don't think it's very serious. Something about possible Lipoma near my adrenal gland but it says it is likely just some type of fatty tissue and even if not, they are usually non-malignant. Chest, liver, kidneys and etc. were all good. Surprising since I've been a smoker for the better part of 50 years. So today I meet with an Oncologist and then I actually get a break tomorrow. Then on Friday I go in for the biopsy and radiation plaque surgery on the eye. I feel sure that it's going to be a very uncomfortable weekend but nothing I haven't been through before. I'm glad that I get a break tomorrow because I have a couple of stairlift service calls waiting.1 point
-
Splitting the Faring If you ride the second generation Venture long enough, you are eventually going to need to get into the faring. This may be to install passing lamps, repair a loose wiring connection, various reasons. Here are some step by step instructions to make the job easier for you. If you do not have passing lamps already installed, you can obviously skip the first step. If you have passing lamps, you will have to remove them in order to remove the front of the faring. The chrome cover in the center of the passing lamps simply snaps off. http://www.venturerider.org/faring/faring1.jpg Once the chrome comver is removed, there are two bolts that secure your passing lamps. The factory supplies allen bolts for this but mine have been changed out to regular hex heads. If you have allen bolts, a "ball end" allen wrench works best as it allows you to go in at an angle without hitting the bottom of the faring. In the following picture, I have removed the bolts and let the bar rest on my front fender. No need to unwire anything. Note the towel...don't want to scratch that pretty paint do we? NOTE: There are two spacers behind the bracket that you will most likely drop when removing these bolts. Be aware of them. You can usually hold your hand under the bracket as you remove the bolts but I usually end up dropping them anyway. http://www.venturerider.org/faring/faring2.jpg The next step is to remove the top two screws, one on each side, located on the inside of the faring. These two screws hold the top of the faring together and also secure the chrome strip at the bottom of your windshield. http://www.venturerider.org/faring/faring3.jpg Once these two screws are removed, you can carefully lift the chrome strip off. BE CAREFUL HERE. There are tabs molded into the chrome strip that are fairly easily broken. Lift first from each end and gently work it back and forth to separate the tabs from the faring. http://www.venturerider.org/faring/faring4.jpg Once the chrome strip is removed, simply remove the 6 screws that hold the windshield on. http://www.venturerider.org/faring/faring5.jpg After removing those 6 screws, the windshield will just lift out. http://www.venturerider.org/faring/faring6.jpg Now you are ready to remove the remaining 6 screws on the inside of the faring. There are 3 on each side. http://www.venturerider.org/faring/faring7.jpg After removing these 6 screws, the only thing hold the front of the faring on is the screw in the bottom of the headlight ring. I always save this one for last because it enables me to be in front of the bike where I had hold the faring and safely set it aside instead of watching it bounce off the floor. http://www.venturerider.org/faring/faring8.jpg Once you have this last screw removed, gently pull the faring off the headlight and set it aside. That's all there is to it. This is what you'll have now. http://www.venturerider.org/faring/faring9.jpg Now...regardless of why you took your faring apart, take the opportunity to check the connections for your audio system and etc. The big connectors are known to cause problems sometimes. In addition to the ones here, there is another one usually tucked under the tape/radio assembly. Simply pull them apart and use some good di-electric grease to ensure that they stay dry and do not corrode. http://www.venturerider.org/faring/faring10.jpg That's all this is to it folks. Putting it back together is just a matter of reversing these instructions and..of course...turning the screws the OTHER direction. A couple of notes though. As you are putting the screws back in the faring...don't snug them down tight until you have them all started..you might need to wiggle it around a bit to get them all started. VERY IMPORTANT. Do NOT overtighten any of the screws. Especially the ones along the top edge that secure the windshield. Yamaha didn't make that top edge thick enough in my opinion and many people have cracked the plastic around these screws. Just snug them down pretty good but not TOO tight.1 point
-
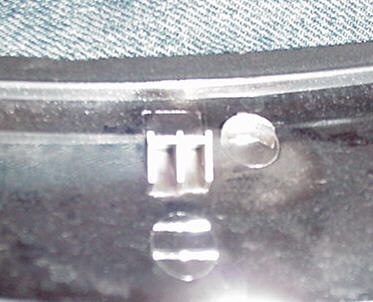
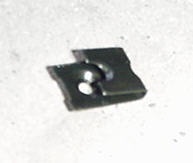
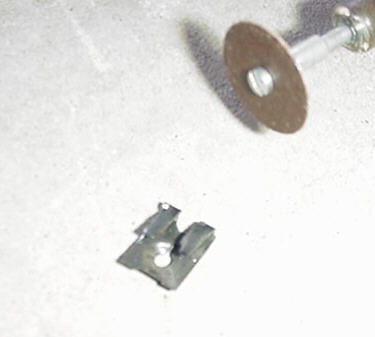
Repairing Broken Windshield Trim Tabs The great things about this forum is the fantastic ideas that we get from each other. This one is so good and so easy that I sure would like to take credit for it but the fact is, the idea came from expanding on a post made by SteveO where he used these type clips to take the slack out of the holes that the tabs actually snap into. His post gave me an idea for repairing the tabs that were actually already broken. The tabs on the back of the plastic chrome windshield trip break very easily. Most people who have ever had the piece off, have broken at least one of them. The following is an easy way to repair them to better than new condition. I had a couple of them broken off and this is so much better and stronger, I actually broke the other two off and did this on all of them. Here is a picture of one of the broken tabs. At most auto parts stores, you will find these clips. They were called "Speed Nuts" at Autozone and I believe these were size 14. It was the smallest ones that they had. Here is what they look like when you take them out of the package. Now...as the top picture shows, there is a center "bar" or "Support" in the center of what is left of the broken tab. In order to slide the "speed nut" over the broken support, you will need to cut the center out of the back of the clip. Also, because the clip is just slightly too wide, you'll have to shave just a bit off each side of the back side of the clip that you just cut the center out of. I used a Dremel tool with a thin cutting disk to do both. Here is what you end up with. Now, simply slide the clip over the broken support and you have a brand new clip that fits right into the slot where it should. It fits pretty tight but just to be sure, I filled the grooves with two part epoxy. They aren't going anywhere.
1 point