Nodaker Posted August 4, 2007 Share #1 Posted August 4, 2007 Just finished up the Flanders handlebar install last week in time for a 600 mile trip. All I can say is "WOW" what a difference! Like many others I would get that nagging pain between the shoulder blades after an hour or so. Went the whole 600 miles without any discomfort. Highly recommend this upgrade if you're having the same problem. And by the way, Rick at Buckeye Performance is excellent to work with. Another change to the scoot, I installed the Radiantz LED tail light. Wished I'd done that when I got the bike. I recommend this as the first tail light upgrade and then go from there. Having a light bar up higher is also good, which I put on first. But get rid of that dull stock bulb and put this bright one in before adding all of the other little add-on's. I've had good comments on the brightness from others. It's now brighter when brakes are off than the stock was with brakes on. That make three big improvements this year. First - installing Avon's which greatly improved the handling, Second - the Flanders bars which greatly improved the comfort and Third - the LED tail light which hopefully will help keep people off by backside while I enjoy the first two. Link to comment Share on other sites More sharing options...
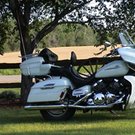
ricky lopckhart Posted August 4, 2007 Share #2 Posted August 4, 2007 Where did you get this Radiantz LED bulb from? Looks good in photo. Thanks Link to comment Share on other sites More sharing options...
Nodaker Posted August 6, 2007 Author Share #3 Posted August 6, 2007 Here's the link. I'm sure you'll like the results. http://www.customdynamics.com/Yamaha_tail_retro.htm Link to comment Share on other sites More sharing options...
SteveP Posted August 6, 2007 Share #4 Posted August 6, 2007 When you installed the Flanders bars, did you replace clutch & brake lines or just the throttle cables? How difficult was the installation. I've been kicking the idea around myself.... Link to comment Share on other sites More sharing options...
Mean Dog Posted August 6, 2007 Share #5 Posted August 6, 2007 Kbran and I will be installing the Flanders bars on my bike this Wednesday before the big ride to Vogel along with replacing my tires and brakes. I sure am looking forward to the added comfort of the riding position to my arms with the new bars and I think that the radiantz LED tail light will be added to my list of must gets! Thanks, Dog Link to comment Share on other sites More sharing options...
Nodaker Posted August 9, 2007 Author Share #6 Posted August 9, 2007 I purchased the "kit" consisting the Flanders bars and stainless breaded lines/cables consisting of both throttle cables, upper brake & clutch, lower front brake line and rear brake line. This was my first time digging into the front fairing so I gave myself several weeknights to take my time. I also documented every step of the way with about 100 pictures. If you're familiar with your bike and know how to turn a wrench I'd plan for a couple of evenings or one full day. It always seems like there are other things you might want to dig into when you've got the front off and the gas tank off. You might want to change your headlight and/or the spark plugs. Just little things but they all add time. The install was pretty straight forward. Make sure to run the lines through the same locations as the stock lines. My throttle cables were a little on the snug side but with a little adjustment and after a putting on a few miles everything is working smoothly. For more details on the parts and what you need and what the options are, give Rick at Buckeye Performance a call or email . Rick Haferkamp Buckeye Performance 513-779-2447 fax 513-779-2615 info@buckeyeperformance.com There's some helpful information on the install at the www.venturers.org website in the tech. library. Just do a search for Flanders and you should find it. Unfortunately I didn't find this until my project was nearly complete. Link to comment Share on other sites More sharing options...
Leland Posted August 11, 2007 Share #7 Posted August 11, 2007 Nodaker, thanks for the link to the Radiantz LED tail light. I got one and really like it. Much brighter than the stock bulb. PS, I put the old bulb in a plastic sandwich bag and stuck it behind the plastic cover on the saddlebag lid latch - just in case... Link to comment Share on other sites More sharing options...

Recommended Posts
Create an account or sign in to comment
You need to be a member in order to leave a comment
Create an account
Sign up for a new account in our community. It's easy!
Register a new accountSign in
Already have an account? Sign in here.
Sign In Now