


gggGary
-
Posts
272 -
Joined
-
Last visited
Content Type
Profiles
Forums
Gallery
Events
Store
Posts posted by gggGary
-
-
OK the thread idea was stolen from the Concours forum. Post your oops here.
Put a lot of miles on the Venture this week.
The set up.
Pulled into a gas station, pavement was slightly sloped away from the side stand. pump on left, turned bars full right to get at filler neck, helmet on back seat gas cap open gloves phone etc laying on bike. Was a strong gust of wind from the left just as I turned back to the bike with the nozzle in my hand. That was the last straw, she was going over, all I could do was slow the descent. Helmet rolled away, cap, phone etc hit the pavement. it was slo-mo and didn't go turtle, no damage beyond a new scratch or two on the roll bars. With my back to bike, hands on throttle grip and passenger grab bar it was easy to pick up. Should have spent more time, made sure it was in gear, side stand full extended but got it all settled with no probs. Guy came over to help after it was all over.
That's my story.
-
Not uncommon for a slide diaphragm to detach from the slide, it will idle perfectly but one slide won't lift. Pretty easy to check and fix on an early bike. My 99 RSV was exactly this way a previous mechanic had pinched one diaphragm putting on the cap, got it back where it belonged and vroom vroom. A bit of compressed air in the small top port will lift the slide if all is well.
-
200 miles of country lanes yesterday with wife, Beautiful time of year in Wisconsin Amish country. then Oil n Filter, synched carbs chasing excessive backfiring. Pics are the aftermarket 14mm MC and an adjustable lever I fitted to it when the handle was too far from bar for comfortable pull. This was the last step in the FJR caliper SS line front brake upgrade and I'm super happy now.

Pic also shows an LED I have on the dash wired positive to an accessory circuit, ground to a front running light HOT wire, this grounds the LED through the bulb when the lights are off so the LED is only lit when the key switch is in accessory position. The audio has been removed so I use accessory to charge mobile devices when stopped. Bulb reminds me to shut the key all the way off when I'm done. I should put an ALARM ARMED label on it..........
getting it ready for a Canadian Rockies trip the end of this month.
-
My sprinter van uses a single torx fastener to hold the brake disk in place after the lug nuts are removed. BRUTAL tight and rusted. socket had given up. ground it back a bit to better edges, then welded on a bar sticking out directly sideways close to the torx bit. Held with a long extension in the socket drive I could then give the bar a sharp smack with a hammer without twisting the bit sideways. Victory.
You could also drill a hole the diameter of the bolt head in a piece of sheet metal so you can apply the torch without heating the chrome cover.
-
A heat gun puts out a lot of heat, and is not as aggressive as a torch............. You have 12 bolts to do, heating the hub good and warm is not unreasonable.
-
PS blue locktite on the bolts from the factory.....
-
I'm trying to break loose the torx, front wheel, but so far no luck. I don't think adding heat will help, but any advise would be appreciated. I tried a drift punch to the center of the trox, but all it did was laugh at me.
Heat probably would help but brake rotors, concentrated heat,
quiver, shake. I used the 1/2" air gun. on a NEW torx socket. May have also used a hand impact wrench, remember to alternately, loosen, tighten even if it doesn't move, the back and forth eventually breaks them free. Add rust buster too. Then clean the rotor thoroughly with brake cleaner. Definitely was time for new bolts, button heads needed the allen heads were too tall, hit the caliper or fork leg. -
The sun is very harsh here in Brisbane Australia. My new to me 99 RSV has sun damaged electrical harness where it's been exposed to the sun over its life.
My 99 sat kinda under a carport in the desert for more than a decade with the same results. Lots of silver cable covers went brown. Also been chasing electrical issues and taking apart, cleaning switches. After steering bearing replacement I had some brake light, cruise control issues. FINALLY found two electrical connectors inside the fairing with the same configuration and yes I had them switched, it all works now. I did have to take apart the brake light switch, cleaned out the grit, lubed it, and polished the contacts.
Bonus I now have a blown up taped together 6 page size RSV electrical diagram thumb tacked on the shop wall.
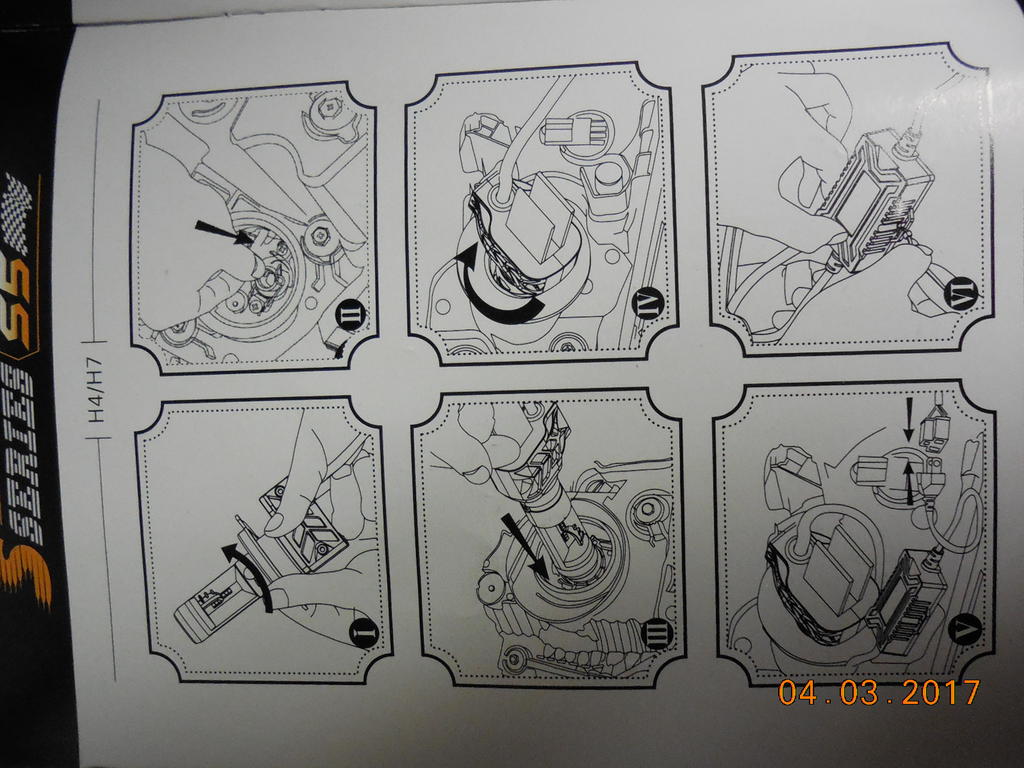
Finished the front brake upgrade with a 14mm aftermarket MC that needed several mods and changes to work. The stock 4 wire brake switch did fit after some aluminum sculpting using a ground drywall bit in a dremel. Not for the faint at heart, but with a firm grip it worked amazingly well carving an aluminum casting. The MC does not have an adjustable lever so I am spanning my smallish hand out a bit too far for best grip leverage. Thinking on a fix for that. Lever is chromed aluminum so rebending is a no-no for now.
g
-
While I have not don much to the bike this year, I did determine that I will be rebuilding the forks real soon, the right one is suddenly leaking pretty bad.
Now to start shopping for al of the parts...............
Not a guarantee but the FJR guys swear these often work.
http://pi.roostin.com/images/items/large/MOP/MOP002Q/X001-Y001.jpg
-
Lake in town by gas station
"Never ride faster then your guardian angel can fly."
Neosho WI? that's not good!!.....
Sounds like rain next three days too.
-
I bought a used rear link set for my 99, did some fix'n, then installed the now 6mm shorter links. To shorten the links I migged the existing holes shut, built up the sides of the bolt area, ground it back to the right shape and drilled new holes. Pulled the pins and greased while I had things apart This bike is low miles 16K on a 99, everything looked good, made my own lift adapter, it works good, a small jack at the back let me move the rear just enough to make link remove install easy peasy. Before and after measurements say the 6mm link shorten raised the rear of the mufflers by 20mm. or 3/4".
Got on and rode 110 miles, I like it! Turn in is effortless, holds a line through the corner, but is easy to pick a new line, tighten or straighten. Saw 90MPH, ride is stable, turning, changing the line is easier but not weird or darty. Will have to get in a day of strong cross winds see how it is in nasty conditions.
I got in a 14mm front MC today, so the last piece of my front end work is up next. Already have FJR13 calipers, stainless steel lines new pads, fresh fork oil, new taper steering bearings, done. It's rolling on fresh 130/80 front, stock size rear Shinko HD tires.
My cruise is out of action, I'm getting two flashes of the green yellow lights, hope I just missed a connection when the fairing was off.
First long ride with the new Bakup backrest. The pad was as low as it would go but still too high up my back and I'm 6'3" with a pad on the stock seat. So the hack saw and drill press got it lowered a strong inch. We'll see if that's enough.
-
I ordered a rear suspension link set and will see if I can hike up my hiney also. There's a "weeky weeky" that needs looking into back thare anyways.
-
Part way through a brake conversion. Used FJR calipers, fully rebuilt with new seals. Hint MANY Yamahas use 4 piston calipers that bolt on the Venture, most only vary by the color of the bore caps. (love parts bin engineering) Using generic pads and 2, one piece, SS lines from a chinese vender, pair for about $15.00 to my door. (good fast cheap). I just ordered an aftermarket 14mm MC 'cause I'm not quite happy with lever feel yet, the lever is hard, it's a big improvement, and it's dealing with a lot of weight but riding back to back with my FJR I'm just not satisfied yet.
-
Well round two I'm worried she's a gonna bust open the mufflers, guess I gotta go through it again. Anyone ever win at keeping backfires away with the valves still functional?
-
you could start splitting up pairs of bulbs.................. One guy buys 2, sends extra to another......
-
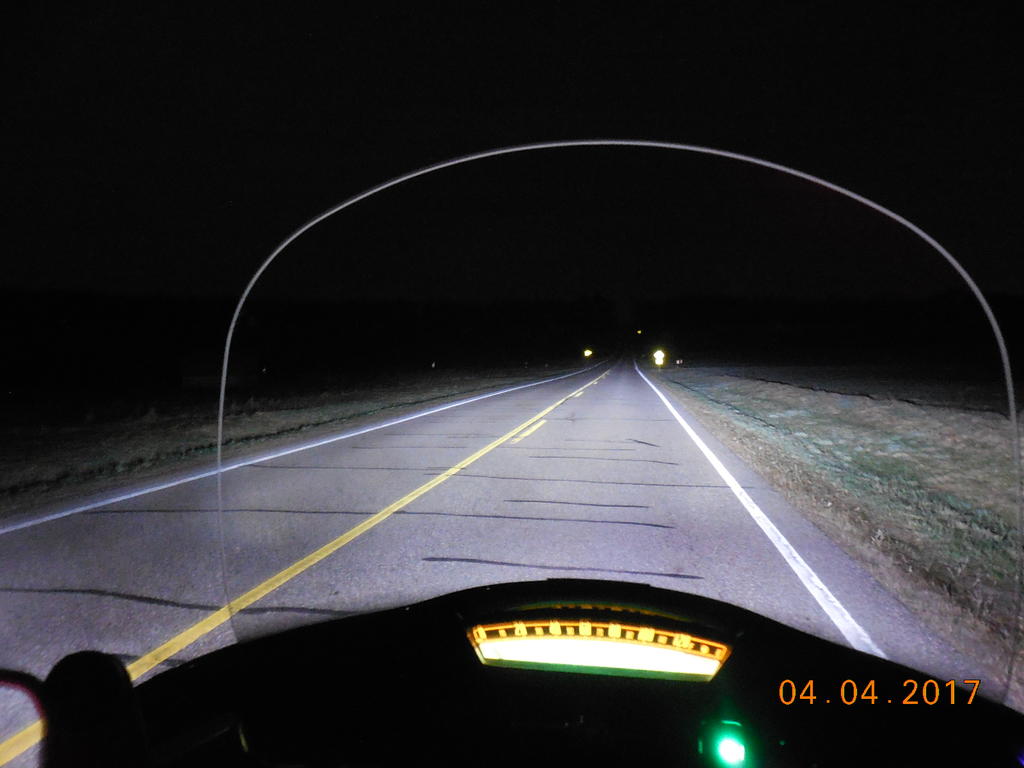
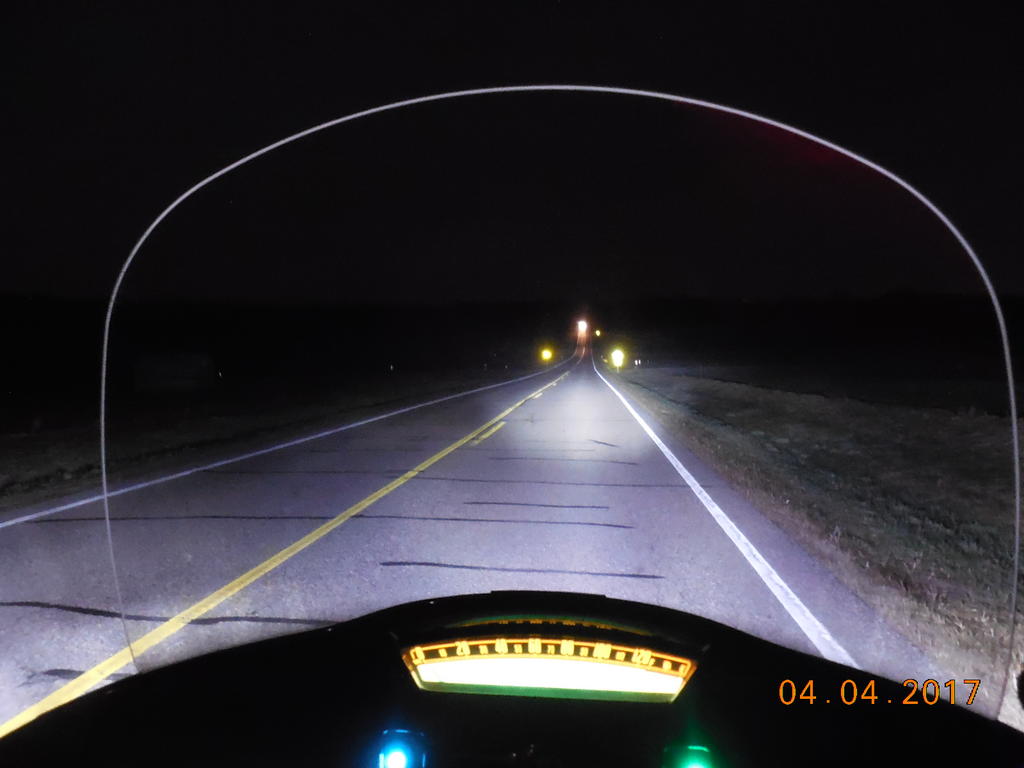
Jus' for youse guys I went out and got a couple of night road shots.
Low Beam High Beam
I flipped back to low beam and did not get flashed.
Will be interesting to take the FJR out with two of these bulbs and see what I can see....
-
Hmm..JPCycles says the 90 aspect ratio won't fit our RSV's.
Since you installed one on the front, Their site is wrong....correct?
P.S. Thanks for LED write up. I'm waiting for the H4's to come back in stock!
You made me go double check the size, but yes that tire fits and works great. Steering is a major improvement over that too wide stock tire. The new steering bearings and fresh fork oil don't hurt either. If I get a chance I'll try the raise the rear, linkage mod.
Just got the big projects wrapped up and took r out.
Loving the FJR calipers I put on it. I won't confuse it with a sport bike but it will WOAH now, not just kinda think about stopping while I death grip the lever, like the stock calipers. Some generic pads from fleabay seem good, only took a couple good pulls to bed them in. Hope I don't need to pull the outer fairing (again) it's not responding to cruise control inputs, lights go on then end up in a double flash pattern.
The new to me Bakup drivers back rest is a winner. Needs few more adjustments but will be super. Now gotta do some back to back comparo's with the FJR. But headed down to an XS650 rally in Mountain View Arkansas next weekend. C'mon Spring!
Anyone else smell exhaust on their RSV? I've got the big stock windshield on it and can smell my own pipes.
And and still gotta take care of a clutch gasket weep, no doubt will do the plate mod at the same time.
-
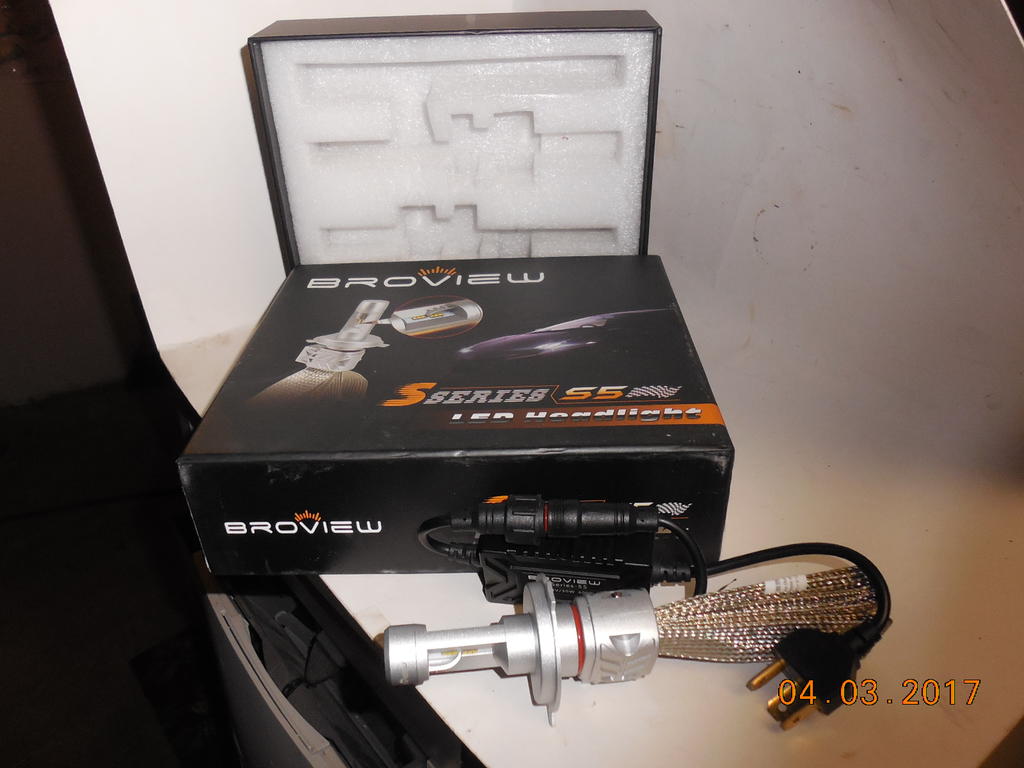
So $52 gets me 2 H4 LED lights... even better deal!
YES, I got two for $48 last summer, IF they get them back in stock....
-
Hmmm... conflicting information on the eBay listing.
http://www.ebay.com/itm/132064359512?var=431419956768
The "Item Description" section says:
dc 12v-24v 30w a piece
6000k-6500k
output 8000 LM total 4000 LM low + 4000 LM high
Where as further down in the body of the listing is says "Motorcycle:"
5500k - 6500k
20w
output 2200 LM
Yeah; I bought a "motorcycle single headlight" off that ad, turns out it was a different "fan cooled" headlight. I returned it for a full refund and got a pair of the "car" headlights.
I think they have dropped the "single H4 motorcycle bulb" from the choices and that blurb just didn't get removed.
PS I don't think you are going to get a fan cooled bulb in the RSV, not enough room.
-
The ebay ad claims 60W but I believe that is for a par in a car. so it would be 30W each. they do not say what the wattage is for Hi or Low beam on the H4. All of the dual beam LEDs that I have looked at are double the wattage for HI beam. In the specs they like to list the LO beam wattage and the HI beam light output. I could not find a proper description for these specific bulbs to know for sure what they are.....
This bulb is like a halogen in that it switches between two elements, doesn't just add more elements for high beam so the difference from high to low is not great. More testing needed for sure. I know I am starting to sound like a broview commercial but beyond buying a few I have no connection with them. Looking around I see several other LEDs now available that appear to be using similar designs to get proper light output. I have set of bulbs to try in my van also.
-
Looking at the draw of the various bulbs above, I think the ammeter confirms what I saw when I tried that "100/80 watt" bulb in the RSV, it's more like a 65/60 bulb, mostly marketing, not fact in the claimed wattage.
-
I'm guessing this one probably won't have the "Cut off" you guys are referring too, especially since its only $15.... http://redirect.viglink.com/?format=go&jsonp=vglnk_149131898603613&key=e24a6de127caafe43f772df085fb6605&libId=j13otdzm0100a62s000DA3lypncyh&loc=http%3A%2F%2Fwww.venturerider.org%2Fforum%2Fshowthread.php%3F127944-LED-Headlight&v=1&out=http%3A%2F%2Frover.ebay.com%2Frover%2F1%2F706-53473-19255-0%2F1%3Fpub%3D5574636522%26campid%3D5335830059%26toolid%3D10001%26mpre%3Dhttp%253A%252F%252Fwww.ebay.ca%252Fitm%252FLED-Motorcycle-Bike-COB-Hi-Lo-Beam-Headlight-Front-Lamp-Kit-H4-40W-4000lm-6000K-%252F151915997250%253Fhash%253Ditem235ee62842%253Ag%253A%257EycAAOSwp5JWbvY2%2526amp%253Bvxp%253Dmtr&ref=http%3A%2F%2Fwww.venturerider.org%2Fforum%2Fforumdisplay.php%3F9-Second-Generation-Venture-Tech-Talk&title=LED%20Headlight&txt=http%3A%2F%2Fwww.ebay.ca%2Fitm%2FLED-Motorcycl...JWbvY2%26amp%3Bvxp%3Dmtr&loAsUuid=j13ote6i-144384e3-2b0d-4786-b4cf-d35aa849e398
Yeah I think you are right, that looks like a COB bulb with random placement of the elements
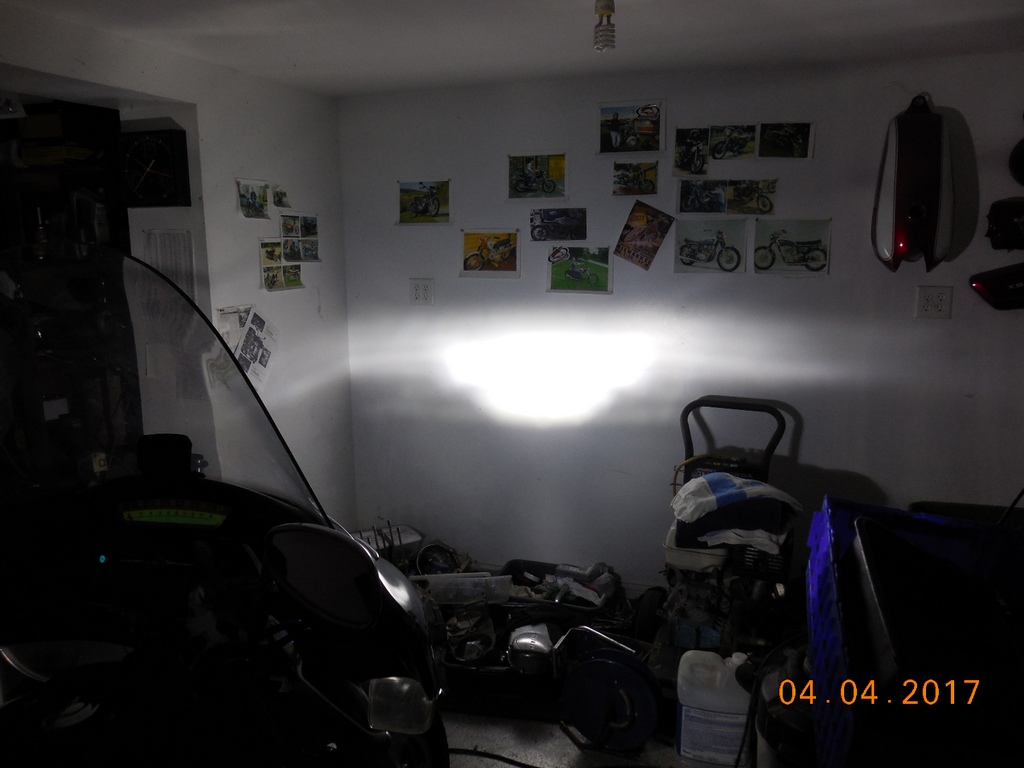
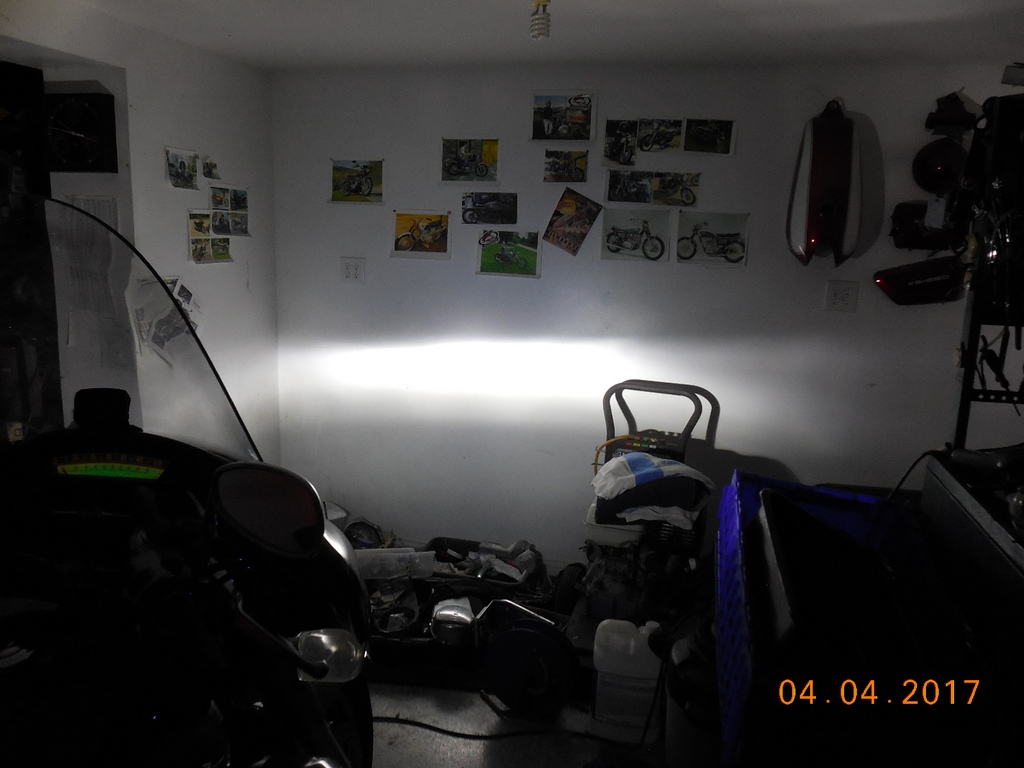
Some views and info.
I have a clamp type ammeter and got these readings, think we have to look at them as relative readings rather than actual amps supplied. More work needed (to confirm) measurements, all readings were taken on a test harness, plugged into a non running RSV via my charging port. I'm guessing there may be issue with true RMS readings as the LED power module prolly makes AC then modulates it for the LED bulb?? I know nothing, nothing, I tell you!
GE 60/55 halogen 79/64
Wagner 100/80 85/67
LED Broview 20/17
Some more photos.
Bike is on the tires supported level by a frame lift.
High beam
Low beam
bulb comparison showing IMHO obvious effort to duplicate the light pattern from a halogen bulb.
Note the little angle at the end of the LED to provide a dropped cut off line on the LH side to reduce glare for oncoming dirvers. It shows fairly on the wall shots. On the RSV I like the cut off, there is "some" light distributed above the bar. My 05 Prius with HIDs had a TOO severe cutoff, it was danged black out there above the cut off on low beam. These results will probably translate well into most headlights designed for H4 bulbs. I tried to shoot "oncoming driver glare" comparisons but the pics did not show, what my eyes perceived. ie in low beam the headlight was not "a bright glare spot" from the front.
-
I've been following this thread with interest. I tried this bulb
https://www.amazon.com/gp/product/B00WVJR0D8/ref=oh_aui_detailpage_o04_s00?ie=UTF8&psc=1
and found it to be much brighter than any other upgrades I've tried. The problem was that it did not have a good cut off line. I made sure to readjust it when I installed it but couldn't find a good compromise that didn't annoy my buddies when I was behind them. Since Gary said the one he used has the proper cut off I'm going to order as soon as I find them for a decent price. I hate to admit how many different bulbs I've tried.
Yes a proper cut off is super important. LOTS of LEDs out there, don't buy unless they show installed light pattern photos. Long night trip monday, and the number of cars coming at me with crap aftermarket LED or HID headlights seems to be on the increase. Get a lot of glare, flash them and they demonstrate that their high beam is even WORSE!
You can get an idea by closely looking at the bulb, the LED needs to have a shape profile that closely mimics the Halogen bulb filament that the reflector is designed for. There are a lot of LEDs that are "scatterguns", spraying too bright light everywhere. IMHO I want the guy coming the other way to be able to see the road also!!!!! My intense interest in LEDs started at the end of a road trip two years ago, I made a 200 miles "run for home" on a misty night on the BMW K1200LT. Even with "super bright" halogen it was a miserable, hope no deer are standing in the road, night. I don't ride at night a lot, but when I do............... I'll try going out and shooting a few night "road scenes" with this bulb. Stay thirsty my friends.
-
We need the H4 that vendor is out of them. They are available on Amazon but at $70 the pair.
The H4 IS high low.
Do you happen to know which size we need? That drop down window has about 6 listed.Thanks again.

 quiver, shake. I used the 1/2" air gun. on a NEW torx socket. May have also used a hand impact wrench, remember to alternately, loosen, tighten even if it doesn't move, the back and forth eventually breaks them free. Add rust buster too. Then clean the rotor thoroughly with brake cleaner. Definitely was time for new bolts, button heads needed the allen heads were too tall, hit the caliper or fork leg.
.jpg.0afafb86c27abe505242fd0cf1ce0fda.jpg)
.jpg.1981182b9cc9712787905c4632c324d5.jpg)
.jpg.696851429ae5f2d2ea969c75c6b83a89.jpg)


Venture droppers, not so anonymous.
in Watering Hole
Posted
A very good warning bongobob! Once it's on the way, there is no stopping it and any bike damage will inconsequential compared to a back or foot-leg injury. Get clear, if you can slow it fine, but let it go!
Admission; last fall I attempted to push the RSV up the slight incline into my garage, the epoxy floor let one foot slip just a bit. it was then slow but inevitable, it came to halt with one bag against the garage door frame. Was able to get free, assess the angles and finally got r back upright with no damage to bike or my back.