HermanK84VR
-
Posts
82 -
Joined
-
Last visited
-
Days Won
19
Content Type
Profiles
Forums
Gallery
Events
Store
Everything posted by HermanK84VR
-
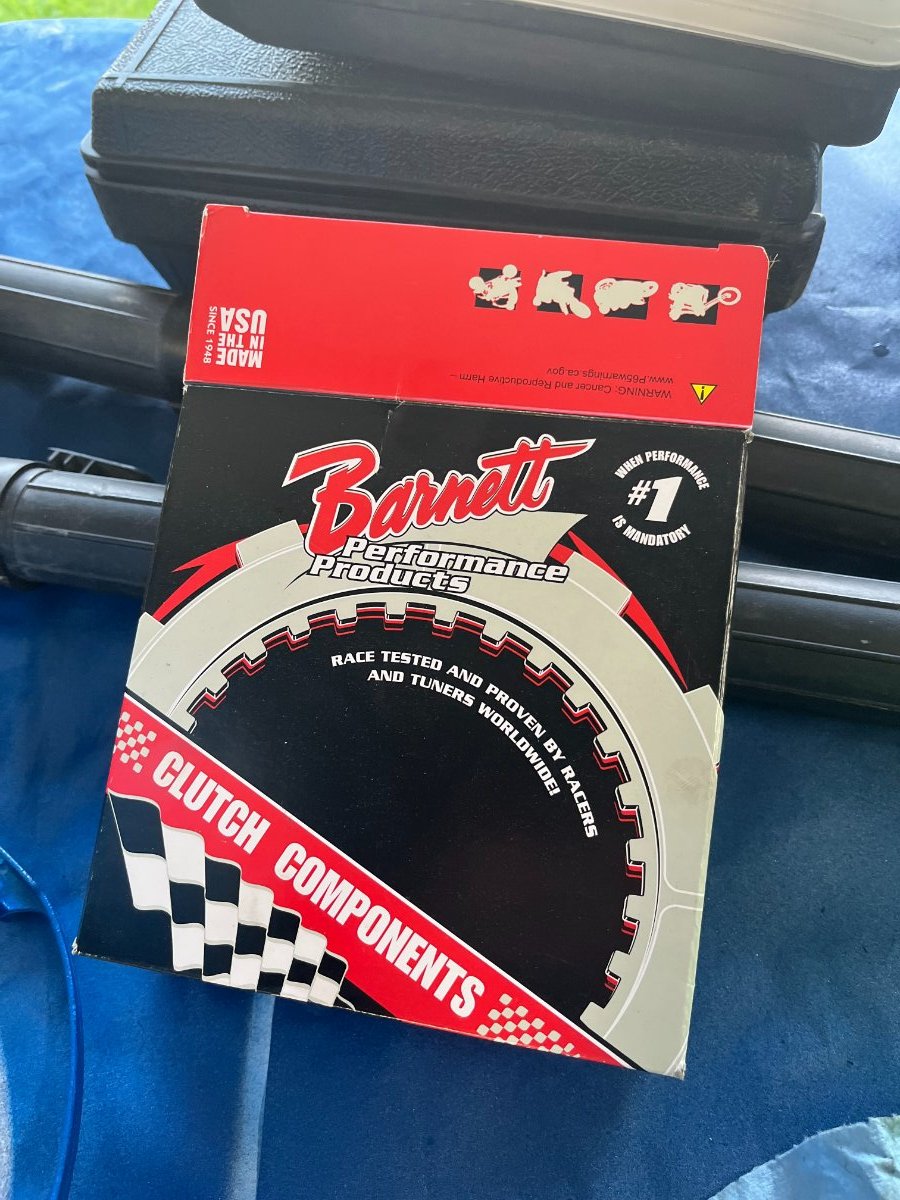
Hi All How is everyone doing this Summer, down in Eastern Canada we are having Record hi temps, Mid to high 30's degree Celsius with Humidex that is between 90 - 108 degrees F. I figured I would give an update on the Venture Max HD, Unfortunately I have not been riding the bike yet this year however I have spent sometime working on the finishing touches. Over the winter I had purchased a Barnett Clutch kit , new Steels and frictions the old clutch was burned bad, I swapped that in May. I also purchased an aftermarket Signal Light controller (a direct Replacement for HD). Added Saddleman Gel inserts in the seat. Cut the Forward Controls Bracket and Raised the Floorboards a full Inch but now have an issue with the Shifter Linkage so still sorting that out, Rear Brake is Fine. I contacted Sean Morley and purchased the Ignitech Ignition Module flashed with the Latest Vmax Tune to match the Heads and Camshafts I Installed last year, I immediately heard the difference in the Engine and Throttle response. I also started experimenting with the Jet kits I ordered thru the winter and Now have the Carb adjustment where the Mixture and Idle screws are meant to be, according to the VW Carb guys, so far, I have dropped the Pilot Jet 2 steps from 55 to 45 and have increased the Main Jet 2 steps from 127.5 to 132.5., I also increased the adjustment on the Throttle pump but may adjust it more as recommended by Gary Hedberg of Venture owners on Facebook. Next step is to fix the Shifter linkage and change the Fork seals and hopefully put some miles on it. I also have a local motorcycle performance shop that does Dyno testing and carb tuning so I may look at retaining their services to fine tune the carb further once I have it dialed in i will provide the final settings and jet sizes. Enjoy the open road Herman K

-
Hi All I hope you all had a good winter Biking season is coming soon, I just purchased my KancaMagus Digital Photo from E Z Rider Pics and Mike has it posted on his Facebook Page. The 1984 Venture Max HD has hit the Bigtime LOL Go to his facebook page and hit like on my photo the most liked photo gets a free 11x14 souvenir photo. Happy riding to all this coming season Herman K
-
Hi All It has been awhile since my last update so I thought I would give you all an update on how the Single Carb is working The summer and Riding Season is nearing the end for this year in my Area, cool evenings with Foggy mornings and summer temps during the day, and unfortunately I am still a working stiff so Riding time is limited. Went out yesterday and toured the countryside with the misses and my 3 riding Buddies to check out the fall colors. The Bike ran better than ever so I did a Mileage check, we ran 212 Km before I filled the tank, the Guage was fluttering on the last bar and the warning light flashing when I pulled into the Gas Station, I filled up and it only toke 15 Litres of fuel of the max capacity of 20L, doing the calculation that works out to approx 39MPG, not bad for 2 up riding, a combination of Highway , secondary Highways hills etc. the VW Pict 34 is working great, I am still running it with the Electric Choke active, I know I am running on Choke occasionally as when we get to a stop sign the Bike is on a higher Idle and I need to give it a crack or 2 of the Throttle to get it back to an Idle. Although I liked the concept of the electric Choke I will be going back to a Manual cable Choke to help improve the Fuel Mileage, between this and re-jetting it will be a different Bike next year. Due to all the rain we got this summer, I have not taken the time to correct the scrapping floorboards and decided to leave this for the winter so I did not take away from the few good riding days we had , same holds true for the Leaking front fork seals. The Kenda Kruz K673 tires have performed awesome through all riding conditions including a 6 Km Gravel stretch of Roadwork we went through yesterday, anyone looking for an inexpensive Tire these tires are for you a set of Front 71H and Rear 77H at Revco.ca here in Canada delivered to my house for $260 Cdn plus taxes. With Regards to the Air suspension settings I have found the ideal settings for me as most here suggested no air up front with the progressive springs and for the rear Medium when Driving Alone and High with the Wife on the back. again this may change once I get more lean angle and no leaking front forks. needless to say I am more than pleased on how the Bike running and I am enjoying the comfort everytime we hit the road. Have a good night all Herman
-
I will put in for a maybe for now and update as it gets close it would be nice to meet you all in person, and enjoy some KY Bourbon.
-
Hi Guys Thanks again for all the Positive feedback, the bike is running better everytime I take it Out. I have sourced out some Jet kits from a VW Performance supplier in California so I will be ordering some Main and Pilot jet assortment kits to dial in the Carb a bit better but so far it seems to be running pretty good even with the Mixture screw turned out an extra 2 turns, Midrange and towards full throttle is responsive when above 2500 RPM I am getting some stumbling when below 2500 RPM. On the trip down to Laconia I was getting some engine Vibration above 4000 RPM this has dissipated and now the Vibration only occurs at 5500 RPM and up any engine speed below 5500 is smooth and no vibration. I have been running this bike as if it was a complete engine overhaul and in the Breakin period, so Gradual increase in engine speed with intermittent bursts at high RPM, I am nearing 4000 kms on the oil so likely will be changing the oil sometime this week, and I suspect I will see some Carbon deposits in the oil, seafoam in the crankcase will go in tonight to help loosen up whatever remains in the galleries and Ring Grooves. Now that I have been able to put some mileage on the Bike I have to do a couple small modifications or repairs. Order Yamaha fork seals and replace this winter Order new Clutch Frictions and replace this winter I will need to Modify my Floor board mounts a bit as the rear Mount is lower than the front and I have been dragging in short 90 degree turns and on traffic Circles, a quick fix with the welder and a cutoff grinder. With more rain in the forecast I will likely get this done one nite this week. I will need to source some new signal light switches as the Harley Controls I put on do not latch the signal light circuit or Cancel so for the interim I added small timer boards to latch the signal lights for 15 secs then they auto cancel, works fine but sometimes even the 15 secs is long especially on lane changes. I have been experimenting with the Air suspension to see the difference in ride and Handling, and because of the dragging Floorboard mounts I have been using the Mid High settings more, with the Misses on the Back I tried the leveling and first set both front and rear to High, no more dragging the floorboard mounts but found the Handling was terrible to the point of uncomfortable in the turns and a heavy feeling in the steering. I now have no air or low setting in Front and Mid to High setting in the Rear, less dragging but still an occasional scrape but steering feels Lighter and more natural in the turns, so this will likely be my preferred air settings. That is all for now and must get back to work. Good Day all HermanK
-
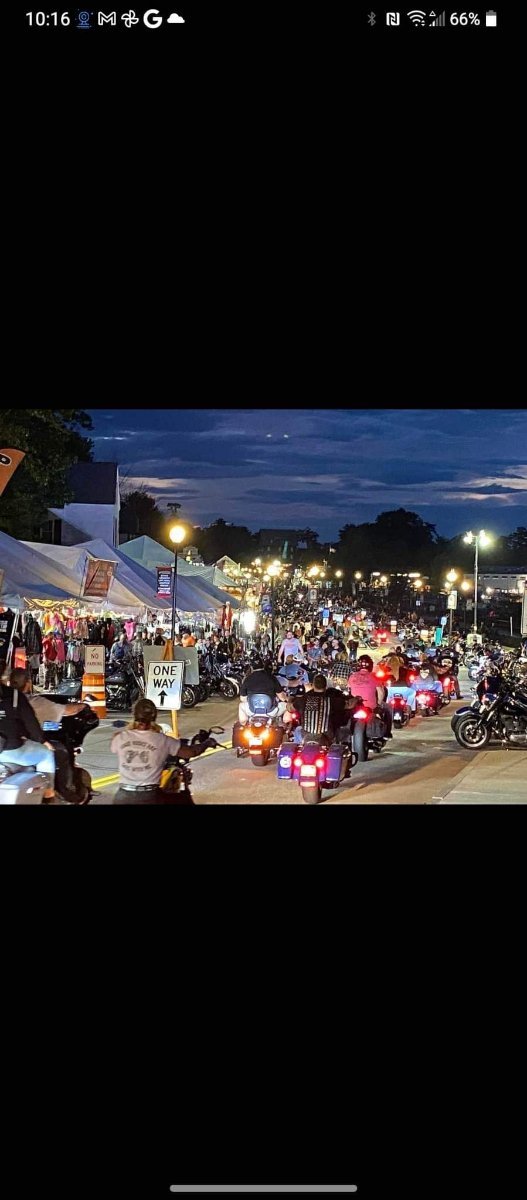
Hi Everyone Made it to Laconia and Back, The Bike worked Better on the return trip than on the way down which is to be expected since the Engine probably has not run in at least 15 years. The only Issues going down I lost power to My Headlight Circuit , I ran a temporary feed to the Hi Beam to continue, I eventually sorted it out once we got to the AirBNB, the wire got pulled out of the Crimp on the Fuse block, I re terminated and all was good. The single carb worked well and I made adjustments along the way for the Mixture and Idle. it seems the sweet spot was above 2500 RPM, below that it seemed to lug in any gear and that could be the difference in the Cams of the Vmax. for the most part I was able to cruise around in 4th Gear thru the Mountain roads and the Kanc at 80 -100 Km /hr and RPM was between 3000-4000RPM. It seemed the Bike was struggling at 4500 RPM so I kept making adjustments to the Carb Mixture and it now pulls to 8000 RPM, and seems a bit more responsive, it is not near the response of the CV Carbs but It was not my intent for the Bike to be a racer, it was built for reliability and cruising comfort, that being said I think I still can make some more improvements on the Carb by swapping the jets, so I need to source those thru some VW forums. I did not bother to check the fuel consumption on the way down but did keep track of the fuel and Km on the way back, when I crunched the Numbers it came out to roughly 32 mpg. One item to note and this likely contributed to the lower than expected fuel mileage , while cruising my Temp never went higher than the very bottom of the normal range but while stuck in Traffic it would go up but did not go any higher than 3/4 in the normal. This being said when we would come to a stop The carb would be on a high Idle, a couple cracks of the throttle and it would settle back down to normal Idle, I am thinking the Electric Choke is cooling off enough from the rush of air than causing the choke to come on. I may disable the electric Choke and go back to a manual pull cable to see if it fixes that. While Cruising around Weirs Beach and Meredith we got stuck in Traffic on some of the Larger hills entering and leaving the areas and at one point I lost my Clutch, It appears I had not got out all the air, a quick bleed on the side of the road and the clutch operations was restored. On the way home I did notice my clutch was starting to slip again but only in 5th gear while going up hill, so I may order a new a set of frictions and steels this winter. being stuck in traffic on the hills definitely did not help. The only other issue I had were my front fork seals " All Balls racing Fork seals" started leaking after I hit a pot hole at about 10KM/hr at first I just thought it was a one off issue but then we noticed spotting on the ground and Fork oil dripping off the Calipers, thankfully it happened towards the end of the trip. The worst thing is the original seals were not leaking I only changed them because I had the forks apart to install the progressive springs, so this will also wait till this winter. Here are a few Pics of the crew at different areas and we actually was able to cruise thru main st but as you can see parking was all full. Good Night all Herman
-
Hi Everyone The Day is Here, headed to Laconia tomorrow morning The bike is working Great now that i have the clutch sorted out I will post how things went when I get back Good nite Herman
-
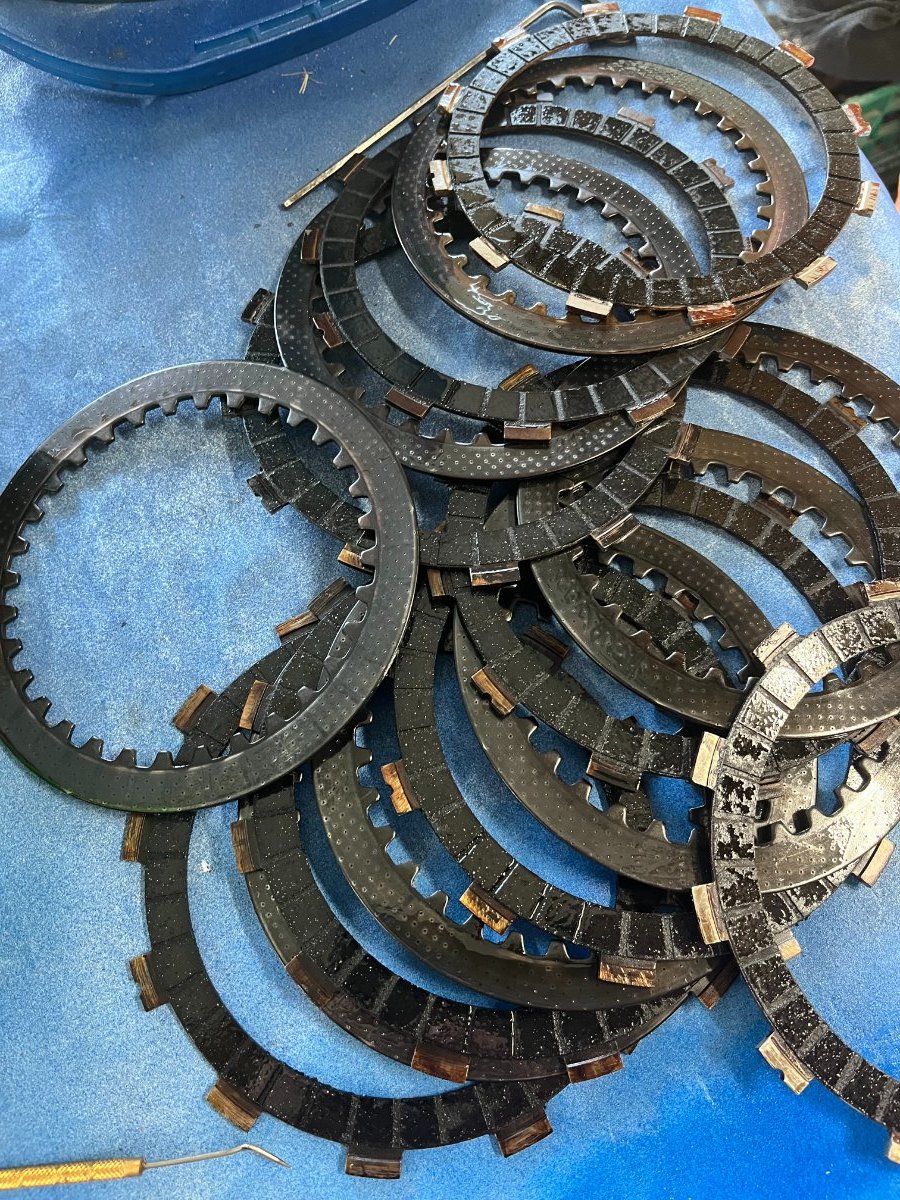
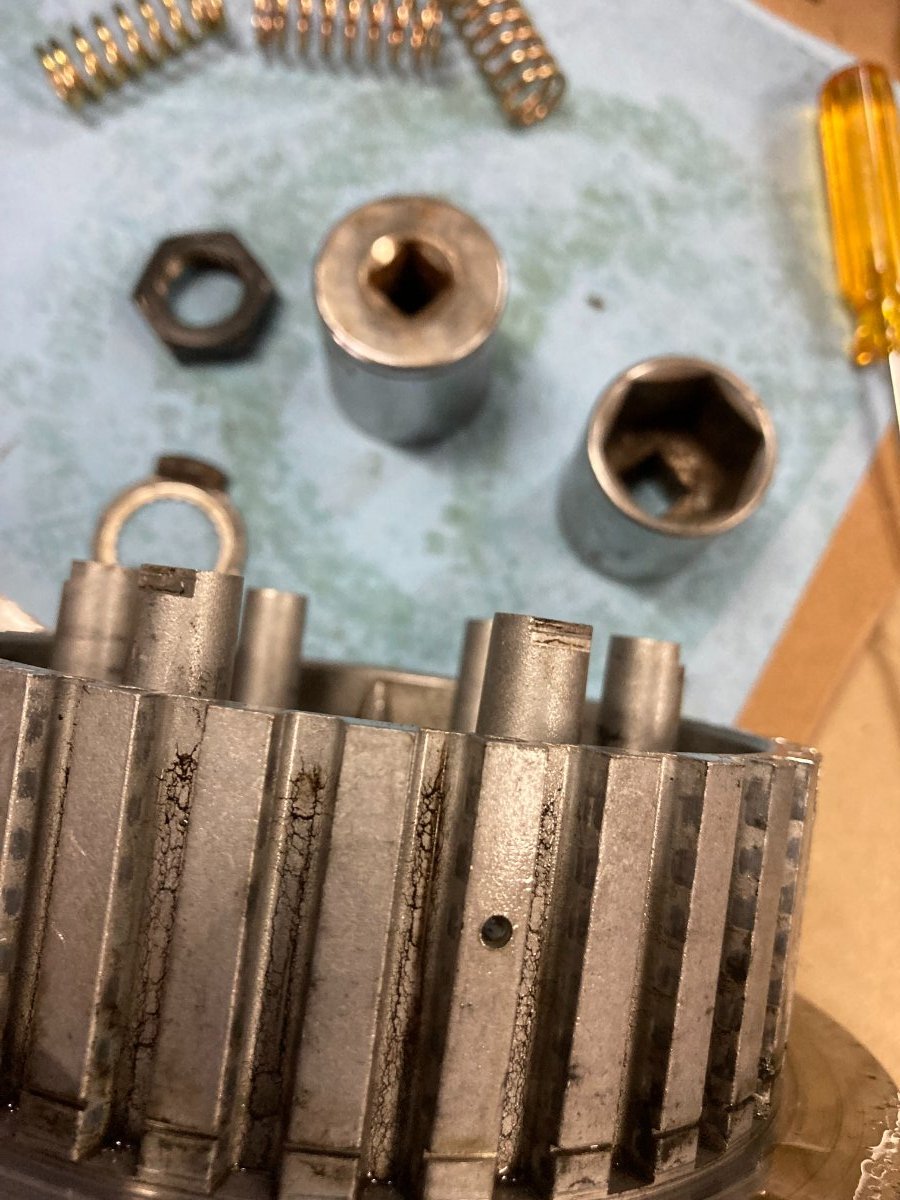
Hi Everyone So I pulled off the clutch cover today to try and sort the issue with my Clutch slipping. here is what i found. When I put the Engine together I looked at the 2 Clutches Boss that hold the Clutch steels, the part number stamped on both was exactly the same 26H00S01. so I did not look any closer to them at the time and figured i was good to use the 1300 Boss with the 1200 Pressure plate. Obviously I probably did not put them side by side until now, so as you can see the Clutch Bolt Standoffs are flush with the 1200 Boss whereas the 1300 Boss these same Bolt standoffs are extended about 10mm past the Boss. as you can see in the pictures. Completely My fault, but it should be good now as I feel more pressure on the Clutch lever now. I also rechecked all thicknesses of the frictions and the Steels, the frictions all measure 3 MM and all the steels are roughly 2 -2.2 mm and the Factory Dimples are all still there, so I should be good. Test drive again tomorrow Herman
-
Hi Guys Thanks for the replies. From all the Oil discussions on VR I should be good with any Diesel Rotella T4, T5 or T6 unless something has changed in their oil formula. The Frictions were soaked in Royal Purple Motorcycle oil also a synthetic blend. With regards to the 6 Springs Earl suggested the Harley Springs as an alternative to the Barnett Kit since I had the pressure plate from the 84 already. I will have it out today, worst case, if it is still slipping, I will pull the side cover and yank out the Clutch and recheck everything, I still have a full set of Steels and Frictions from the old 1200 I can swap in and give it a try. I still have a couple days before my Trip LOL. Thanks Herman
-
Hi Everyone I finally had the Bike out for its maiden voyage today, the bike is a dream to ride, very responsive and very comfortable with the new Handlebars and Forward controls. Only issues I had was I almost lost my Shifter Linkage, It had loosened off and was literally on the last couple of threads on the shifter Side so it appears I forgot to Tighten the 2 Jam nuts or did not tighten them enough, I am glad I Had brought a few tools with me. The second issue is a slipping clutch, which I am bit shocked as I had upgraded the 6 springs to the Recommended Harley springs as well as replacing the 1/2 disc with a full disc, one thing to note is most of you who have updated their clutch by replacing the 1/2 disc commented that the clutch was a bit stiffer to pull I do not feel this is the case with my Clutch so maybe I missed something during the re-assembly. I had not replaced any Frictions or steels but did verify the Thickness with my caliper and they were all at the upper Thickness so I figured they were good, I had soaked the Frictions in Oil overnight before re-assembly, My only other Thought was maybe I should Have ran Dino Oil for the first Oil Change instead of T5 Rotella which Semi Synthetic. Upon arriving Home from the 100Km run I did get a low oil Indication, would this have caused the Clutch slippage? I had checked the oil before leaving and was 1/2 way between the marks as recommended but had to add a little more than 1/2 a Litre to get it back to the 1/2 way between the marks, there are no Oil leaks so I can only assume the few times running the engine on the Lift was not enough to fully fill the oil Passages and filter. The engine Likely has not run in 15 years and I did pull it apart to replace all the Seals and gaskets. I am on vacation for the next couple weeks and heading to Laconia on The 15th so I will be out riding over the next couple days to work out any kinks and to do some Final adjustments on the Single Carb so hopefully the Low Oil was the cause of my Clutch slipping. worst case I pull the Clutch Cover to re-confirm the Clutch configuration. Any Thoughts let me know Thanks Good Nite Herman
-
Hi All I have done some research and I am going to give the seafoam in the Crankcase a try, I have T5 rotella in the the crankcase now so I have added the recommended 1 oz per quart then will run the bike for 200 miles then change the oil before my trip, the plan was to put some miles on the bike to work out any bugs that crop up before the trip and change the oil to flush out any dirt or crap that got in the block while I had it all apart, Normal practice after pulling apart an engine. The engine only has about 37000Km so there is not alot of wear but because it sat Idle for so long there is likely some gumming of gears which should loosen up with some movement with fresh oil. I had inspected all the clutch plates and frictions and they were all at the thickness of new plates plus I swapped the 1/2 disc and added the HD springs so I am thinking once i get the Transmission working thru the gears it will loosen things up. the forecast is looking good for sunday and next week so hopefully I can get some miles on it. I will update before the trip and try and post while in Laconia. We are there from the 15th to the 20th. Have a good nite all Herman
-
Thanks Ben, Now I just need to take it out for a Ride. We are getting steady rain all this week for the forecast But supposed to clear on the weekend. I still need to put the Badging back on but will do a wet sand first then mount the badging then polish and wax. One question you maybe able to answer the 1300 came out of a 87 so it has not run for probably 8-10 years, I had it all apart but did not pull the Transmission or split the main case. Just Running the Engine and testing the clutch it seems to Shift Fine but have a hard time finding Neutral, I am hoping once I get it out on the road It will free up after getting the Oil circulating thru the Gears of the tranny. Herman
-
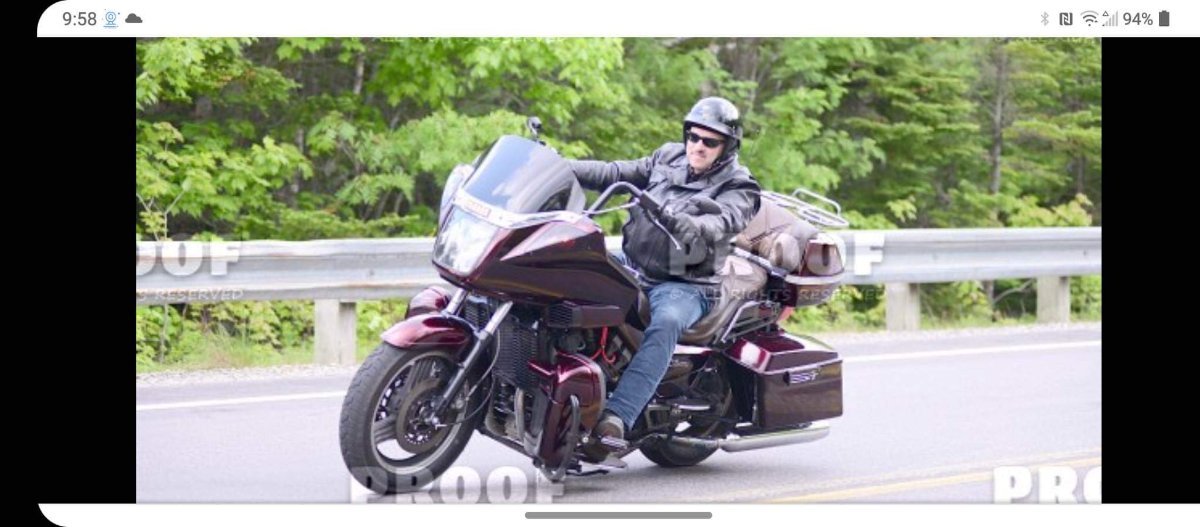
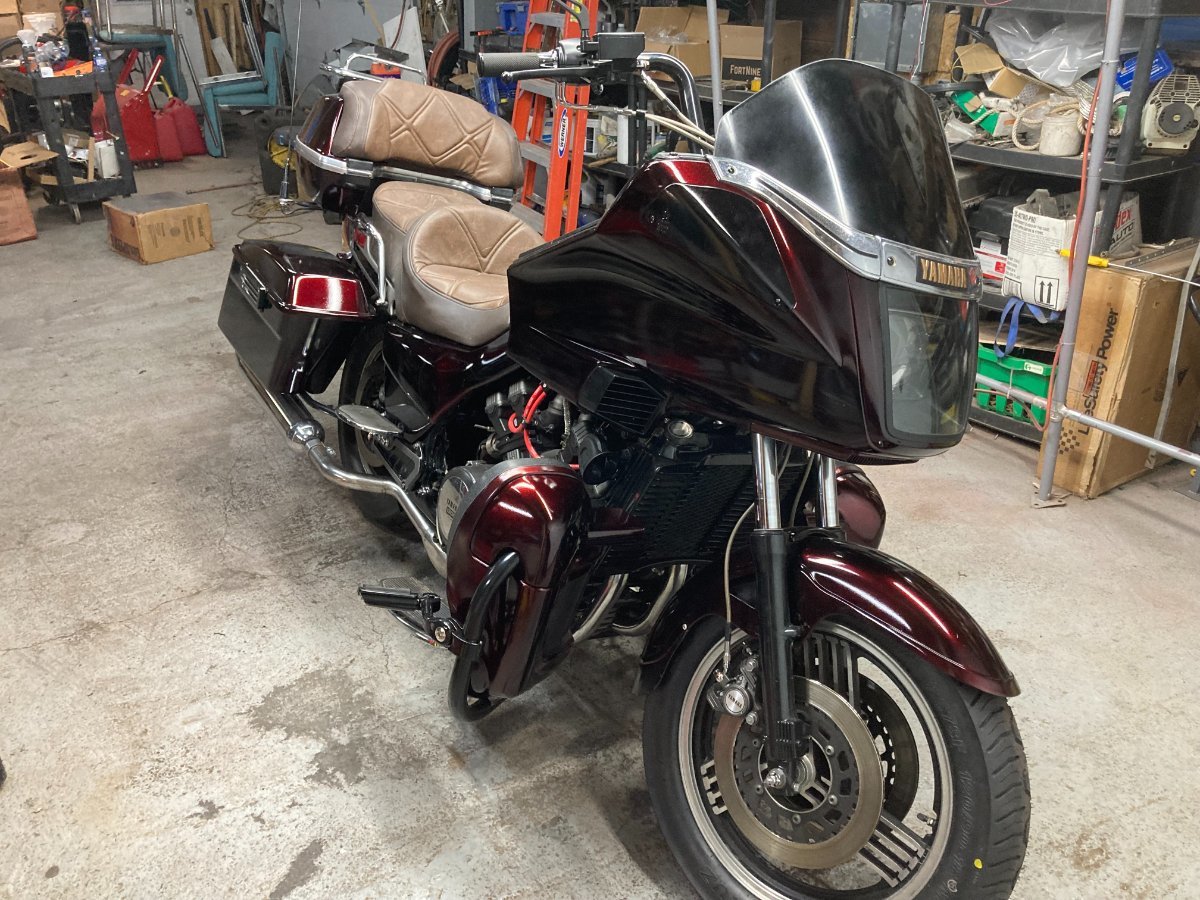
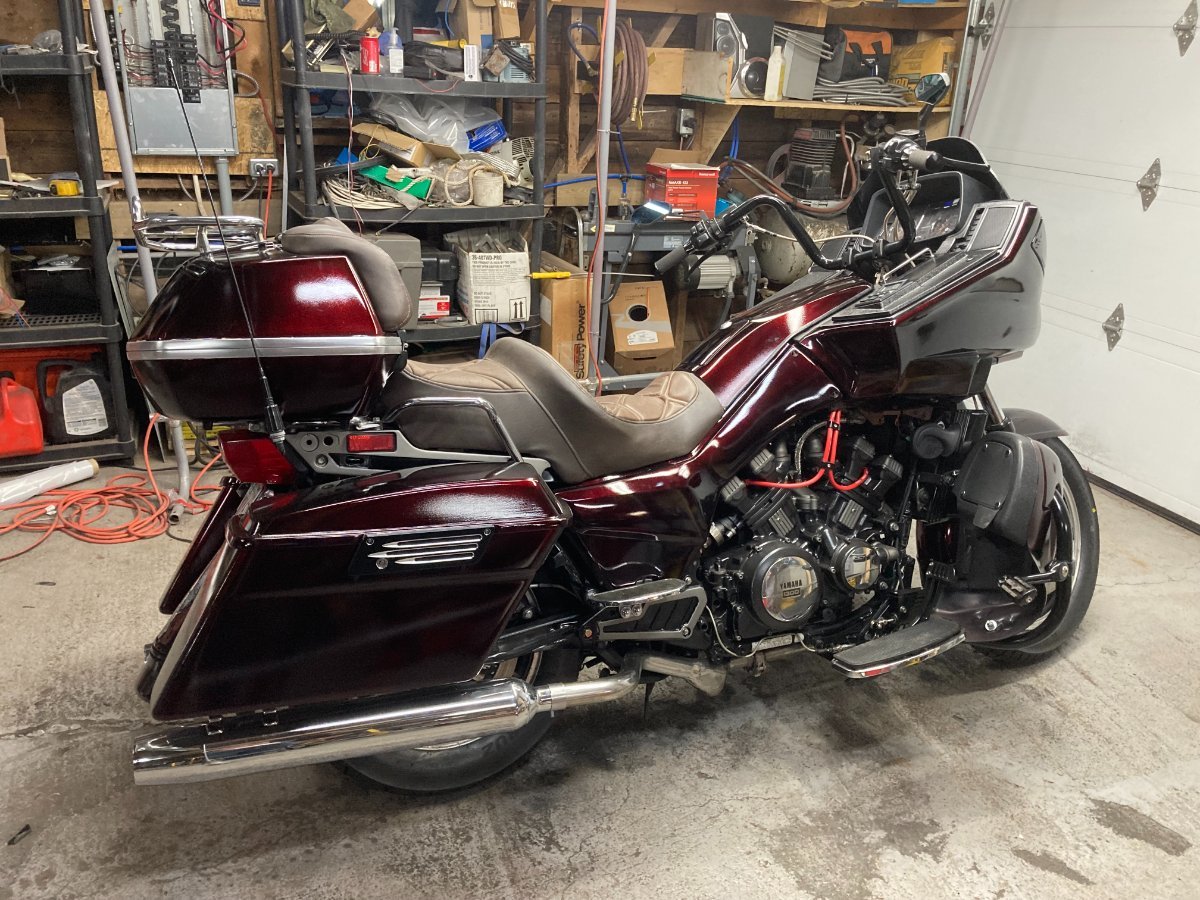
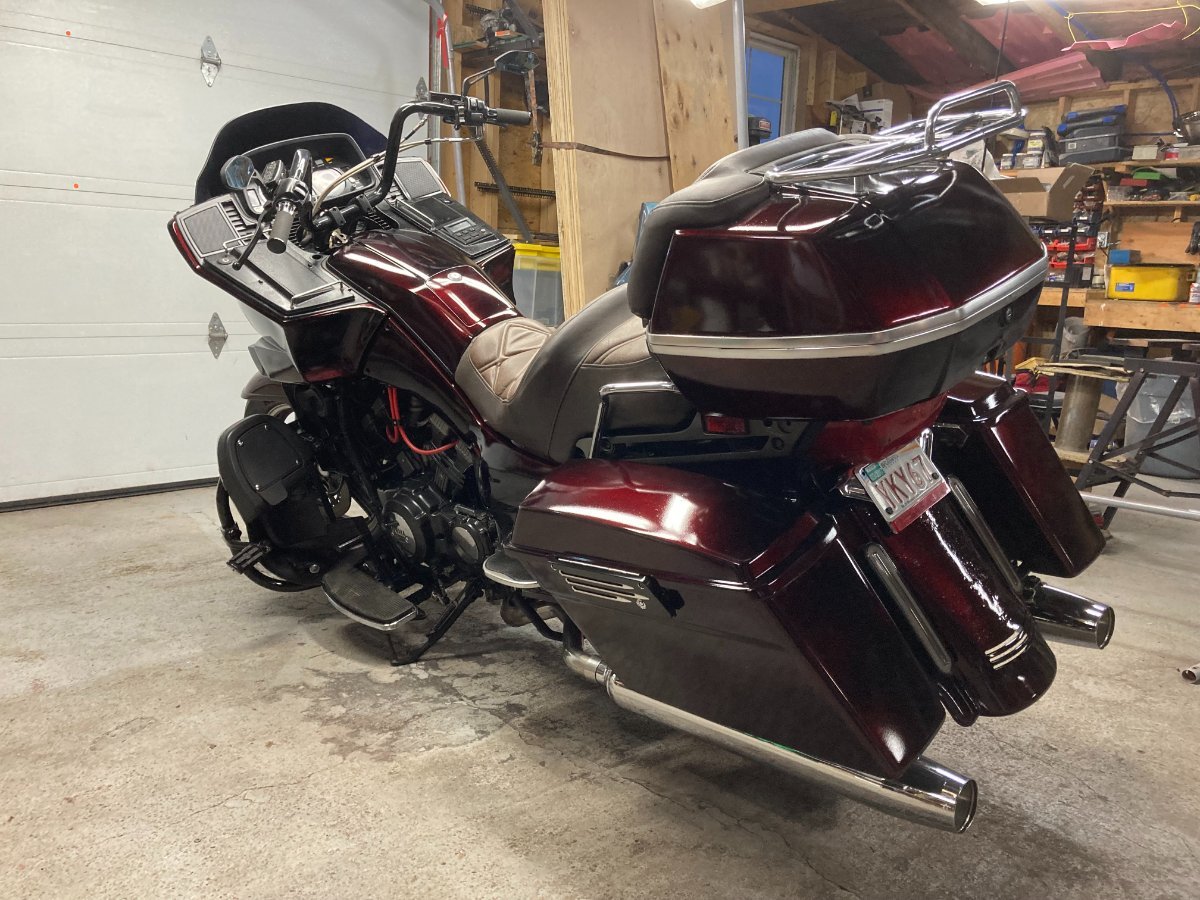
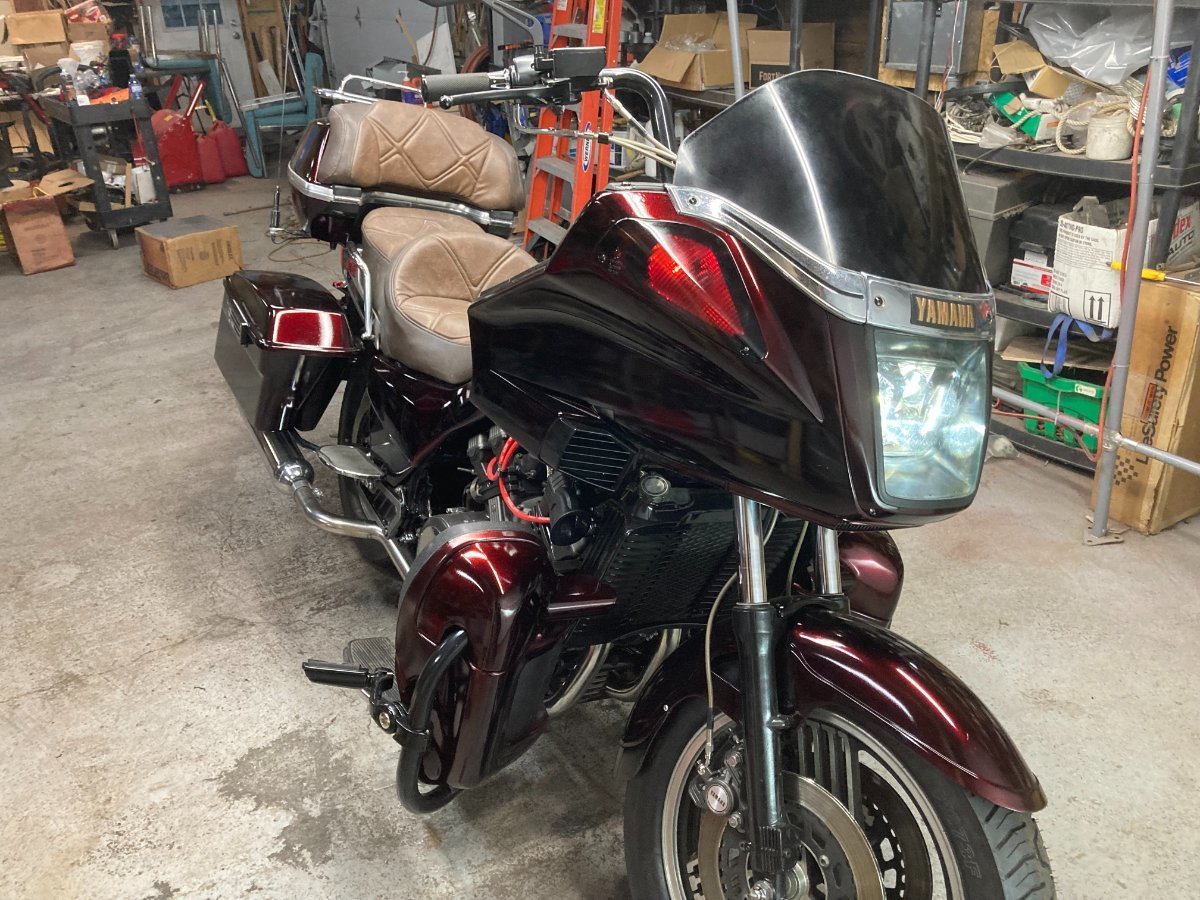
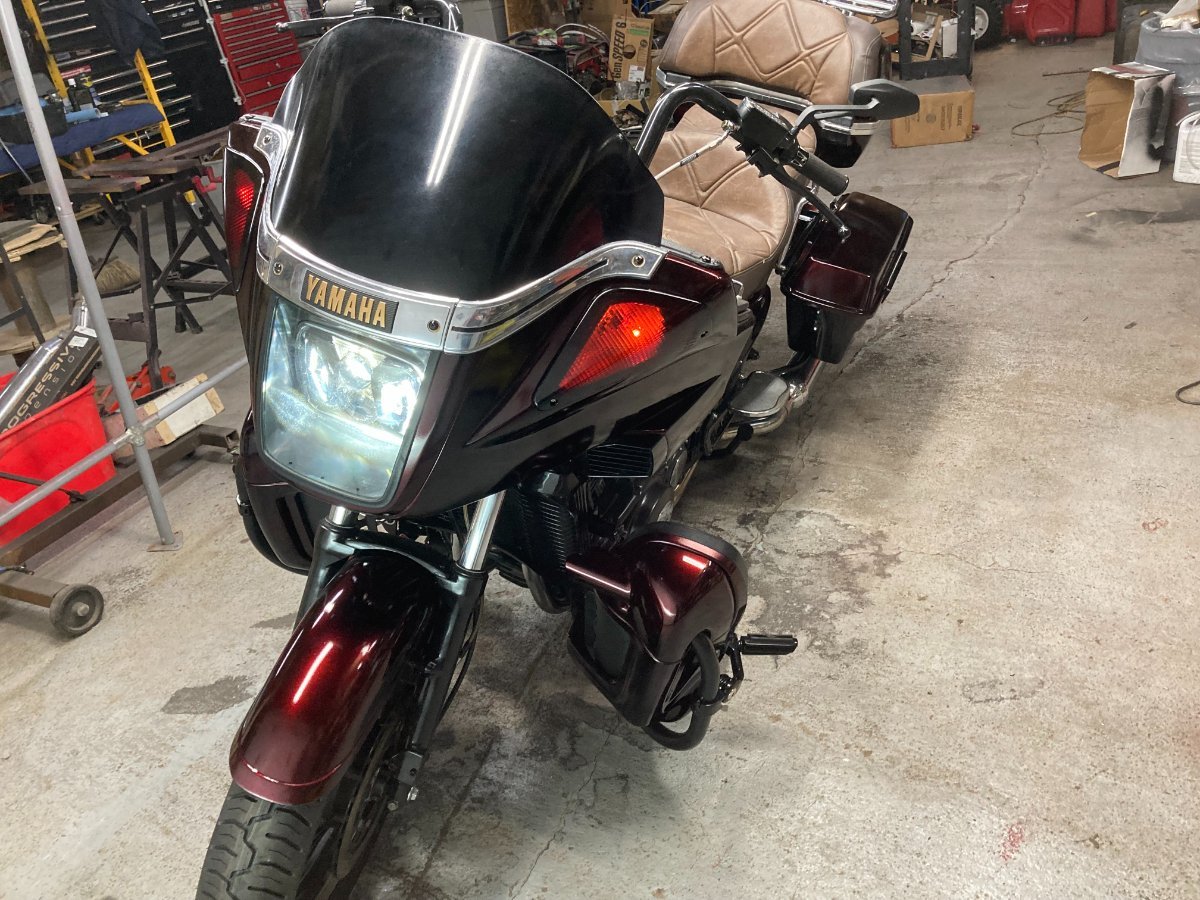
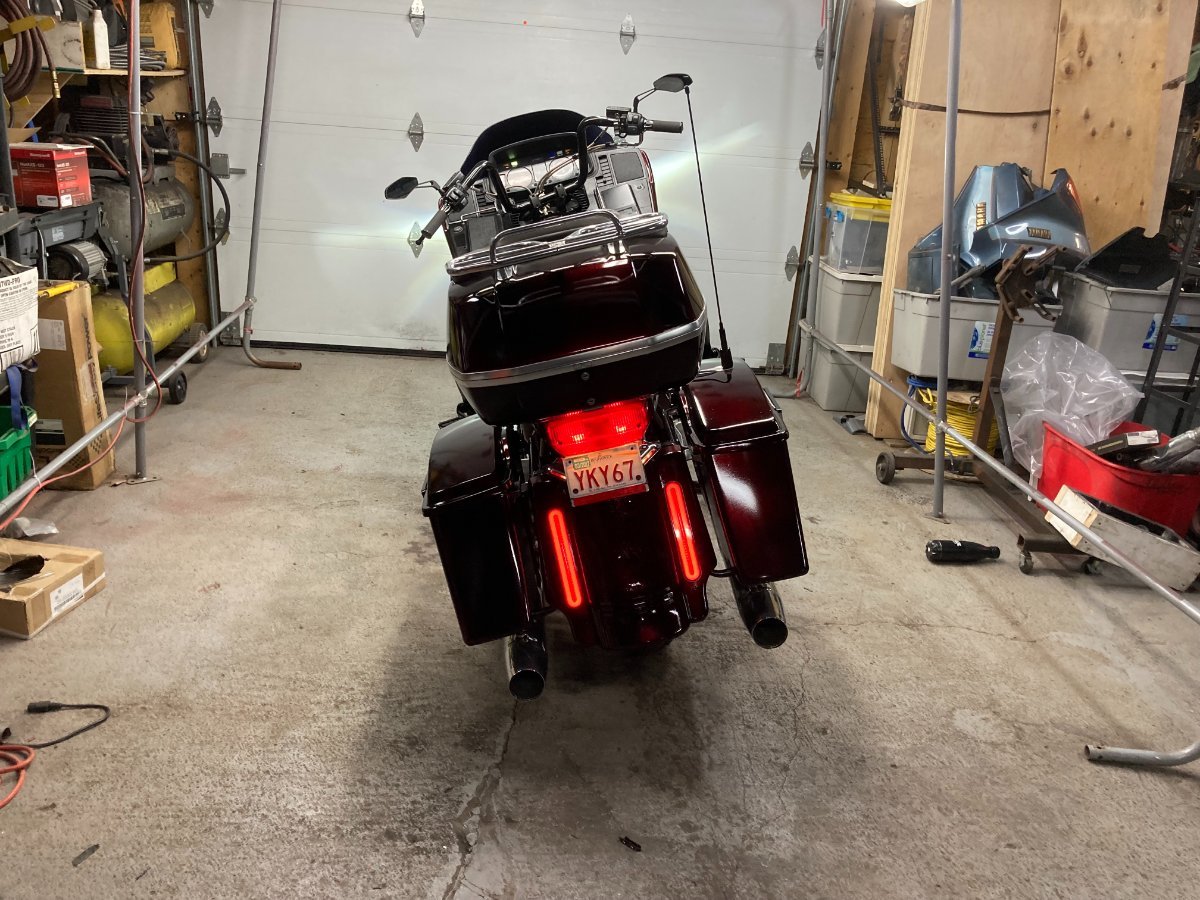
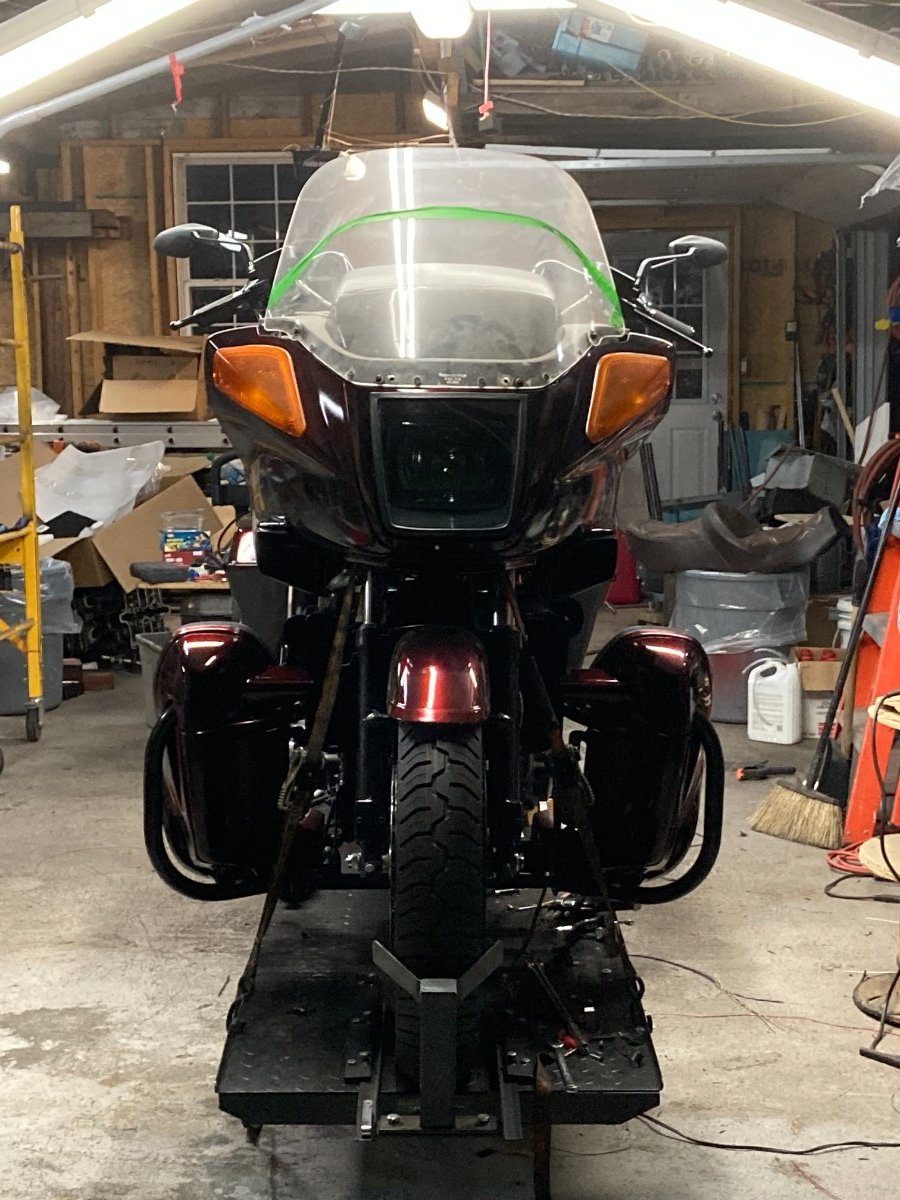
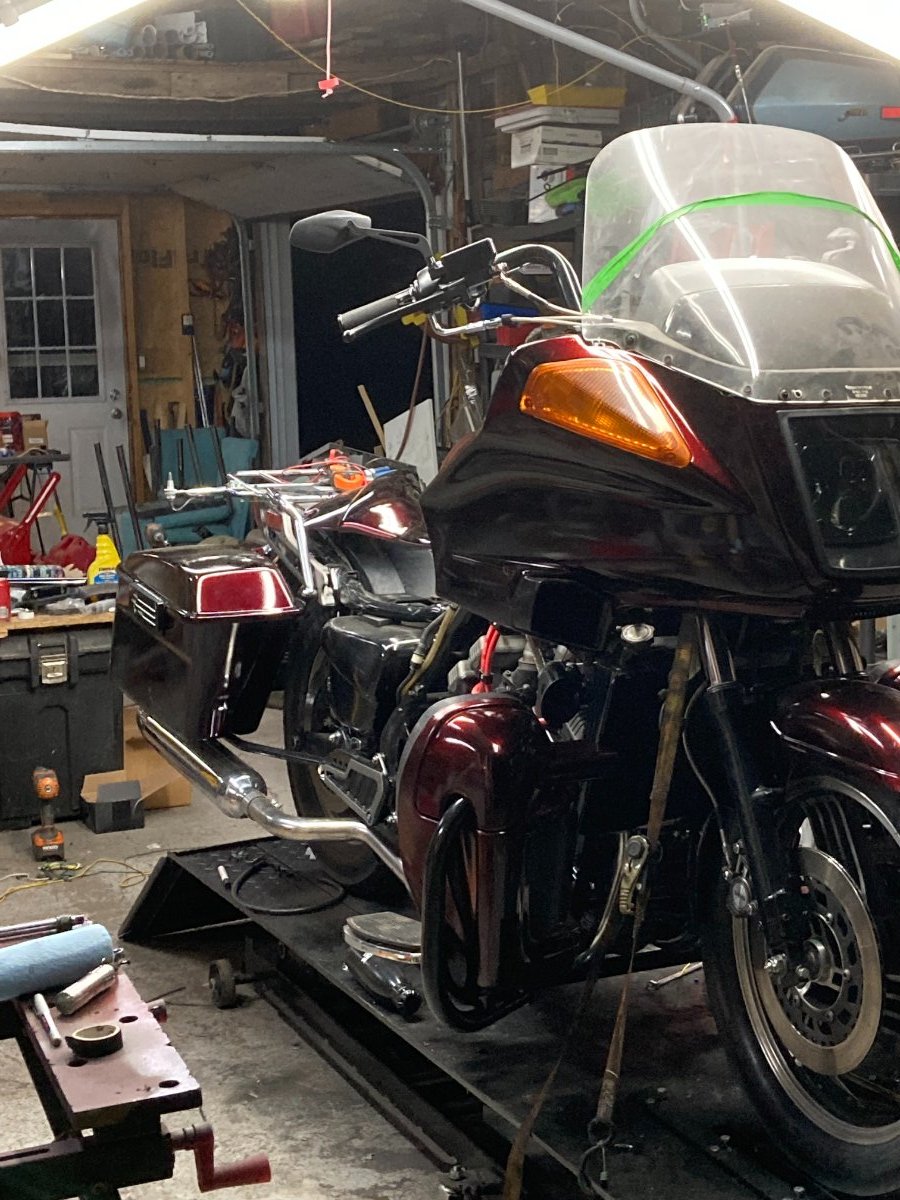
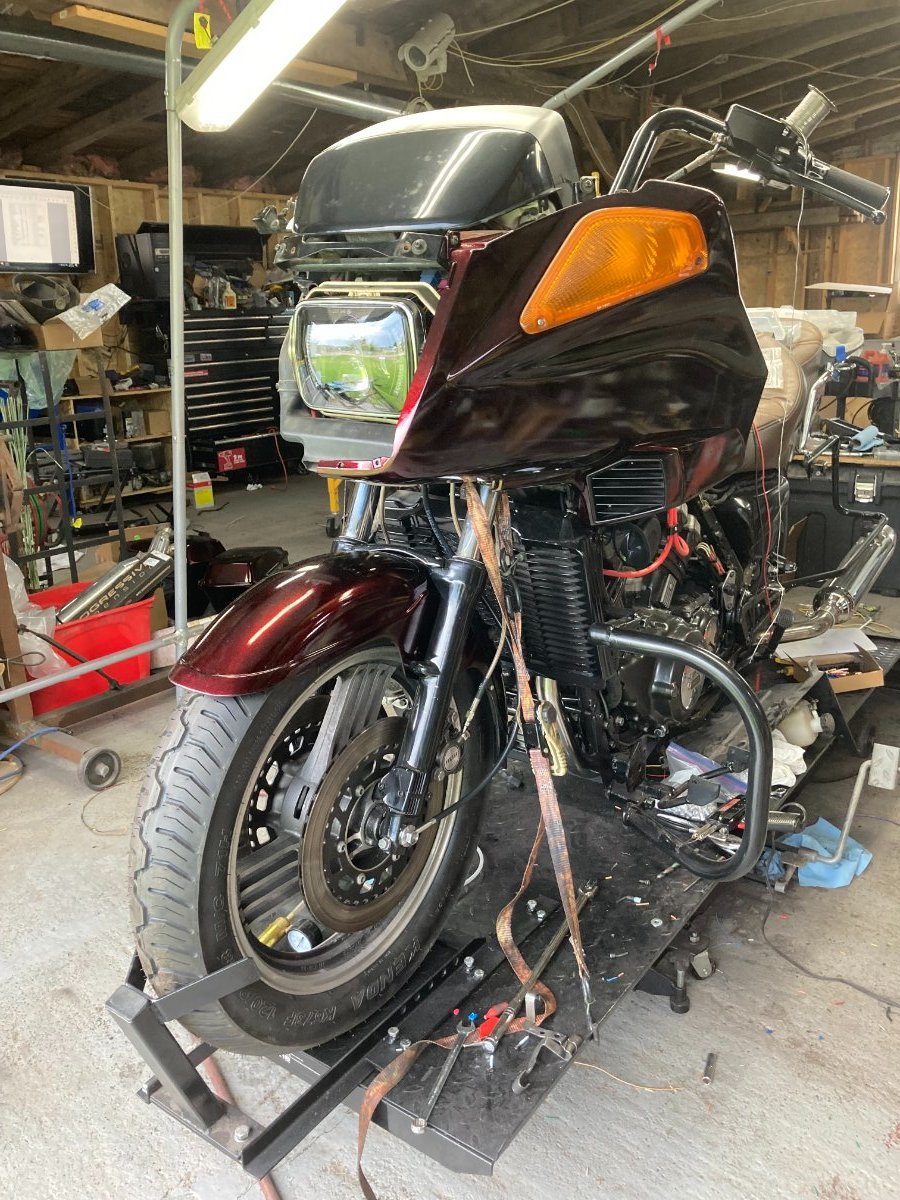
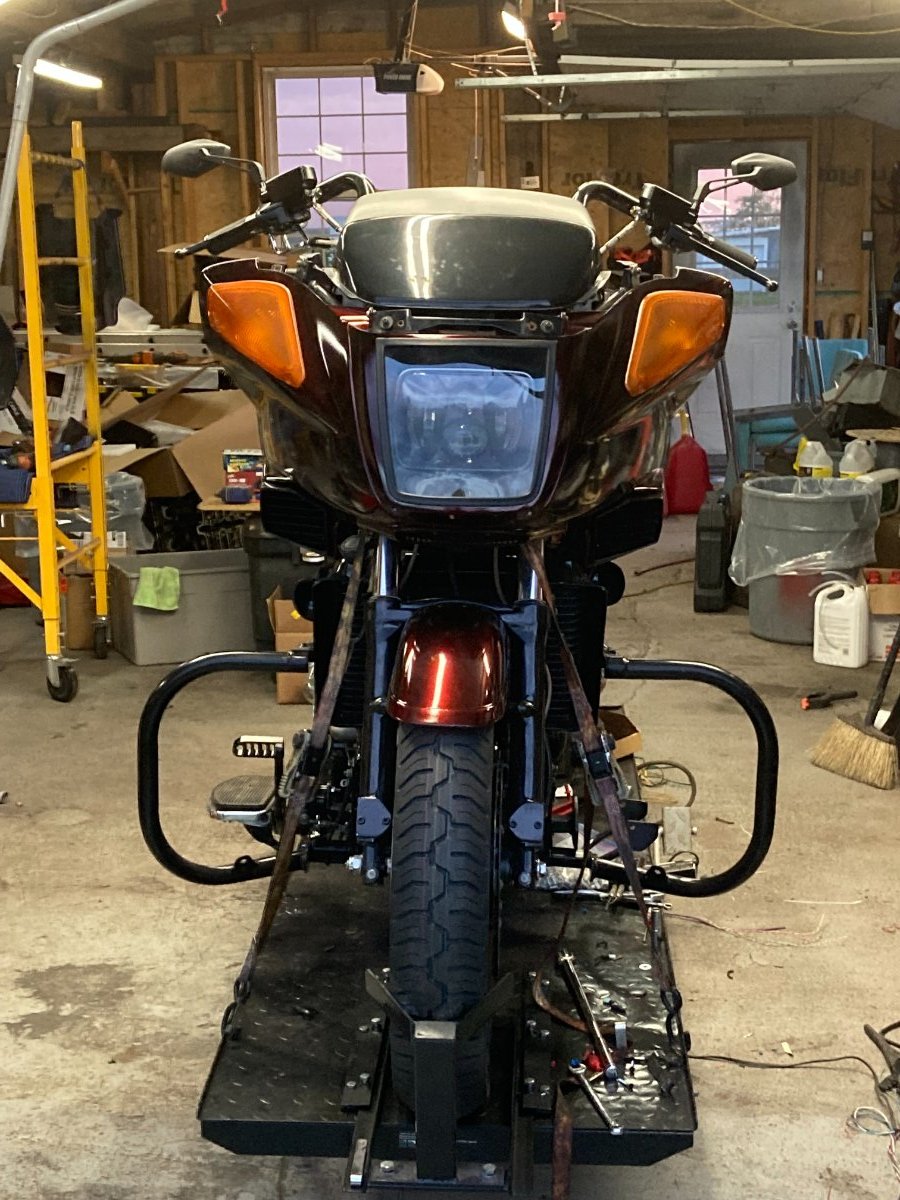
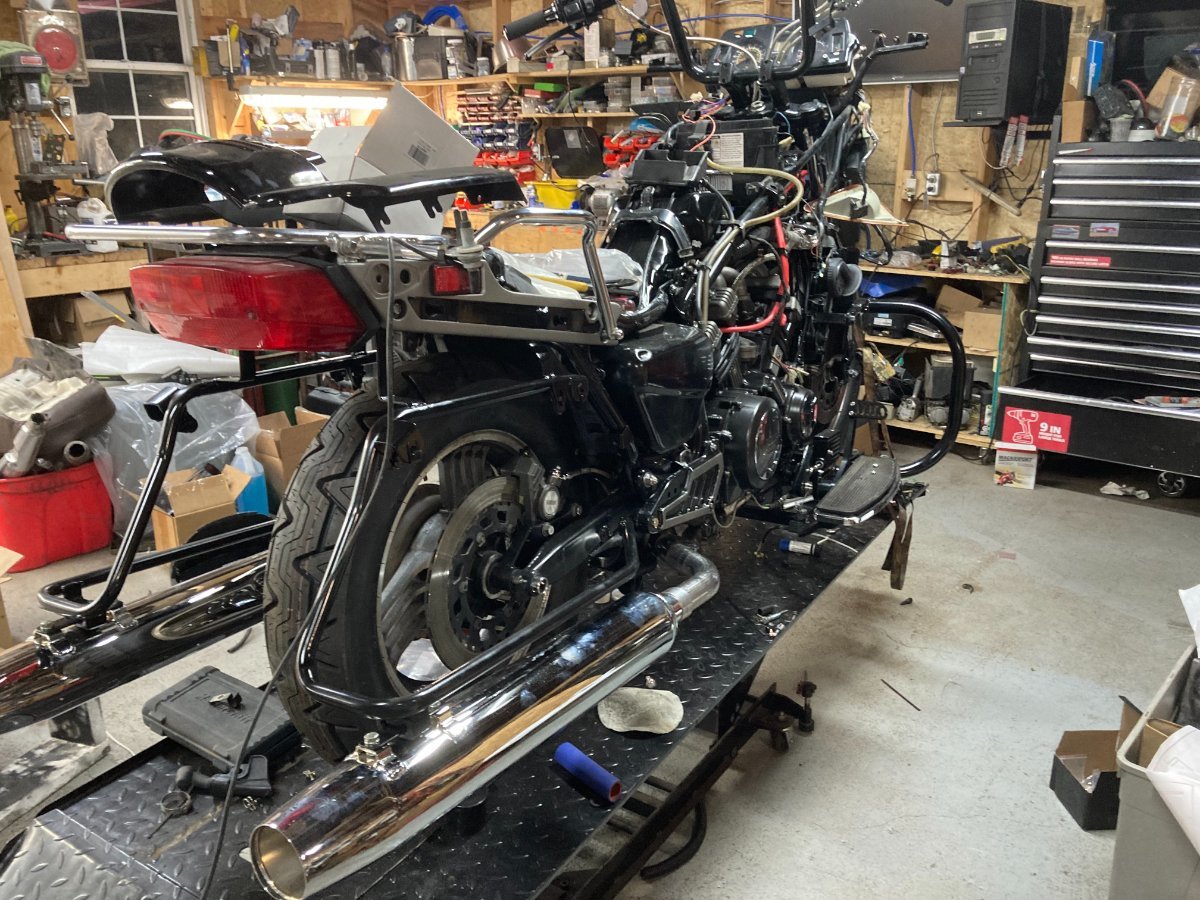
Hi Everyone I am pleased to announce the Venture Max HD is now complete and off the Lift, now I just some good weather to take it out on its maiden Voyage, and put a few Kms on the bike before heading to Laconia in the 15th. Here it is fully assembled and ready for the road. I have also added some photos of the Blacked out Signal lights and the rear Lights. Thanks for all your Support thru out this process I will update the post after I have my maiden Voyage. Thanks Herman
-
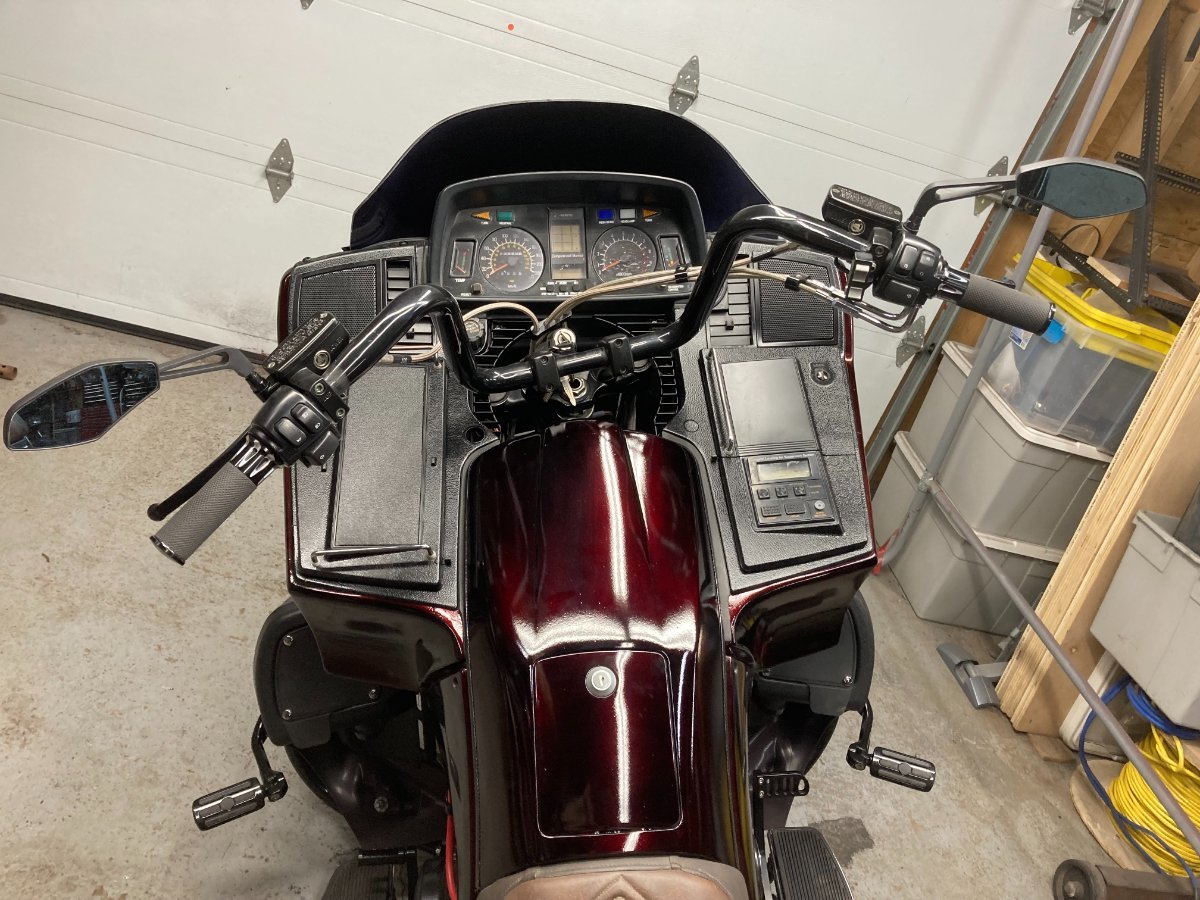
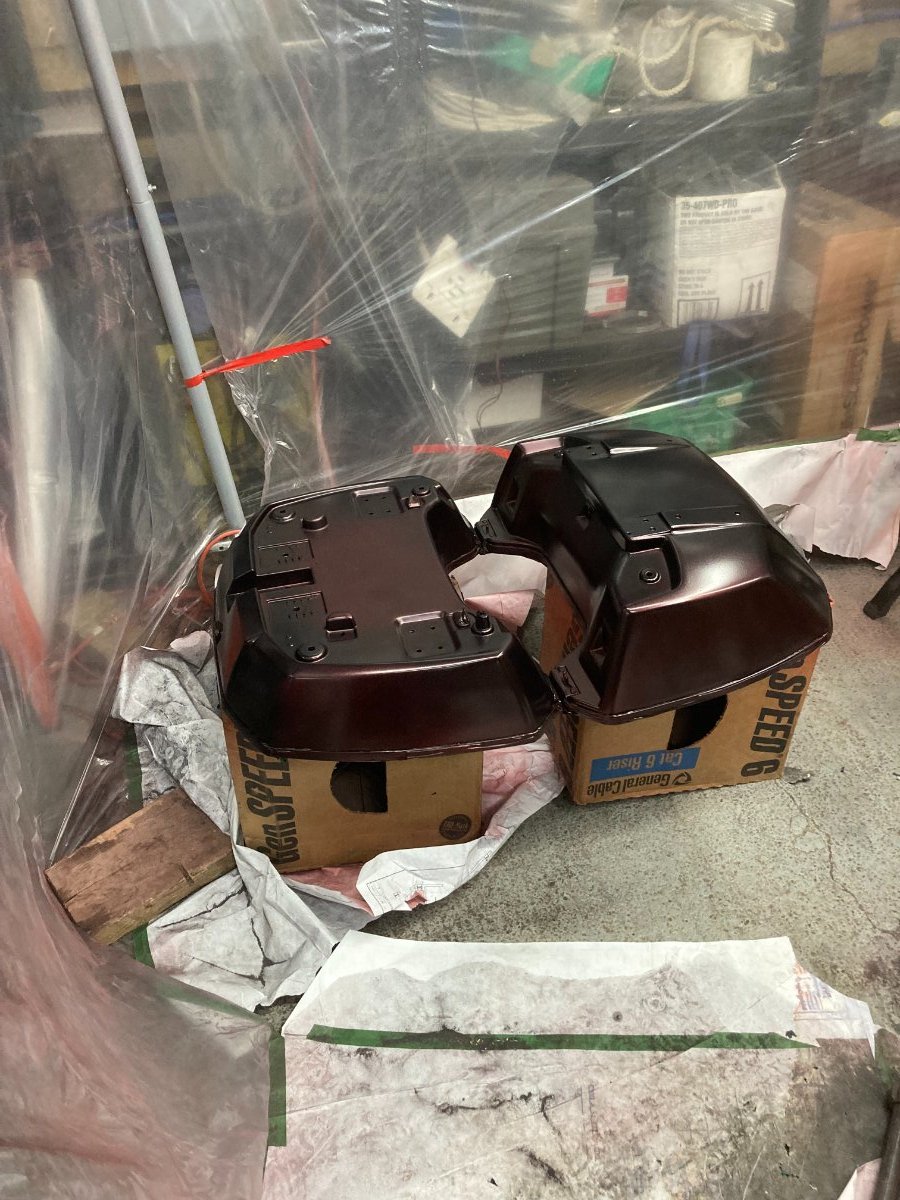
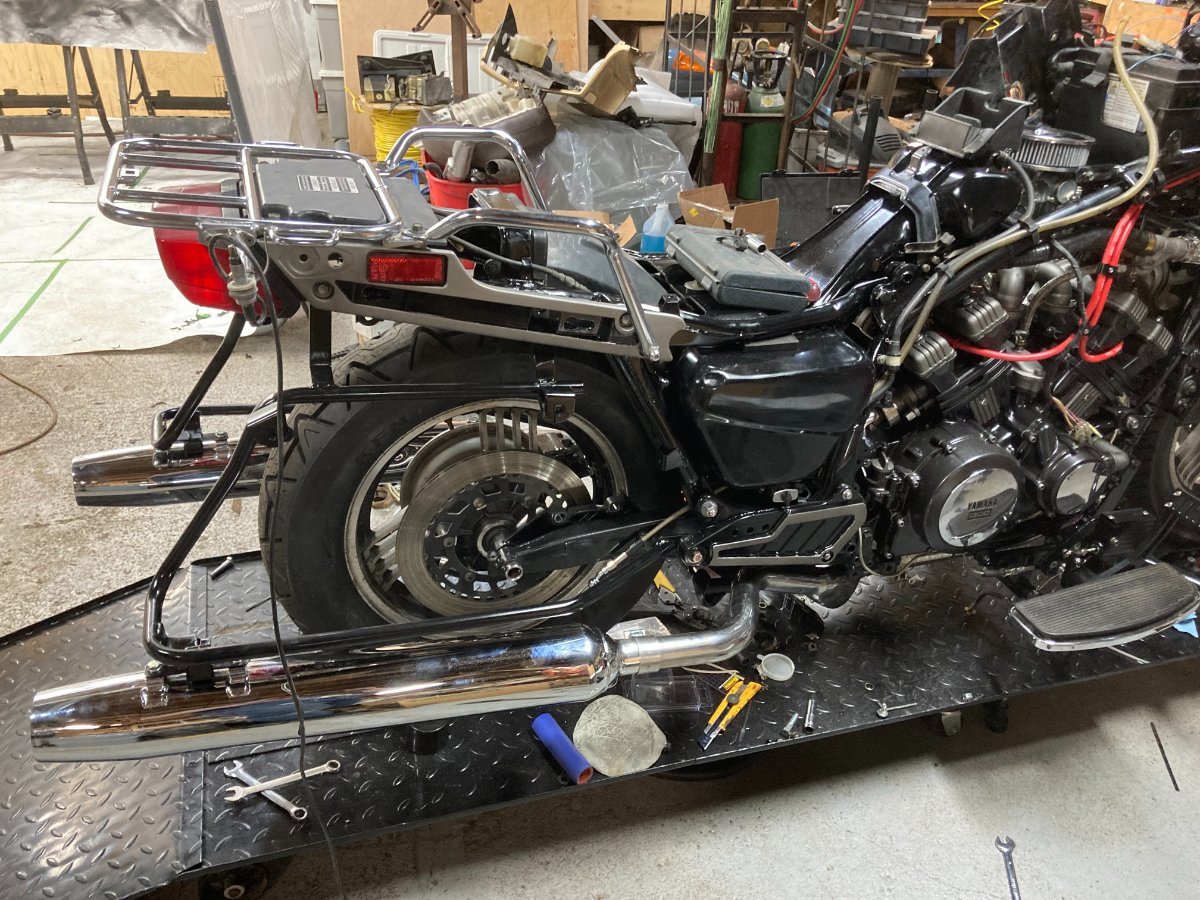
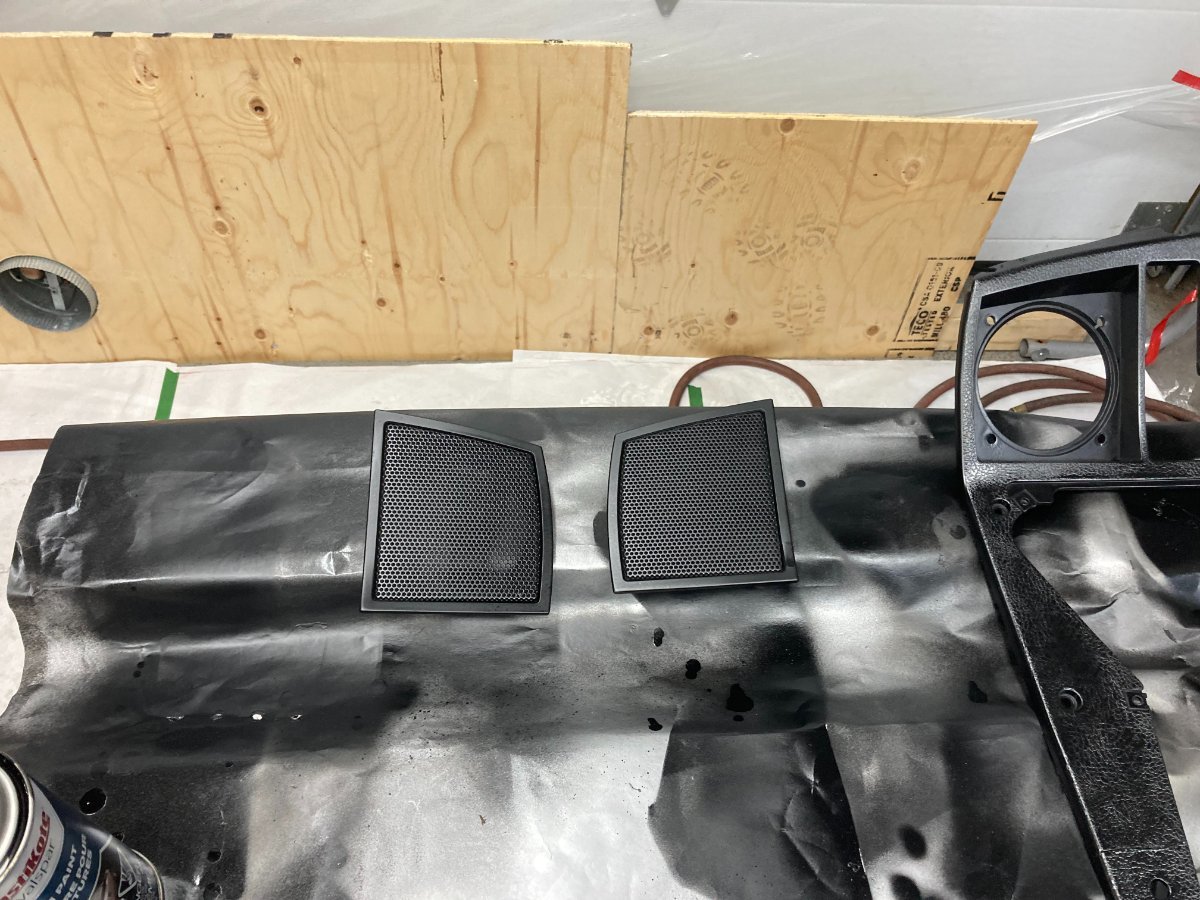
Hi Everyone Made more progress on Tuesday Nite and the bike is really coming together. We installed the lower fairings to complete the front end, then went to work on the rear, installing the rear fender and the new Rear filler panel between the HD saddlebags including new LED Lights for Park/Brake/ signal. Also installed the saddlebags. Thursday evening I finalized where I was going to cut down the windshield and Cut it and finished the edge then Polished both sides with 5000Grit wet sanding. Also removed the Front Signal Lights then sprayed these and the inside of the Windshield with Black candy paint. Back out in the garage after supper tonight to Wet sand the Lights and Windshield and applied a second coat of Black Candy, I will spray the clear tomorrow on both sides of the windshield and the lights, also sprayed some gloss black on the inside of the Trunk to freshen it all up. A couple photos to show the progress. Shifter Linkage and Fairing dash pieces tomorrow, finish wiring up the rear lights and final adjustments to the Trunk mounting, also Mount the windshield and re-install the Lights. Have a good nite Herman
-
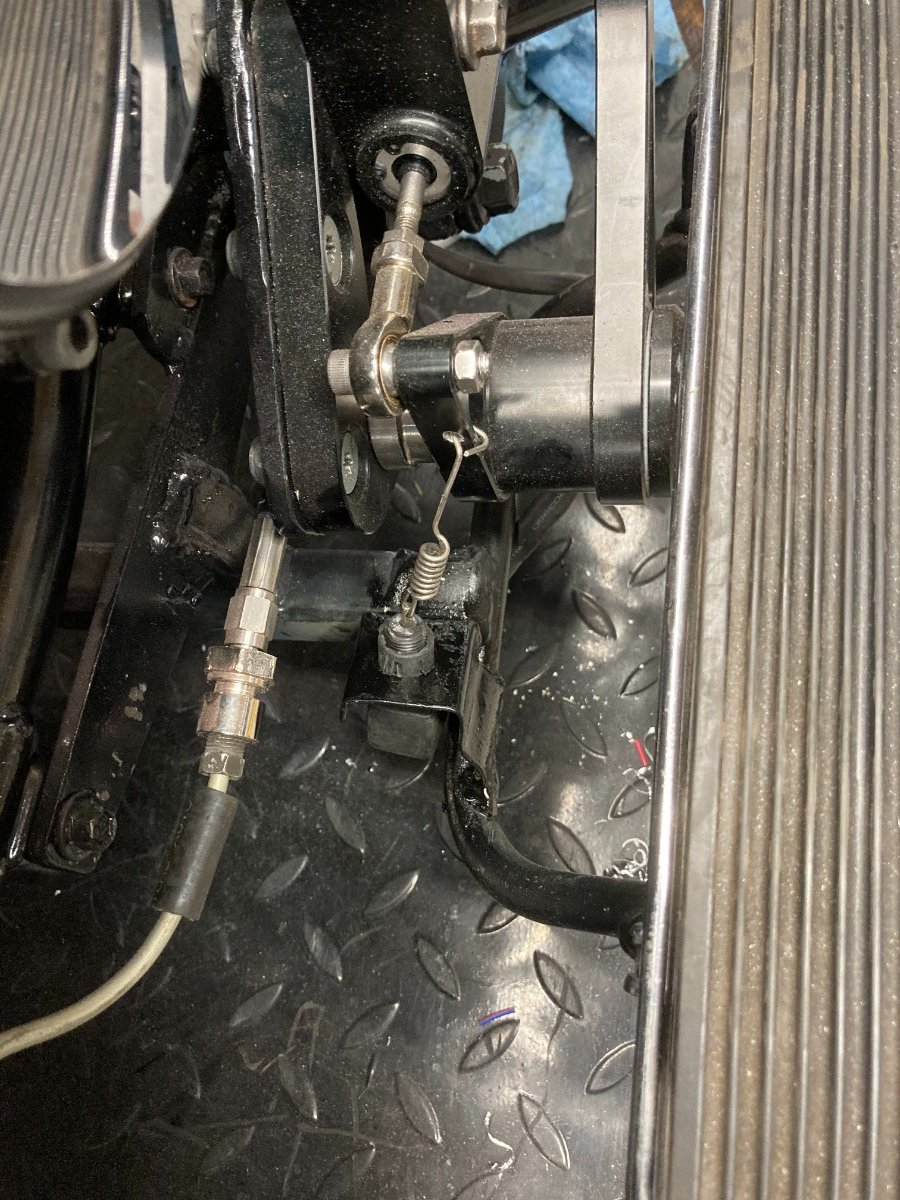
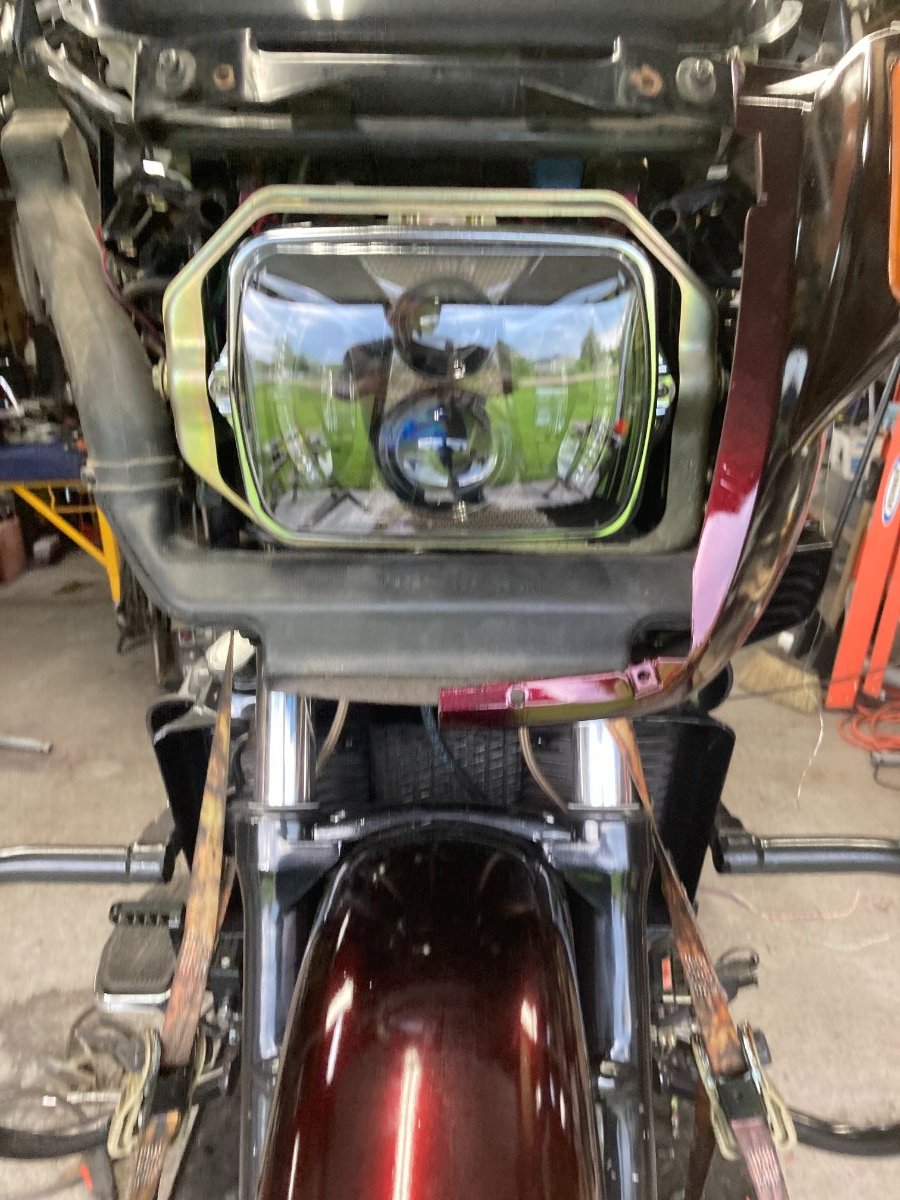
Hi Everyone It is starting to look whole again, My Buddy Brian was over on Saturday to assist with the Brake bleeding as well as the clutch, all is bled and functional and no leaks. We also did the final adjustment of the Handlebars. I completed all the wiring and built a mount for the Rear Brake switch for the new Forward control brake peddle, while Brian re-assembled the Jigsaw puzzle of the Trunk and the saddlebags . After Brian left I continued to Work on getting the Fairing installed and the Front Fender, my LED headlight was covered in minor scratches from being moved around the shop so I gave it a wet sand with 5000 then sprayed on some gloss clear. After getting the fairing done the Signal Lights were sticking out like sore thumbs, I temporarily covered these with some Limo Black Tint (too dark) so I am gonna spray some Black Candy since it goes on transparent this way I can control the Tint level The Lights are still fairly Bright even with the heavy Limo tint so somewhere in between should suffice just to blend them in with the Black Cherry. Brian and I are set to work at the Bike tomorrow after work, so we should be able get the rest of the Bike together and knock a few more items off the completion List. More pictures and updates as I work at this project Good Night all Herman
-
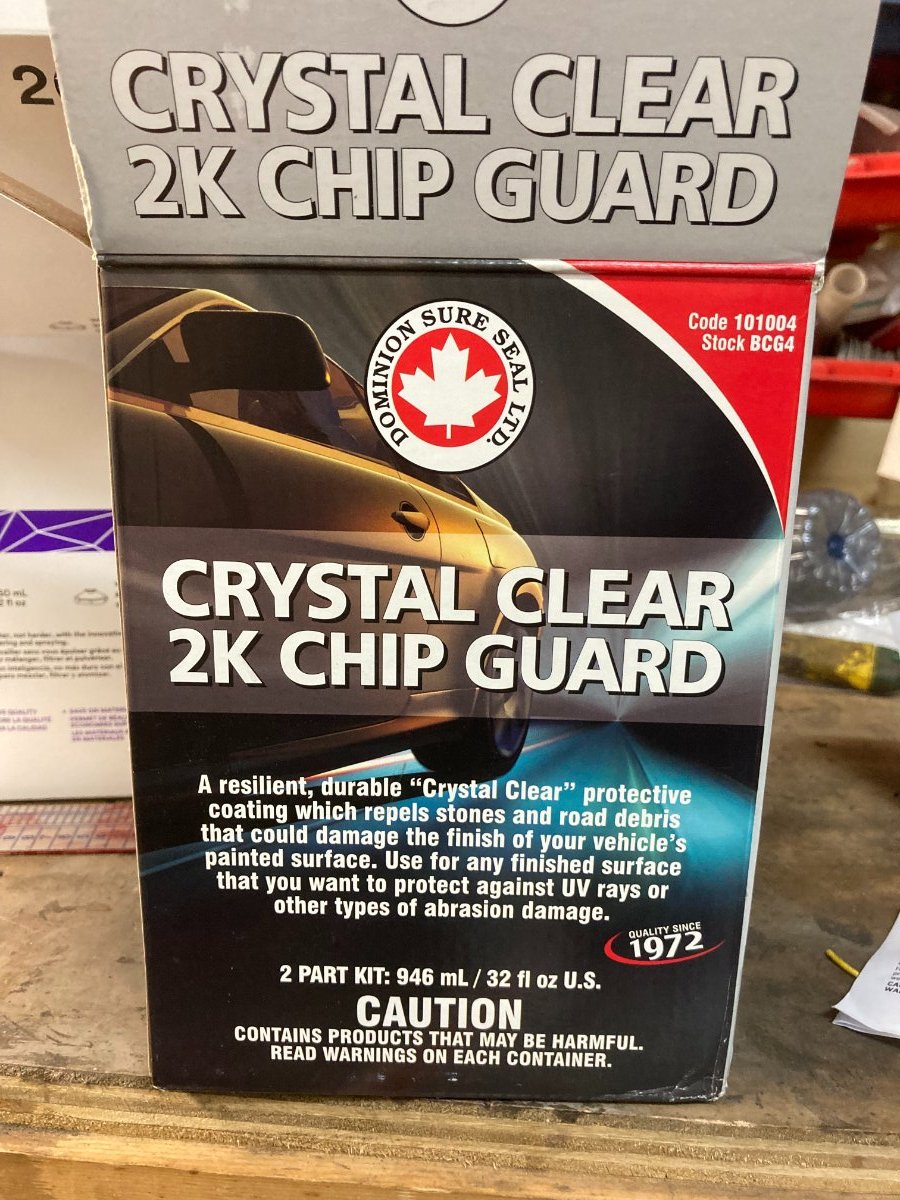
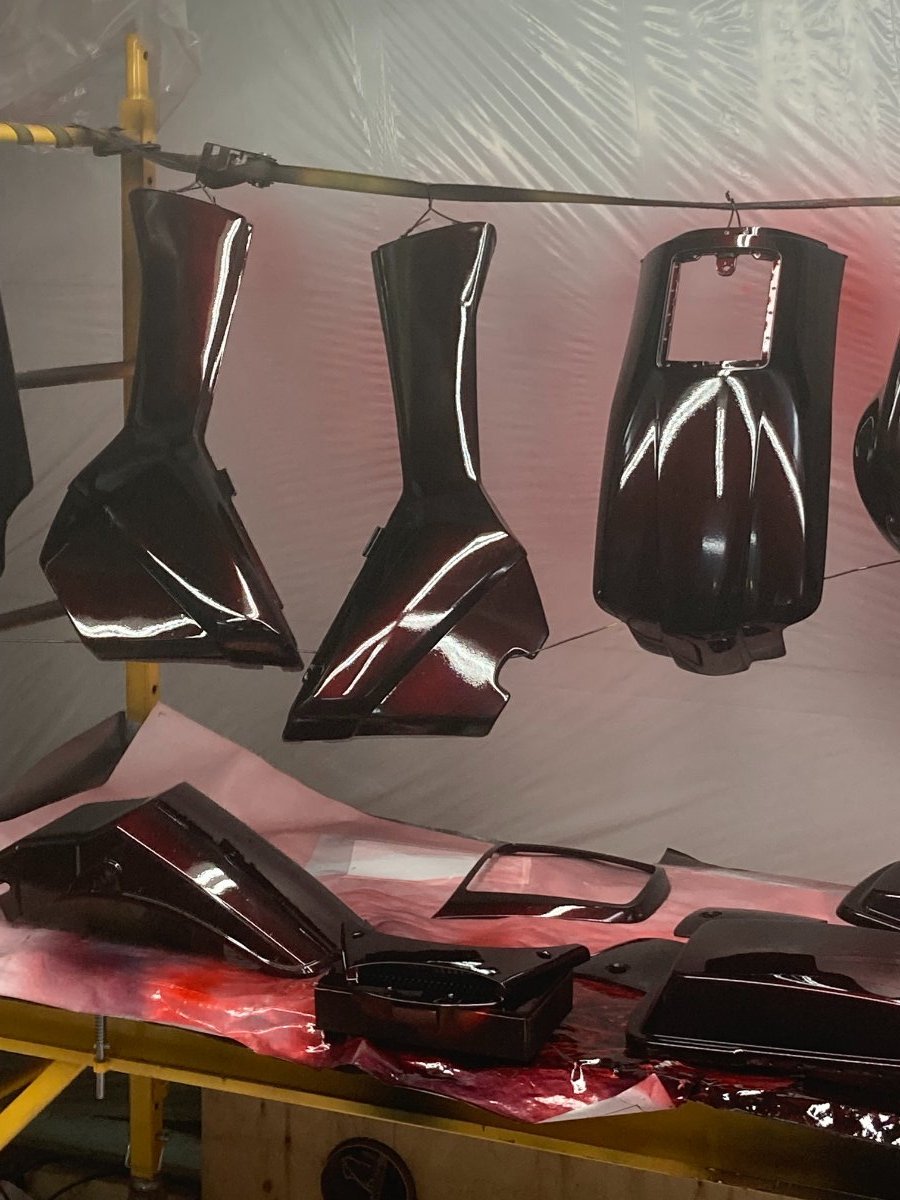
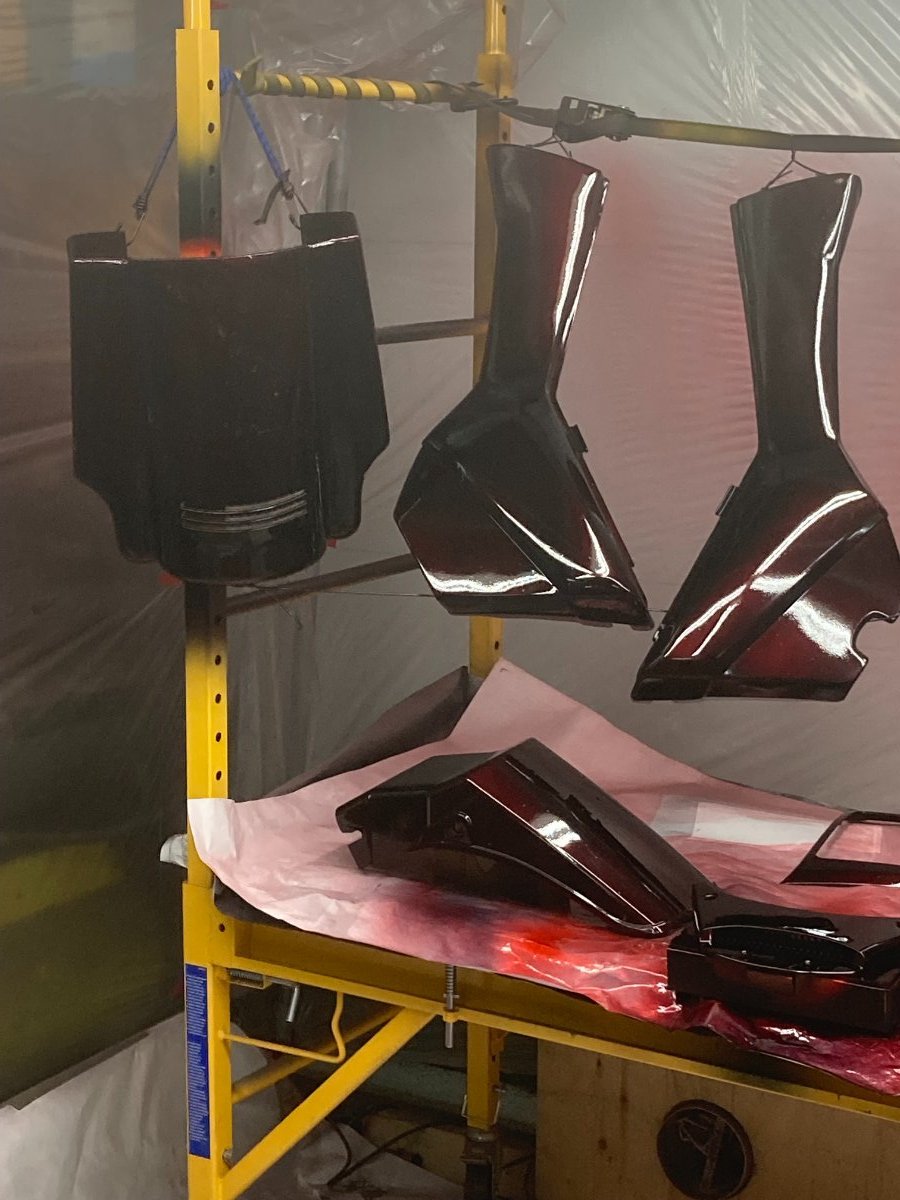
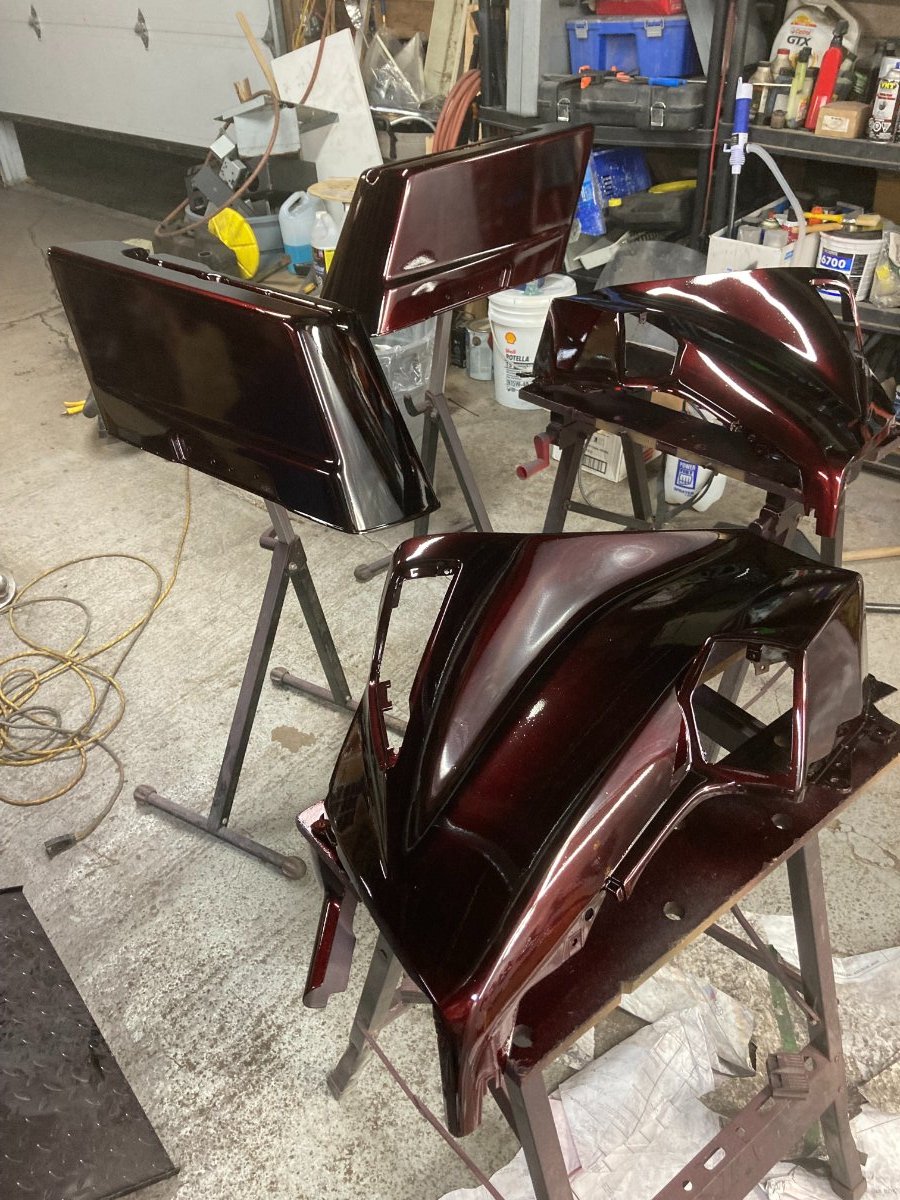
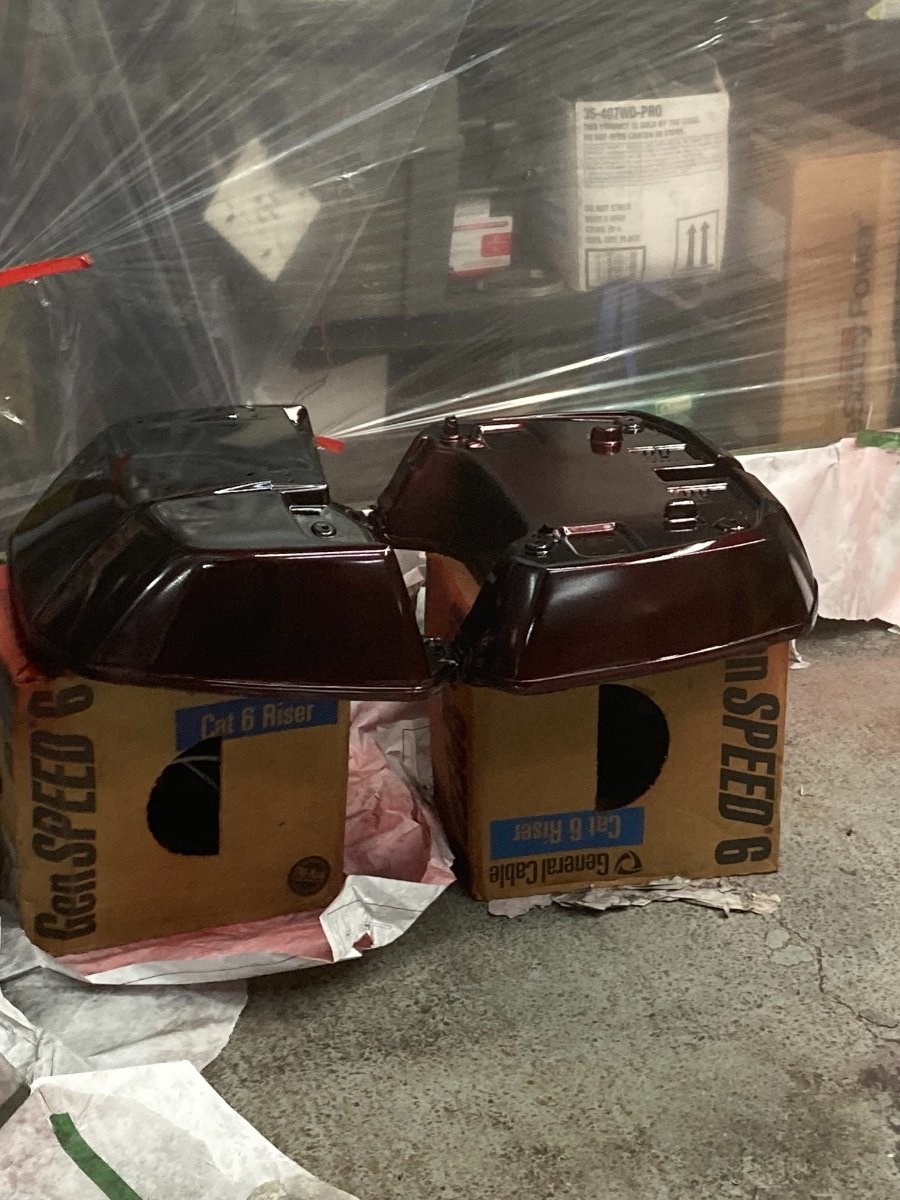
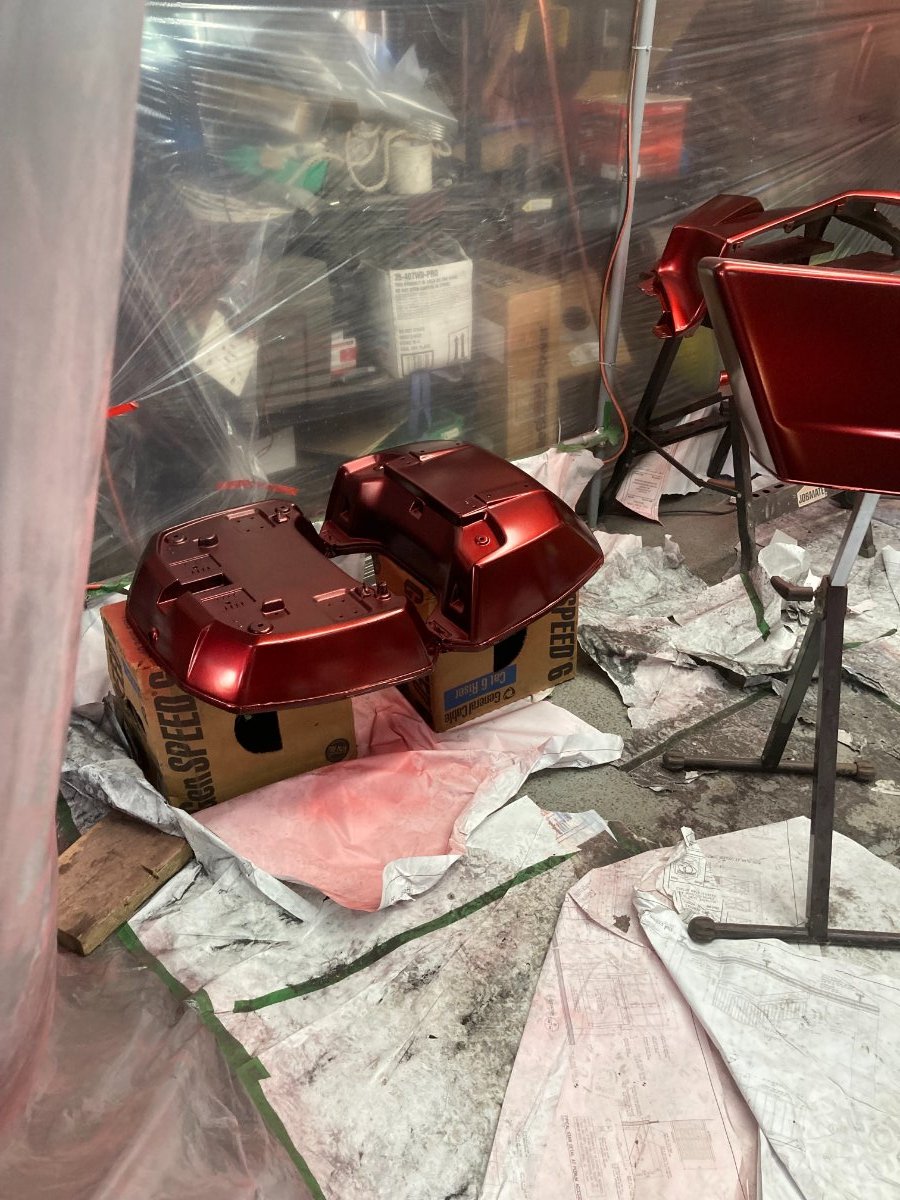
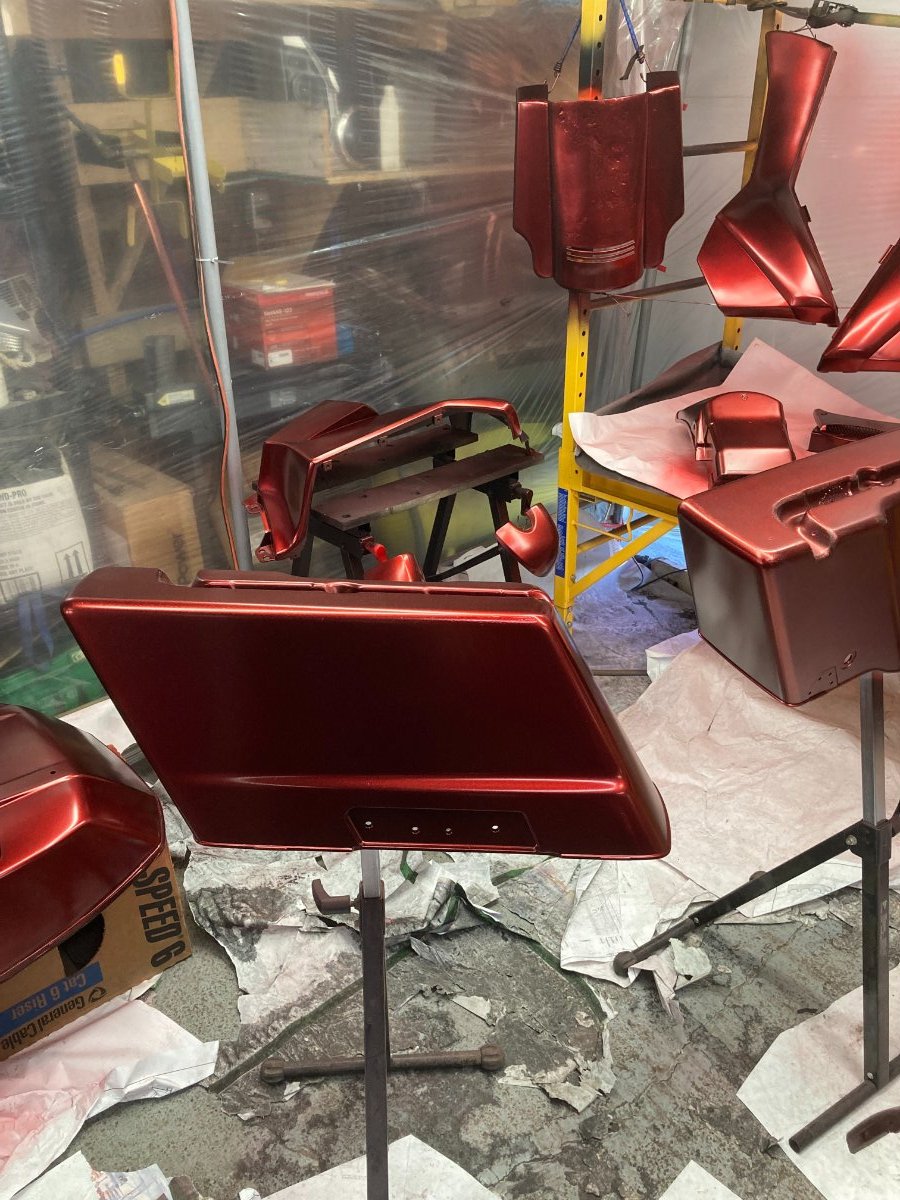
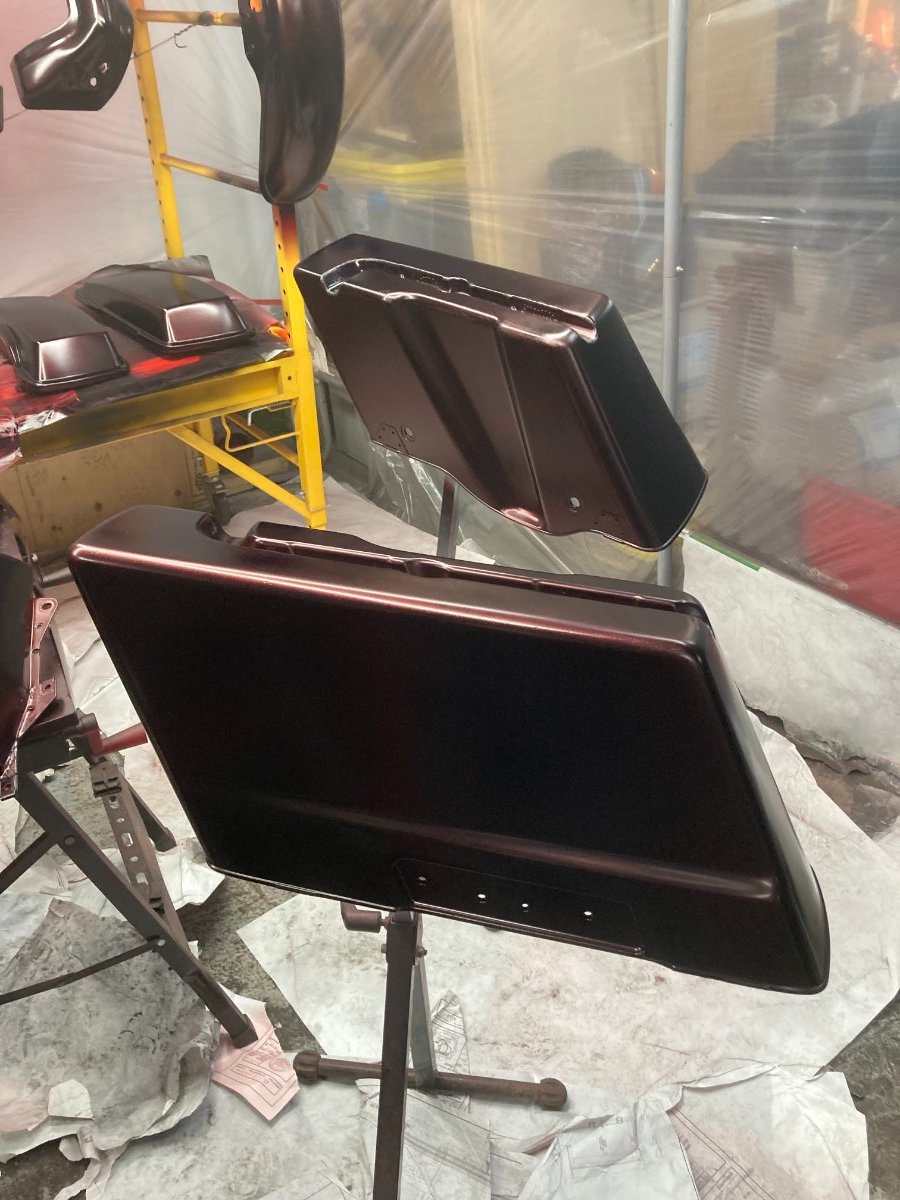
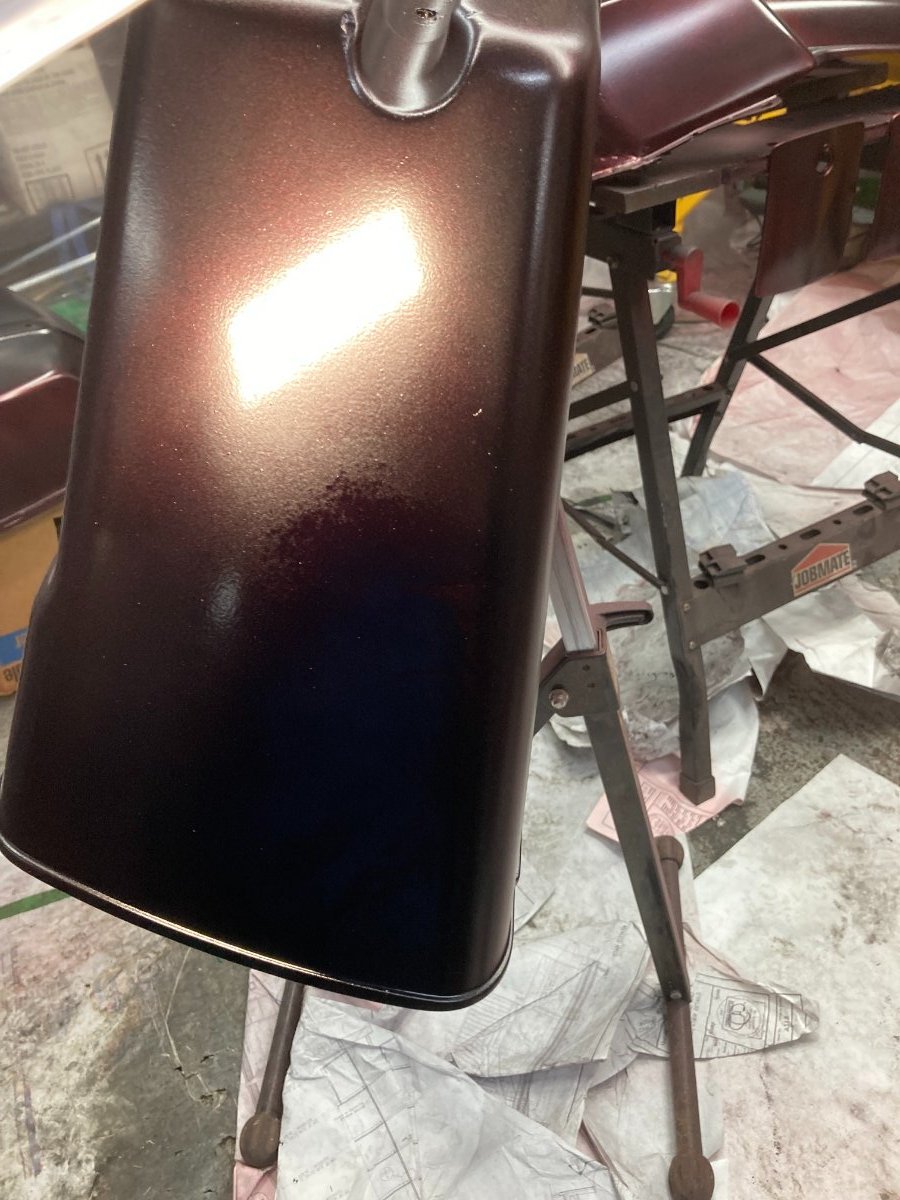
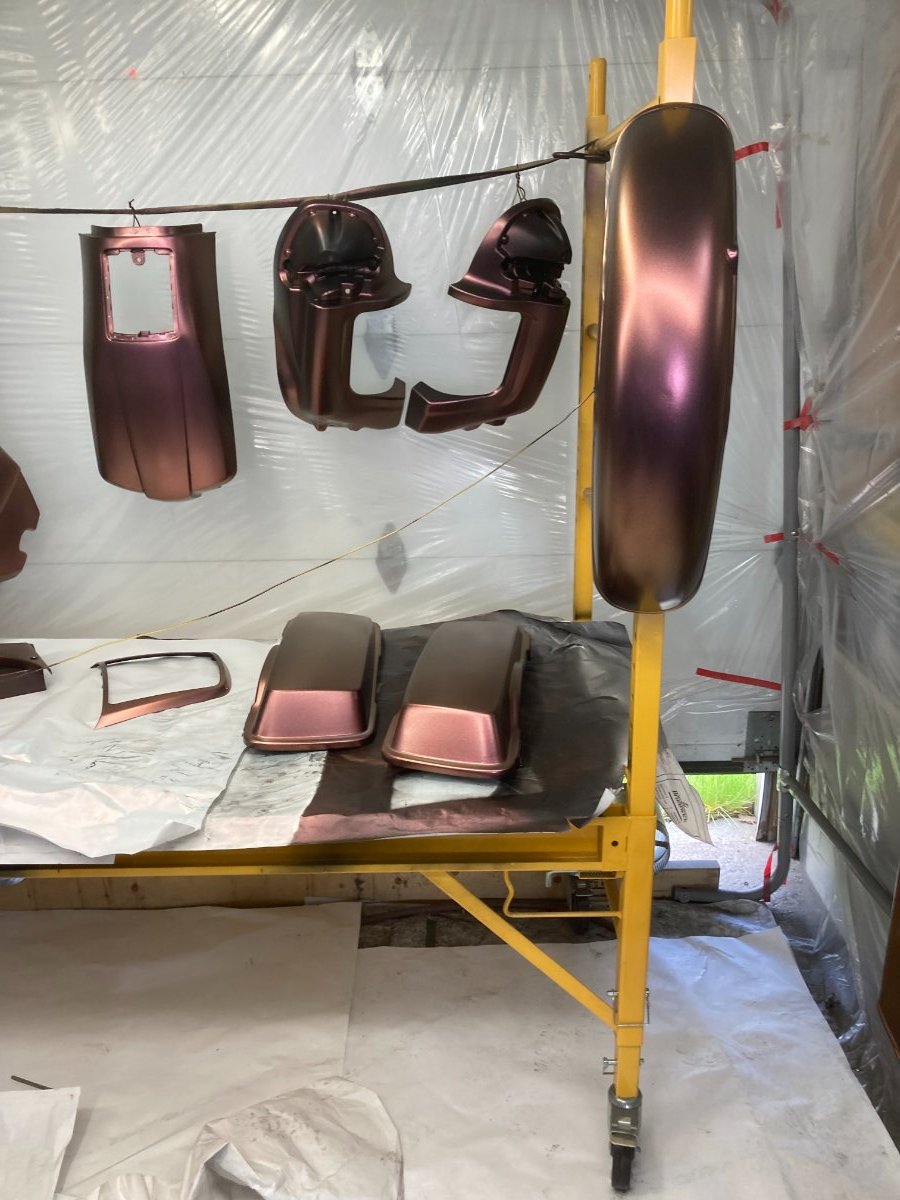
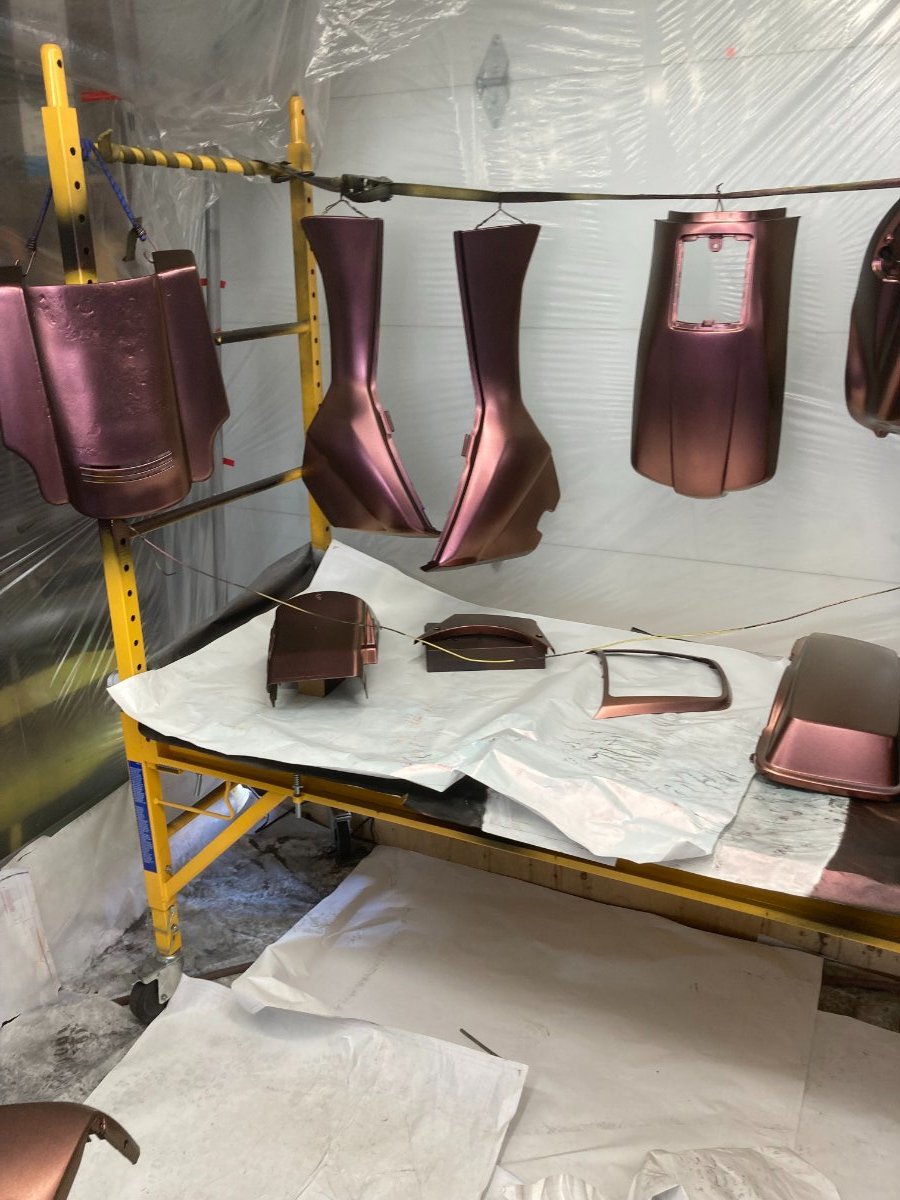
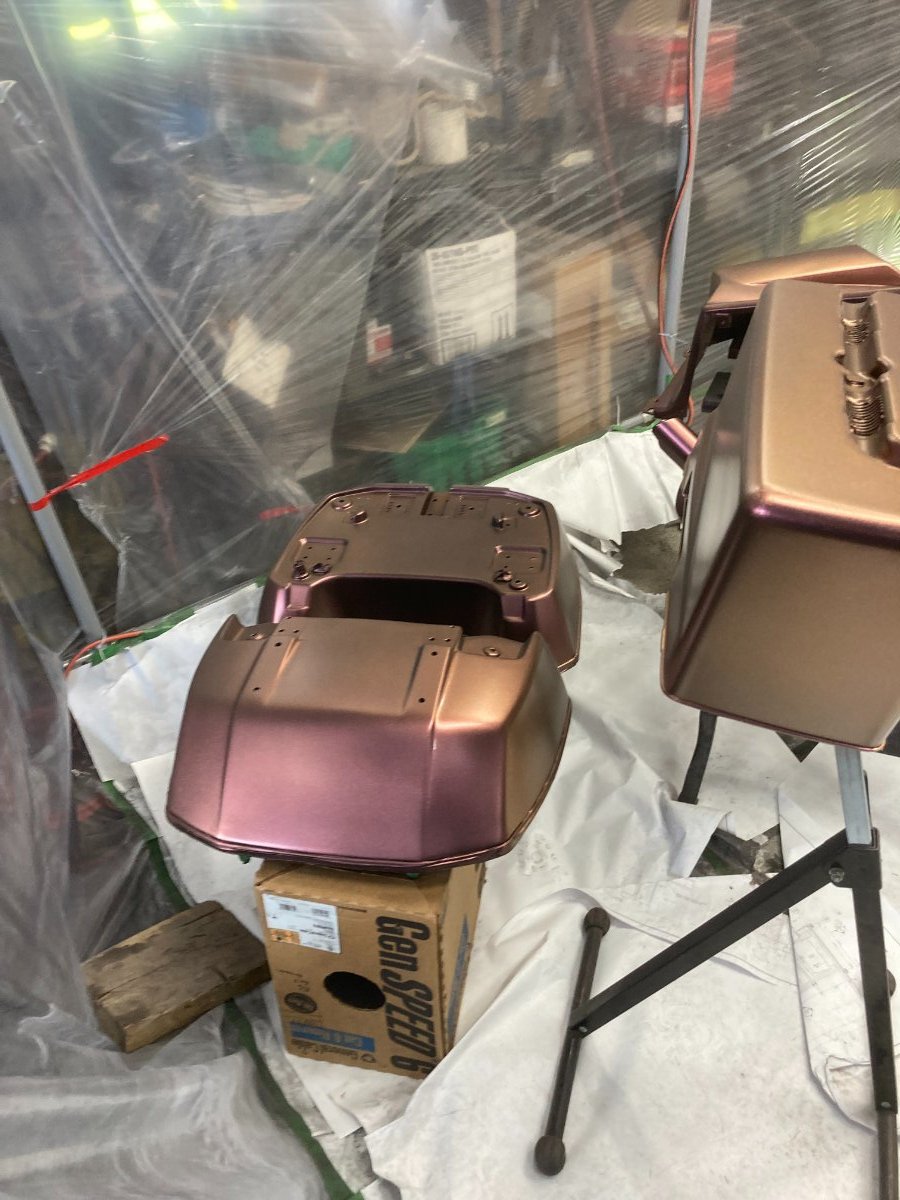
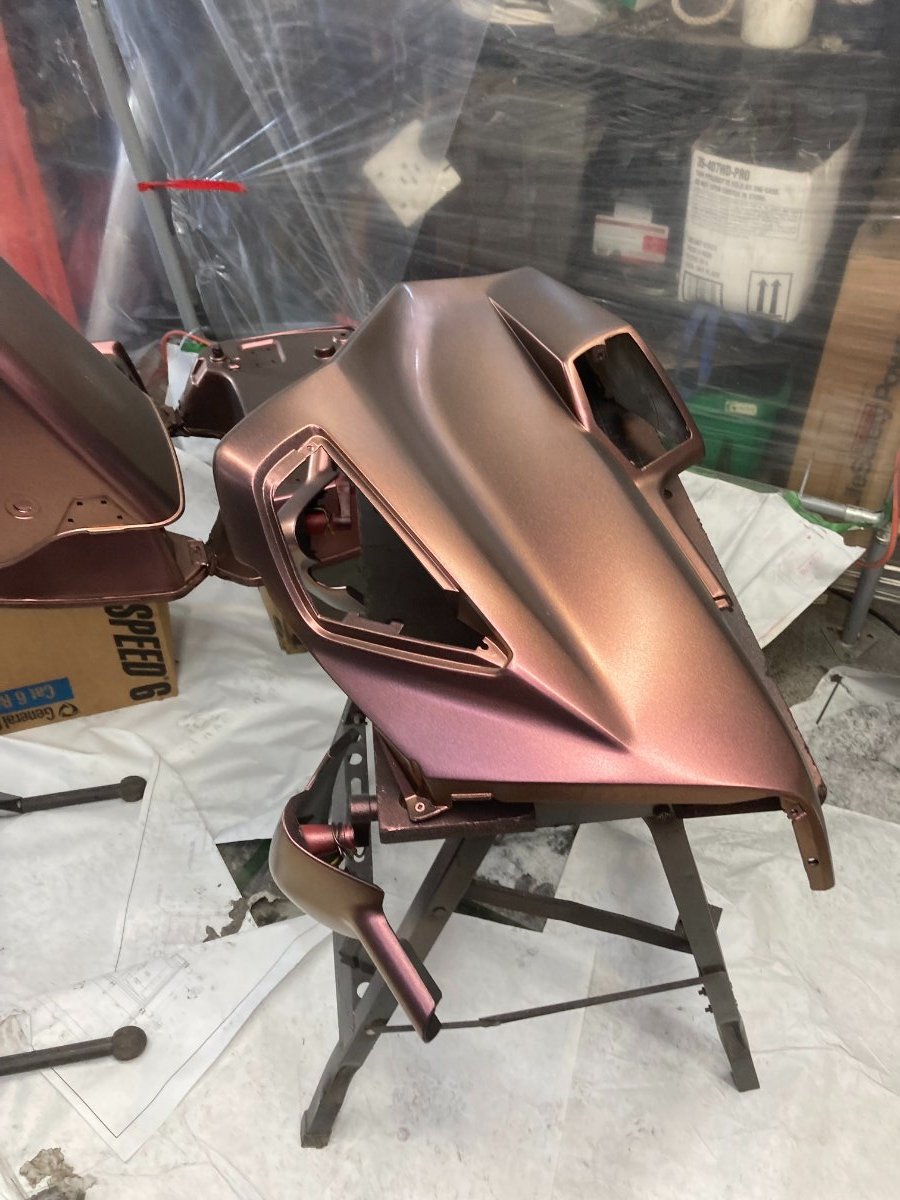
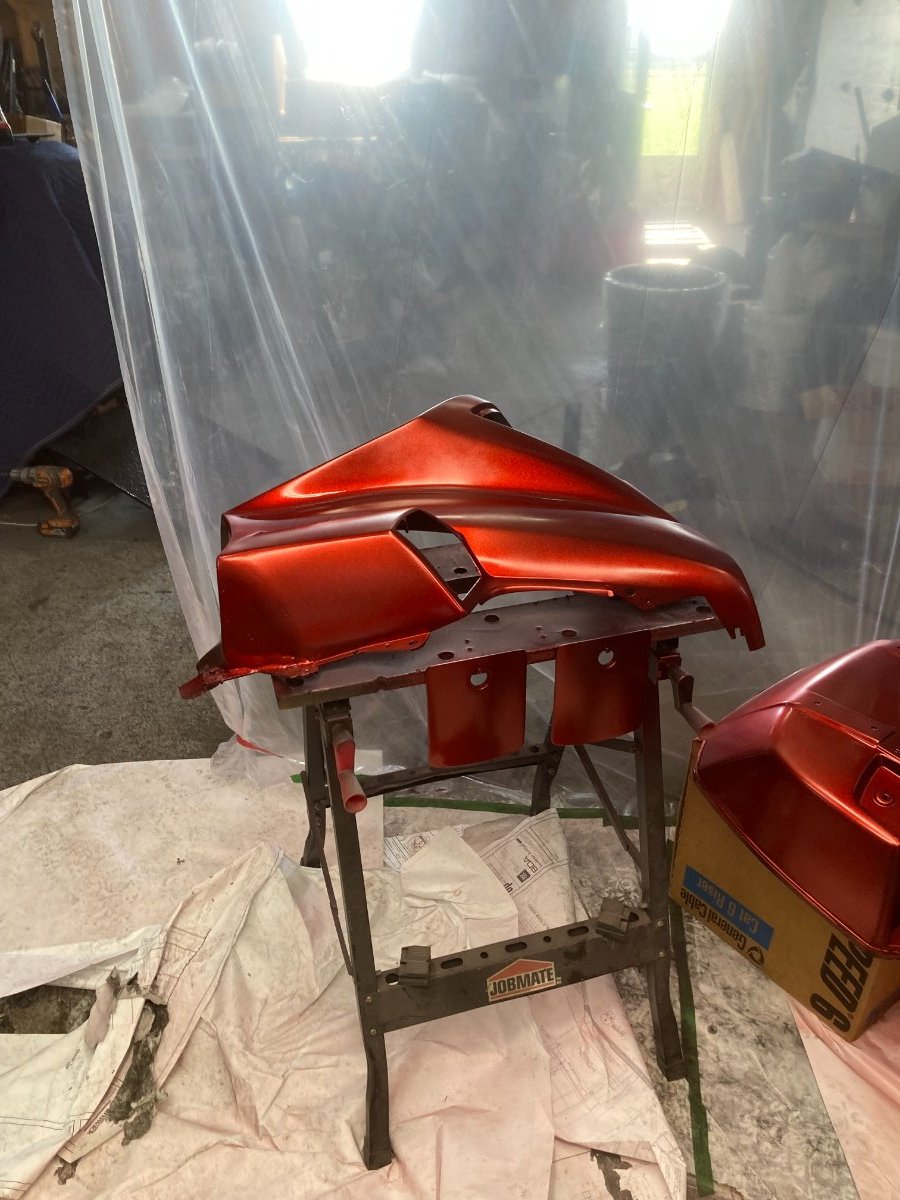
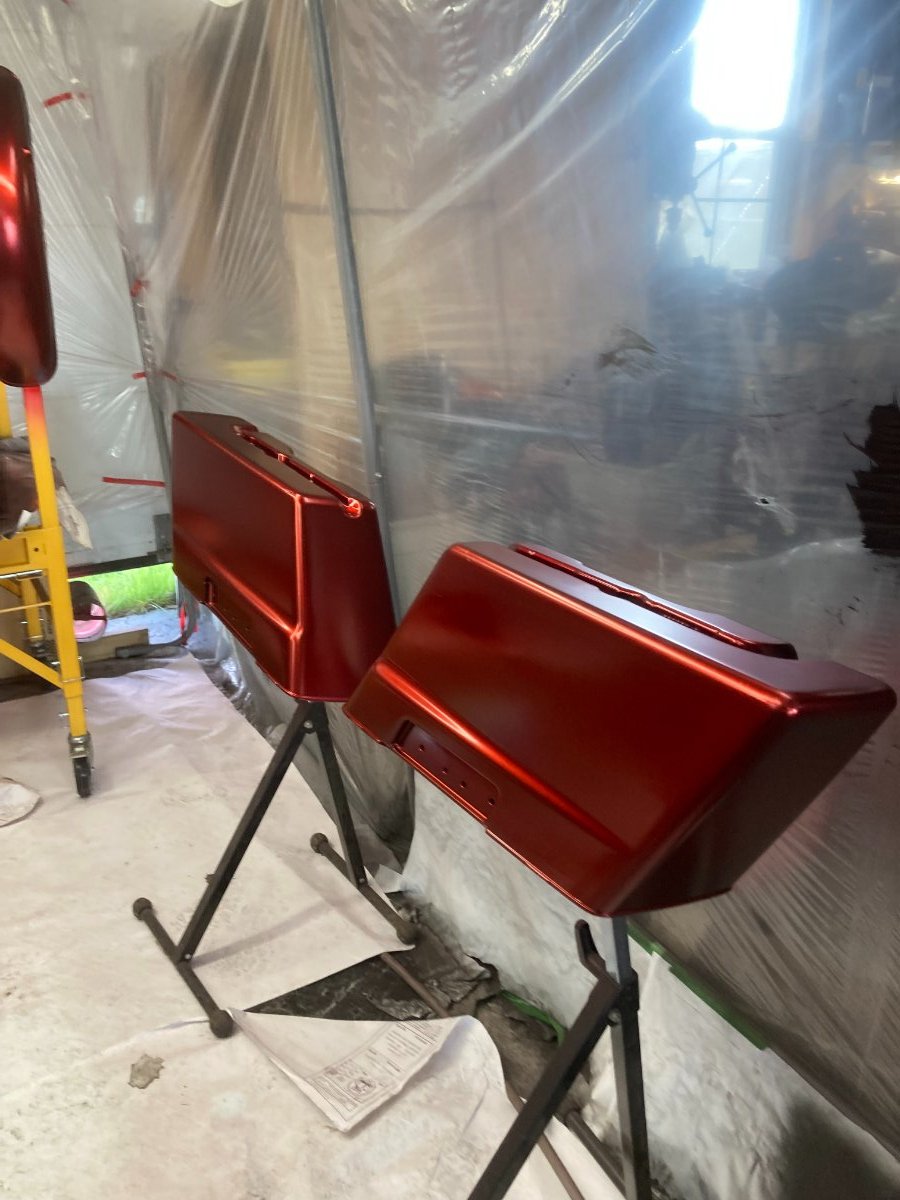
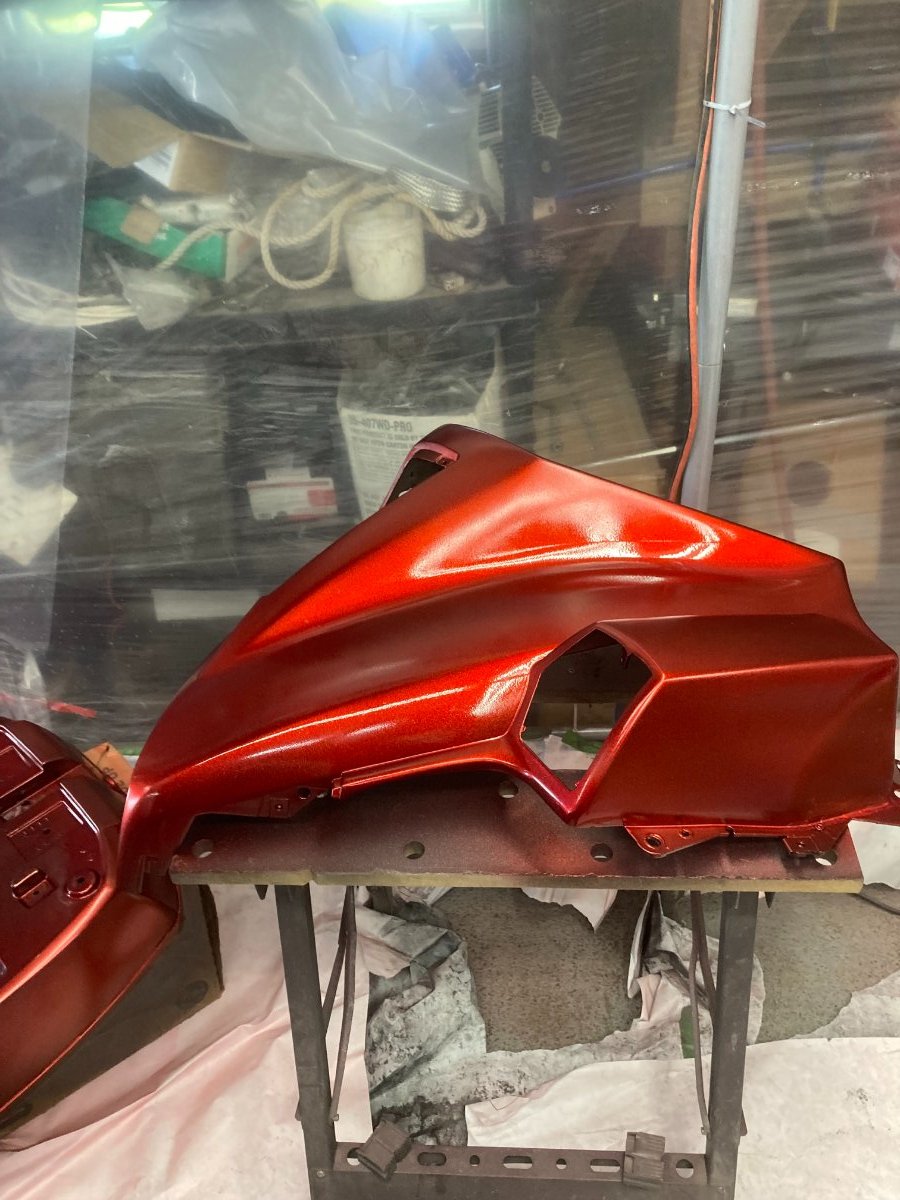
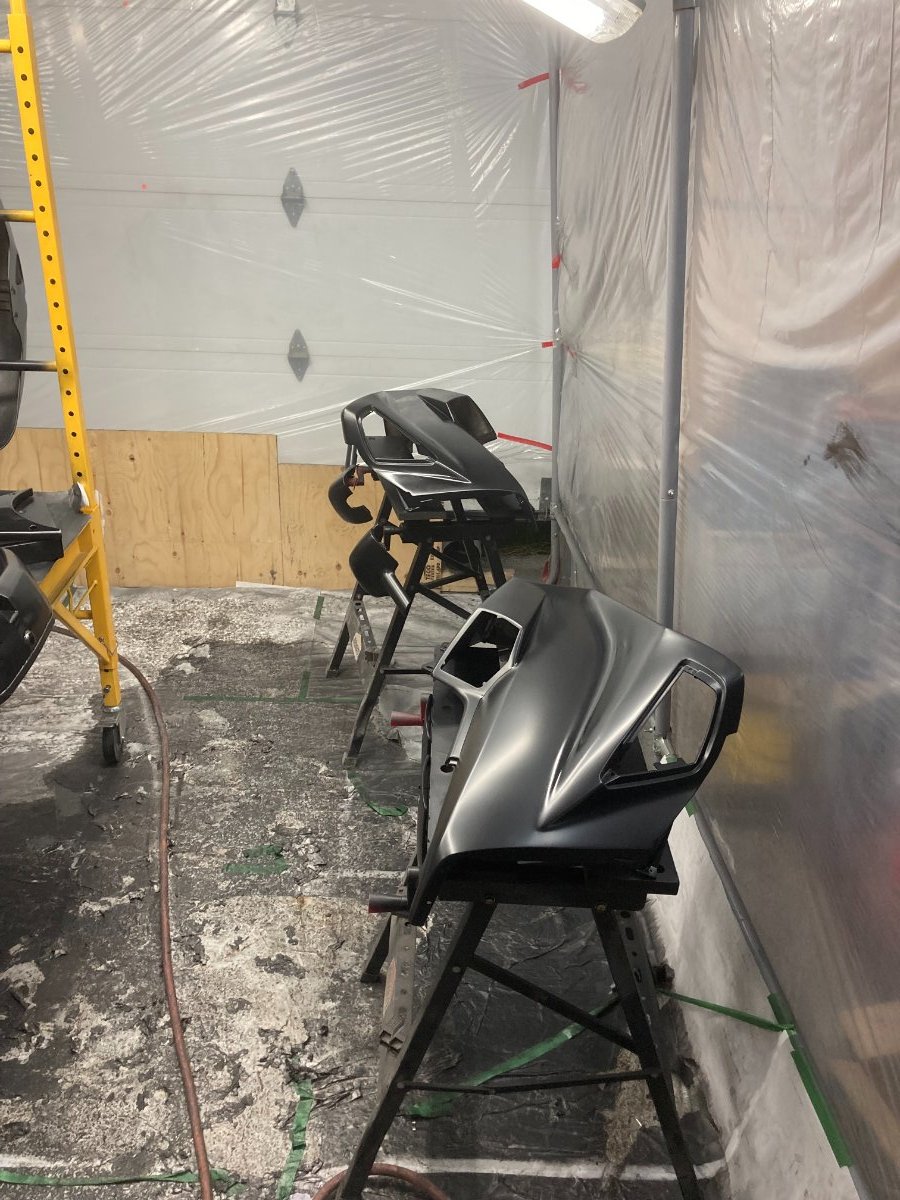
Hi Everyone Here is the finished Paint with 2k Clear, I am very pleased with the end result, I have included pics of the Paint used as well as the 2K Clear. The finished paint color is called Murdered Black Cherry Candy and originally demonstrated on Createx You tube Channel by Chris Arpin from Createx, he is a very good presenter and explains the steps and procedures very well. I will be continuing the Re-assembly this weekend and hoping to have it completed next weekend. More pictures and updates as I work at this project Good Night all Herman
-
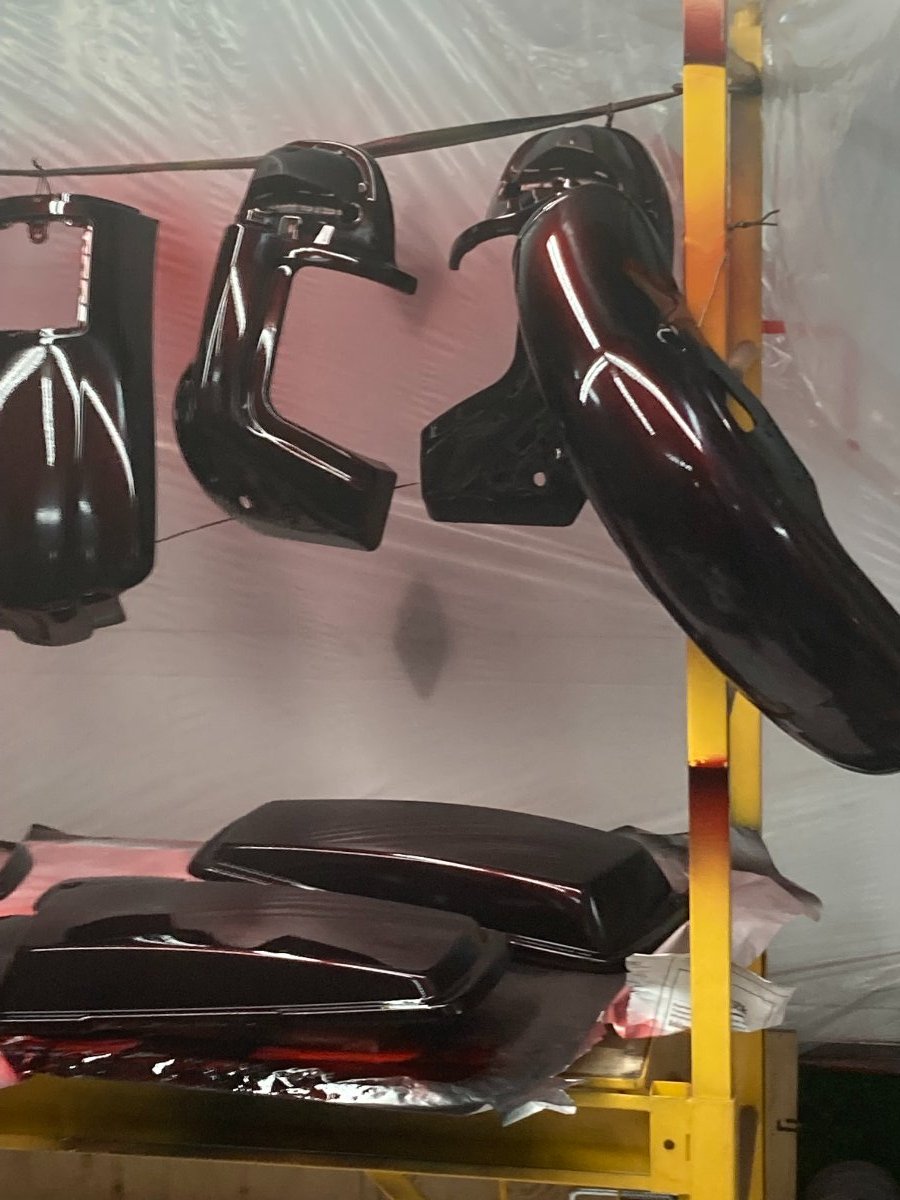
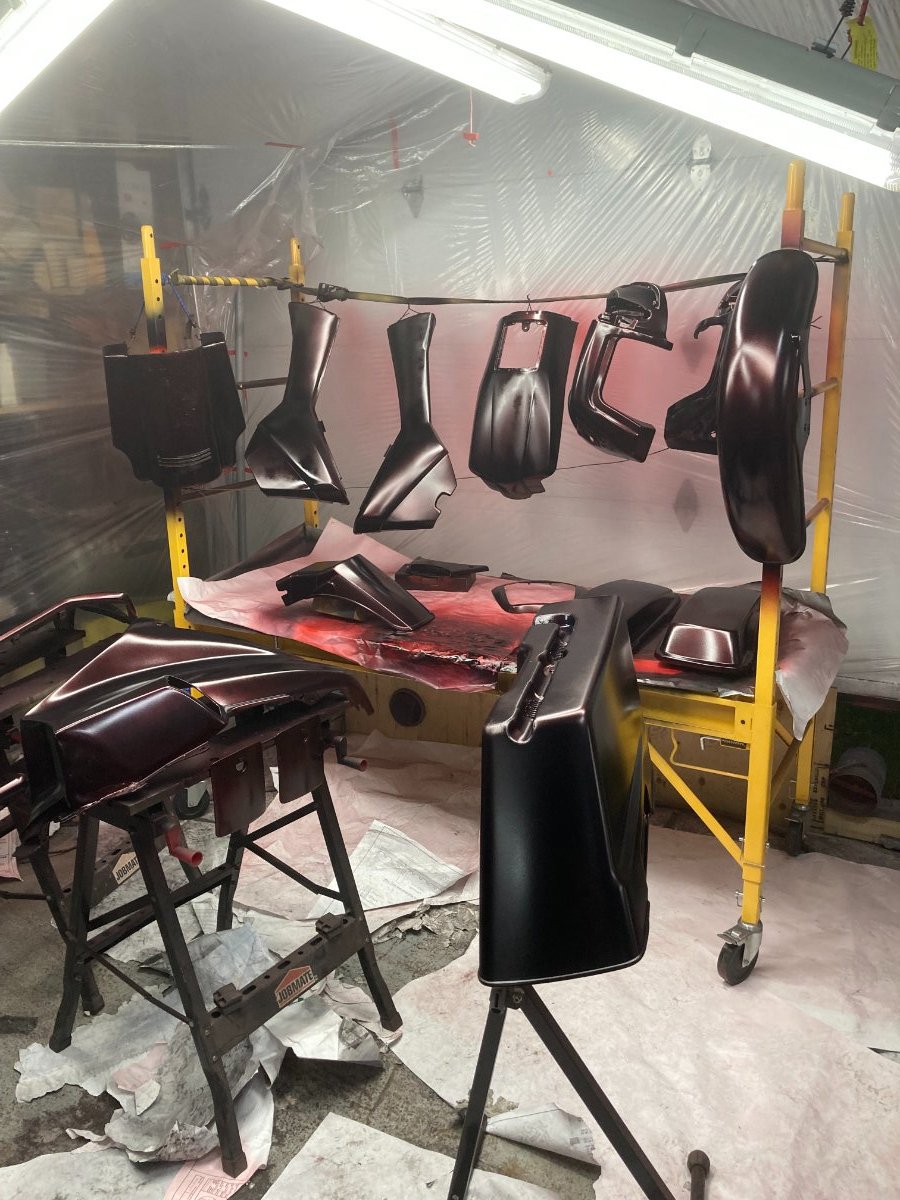
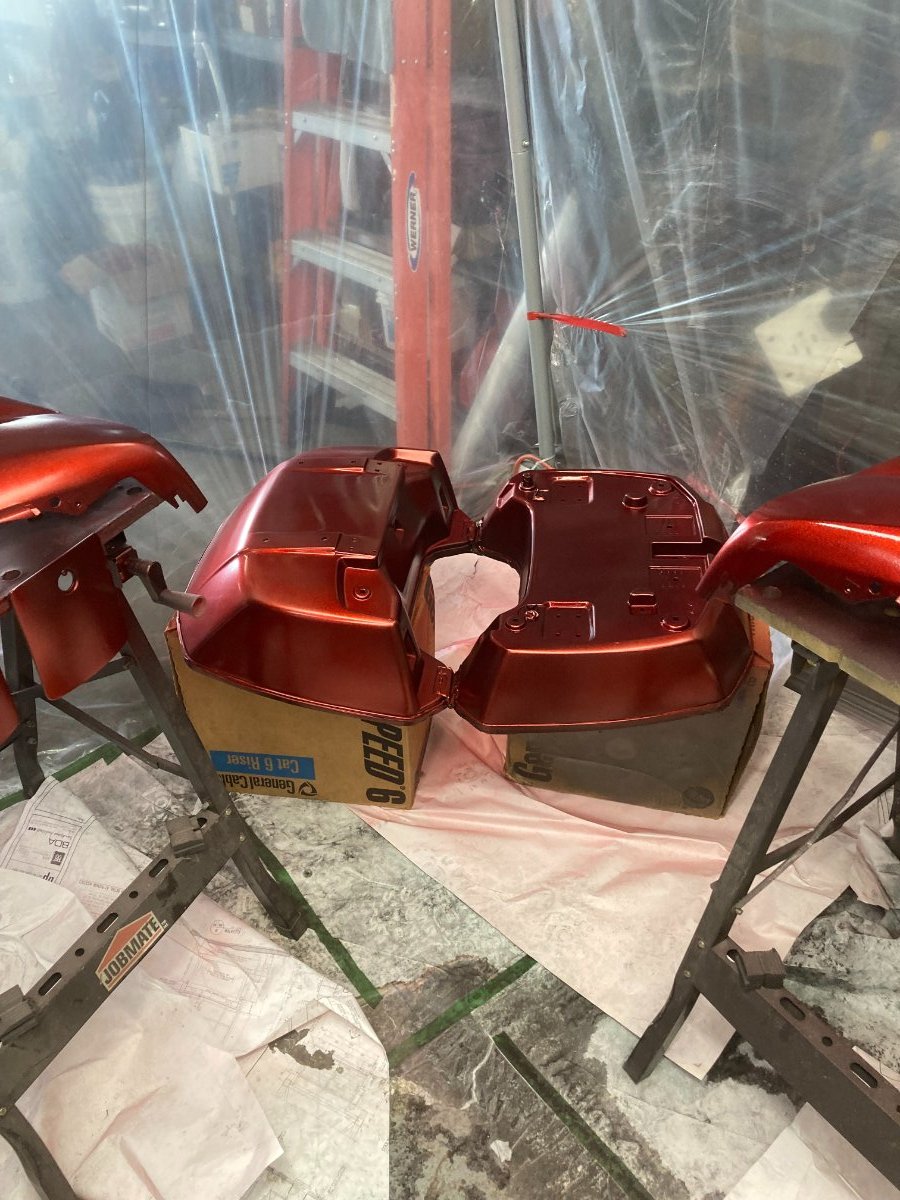
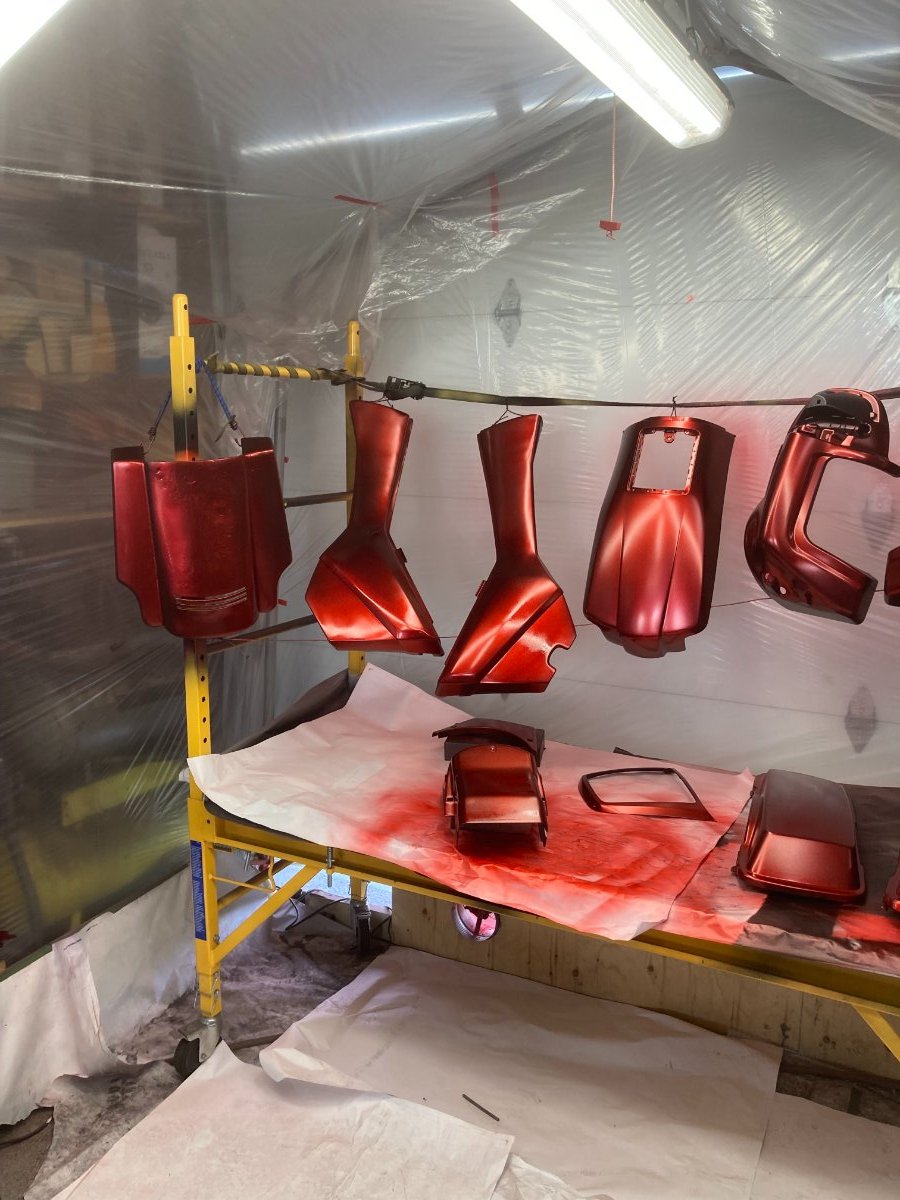
Hi Everyone Second coat of Blood red Candy went on this morning this really brought out the dark Cherry color, then the Final coat of Black Candy went on tonight to bring out the Final color of Black Cherry. next step to Buff with 1000 to knock down some dust bumps then apply 2 coats of 2K clear. more pictures to come once the clear is on Herman
-
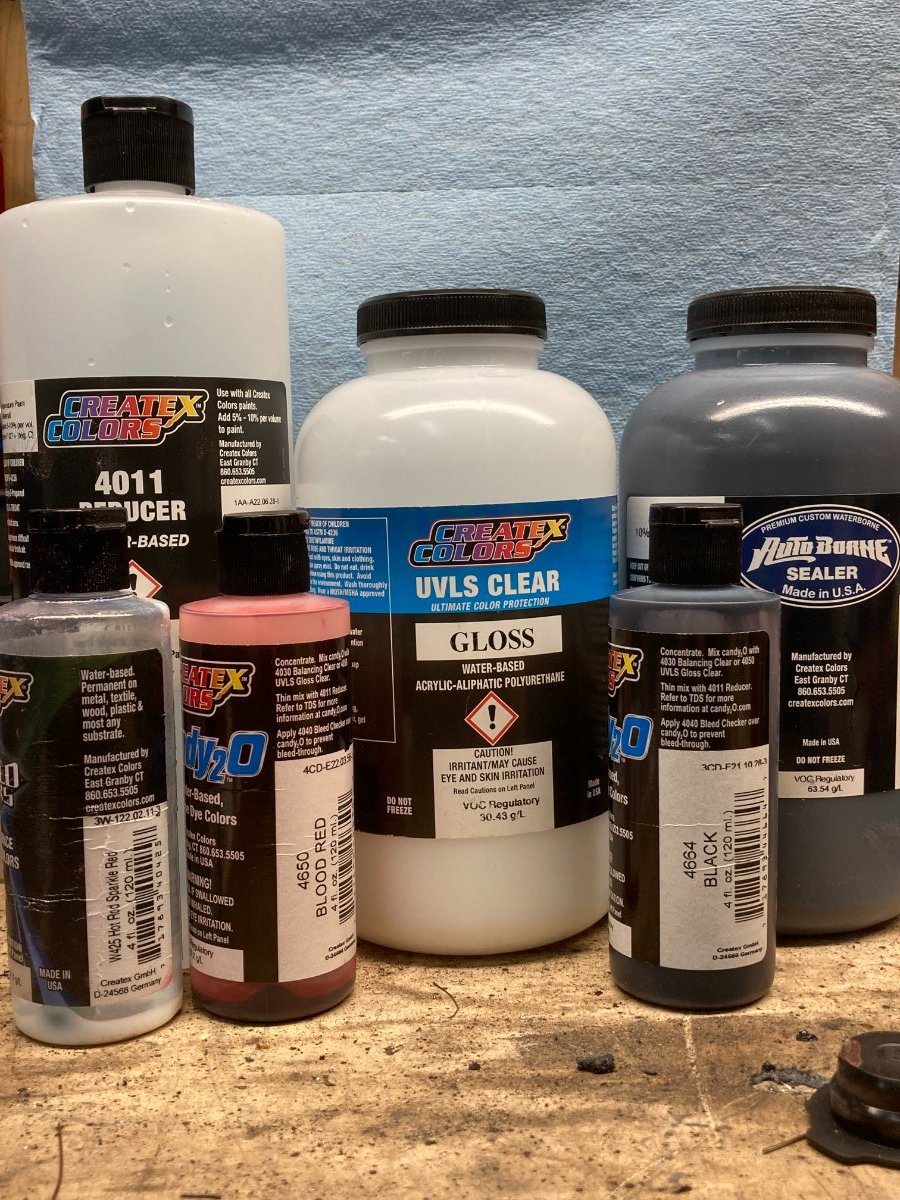
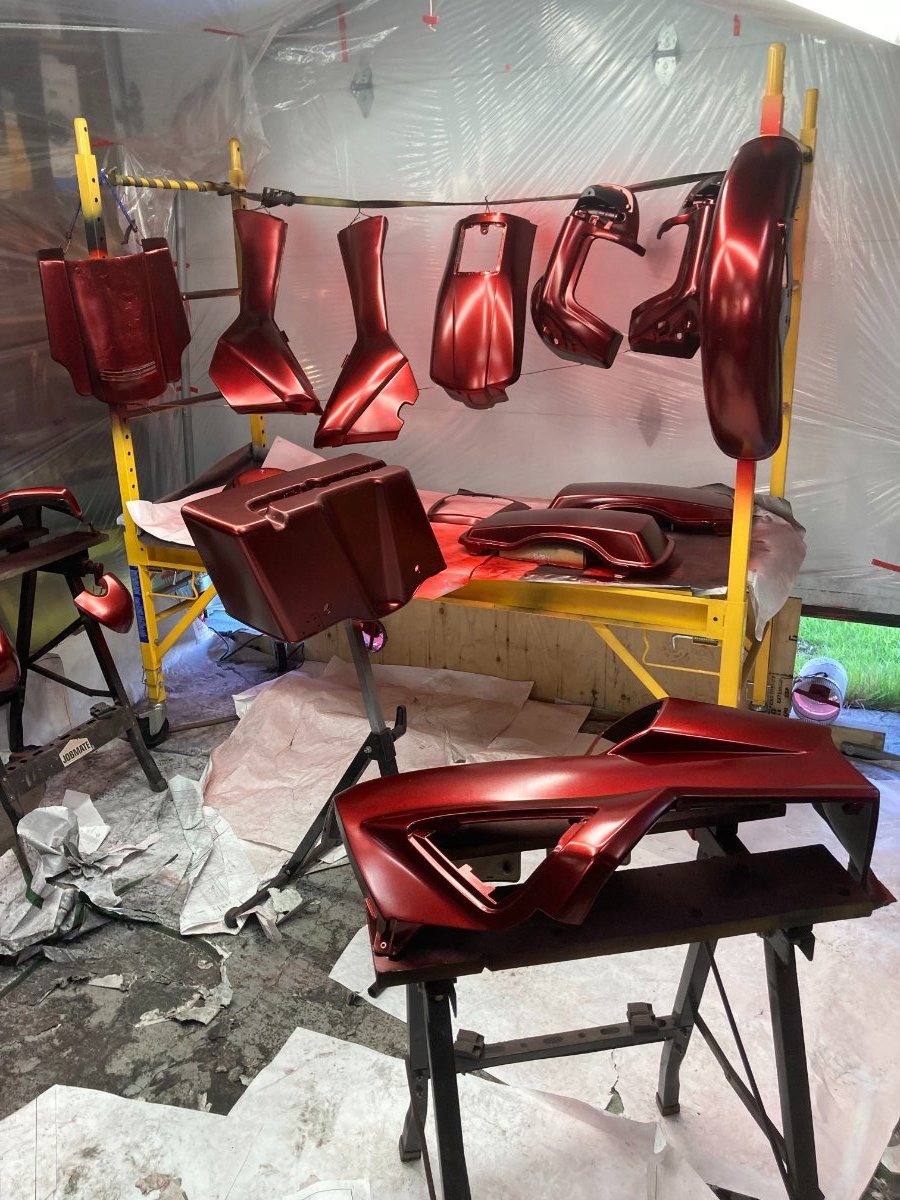
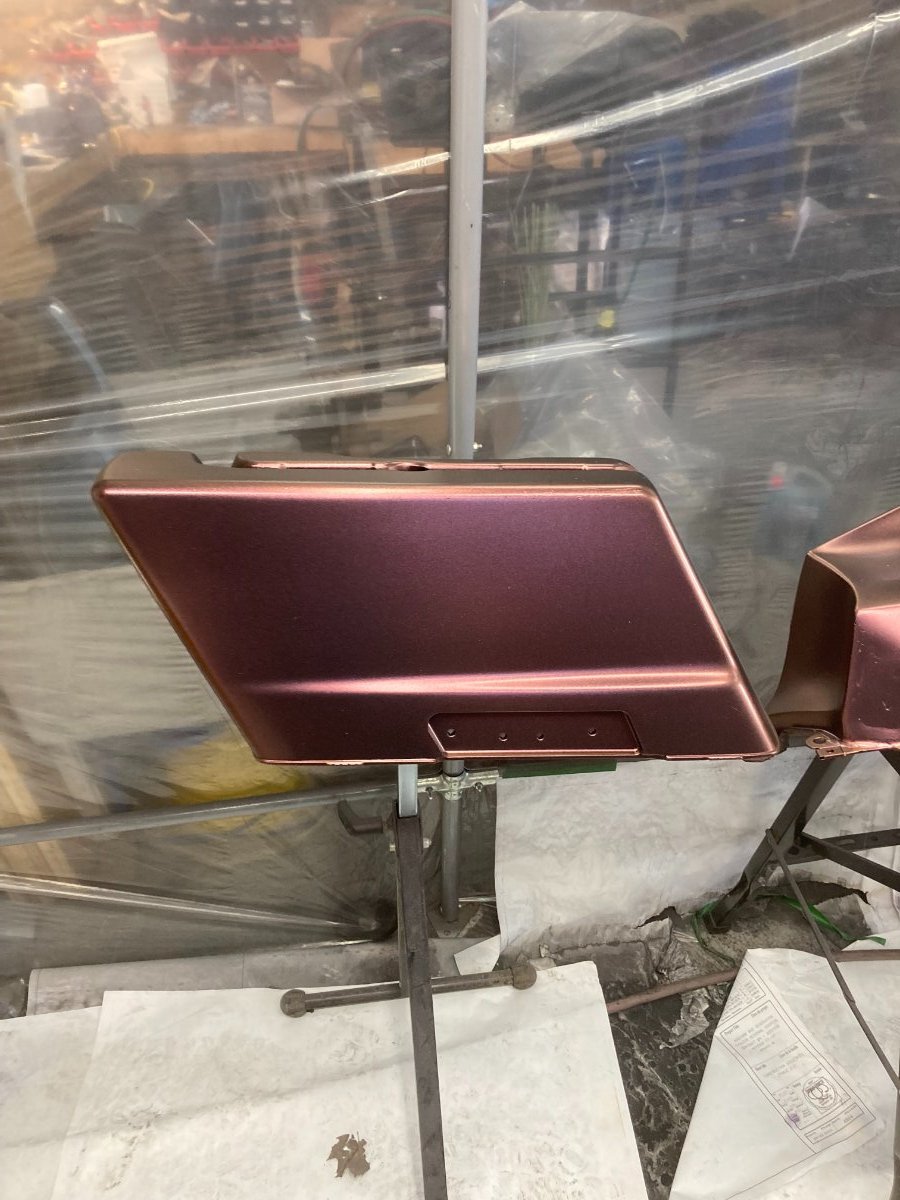
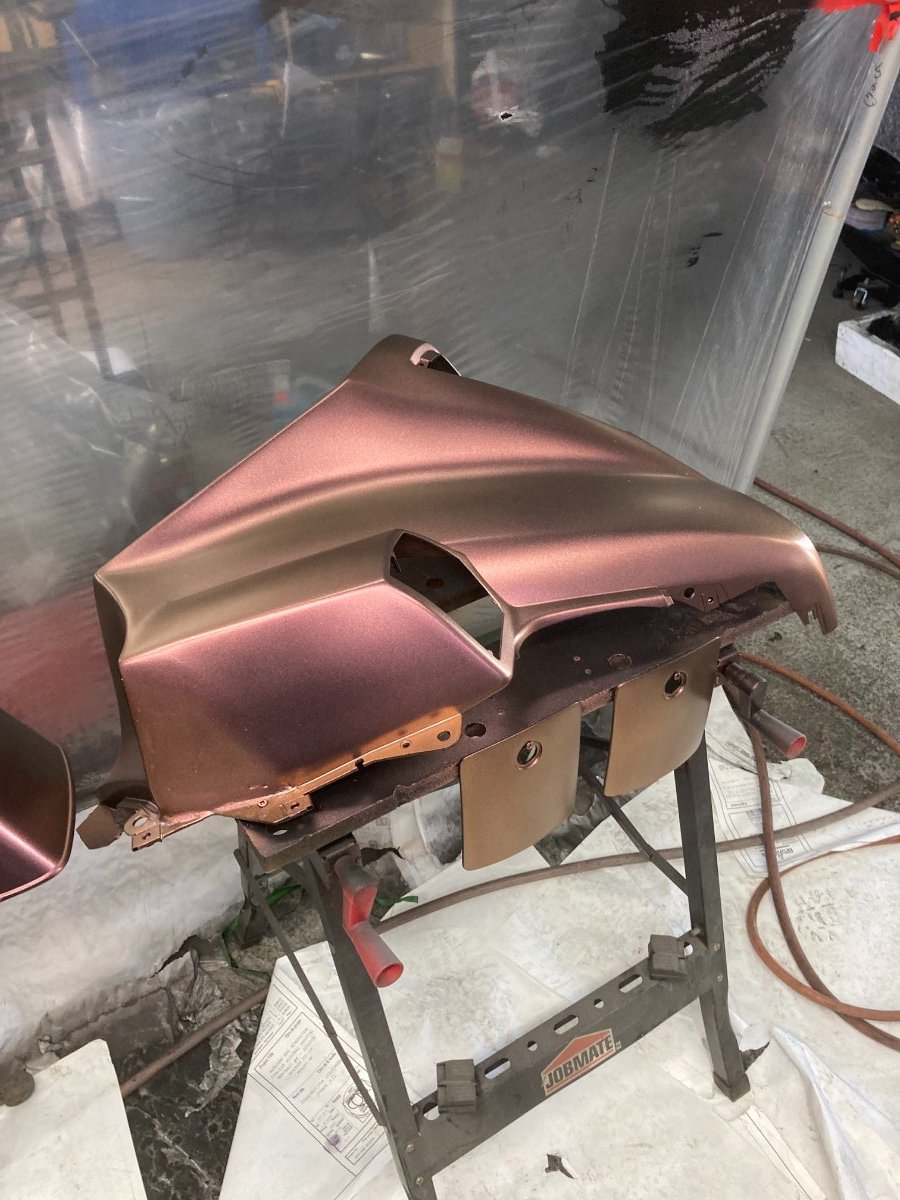
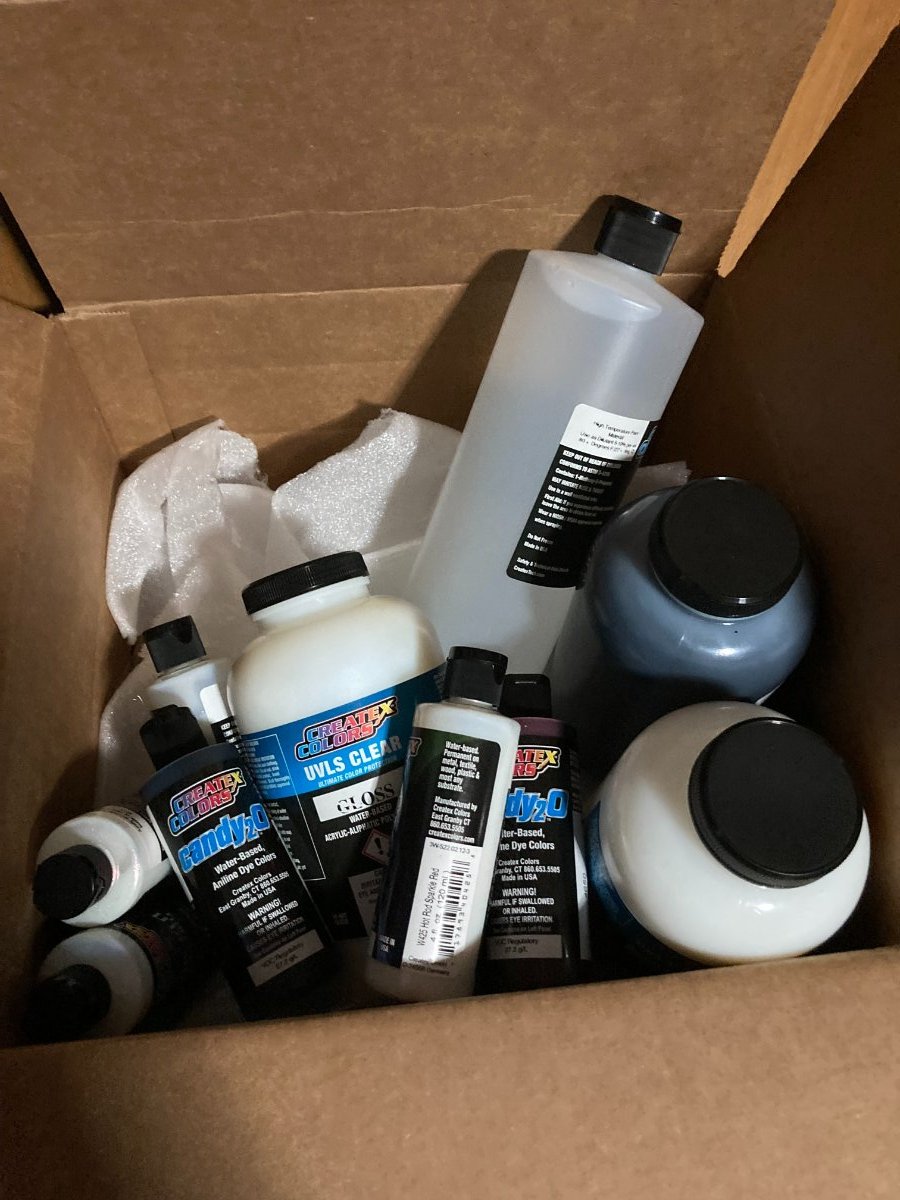
Hi Everyone Worked all day painting the parts, first step after the primer is 4 coats of Createx Hod Rod Sparkle red, Then applied 1 coat of Createx Blood red Candy 2o to bring out the red, I will apply a second coat of red tomorrow, followed by a a coat of Black Candy2o to Blacken out the red, so in daylight Color is Red Metallic and at night it will appear to be red. The first 7 pictures are the Hot rod sparkle red the remaining 6 pictures are with 1 coat of the blood red. More Pictures tomorrow Thanks Herman
-
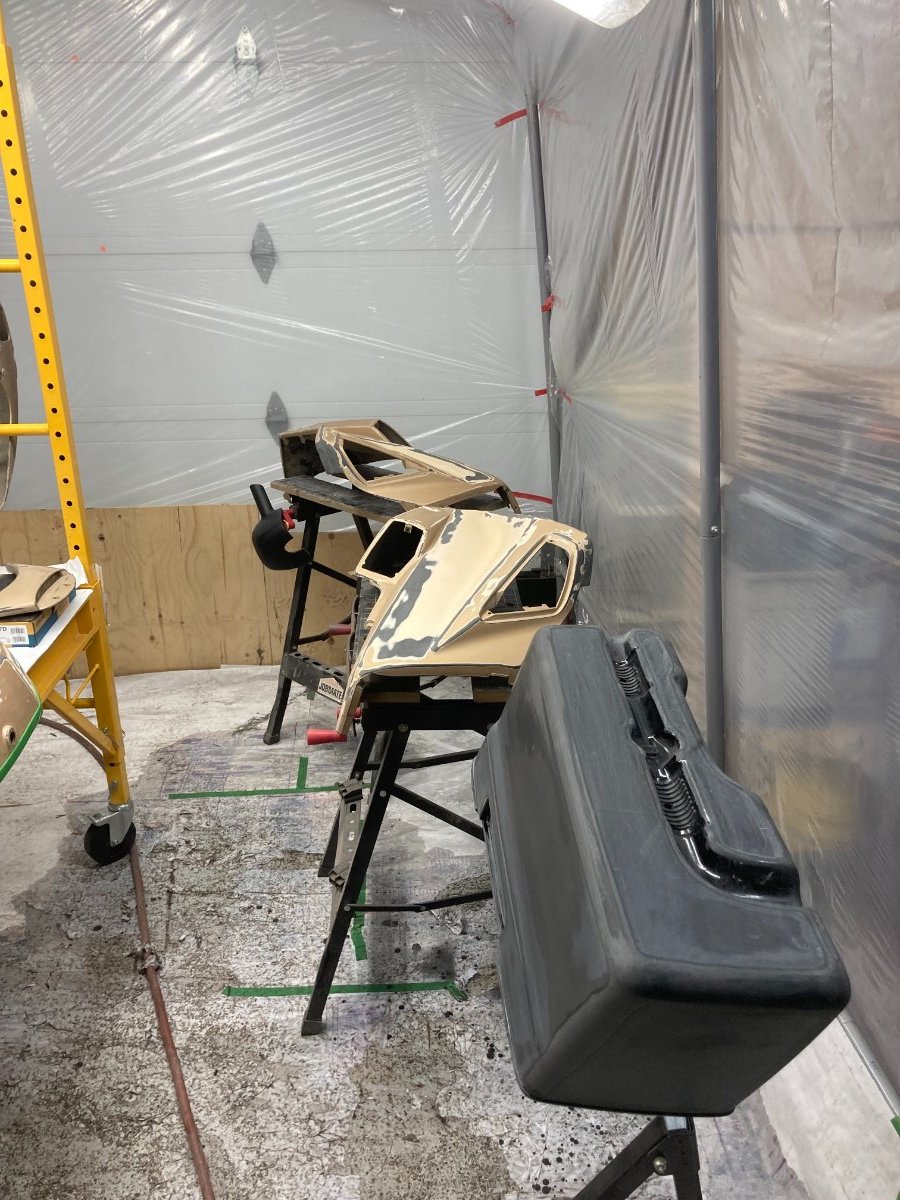
Hi Everyone Finally spraying the paint, late nite last night, I had all the pieces ready to spray in the paint booth only got the primer coat on last nite but it all looks good, I went a bit heavy on the first coat due to not having the gun set correctly and ended up with a couple runs, finished up the second coat and let it dry overnite. I was able to knock down the couple runs with a bit of wet sanding with 1000 so i am good to add color today. I will post additional pics tonite.
-
Thanks Earl You and I have chatted on this Build over the past couple years; as I was building up parts to move forward on this build and I appreciate your Knowledge on these Bikes. For the most part it is turning out how I envisioned but like any project changes occur because either they just do not fit (with torches grinders and welders you can always make it fit LOL) usually it does not fit aesthetically and sticks out like a sore thumb so you have to adjust so everything looks right . The key things on this build I was aiming for are in this order Safety ; Reliability ; and then enhance on the classic style that was already ahead of its time ; and of course Functionality. I have had positive feedback from many members and appreciate the nice comments as it reinforces that I am moving in the right direction with the built I thank you all. So you want to hear it running; click on the attached video Clip I toke tonight just to post here. Enjoy and have a good evening Herman IMG_3326.MOV
-
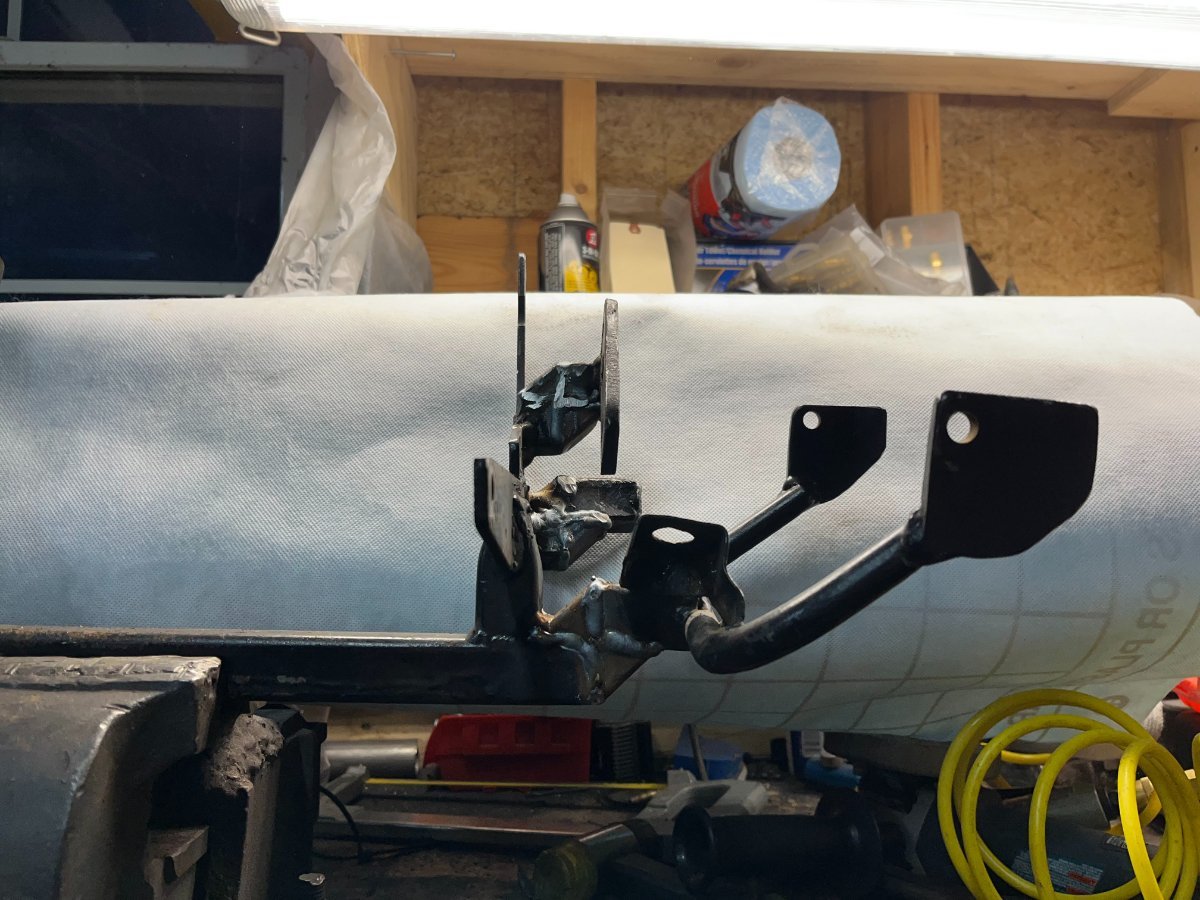
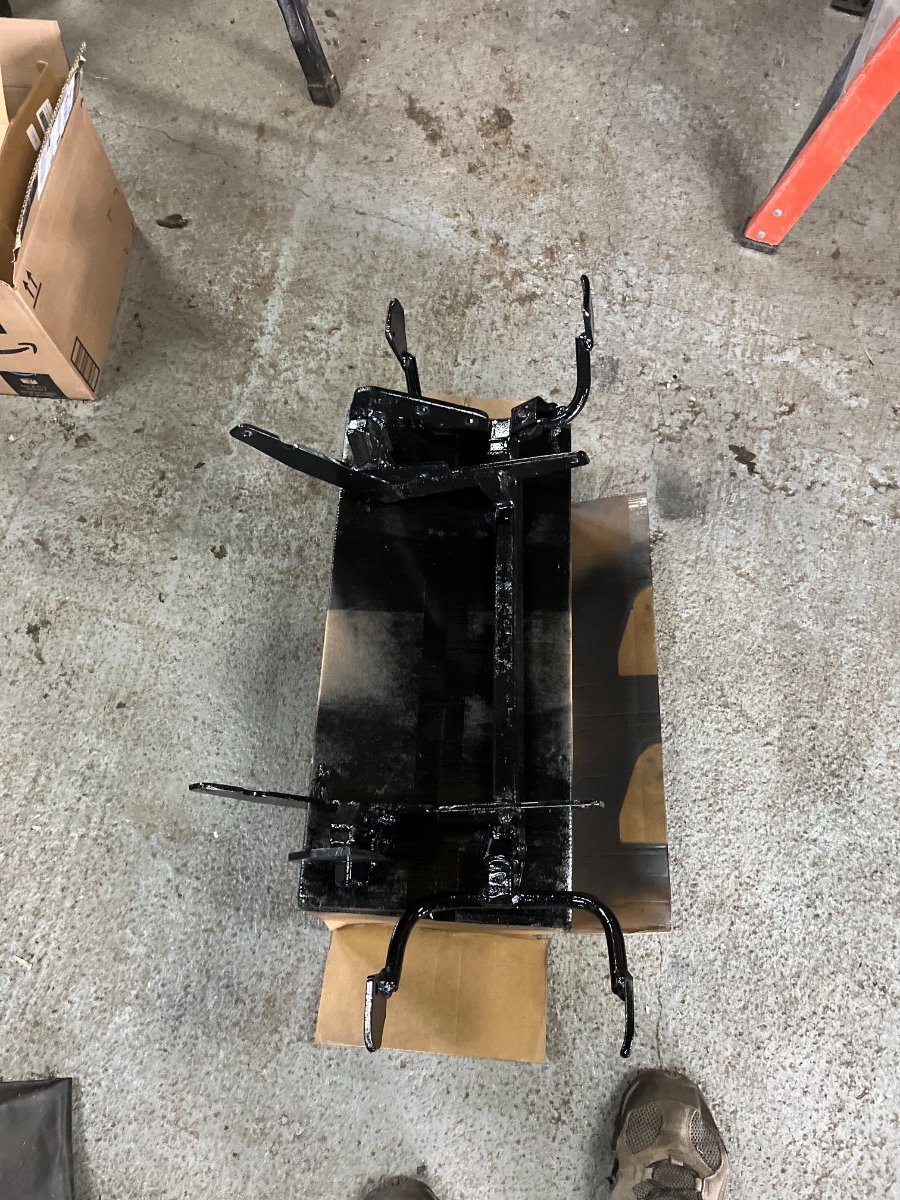
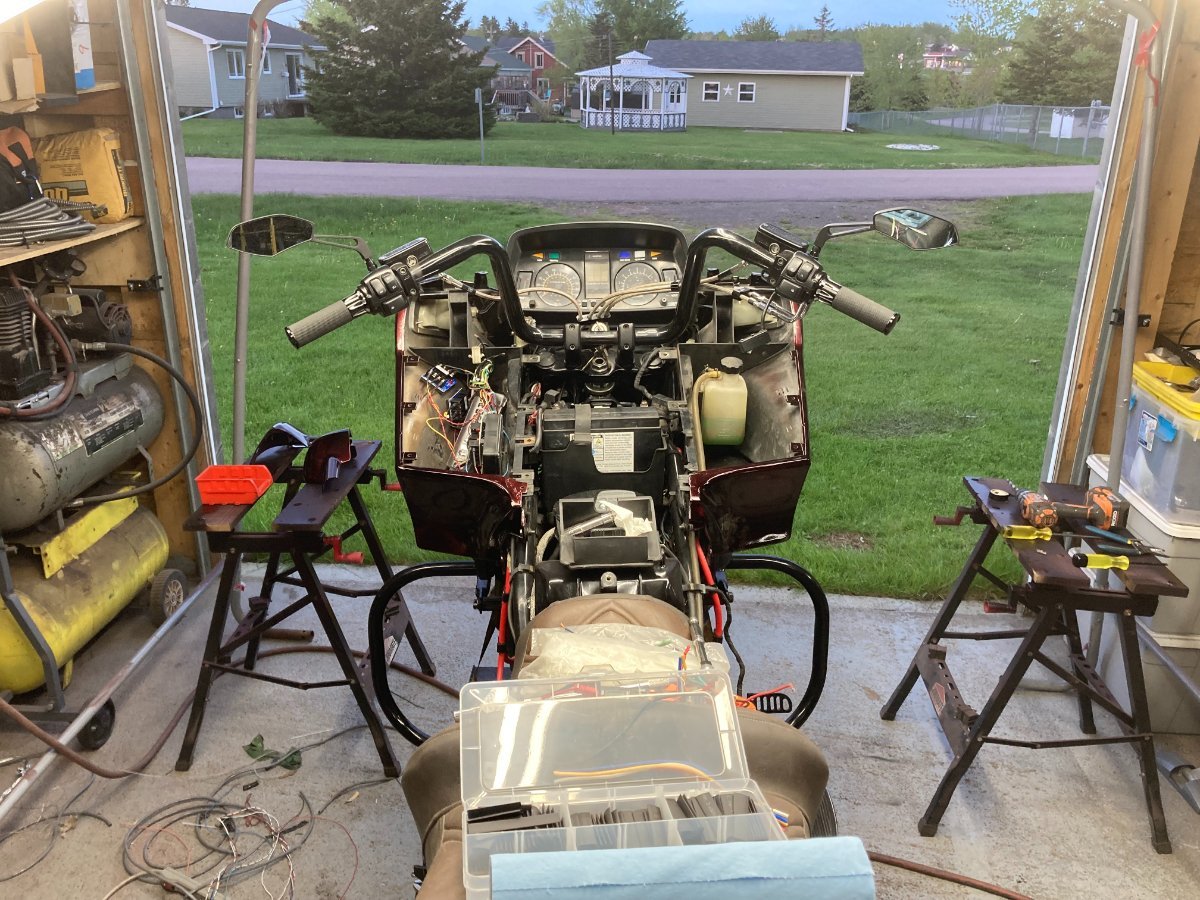
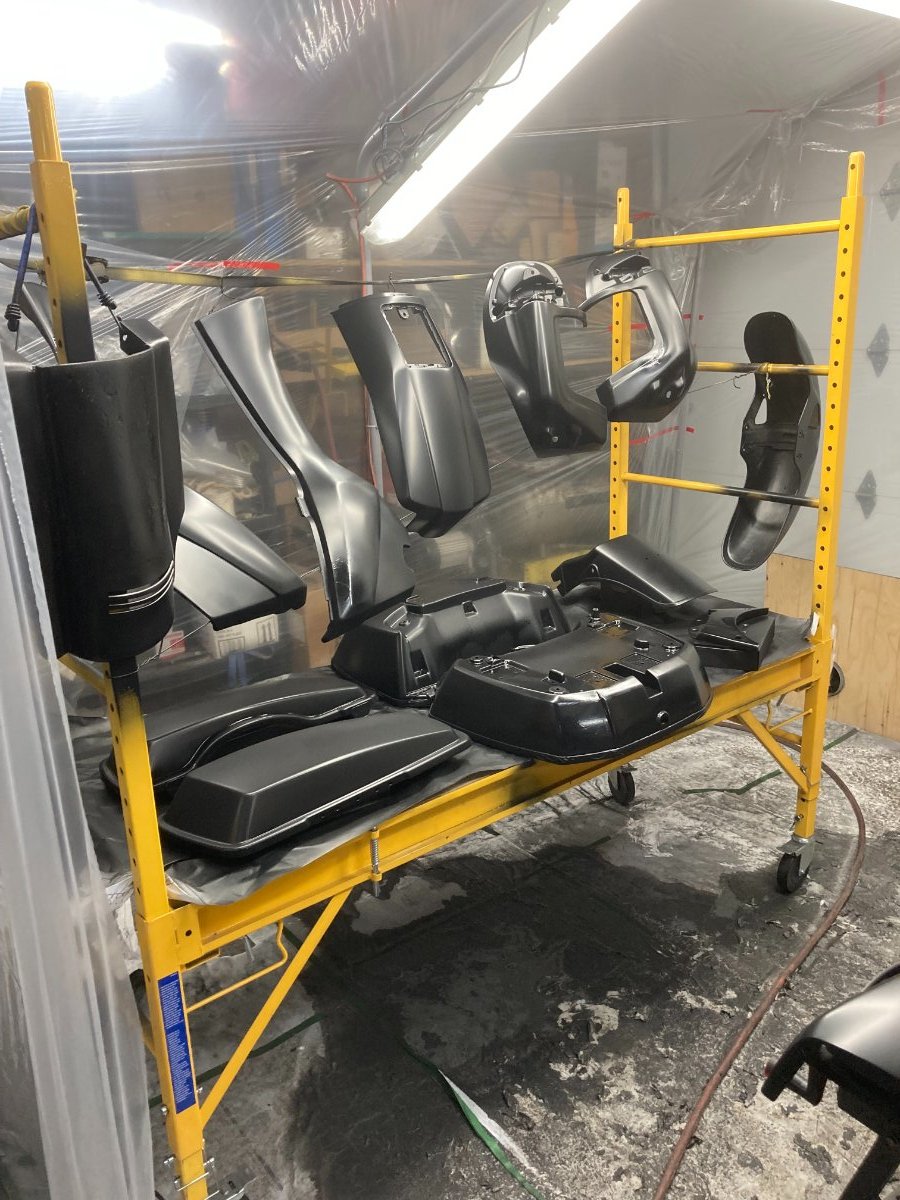
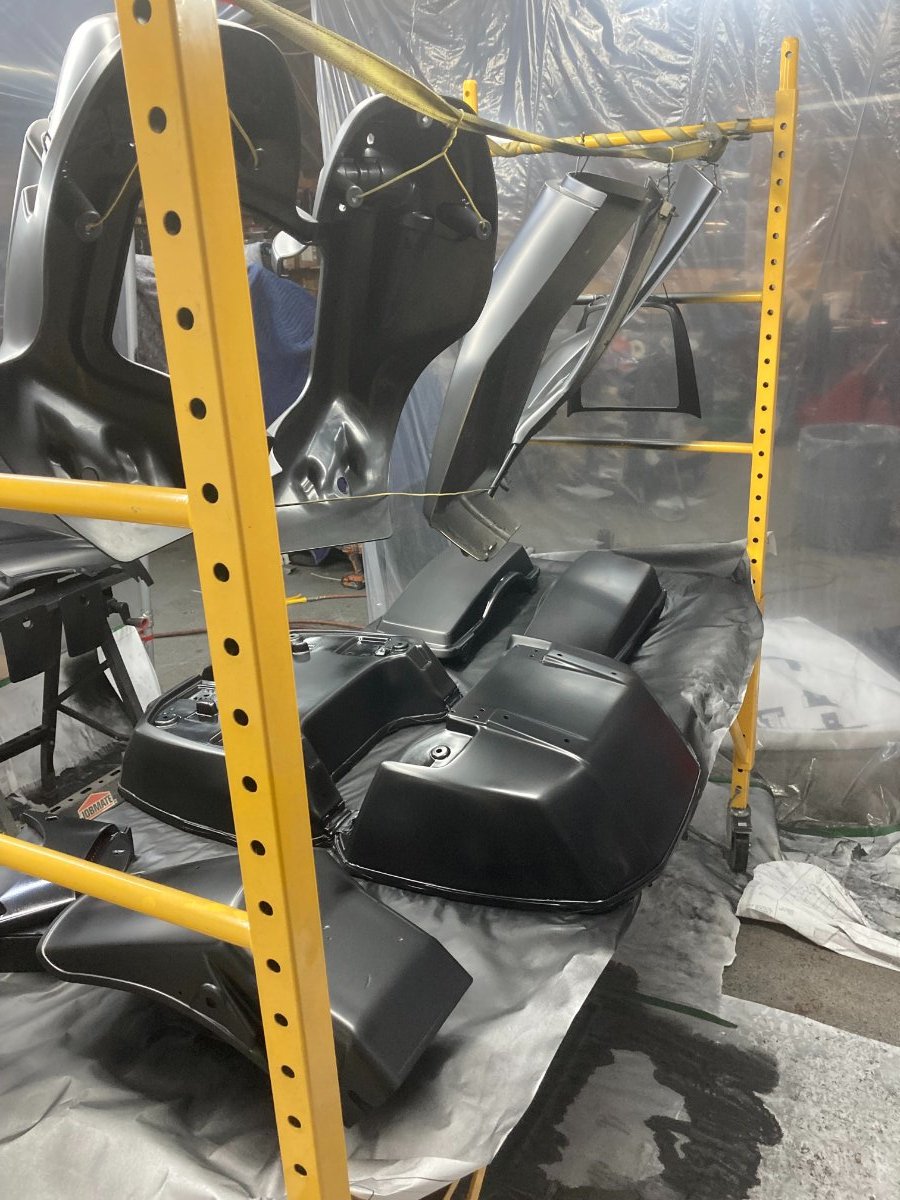
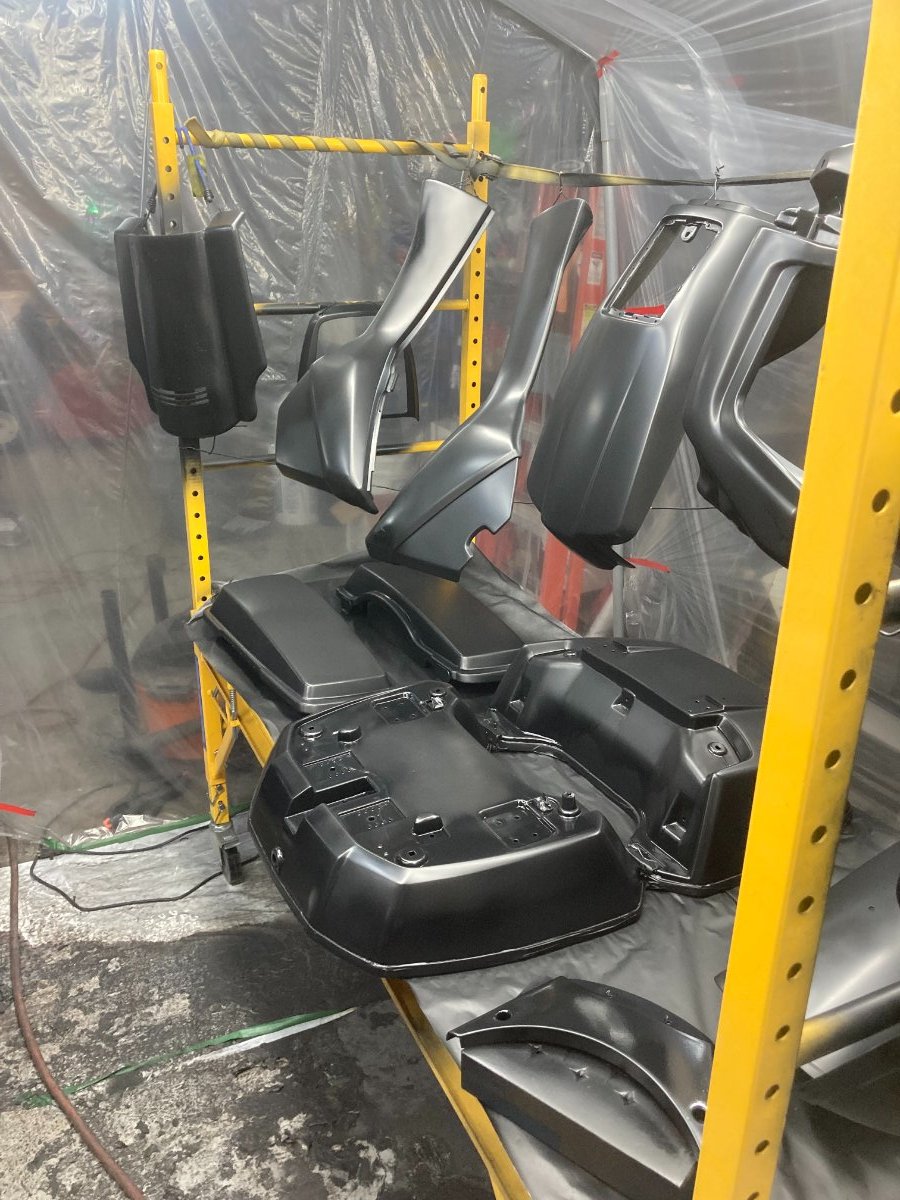
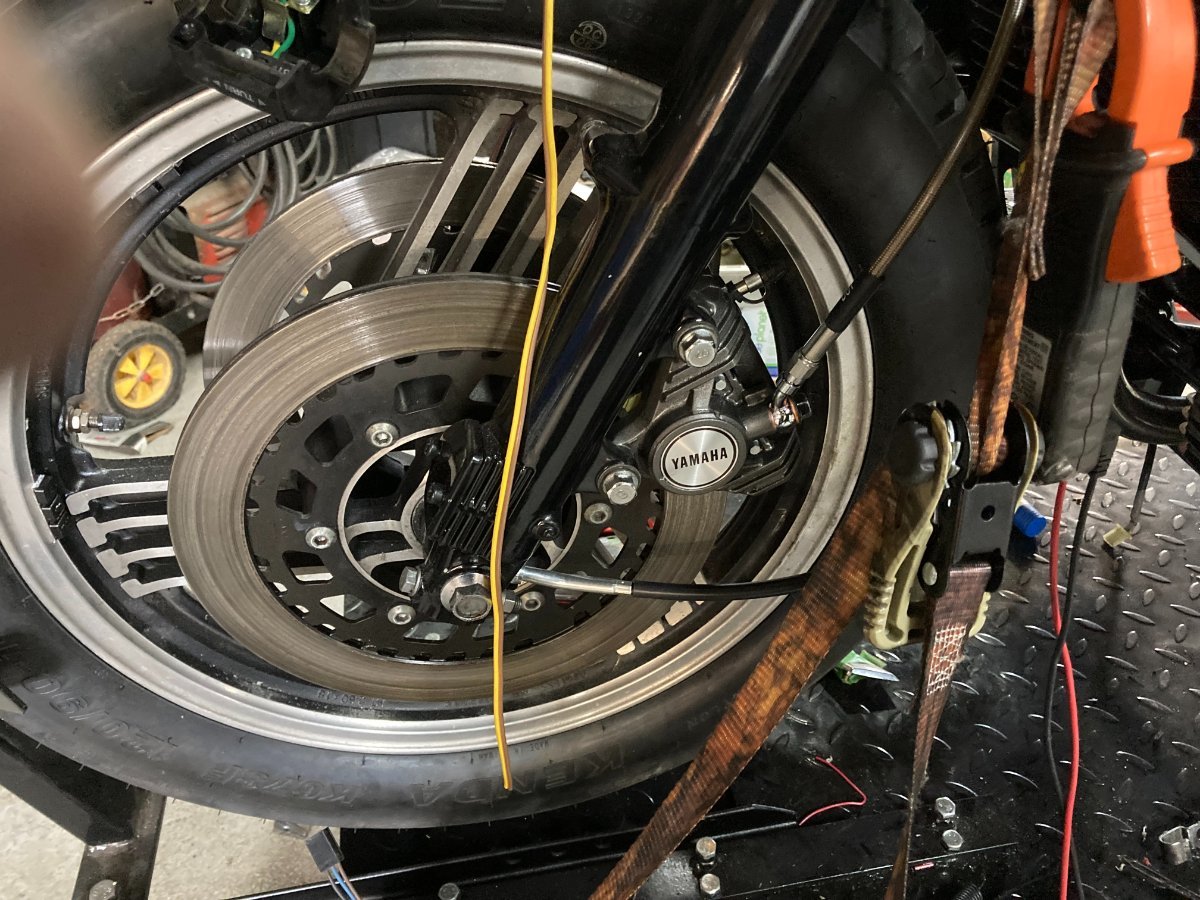
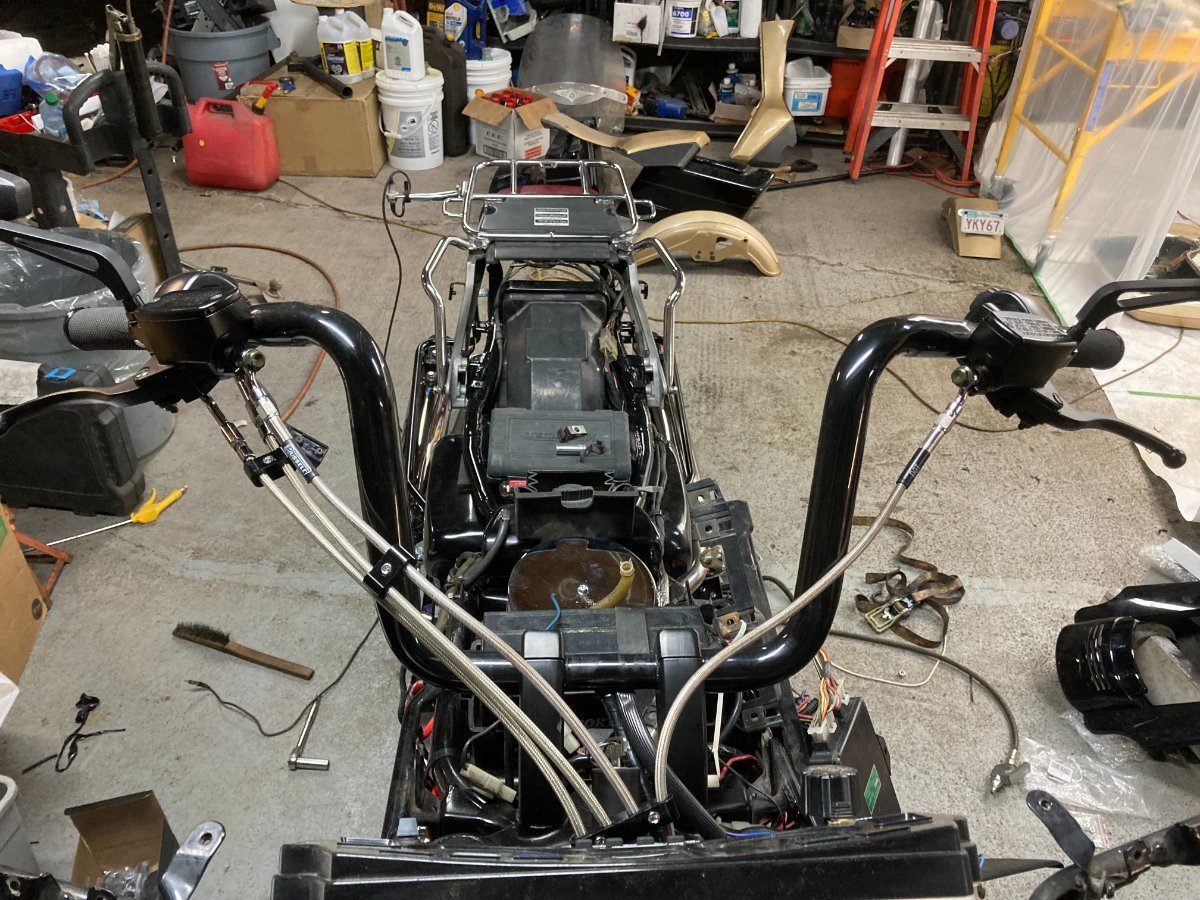
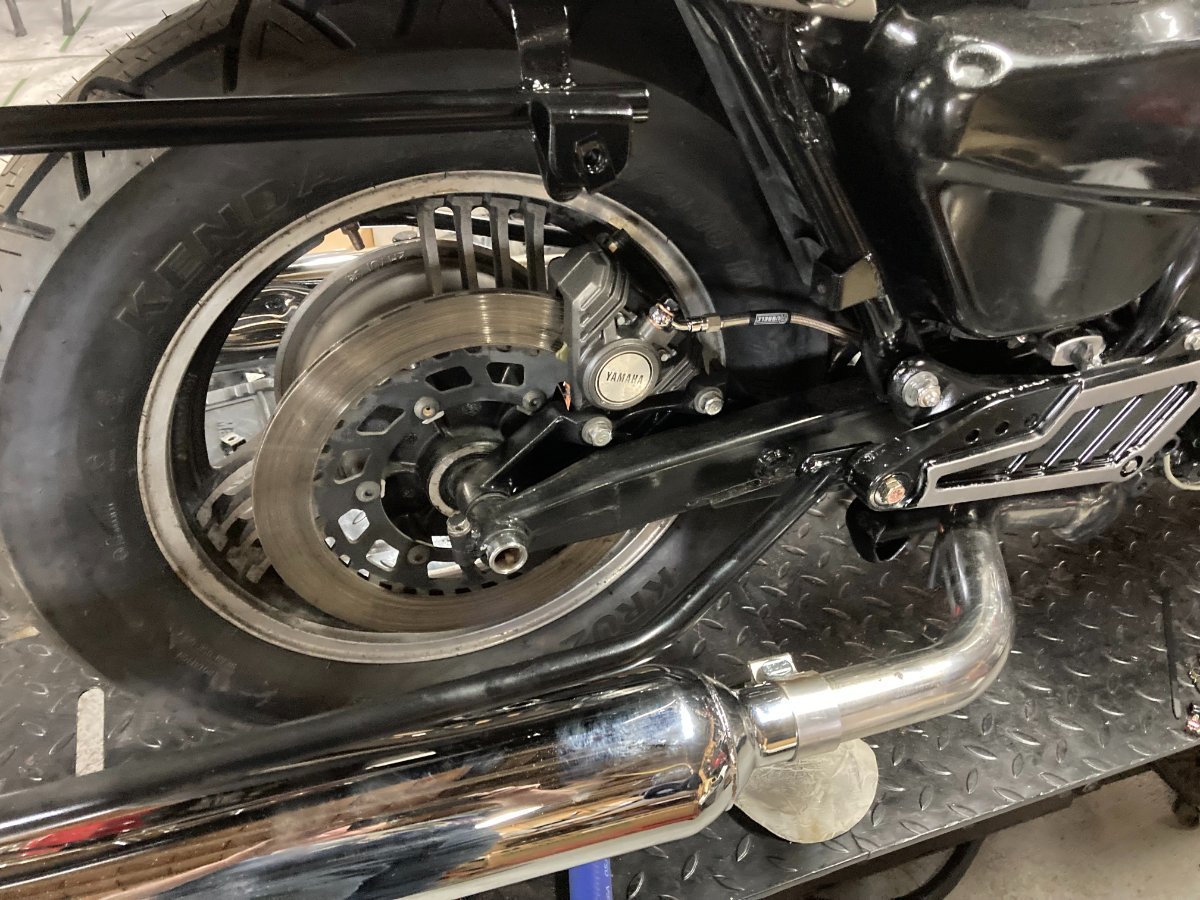
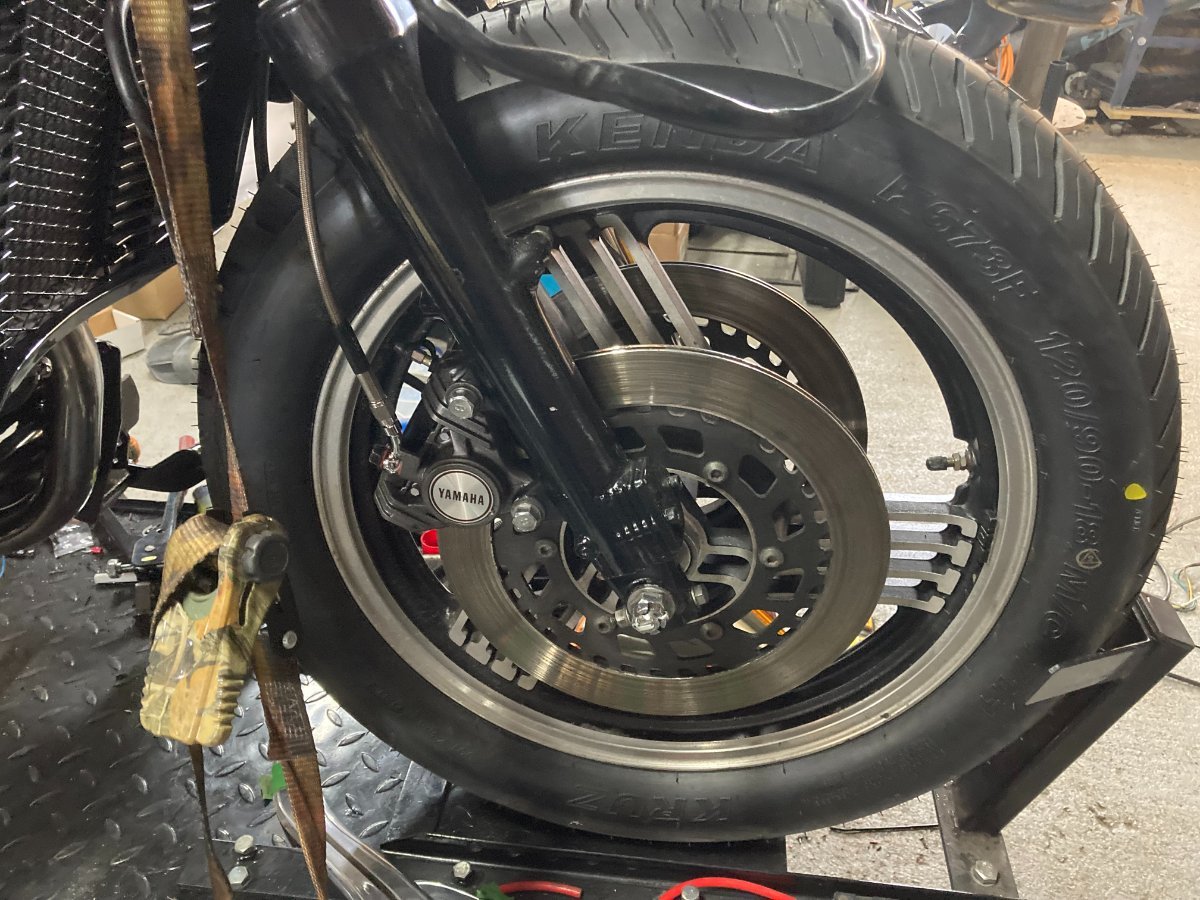
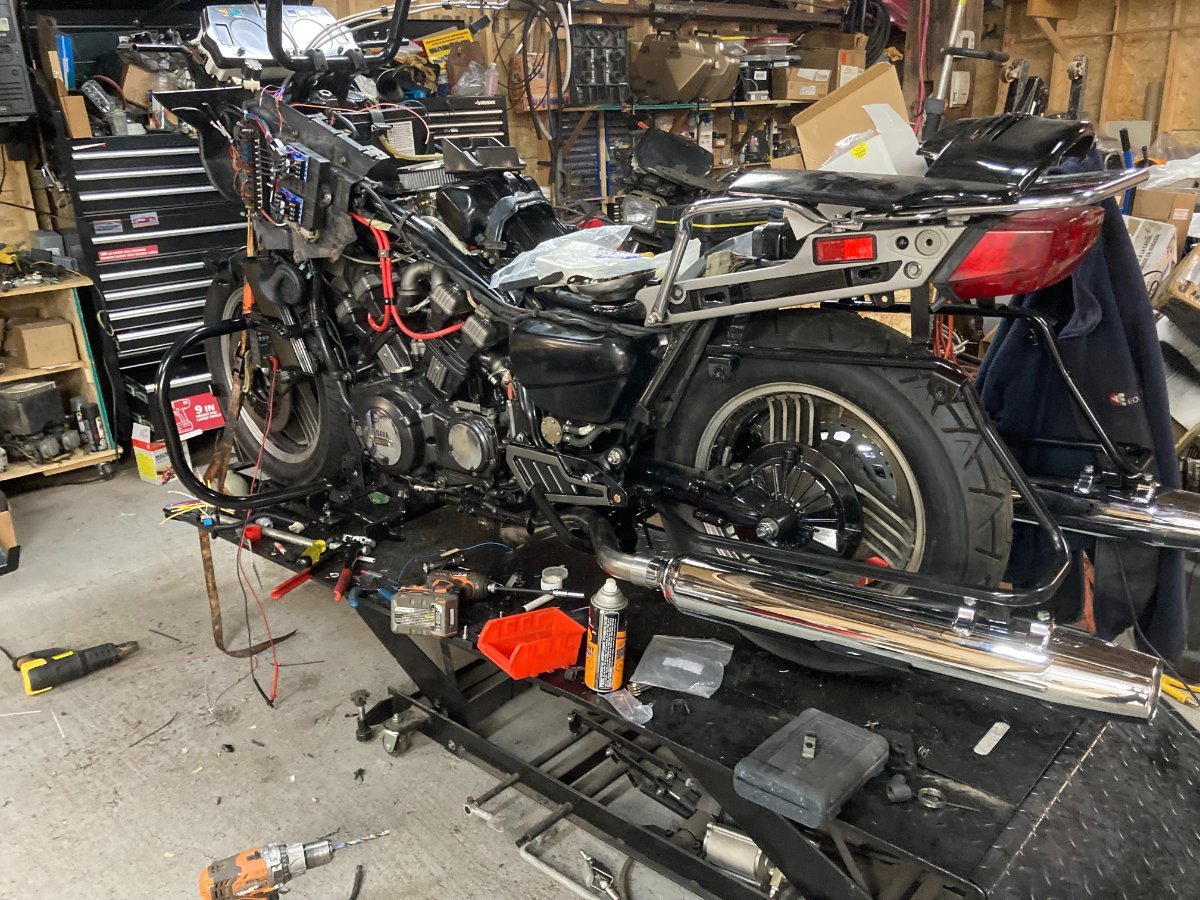
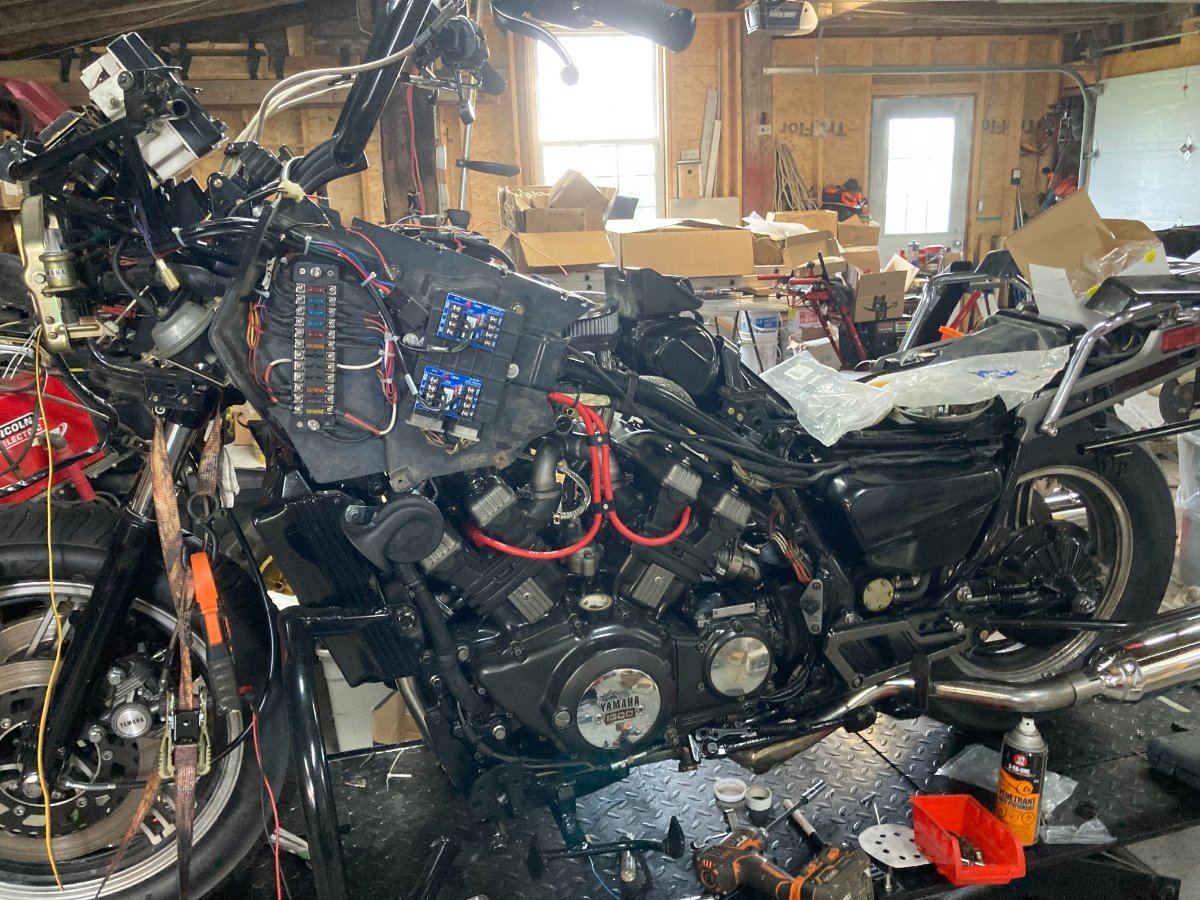
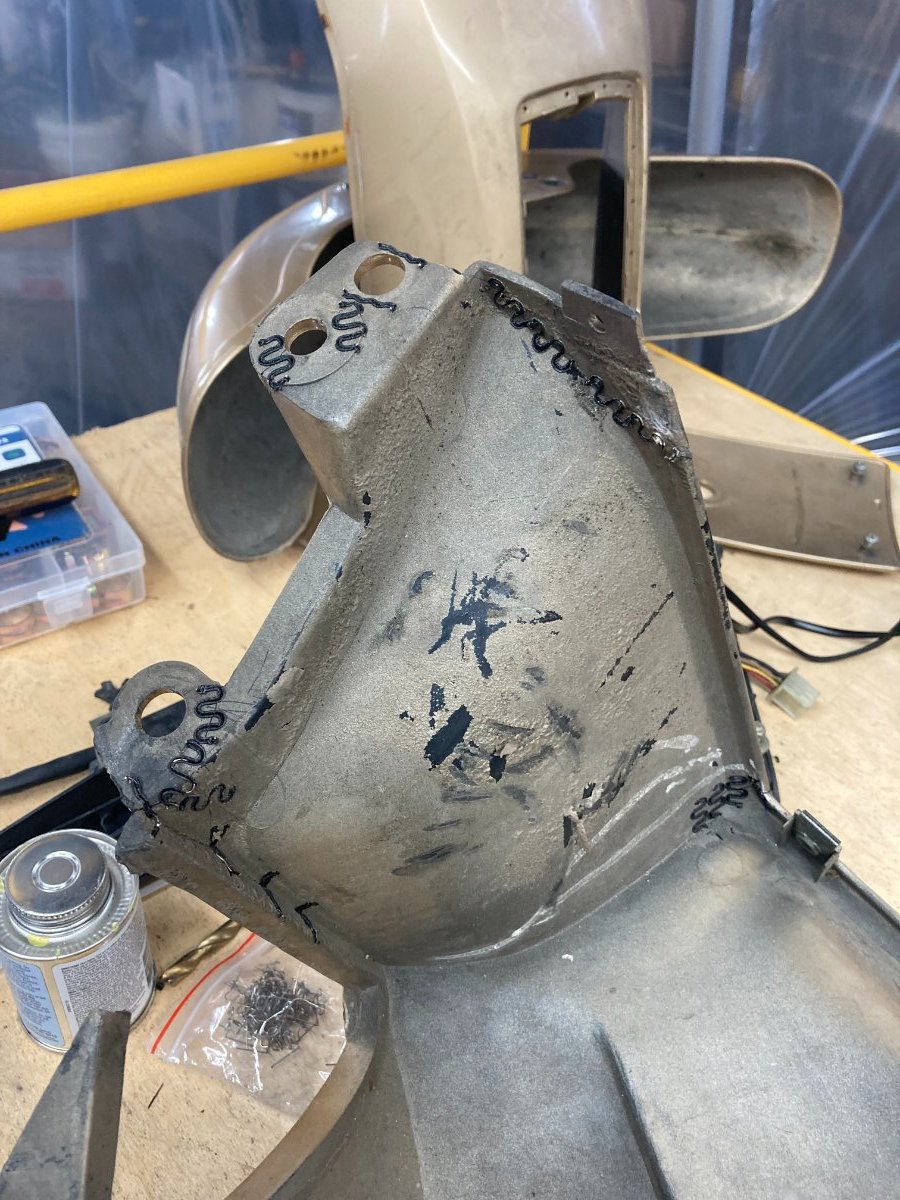
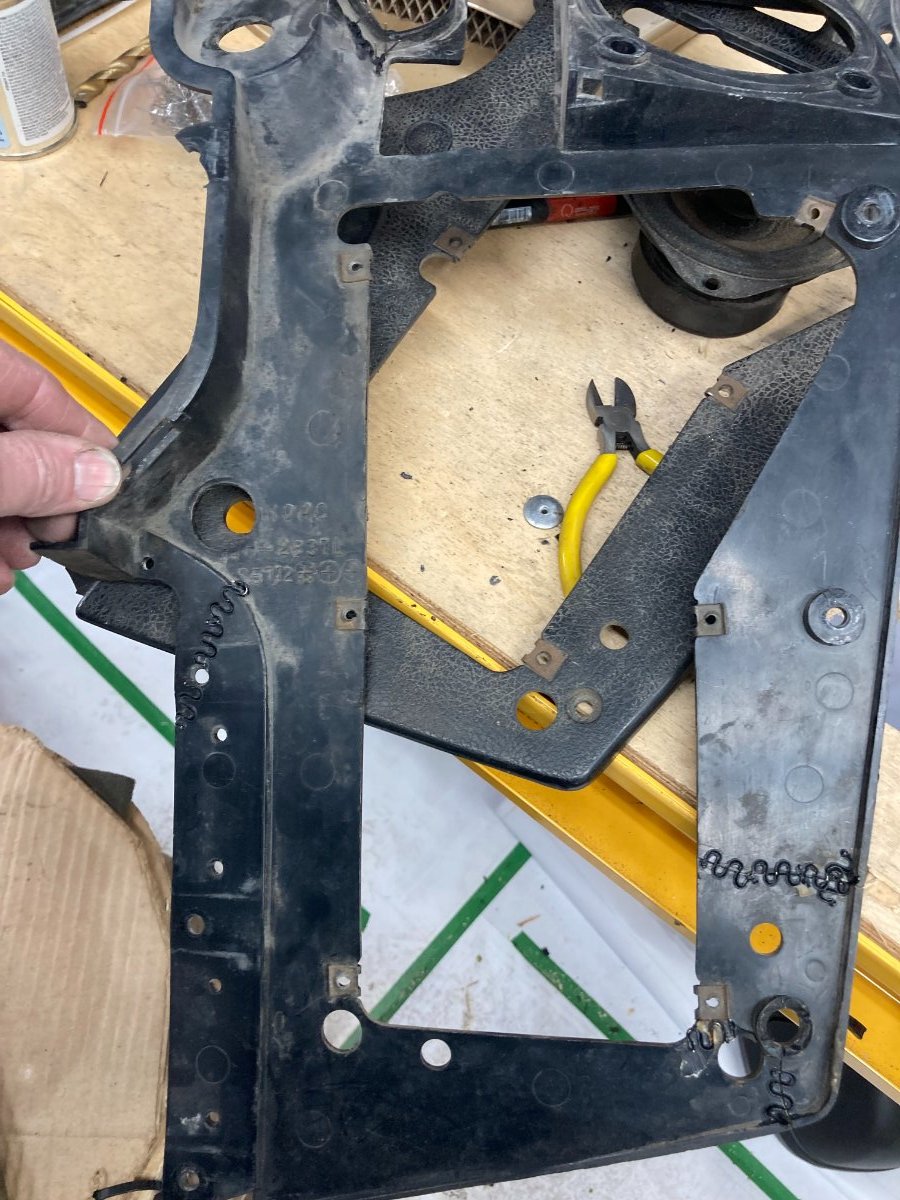
Hi Everyone Made more headway on the build. I am working on a bit of everything as time permits in the evenings and put a few hours in this weekend. I was held up on completing the Calipers as I ran out of the Cast Iron paint and it appears it has been a popular color since no one in in Town had it in stock I managed to find some at Napa and they had to bring it in from Montreal. I picked up the can Friday and Sprayed the Calipers and the four rear brackets. I build the new Throttle Cables and installed them along with the new grips. Installed the new Russell Brake and Clutch hoses. picked up some Wire clamps and used these for the Hose and Throttle cable Management as well as the Spark plug wires it looks neater than the Wire loom I had on the Plug wires. Finished patching up the Fairing halves with my homemade ABS filler made up of acetone and ABS chunks (found the recipe in an old post from saddlebum) it works really good at bonding and filling. It is sandable but seems harder than the original plastic. Installed the Brackets on the Rear and also installed the saddlebag brackets and mounted the mufflers and Clamped them no leaks on the exhaust and it sounds really good. Put together all 3 calipers and mounted them on the Bike and connected all the hoses and installed the speed bleeders now just need to bleed them all. Started sanding all the plastic pieces and got through about half the parts I am hoping to finish all the sanding over the next couple nights and Plan on spraying some paint this coming weekend. I mounted the Inner Fairing on the left side so I can finally mount the new fuse box and Ignition Module. since I am not putting the factory radio back in there is all kinds of room in here for these 2 Items along with the relays I need to install due to me changing the controls. It is starting to look like a bike again I will likely go over the entire bike to make a list of what is left to do or what I missed. I have attached pictures of the progress. Good Nite all Herman
-
Hi Everyone Work on the Bike is going slow and steady. I am into all the time consuming details Wiring rebuild of all calipers, repairing all the plastics and getting them prepared for paint. I am shooting for the May 20 weekend to spray the paint. I have replaced the old exhausted Desiccant beads and re-installed the Compressor and re-attached all the air lines. I still need to pull apart the Class controller to resolder the connections. I have the Right hand side controls all wired up just need to complete the left side. Still need to pull out the Dash to jump out the Lighting alarms for the LED bulbs. With only 40 or so days til Laconia I am very much in a time crunch getting the bike done so I am hoping to get the paint done then Finish up the rest of the Items before re-installing all the plastics. Not much update for pictures so i will leave it at this for tonight. have a good nite all Herman
-
Hi Barnacle 442 When was the last time you replaced the Fuel Filter? Is there any visible rust in the tank? the Tank Outlet filter could be clogged? At what fuel level did it start acting up Near full or below half quarter tank Etc. if at the lower levels I would pull the Fuel petcock and check the filters and have a look inside the tank for sediment or rust. Herman
-
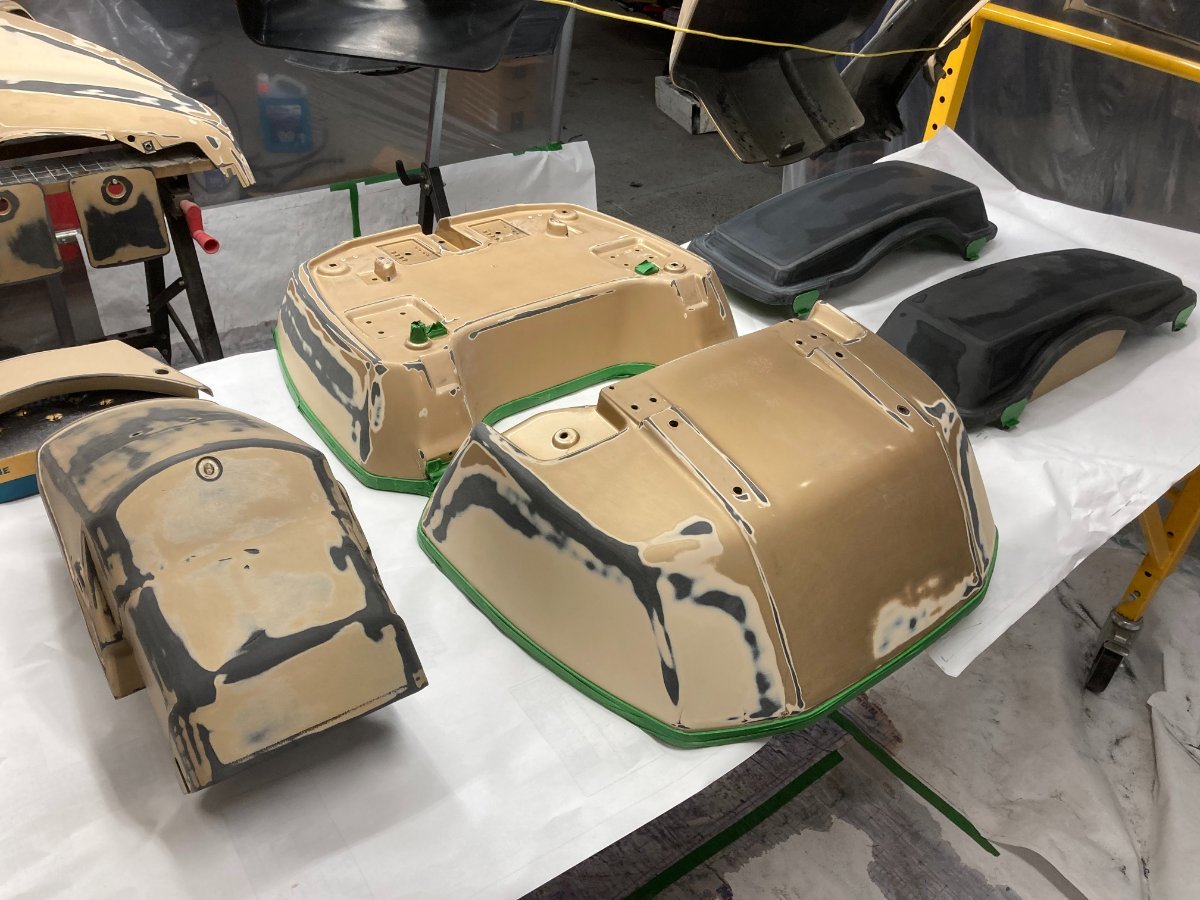
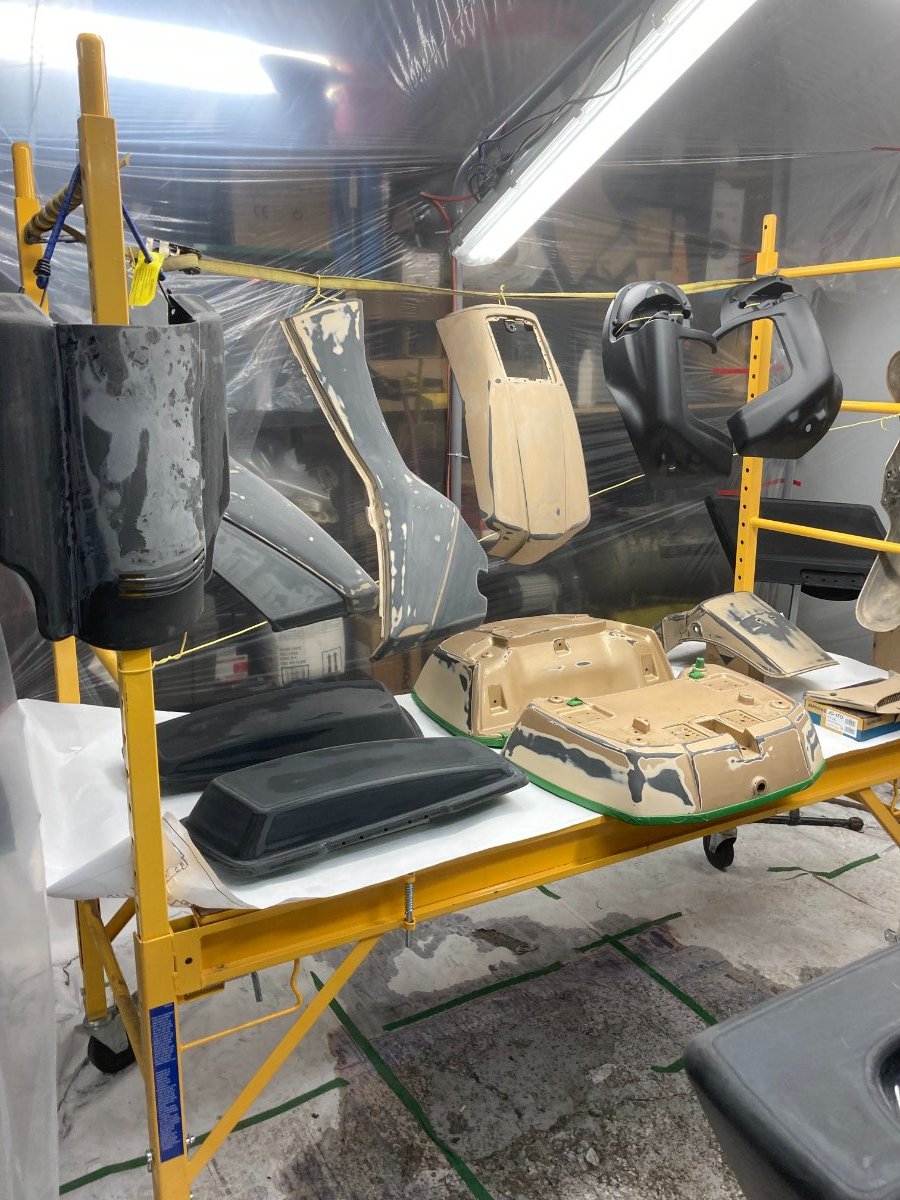
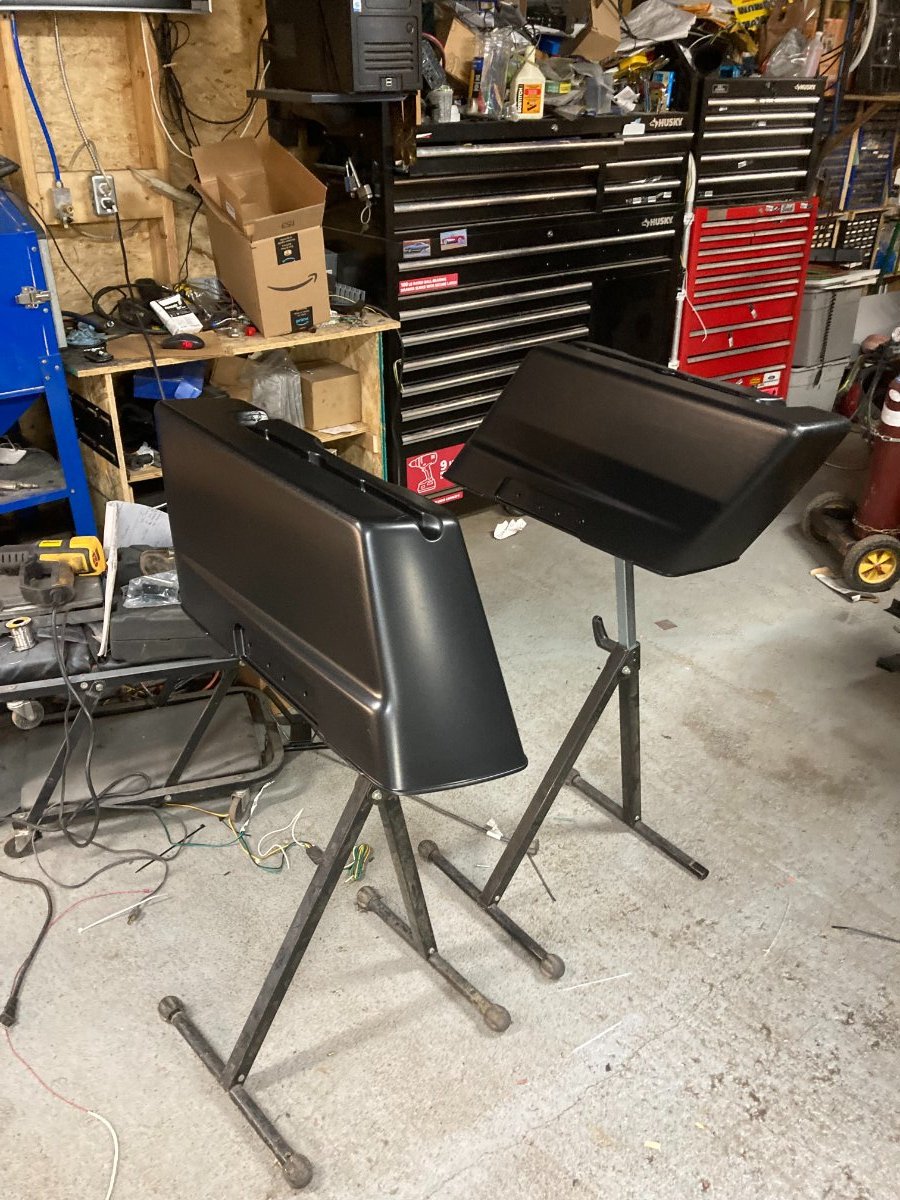
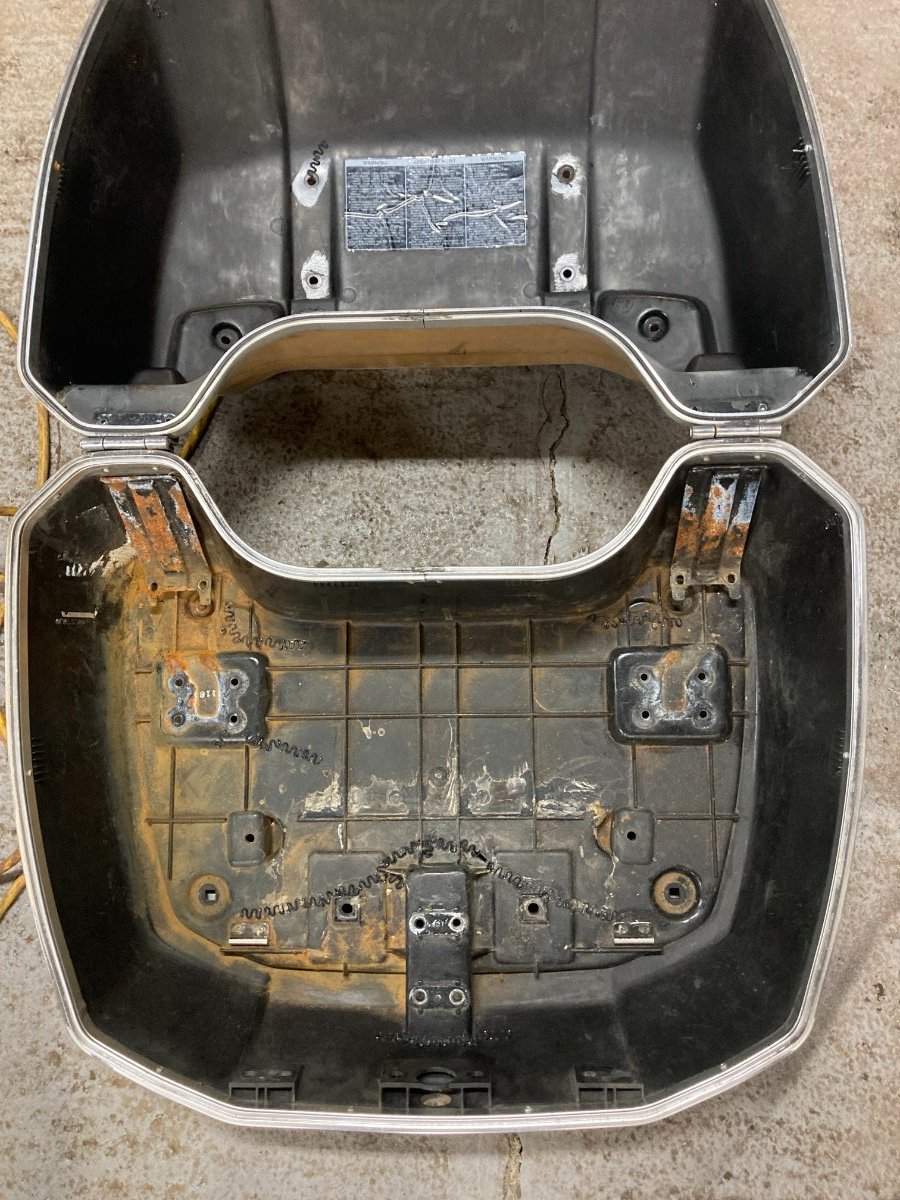
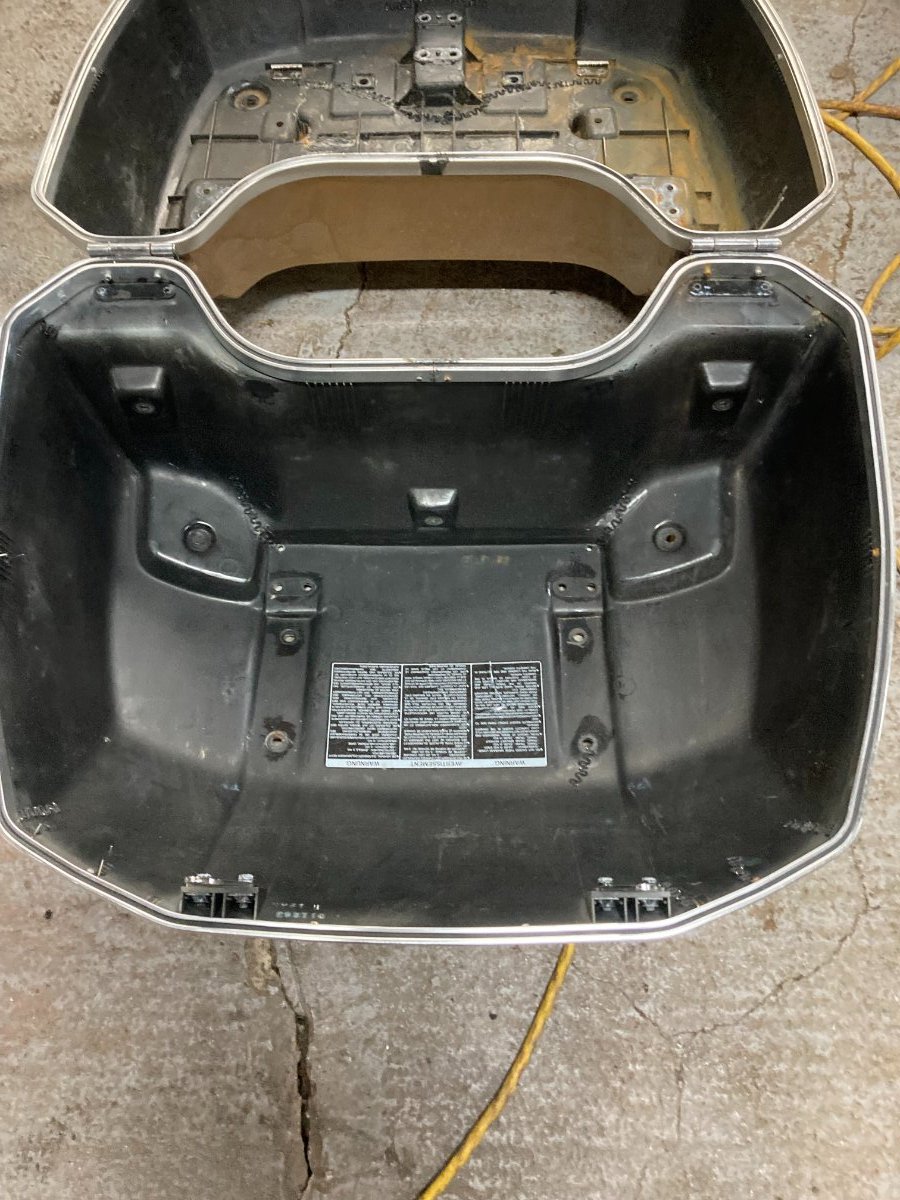
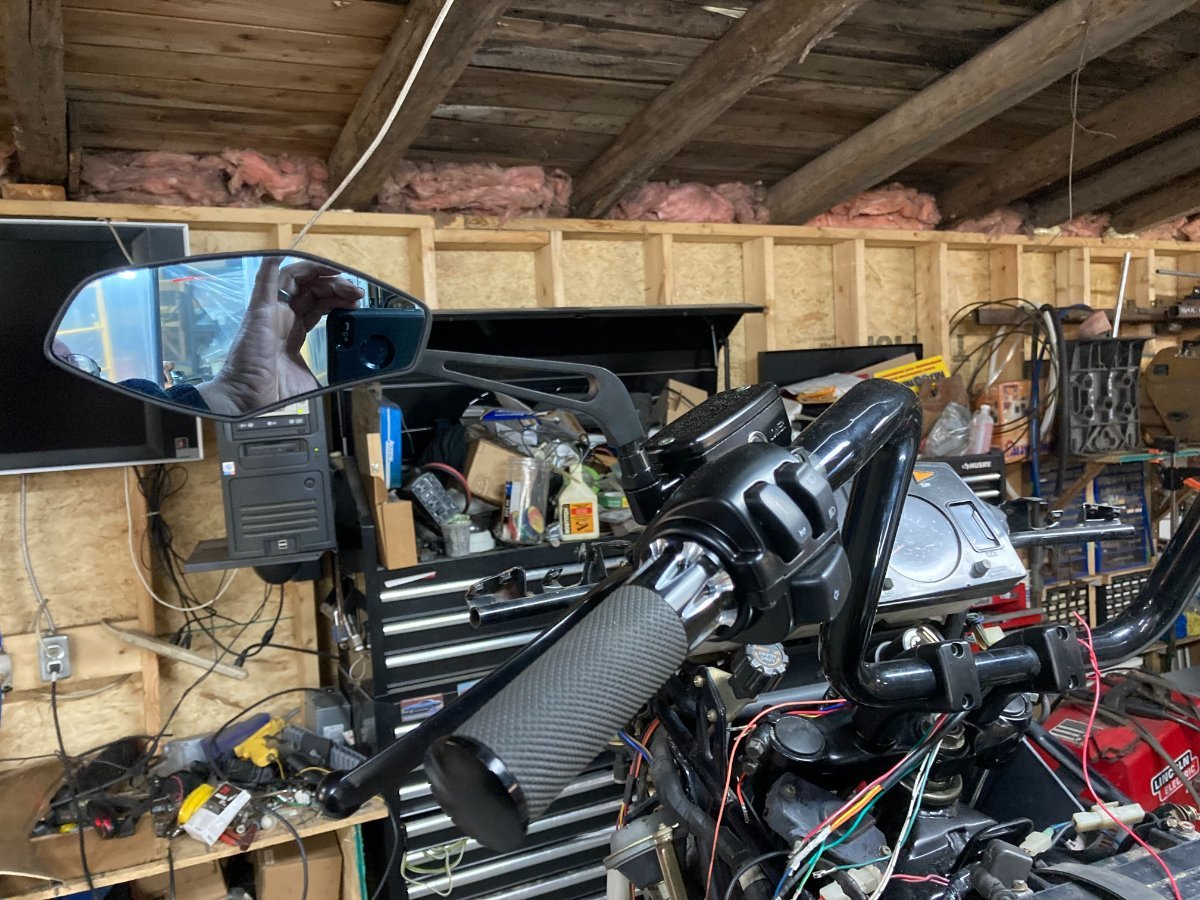
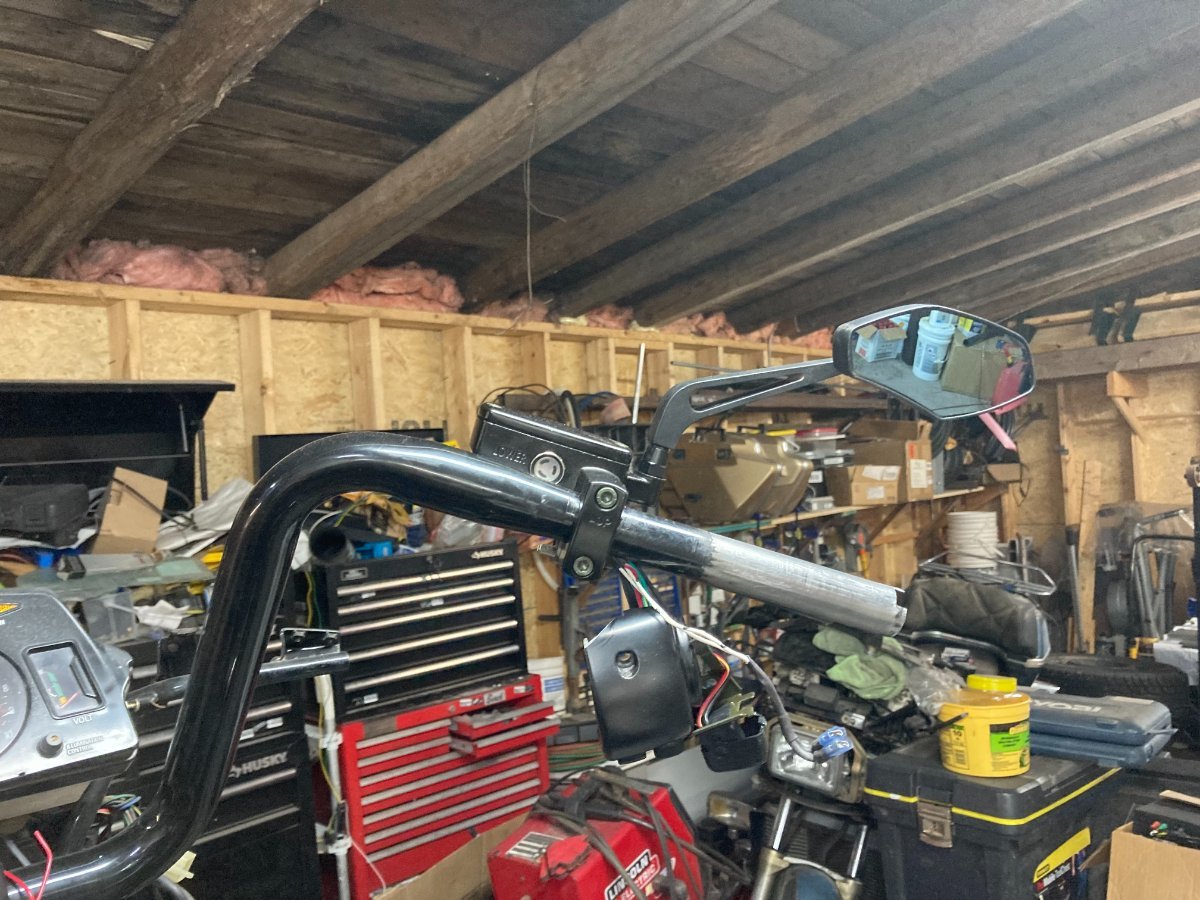
Hi Everyone My Createx paint Arrived on Thursday I am not ready to spray yet but decided to have a change of pace on the bike. Got out of work early on Friday and Got to work on setting up a portion of my old Portable garage frame inside my garage covered it in Plastic to make myself a Paint booth. added some LED lights and a couple small exhaust fans and I can paint when I am ready . I started looking at all the plastics and making the various Crack repairs with the plastic welder removed all the Badges and bolt on components to prepare all the pieces for painting Got most of that done on Saturday along with some side panel modifications. Finished cleaning up and painting the last of the Frame components these are the Rails below the seat and the two Frame sides that has the original Muffler Mounts Repainted the Black but ran out of the Cast Iron Paint that will cover the Aluminum portions I will post those pics after they are fully painted. Repaired and Painted the 2 fairing Top panels I had a can of Automotive Black Trim paint so I used that for the panels. Received my new Mirrors and screwed them onto the New Master Cylinders on the Handlebars. Found all kinds of Cracks in the Trunk and stitched it all back together with the plastic welder next steps with the Plastics is to make up a slurry using scrape pieces of ABS and Acetone and use this to fill all the stitched areas. The list is getting shorter but all time consuming Items rebuild calipers install with new hoses and Bleed. Install upper Clutch Hose Bleed and test along with Installing the Forward control shifter and Linkage . Finish wiring all the handlebar controls. Build the Throttle Cables and Install. Finish putting together the Rear subframe components and Saddlebag brackets. Install the Mufflers. Install the inner Fairing walls. Get all Plastics and Body parts prepped for paint.....Paint.....re-assemble. as always a few Pics to look at Have a great nite Herman
-
Hi Mike the Bolts are a bit difficult to get to put is doable with long extension usually you can take apart the switch and clean up the contacts and it will be fine. I just had Mine apart and it cleaned up pretty good. It was intermittent in the on position it looked like some sort of insect was trying to make a home in there. All good now I am in Dieppe NB if you are stuck Herman