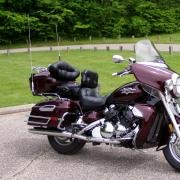
frogmaster Posted June 24, 2009 Share #1 Posted June 24, 2009 (edited) Weight = 170 lbs Tongue Wt = 17 lbs Tongue Angle = SLIGHT DOWNWARD ANGLE Overall Width = 44" Length = 84" Height = 36" CuFt = 20.5 Diamond Plate 16ga Alum on a floating 9/16" rubber (Camper/Topper Weather Stripping). Sears X-Cargo on 6/16" rubber (Camper/Topper Weather Stripping). Hold Down Plates w/ 3/16" (Camper/Topper Weather Stripping). Lights are LED's Investment approx $600.00 and LOTS of time... Improvements To DO List. Add 24" to Tongue and add a Cooler Rack (this will increase my Tongue Weight from 10% to xx%. Also drill out existing hinges that hold it open to 30 degrees angle and allow it to open with small chain to 95 to 100 Degrees Angle. Thanks to all for your information and ideas. Edited March 4, 2011 by frogmaster added info Link to comment Share on other sites More sharing options...
Kregerdoodle Posted June 24, 2009 Share #2 Posted June 24, 2009 Nice looking rig, whats you total $$ in it, if you don`t mind me asking.. Thanks, Link to comment Share on other sites More sharing options...
Dave77459 Posted June 24, 2009 Share #3 Posted June 24, 2009 Great looking trailer! Where do you plan to put the license plate? Nice looking rig, whats you total $$ in it, if you don`t mind me asking.. Thanks, His post says approx $600? Do you mean including the hitch? Dave Link to comment Share on other sites More sharing options...
BuddyRich Posted June 24, 2009 Share #4 Posted June 24, 2009 I gots one of them thar escargot's. It worked both ways,had it for an MC trailer and removed it to put it on top of the RAV. Works pretty good. Link to comment Share on other sites More sharing options...
frogmaster Posted June 24, 2009 Author Share #5 Posted June 24, 2009 Great looking trailer! Where do you plan to put the license plate? His post says approx $600? Do you mean including the hitch? Dave Plate see Pic #3 Below LED Taillight is Bracket for Plate Oops for got hitch add $140... Venturedad complete. Now nearly $750.00 Link to comment Share on other sites More sharing options...
Dave77459 Posted June 24, 2009 Share #6 Posted June 24, 2009 Plate see Pic #3 Below LED Taillight is Bracket for Plate Ah, on the left side. Thanks! Link to comment Share on other sites More sharing options...
Snaggletooth Posted June 24, 2009 Share #7 Posted June 24, 2009 I got to ask. I've been seeing a lot of the guys using these so I stopped at the local HF the other day. Alas.... no trailer kits to see so I'm still in the dark. As far as basic assembly, is there a lot of welding or is it pretty much bolt together? Seems like a good answer for those of us that are cheap.....er....budget minded....ahh....frugal.....and makes a nice looking rig when a little personal touch is added. Something that I'd like to put together for my long rides. Mike Link to comment Share on other sites More sharing options...
Eck Posted June 24, 2009 Share #8 Posted June 24, 2009 Same luggage carrier I have on mine. I didnt like the way the lid opens to 45 degrees, and you have to bend down to rach back and in to get something. SO........this is what I did to mine. I drilled out the (8) small rivets that hold the (4) brackets that the (2) plastic lid hinge/ holders attach to. Discarded the plastic hinge holders alltogether. I reinstalled the (4) metal brackets that the plastic hinge/ holders attached too using small bolts, plastic washer on outside, and locking acorn nuts on inside. I then installed two pieces of small thin chain that were long enough to connect from one bracket on the box to the mating metal bracket that is mounted on the lid. After you install the chain, you can open the lid where it leans forward and the chain holds it open. You cut the length of the chain so that when the lid leans forward it does not hit hte rear center trunk on the bike. You now have FULL ACCESS to the entire lugage box and the lid is completely up and out of the way... You could also install two of those mini gas struts to open and hold the lid opne, like they have on the rear of those hatch back cagers........ Link to comment Share on other sites More sharing options...
frogmaster Posted June 25, 2009 Author Share #9 Posted June 25, 2009 Same luggage carrier I have on mine. I didnt like the way the lid opens to 45 degrees, and you have to bend down to rach back and in to get something. SO........this is what I did to mine. I drilled out the (8) small rivets that hold the (4) brackets that the (2) plastic lid hinge/ holders attach to. Discarded the plastic hinge holders alltogether. I reinstalled the (4) metal brackets that the plastic hinge/ holders attached too using small bolts, plastic washer on outside, and locking acorn nuts on inside. I then installed two pieces of small thin chain that were long enough to connect from one bracket on the box to the mating metal bracket that is mounted on the lid. After you install the chain, you can open the lid where it leans forward and the chain holds it open. You cut the length of the chain so that when the lid leans forward it does not hit hte rear center trunk on the bike. You now have FULL ACCESS to the entire lugage box and the lid is completely up and out of the way... You could also install two of those mini gas struts to open and hold the lid opne, like they have on the rear of those hatch back cagers........ Oh YES... I forgot to add that to my to do list. Thanks ECK Link to comment Share on other sites More sharing options...
DaveDanger Posted July 6, 2009 Share #10 Posted July 6, 2009 Frogmaster.. Lemme offer a tiny suggestion. You mentioned adding 20" I think, to enable you to install a cooler rack on the tongue. It's a great idea and I love mine and use it daily. My suggestion is to make sure you add enough to allow the trailer box top to flip forward beyond 90° like you said you wanted to do. My cooler rack is placed close enough to my trailer box, that when I try to open the top beyond about 70°, it hits the cooler. Make sure and give yourself enough room to open as far as you desire. When that top lifts up to 90° and beyond, it moves forward from the hinge point, by the height of the top. Great looking trailer Link to comment Share on other sites More sharing options...
99silver Posted July 6, 2009 Share #11 Posted July 6, 2009 Charlie, Looks good, I have put about 1500 miles on mine and it pulls like a dream !! I'll catch up with you one of these day's. Gary Link to comment Share on other sites More sharing options...
frogmaster Posted August 23, 2009 Author Share #12 Posted August 23, 2009 Gary, Hope to see your trailer at this event: [ame=http://www.venturerider.org/forum/showthread.php?t=38612]Mid Michigan M/C, M&E and Camp Out 2009. - VentureRider.Org[/ame] not to far for you maybe 2 hours drive max! Should be many trailers to see there. I will have Mimi's Motel there and weather as of now looking to be fantastic... Link to comment Share on other sites More sharing options...
Guest Swifty Posted August 23, 2009 Share #13 Posted August 23, 2009 Great job, nice box! I used some of that diamond plate to make mudflaps for mine. Link to comment Share on other sites More sharing options...
dave_wells Posted August 23, 2009 Share #14 Posted August 23, 2009 WOW That looks great I cant wait to see it FYI Labor day is still looking good for a trip up north Ride Safe Dave Link to comment Share on other sites More sharing options...
Guest tx2sturgis Posted August 23, 2009 Share #15 Posted August 23, 2009 .....I then installed two pieces of small thin chain that were long enough to connect from one bracket on the box to the mating metal bracket that is mounted on the lid. After you install the chain, you can open the lid where it leans forward and the chain holds it open. You cut the length of the chain so that when the lid leans forward it does not hit hte rear center trunk on the bike......... One of the problems I had with that small decorative chain, is that it tended to get tangled up in my clothing that was packed in the trailer. I ended up using some black nylon cord, and then attached it using some split rings at both ends. Works well for me! Link to comment Share on other sites More sharing options...
DragonRider Posted August 24, 2009 Share #16 Posted August 24, 2009 Will it float when you cross your swollen creek............ Link to comment Share on other sites More sharing options...

Recommended Posts
Create an account or sign in to comment
You need to be a member in order to leave a comment
Create an account
Sign up for a new account in our community. It's easy!
Register a new accountSign in
Already have an account? Sign in here.
Sign In Now