Search the Community
Showing results for tags 'studs'.
Found 10 results
-
What diameter are our handlebars? (1 gen ) Also....what Dia. are the "Snaggle studs" ?
-
The other day I posted about a recent project I had done. My handlebars extention studs for the 1st gen bikes. I had a few responses that some of you were interested in them. It turned out Bob Myers had done something much like my studs back in '08, much shorter than mine are at 4 inches and he made his at a much higher level of quality than I was able to. He actually has the right tools!!! So I contacted Bob and we talked about it. He has offered to make some of these sets for the guys interested, if there are enough to justify setting it up. So in the exchange with Bob the questions discussed where the material and the big one was how long should they be? Bob is looking at using 1" aluminum in stead of the 7/8" I did mine out of. The one Bob did for his bike is the 1st picture. Mine are the second shot. Which one looks better? Hello Mr. Myers! With mine at 4" on the bars there is exactly 4" between the inner ends. Some of you were interested in shorter ones. So for those that are interested in a set, or one, or a handful post your preference for for how long you would want them on this thread and we shall see what the choices are and what can be done to get this rolling. I can't give any idea of what the cost might be until we hit on some specs for Bob. By the way..... these will probably not be available in wood at this time. Sorry. Let us know. Mike
-
Does anyone know of where you can get replacement studs for a pillow top seat (drivers) for a 2003 RSV? Or maybe have a homemade solution to fix them? I'm talking about the threaded mounting studs that bolt the seat on to the frame.
-
 So I have been growing tired of looking at my weathred old studs. Not pretty. bike looks good from far. Takingoff the studs will leave stud holes so Im pondering how to cover or dress up. I hjut ordered some leather laces lets see hat I can come up with.
 -
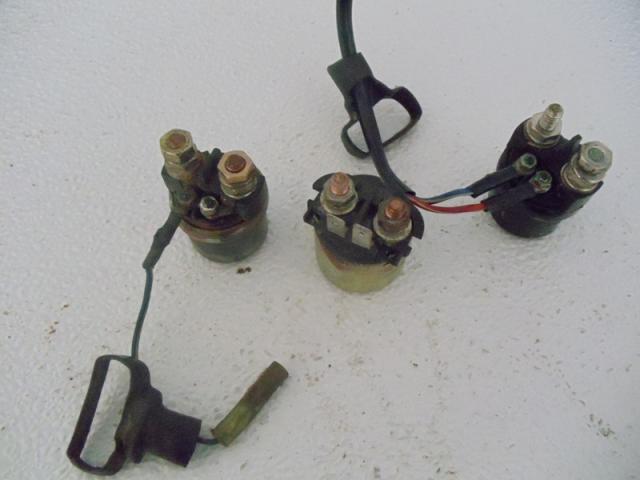
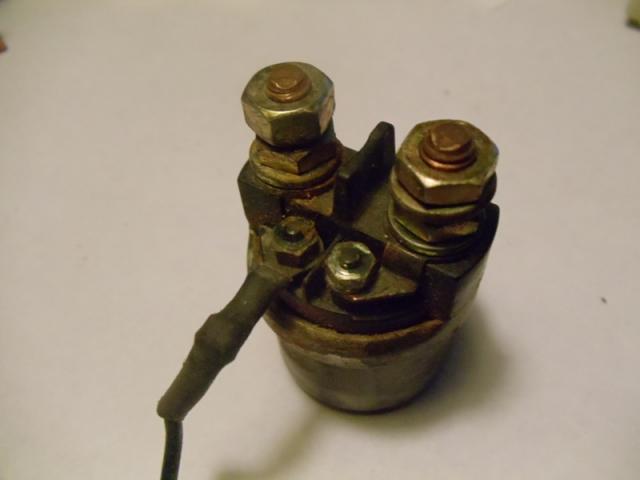
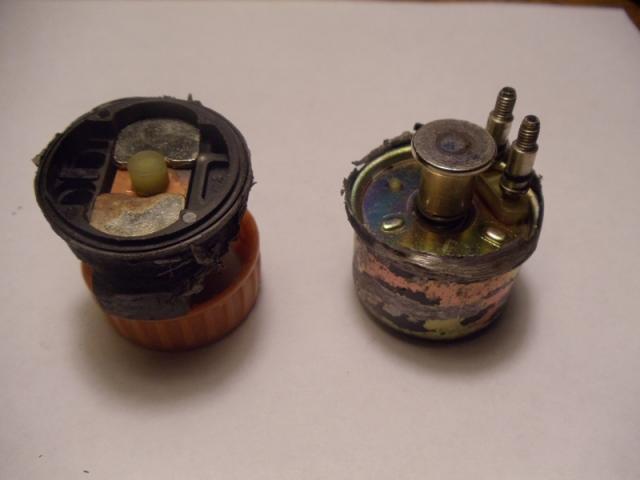
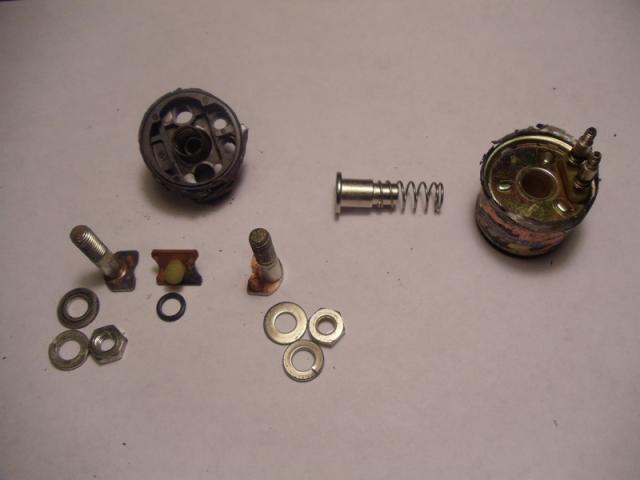
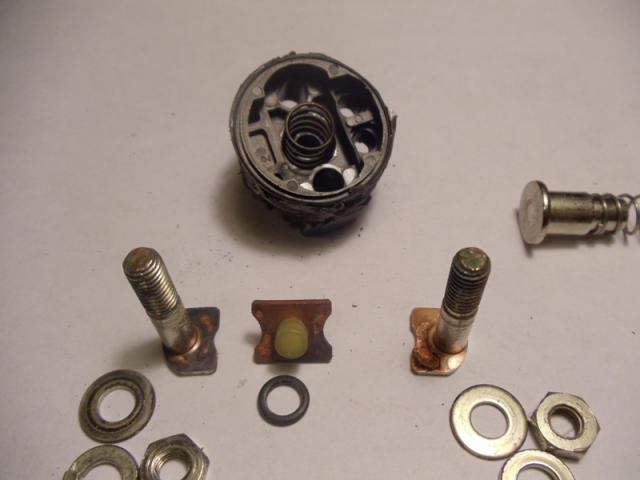
I will start this post by saying, 'No Venture parts were harmed in the making of this post, however there was an unfortunate VMax casualty' Pictures attached are of a group of solenoids from a MKI, MKII Venture and VMax. 1st picture is of on left an MKII Venture, middle is I believe an 83 Venture (probably similar to 84-85), and on the right is a VMax solenoid. [ATTACH]61706[/ATTACH] Next is shown why the MKII's only need 1 wire in control circuit, on the right side there is a jumper from the coil terminal to the large terminal that is connected to the positive battery. The MKI's and the VMax's have two wires in the small coil control circuit. The MKII circuitry is all done on the 12V- side. [ATTACH]61707[/ATTACH] This picture shows the VMax solenoid split in half. Right right side is the coil, plunger & spring. The two small studs are for the control circuit wires. Left side is the main contact set. The two silver colored pads are the tops of the studs the main heavy starter circuit wires are attached to. Between the two silver studs is a plastic plunger nub for the copper contact plate between the two studs. This plastic nub keeps the coil plunger from contacting the two stud tops when the coil is de-energized. Normally the spring in the coil side keeps the plunger in a position to press down on the plastic nub and break the connection between the two studs. [ATTACH]61708[/ATTACH] This picture shows the plunger and spring removed from the coil pack on the right side. On the left side is the two studs removed and the copper contact plate that completes the circuit. Notice the dislocation from arcing on the stud base to the left. This carbon build up is enough to cause failure of this solenoid. Not obvious in the picture is a spring in the contact black housing in the center hole. This spring pushes the copper contact plate into two stud bases when the coil is energized. [ATTACH]61709[/ATTACH] This picture shows a closer view of the contact side. Arcing damage to stud faces is more visible. [ATTACH]61710[/ATTACH] Gary
-
I will start this post by saying, 'No Venture parts were harmed in the making of this post, however there was an unfortunate VMax casualty' Pictures attached are of a group of solenoids from a MKI, MKII Venture and VMax. 1st picture is of on left an MKII Venture, middle is I believe an 83 Venture (probably similar to 84-85), and on the right is a VMax solenoid. Next is shown why the MKII's only need 1 wire in control circuit, on the right side there is a jumper from the coil terminal to the large terminal that is connected to the positive battery. The MKI's and the VMax's have two wires in the small coil control circuit. The MKII circuitry is all done on the 12V- side. This picture shows the VMax solenoid split in half. Right right side is the coil, plunger & spring. The two small studs are for the control circuit wires. Left side is the main contact set. The two silver colored pads are the tops of the studs the main heavy starter circuit wires are attached to. Between the two silver studs is a plastic plunger nub for the copper contact plate between the two studs. This plastic nub keeps the coil plunger from contacting the two stud tops when the coil is de-energized. Normally the spring in the coil side keeps the plunger in a position to press down on the plastic nub and break the connection between the two studs. This picture shows the plunger and spring removed from the coil pack on the right side. On the left side is the two studs removed and the copper contact plate that completes the circuit. Notice the dislocation from arcing on the stud base to the left. This carbon build up is enough to cause failure of this solenoid. Not obvious in the picture is a spring in the contact black housing in the center hole. This spring pushes the copper contact plate into two stud bases when the coil is energized. This picture shows a closer view of the contact side. Arcing damage to stud faces is more visible. Gary

-

Ball Studs for Side covers
frankd posted a topic in Venture and Venture Royale Tech Talk ('83 - '93)
I contacted Russel Hicks and he does not have any ball studs, plus he is real busy at work right now so he isn't planning on ordering any. If anybody else needs a couple, let me know and I can order some extras. Or if somebody else is planning on ordering them from McMaster-Carr, let me know and I can have you add mine to the order. My E-mail is ka9j2003@yahoo.com Frank D. -
Are any Midnight seat sets made without the chrome studs?
-
Where could I get on of those? I have kept an eye on Flea Bay but the only ones there are not studded. I was thinking on adding my own studs but don't want to scratch my tank if the studs rub in any way. Any feedback would be great.
-
I am looking for a stock seat that will fit a 2006 Royal Star Venture preferrably in good condition. No pillow top or studs, just a regular seat. I'm hoping someone has one lying around collecting dust that they are willing to part with at a fair price.