Search the Community
Showing results for tags 'coil'.
-
 Can anyone tell me which wire coming rom the TCI module goes to which coil? I have determined that number one cylinder is the left rear, number two is left front, number three is right rear and four is right front. Now, there are four wires coming out of the TCI- Orange, Grey, Yellow and White that go to the coils. I need to know which wire goes to which cylinders perspective coil. Any help greatly appreciated! Tim
 -
 Please oh great and wise ones... I'm going nuts here. About two months ago now I got stranded at work on my 99RSV. Rode to work just fine. When I went out to start it to go home, the starter turned and turned but she wouldn't start. I pulled the two back plug wires (cuz I could reach 'em) and stuck a screwdriver in there. No spark. I got the bike towed home and checked the other two plug wires. No spark there either. Checked resistance to the coils, and I'm easily within specs. Same on the batt'ry voltage. I then skipped all the other smart things to do and ordered a new pick-up coil and gaskets. After installing the pickup coil, the bike started!! Unfortunately after I shut it off, I could not replicate the victory and it hasn't started since. Well... I'm too much of an idiot to admit to my co-workers that I don't want to ride cuz it's just too darn cold, so I've been using the excuse that the bike ain't runnin' as my out. I'm now starting to get that twitch in my eyelid from driving the cage to work for two months and have decided to re-enguage. Any ideas? I'm gonna try to bypass the Kickstand and kill switches tonight (there's no need for anyone to remind me that I should've checked that before buying a pickup coil... my wife has that covered) but I'm not hopeful. any suggestions? thx!
 -
 Im appealing to the wisdom of this site to find a mistery. Well here goes. I'm not getting a spark on second cylinder. I've gone thru the diagnose on the clymer's manual and all indicates is the igniter unit. I've changed it twice and same. I've switched the wires from the front primary coil to the second and I get a spark. Hence it's not the coil. A mechanic friend said it was the pickup coil. I changed it. Same symptom. Both sparks and caps tested and good. The only thing left is the stator, which test fine and produces spark in both coils. Any suggestions? Thanks!
 -
Hi, I have been having issues with a poor running 89 that is very sluggish. acts likeit is on 3 cylinders much of the time. I have rebuilt the carbs, synced them with a tool, and installed new plug wires, caps and plugs, checked the pickup connectors, and cleaned up the TCI connectors. All cylindars fire but many seem weak and for 1 cylinder in particular I can remove the plug wire while idling and it barely changes the idle. Due to another issue I was able to get to my coils & TCI. Upon inspecting the coils I found that 3 of them have cracks in the housing at the top of the body on the mold parting line. Does this indicate that they are bad or weak? Would the cracks affect the delivered spark? Thanks in advance!
-
:sick:hay I gess I will just jump in and ask you if anyone can help me out I have got a 87 1300 with a dead # 2 cylender no fire I thought it was a dead coil but I took the # 4 electrical conector and hooked it to the # 2 connecter and I got fire from the coil so I don't know if it is the brain or the igniter or what it could be I cleaned all other connections it"s got me stumped just call me brain dead if any ideas thanks............
-
I am considering a diaphragm to coil spring conversion to try to minimize slippage during hard acceleration. Before I do, I would like to get some feedback from anyone who has done it. Was it worth it. I don't want to do something I will just regret later. Why did Yamaha change to the diaphragm clutch spring? My 84 had coil springs. Now I have a 99 RSV and I'm back to the same problem I had with th 84 until I installed the heavy duty springs.
-
Going to try this again. Anybody have an old , bad, removed, ignition coil from a 2nd gen laying around ?? If you replaced a coil, could you pull the plug wire out of the " old " ignition coil, and take a photo, or let me know, if the plug wire can be " Re-Installed " after you pull out the old one ?? ie: is there a pointed SCREW inside the hole the same as on the 1st Gen Ignition coils ??? I'm trying to figure out if I can replace the plug wire on these coils, but do not want to destroy a good one in the process. Any help here, appreciated, thanks.
-
Ok, we all know that on 1st Gen coils, you can eaisly remove the plug wire from the coil, and the spark plug cap. On the 2nd gen coils. the plug wire appears to " NOT " be removable, ( or replaceable ) from the coil end, of the plug wire. SO-- I was looking at my right front Ignition Coil on my 08, yesterday, and where the plug wire go's into the Coil, it appears as if there is a " Sealant " applied around the wire where it mounts into the coil. What I am getting at here, is I would like to replace the Plug Wires, with some type of " Shielded Spark Plug Wires " . Anyway, so I am wondering if maby I Could remove , and replace the wires from these coils. Does anybody, have a Used ( ie: removed and replaced coil ) laying around in their garage. If So, any chance I could get you to take the old coil, and pull " out " the plug wire, and take some close Ups, of what the hole looks like, and what is inside the hole after you pull out ( ie: remove ) the old plug wire. I hope this all makes some sence, any way thanks to anybody who might be able to accomplish this, I'm working on " Reduceing " Ignition Noise on the AM radio I have installed on my RSTD. And installing Shielded Plug wires might be of some help. ---------------------------------- Next Qustion : ??? Just curious, has anybody, Installed the 1st Gen Ignition Coils, on a 2nd Gen Bike ???? this would obviously solve the plug wire problem, if the coils will work on the 2nd gen bike . I make this point, because it very easy to replace wires on the 1st gen coils, and lots of them avialable, I allready have two of them, and would only have to find 2 more to do the job, if this is possible. ?? --------------------
-
Greetings, I am at an end. I do not know what is wrong with my motorcycle. I have a 2006 RSTD with 8500 miles, and a few months ago I noticed a little backfiring when riding (mainly coming out of the right muffler.) It progressively got worse. I decided to change the plugs and noticed that the rear right cylinder plug was fouled (completely black.) I changed all the plugs, the problem persisted. In fact, after just a 20 min ride it fouled the new plug on the Right Rear Cylinder. My local dealer suggested to run some Techron through the bike, did not help. Also, there is a strong gas smell when running the bike. I checked the plugs and they are getting fire. I read on the forum that it might be my carbs, I bought a Carbtune 2 and synced the carbs (they were not even off that much.) No Change. A friend suggested to change the plug wire, but I quickly found out the plug wire is molded to the coil. I am not a mechanic, but I have done minor repair and maintenance on my bikes through the years. I am at a total loss. The owners manuel says that a black plug means a defective engine (I sure hope this is not the case.) Your help would be much appreciated. God Bless, Matt Powell My bike needs a good doctor
-
 Before my long trip i have accumulated some spare parts to take with me. I am taking TCI, rectifier/regulator and ignition coil (I am taking just 1 spare of the 4 that i have). Is there a way to test the regulator and ignition coil without putting it on the bike? I have already cheched the TCI on the bike. (BTW I am not bike electrical literate.)
 -
Before my long trip i have accumulated some spare parts to take with me. I am taking TCI, rectifier/regulator and ignition coil (i am taking just 1 of the 4 spares that i have). Is there a way to test the regulator and ignition coil without putting it on the bike? I have already cheched the TCI on the bike. (BTW I am not bike electrical literate.)
-
Well I have finally finished my Bench Tester for TCI's. I can now take in anyone's TCI to test and give a report on the results. The test will consist of the following. 1. Test each input coil circuit to see that it activates the corresponding ignition coil output transistor in the TCI. 2. Test the circuit for the kickstand switch ensuring that it deactivates the TCI. 3. Test the circuit for the pressure switch making sure that it advances/retards the timing. 4. Test to see that each ignition coil is getting the proper voltage to energize. 5. Run tests at a simulated 900 RPM up to 6000 RPM at various speeds. I can bench test the TCI without taking it apart by unsoldering the motherboard from the case. I can also test the board even if it has been taken out of the case. I will do this testing for $30 (return postage extra). Any repairs would require taking out the board and replacing components as required. Pricing will depend on what components would be required but total cost above the $30 should be under $75 (postage extra) I just completed a repair for Rich at wera90ex@aol.com and he was quite happy with the results. (He said I could use his name as a reference.) I'm attaching a picture of my test rig which outputs to my scope. The picture shows an output from a good TCI running at about 1000 RPM. It shows a test for input coil #1 with the output going to ignition coil #1. It was very hard to get a good picture but this does show the output. Any queries about this testing can be sent to me at donb@MNSi.net Best regards to all Don Brechun Windsor, ON
-
I swapped wires on the coil and still had a dead left cyl. Does anyone have any pointers on how to drop the rear cyl. coil packs so I can check the wiring. Is there a test that will tell if the ignitor is toast?
-
.thumb.jpg.9dfefb49018580a1813c8128f131546e.jpg) is this what we (1st genners) have? a CDI system? anybody try these?http://store.prestoliteperformance.com/accel-mc/metric-motorcycle/universal-super-coils-black.html.
is this what we (1st genners) have? a CDI system? anybody try these?http://store.prestoliteperformance.com/accel-mc/metric-motorcycle/universal-super-coils-black.html. -
 Well figured I would post this here just to see if we have any out board Techs or folks familiar with this engine. Here's what I have got. 1995 Yamaha 225TXRT. Carbureted (6 individual) 76 degree V6 First noticed the problem as a surge sensation running at 4000, would get an intermittent burst for 1-2 secs then drop back. Had a little miss stutter I could detect coming up on plane, but otherwise planes easily (226 GW Seafarer). Replaced spark plugs, ran the same. Ran it for about an 1 hour after that. Checked the plugs and number 2 looks new. Here's what's been done. The engine has spark on all six at idle and I have visually verified spark at the spark plugs on all six at cranking speed (old school test with plug in the boot). Checked the ignition coils resistance primary and secondary windings. All OK per spec. Checked the resistance on the spark plug caps and found #2 way out . Replaced the spark plug cap on # 2. Test ride no change. Swapped complete coil assembly between #2 and #4, Still no change, problem does not follow the coil. Still missing with no coloring of the #2 plug. Resistance of Both Charge Coils and each of the 6 poles of the pulser coil are in spec. Using the Yamaha (Electro Specialties) CDI Tester (Black box with the dial, light and High/low switch) The Pulser coil (all six poles), the charge coils, and the CDI outputs to the ignition coils (using the specified load coil) all test in range. All of them tested higher than the minimum specified set point. Spec for CDI output to coil is dial at 75 and switch on high. All 6 cdi outputs would continue to light the light up to a dial setting of 82. Cranking speed with all plugs removed. Same for pulser coil output. Spec is 45 and low switch. All 6 poles will light the light with a dial setting up to 55. Repeated the output tests with the Yamaha CDI tester with engine hot. Same result. Ran boat with Air intake removed and confirmed fueling on #2 with same spray pattern as 4 and 6. Fresh fuel, 90 octane No ethanol Recreational marine fuel, New Racor filter, have never had any fuel starvation problems. Still have even compression 125-130 in all cylinders. Can Pulser Coil check good at cranking speed and be bad at higher Speed?? Pulser coil is over $300.00 don't want be wrong on this. Anyway to check if I'm dropping the pulser for #2 under load?? Don't have a winky blinky (Yamaha Diagnostic Tool YB 6444), but the manual says it works on mine. Is the winky blinky a reliable test? Would you condemn a pulser based on the Winky blinky code? Have I missed, not checked anything obvious that would effect just #2? Thank You in advance for any help, suggestions, Derrek
 -
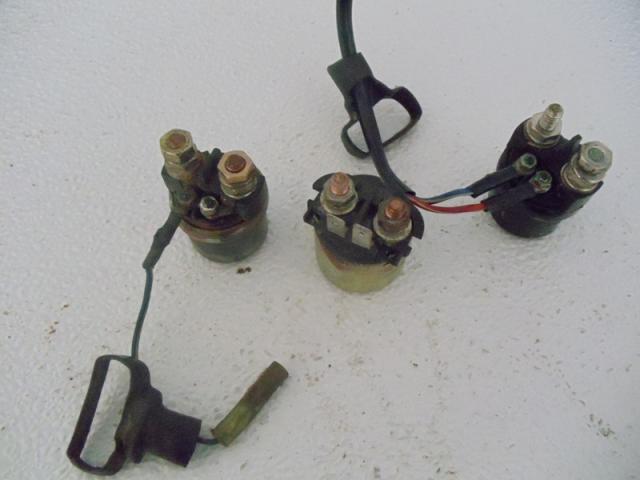
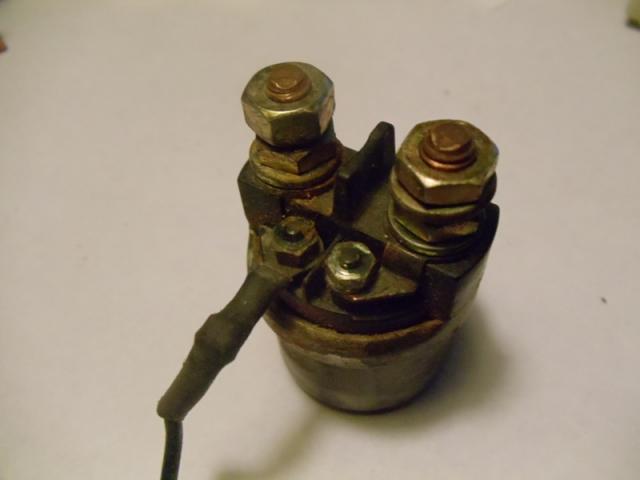
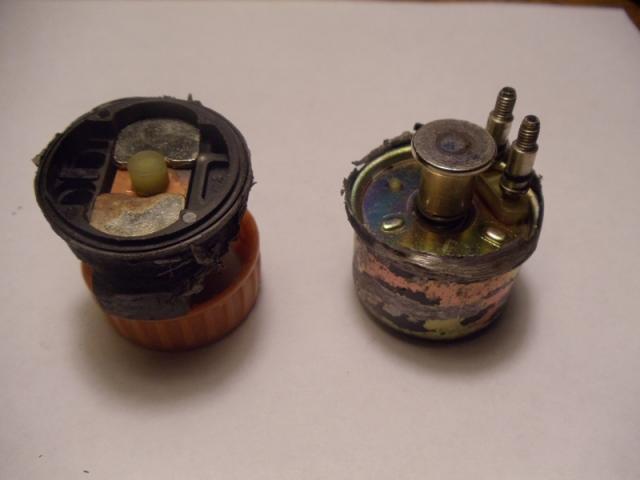
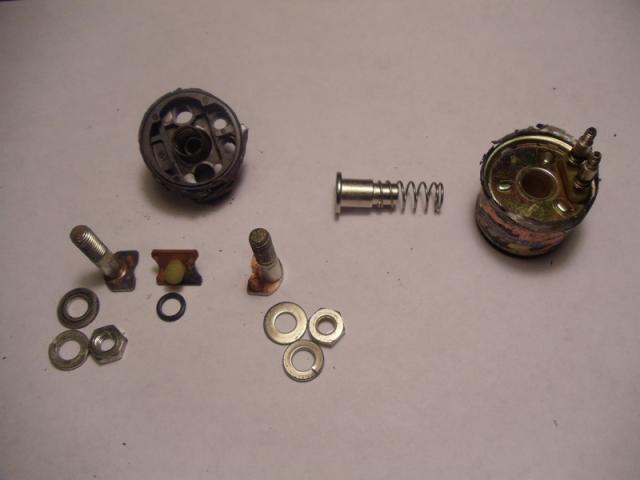
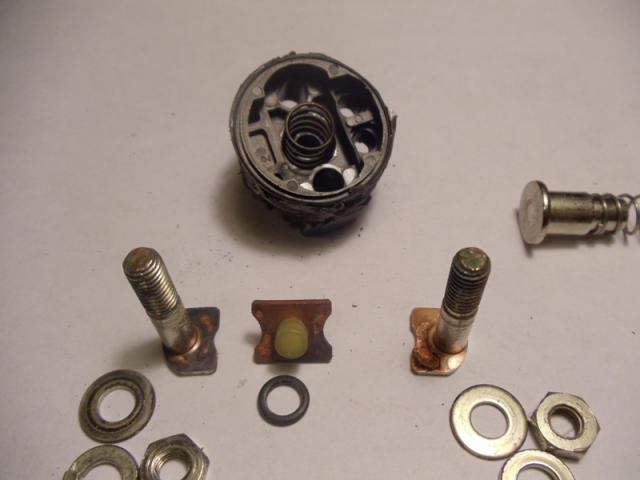
I will start this post by saying, 'No Venture parts were harmed in the making of this post, however there was an unfortunate VMax casualty' Pictures attached are of a group of solenoids from a MKI, MKII Venture and VMax. 1st picture is of on left an MKII Venture, middle is I believe an 83 Venture (probably similar to 84-85), and on the right is a VMax solenoid. [ATTACH]61706[/ATTACH] Next is shown why the MKII's only need 1 wire in control circuit, on the right side there is a jumper from the coil terminal to the large terminal that is connected to the positive battery. The MKI's and the VMax's have two wires in the small coil control circuit. The MKII circuitry is all done on the 12V- side. [ATTACH]61707[/ATTACH] This picture shows the VMax solenoid split in half. Right right side is the coil, plunger & spring. The two small studs are for the control circuit wires. Left side is the main contact set. The two silver colored pads are the tops of the studs the main heavy starter circuit wires are attached to. Between the two silver studs is a plastic plunger nub for the copper contact plate between the two studs. This plastic nub keeps the coil plunger from contacting the two stud tops when the coil is de-energized. Normally the spring in the coil side keeps the plunger in a position to press down on the plastic nub and break the connection between the two studs. [ATTACH]61708[/ATTACH] This picture shows the plunger and spring removed from the coil pack on the right side. On the left side is the two studs removed and the copper contact plate that completes the circuit. Notice the dislocation from arcing on the stud base to the left. This carbon build up is enough to cause failure of this solenoid. Not obvious in the picture is a spring in the contact black housing in the center hole. This spring pushes the copper contact plate into two stud bases when the coil is energized. [ATTACH]61709[/ATTACH] This picture shows a closer view of the contact side. Arcing damage to stud faces is more visible. [ATTACH]61710[/ATTACH] Gary
-
I will start this post by saying, 'No Venture parts were harmed in the making of this post, however there was an unfortunate VMax casualty' Pictures attached are of a group of solenoids from a MKI, MKII Venture and VMax. 1st picture is of on left an MKII Venture, middle is I believe an 83 Venture (probably similar to 84-85), and on the right is a VMax solenoid. Next is shown why the MKII's only need 1 wire in control circuit, on the right side there is a jumper from the coil terminal to the large terminal that is connected to the positive battery. The MKI's and the VMax's have two wires in the small coil control circuit. The MKII circuitry is all done on the 12V- side. This picture shows the VMax solenoid split in half. Right right side is the coil, plunger & spring. The two small studs are for the control circuit wires. Left side is the main contact set. The two silver colored pads are the tops of the studs the main heavy starter circuit wires are attached to. Between the two silver studs is a plastic plunger nub for the copper contact plate between the two studs. This plastic nub keeps the coil plunger from contacting the two stud tops when the coil is de-energized. Normally the spring in the coil side keeps the plunger in a position to press down on the plastic nub and break the connection between the two studs. This picture shows the plunger and spring removed from the coil pack on the right side. On the left side is the two studs removed and the copper contact plate that completes the circuit. Notice the dislocation from arcing on the stud base to the left. This carbon build up is enough to cause failure of this solenoid. Not obvious in the picture is a spring in the contact black housing in the center hole. This spring pushes the copper contact plate into two stud bases when the coil is energized. This picture shows a closer view of the contact side. Arcing damage to stud faces is more visible. Gary

-
For repairs. I've been dealing with bad gas milage for a couple years now. I've had everything fuel related checked, synced, cleaned etc. I've read about these coils going bad on occassion. Namely the number three coil. So this summer I bought a set of coils from a low milage crashed RSV for $40. I'm in the process of replacing the #3 coil. Has anyone done this themselves? If so, how the heck do you get your hands in there to replace it? I've torn up my hands to get the old one out and I almost have the new one in, but I'm having a hard time getting anything in there to tighten the screws. I've pulled the right side rear exhaust off. I moved the two metal tubes out of the way. But there is not much room for my paws. I've gone at it from the top and underneath. Any suggestions?
-
 Last week, I replace a bad coil on my RSV. It was the right rear (number 3) coil. I was talking to a couple of other RSV owners today and they commented that everybody they know who has had to replace a coil it has been the number 3 coil. If you have replace a coil, which one was it that was bad? I'm just wondering if there is a pattern here and if so, why the number 3 is going bad.
 -
 I have a 08 RSV and getting ready to install a Biker's Choice tach. It says the green wire goes to the negative terminal on the coil. Is there a coil diagram available to show me where the negative terminal is? Thanks
 -
The Problem... My 07 RSV ran good (not great) most days, until a 100 to 150 mile break/rest, after the 15 to 30 min. break the bike seemed sluggish and sometimes similar to a dead cylinder. Sometimes if the ride was early morning, a damp day or late evening, the problem seemed to self heal. Having a somewhat mechanical background and reading all the posts, I flushed the carbs, did Sea Foam and a carb sync, but the problem remained the same and seemed linked to heat and humidity. The problem was very similar to a coil breaking down and I almost stopped by the dealer to purchase a coil. I did a search on coils and found the post by V 7 Goose listed below. http://venturerider.org/forum/showthread.php?t=41216&highlight=coil Following "Gooses" instructions I found #3 cylinder plug cap with a resistance of 13k and the brass disc being black (not green or corroded) with the spring shinny as new, # 1,2 and 4 cylinder caps were like new. I cleaned the black disc and applied Di -Electric Grease to all contact areas of springs, discs, resistors and screws of all 4 caps. All had a resistance of 8-9k after cleaning and grease. 400 Miles later.........Again...."Thanks Goose":thumbsup: "The problem Is Gone" "The Bike Is Like New" "Great site with knowledgeable members " $12.00 per year..........How much for a coil??????
-
After 5 months of on again off again tinkering, my 92 finally runs, not well, but it runs. Got the bike from an estate, as a basket case, last year and actually began work on the bike last July after I found a good drive shaft and differential. It had been torn apart in 2003 after the previous owner twisted off the pinion shaft. Got it all put together last summer. Cleaned the carbs - they were pretty bad, put new diaphrams in, lined the gas tank, checked all the wiring connections, scanned a lot of the threads on here regarding getting these older bikes back on the road and performed as many of the items as I could and thought I was ready to put it on the road in August. Tried to start it up, no spark. Back to the forums, rechecked all the wiring, re ohmed the coils and pickup coil, everything tested ok. Everything was pointing to the TCI, got it out from under the battery, opened it up and sprayed everything down with electrical contact cleaner and baked it in the oven for a couple of hours, still nothing, retested the ignition components again, coils and pickup tested ok - must be the TCI; so I ordered the ignitech unit in November. When it arrived it came with the wrong wiring harness for a 93 and they also informed me that it had the wrong program in it. To shorten up this long story, have yet to get the Ignitech program to work. In retesting all the ignition components, the pickup coil did not read out, out of desperation, I was able to find a pickup coil on ebay in February and changed it out. Still no spark with the Ignitech unit, what the heck, plugged the original TCI in and it fired up. It wuld only run with a lot of choke, but hey, it was running. Let it run for 20 minutes or so and shut it down. Came back to it the next day - no spark and the new pickup coil did not ohm at all. Last week found another used pickup coil, ohm'd it when it arrived, tested good. Drained all the fuel that had been in the tank for the past month and refilled with 5gl of gas and a can of Seafoam. Put it in with the original TCI, fired right up - again with a lot of choke. Ignitech still no spark. Let it run for an hour and a half, was slowly able to reduce the choke to about 1/4 to 1/3. but can't take the choke all the way off and if I give it any throttle it dies. tried it again last night, same thing, fired right up with choke, but can't take the choke all the way off and if i give it any throttle at all it dies; so I still have a carb issue to resolve. Just not sure what to look at - more carb cleaning, more Seafoam and let it work it's magic, new parts, float level,...?
-
 I have a set of Denso COP coils in hand. They came out of a 2007 Honda CBR 1000. This unit would replace the larger coils used on the bike now. 129700-4840 10484 printed on coil end - 08H31 stamped in same area The Ignitech TCI module maker said it would handle the coils lower primary resistance. Going to give these a try on the bike as I am not really happy with where I had to install rear pair of coils. A little other discussion on this at link below. Started a new thread to maybe get some fresh inputs. http://www.venturerider.org/forum/showthread.php?t=58797 All 4 coils primary's measure 1.4 ohms All four coils secondary's measure 13.46K ohms. How do I tell which of the 2 input terminals is the common 12V+ terminal. I can see no markings which indicate internal wiring. My meter is not sensitive enough to differentiate between 13.46K ohms only and 13.46k ohms plus the 1.4 ohms coils in series. Could I just test wire up a circuit. Put plug in & grounded. Put 12v + to one side of coil & 12v - to other side of coil (this attached to plug ground). Open negative side at coil. This seems like it should fire plug. If it does polarity guessed at correct. If not flip polarity at coil pins. It should fire if it didn't before. Schematic shows two wiring choices. Anyone see any fault with this. Picture of COP coil on head is just a random one I came across for an idea what they look like installed. Gary
 -
Picked the new bike up from the dealership on Thursday, on the ride home I thought it was running a bit on the lumpy side but put it down to not being run much since it was imported from the US. When I got home I checked the temperature coming from the header pipes and the rear left was a lot cooler than the other three so first thing Friday morning I rang the dealer who told me he had no vans in the area to pick it up so I offered to ride it back for them to have a look at (only about 25 miles from me). On inspection they first reckoned it was a spark plug breaking down under load, then after further investigation discovered it was an intermittent fault with the coil, so after nearly three hours hanging around the shop they fitted a new ignition coil and handed it back to me, was I annoyed? Naaah, these things happen. Anyway the bike ran ok on the way home, it just felt like it needed the carbs balancing......you know, a little hesitant on the throttle and a little vibration through the footpegs, I wasn't too worried as the dealer wanted me to drop It back the following week as they had to fit a non genuine coil to get me going and were ordering a genuine Yamaha part as soon as the Easter holidays were over so I thought they could sort it out then. Didn't get a chance to use the bike yesterday because of work but I'd arranged a breakfast run for this morning, so I went out this morning to start her up and she's sounding a bit rough, so I ran her round for about 15 minutes and when I get her back guess what? The rear RIGHT cylinder is stone cold........am I annoyed now? Oh yes I sure am......So I get underneath the bike to have a look and make sure the connections to the coils are ok (which they are), but I notice that that the coil for the rear right cylinder is only held on by the bottom mounting bolt.....the top one is missing because the coil doesn't fit the mounting holes correctly and there is a gap of about half an inch. So thats where I am up to now, stuck at home on a lovely spring day. How is Royal Star ownership going so far? You don't want to know http://www.venturers.org/Forum/images/smilies/icon_censored.gif If the dealership is open tomorrow (public holiday here) he's not going to know what hit him. http://www.venturers.org/Forum/images/smilies/icon_mad.gif Starting to wish I'd kept my Roadliner now. Rich http://www.venturers.org/Forum/images/smilies/soap.gif
-
 I need to know how to properly diagnose a bad ignition coil. For a while I have had a vibration mainly under load and feel I loose power at the top end where everyone is bragging of all kinds of power. It feels like when I rev it up that its just not all there. I currently have Iridium plugs in there but am not impressed and am going back to regular NGKs. Ive thought about changing to after market coils and wires but dont want to change if it will do me no good. So how do I find out if I have a problem?