Search the Community
Showing results for tags 'steering'.
-
OK hear my story and I'm sticking to it Back in Dec. there was a discussion about packing the bearings in the steering head. I stated that I had Installed a ZERK in my 04 RSV (as I have done in about 50 different type of bikes). Another member tried it and had a problem 05 model I think, he had put 14oz in his and it still was not coming out. I then tried putting a Zerk in the steering head of a 03 and had the same problems. I said I would find out why and this is what I found. there is a small hole about 1/8 inch in diameter and 1' below the the bearing race in the tube on the back side On my 04 it appeared to be welded from the out side from the factory. My fix was to weld up his from the in side which I did and now his also can be greased Will out pulling the bike apart. what I wanted to know is if this hole is in your bike (it can only be seen when you pack the bearings) and is it open or welded up .this is the first time I have come across something like this. I can not image that this is left open by the factory as water could get in the steering head bearings. I have no ideal why it is there except to poss let the welding gas out when manufactured The pitures are taken standing in frount of bike looking in to the steering head 1 one is of hole 2 is after repaires
-
had rear tire replaced and steering head bearing,after i picked it up tuesday and road it home i noticed when i swerve back and forth the roar is gone however when i let go of the handle bars it shakes worse than before.(please don't say hold on to the bars)i called the dealer and he said that they cant press the bearing in so after i put 2 or 300 miles on it bring it back and they would re torqe the bearing. to me that sounds a little funny,need some imput.
-
I've got my RSV on a lift to replace the fairing. While there I checked for looseness of the steering head bearings by grabbing the front end & rocking it. Never had any problems with it but thought I'd check while on the lift. I've got 40k on it. Don't see any looseness at all. So do I need to remove and retighten the nut or just leave well enough alone? Also, is there any greasing to be done? I don't see any grease around the area, but do see dirt that looks like it's glommed onto grease that's seeped out over the years...not a lot, but some. Just wondering if I need to do anything or if I should just leave it alone? Thanks for the help in advance...JR
-
droped off the ole girl to get a new rear tire and a steering head baron,cant wait to get her back and its just in time for the bike show in greenville,sc next weekend.cant wait to see the sleeperhawks and other!!!
-
Just fishing for tips and tricks from any one who who Has done this. Mine is an Air Bag. I am hoping that disconecting the battery is sufficient to prevent mis hap in that area. Plan is to drop the forks tear them down install Progresive springs and reseal and re bush. In my head it is a pretty straight forward operation. I should have gotten "All Balls" for the steering head as well but it is an afterthought and with the holiday and availible time off now I will go ahead with the forks and do the steering head later.
-
I'm having trouble getting access to a Dodge forum. I know many of you are experienced with other than Ventures/Yamaha. I have a 2005 Dakota, 4.7 V8, 4 wheel drive. Low mileage, under 30,000. My problem is with the power steering. When it is cold, the power steering is "stiff", difficult to turn the steering wheel. It is slow returning to center, I have to steer it back to center. I feels kind of "jumpy" with little surges of power assist. As it warms up, the problem diminishes, and eventually virtually disappears. In warm weather as the engine warms more quickly, the problem also goes away more quickly. I'm looking for suggestions as to what the problem may be. I have limited mechanical resources. I've thought of trying to change the fluid, but don't know how I would get all of the old fluid out of the system.
-
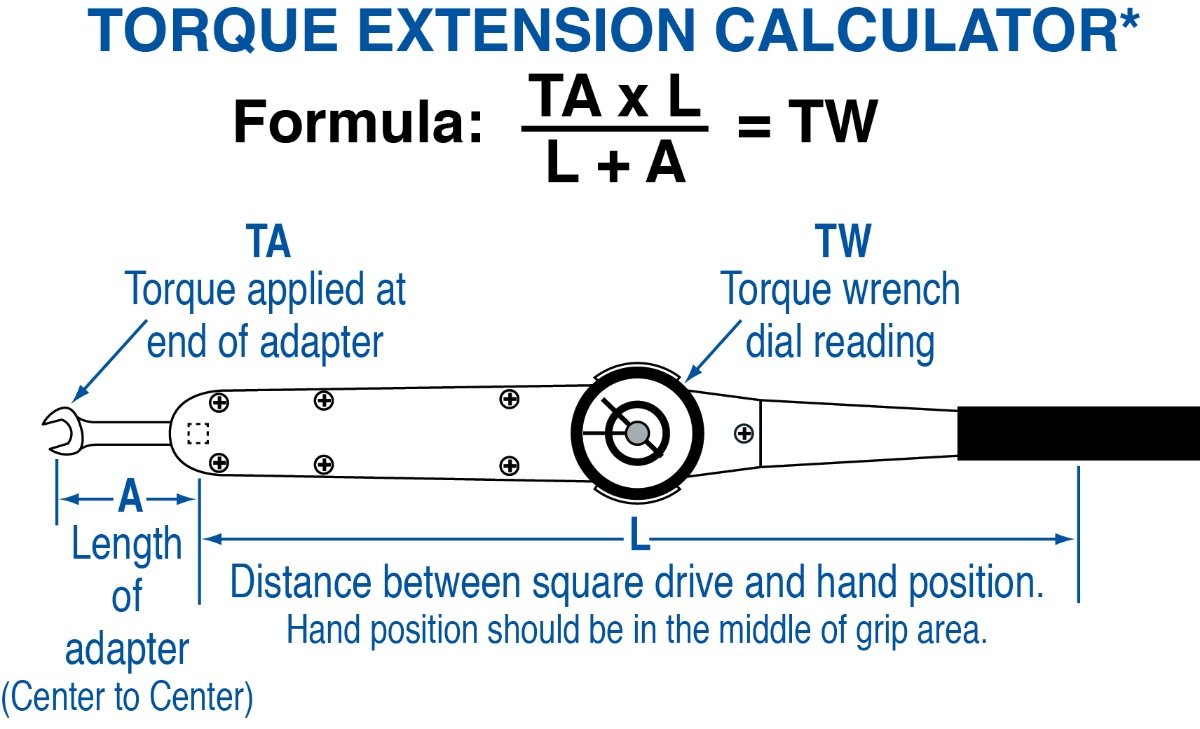
 Submitted by Saddlebum. Proper use of steering head wrench with torque wrench By the way everyone for some of you who may not be aware of this, There is a small issue you need to keep in mind when using this tool with a torque wrench. If you mount the tool on on a torque wrench at a 90 degree angle to the torque wrench . You may set the torque wrench to the exact torque spec. If you mount it at a 45 DEG. angle or straiaght in line. You have to do a small calculation to compansate for the additional length. In otherwords you set your torque wrench at a lower setting to compensate for the added length. Here are two links that will do the calculation for you as well as explain it. The second link actually gives you a pic of the torgue wrench setup. you simply fill in the boxes and it will tell you what set your torque wrench at in order to reach the desired torque. https://belknaptools.com/extensions-calculator/
-
February 12, 2010 post date I have received my order of the steering head bearing nut wrench. I will be shipping out to every one that has ordered one. I have extras, so if you would like one and have not ordered, see below for info. I have include a PDF cut from the 1st Gen & RSV service manuals relating to the procedure to set torque. Pay attention to text about setting torque wrench at a 90 degree angle to wrench. Not doing so will affect torque reading. Also listed below are the threads relating to this tool. Gary http://www.venturerider.org/forum/showthread.php?t=45046 http://www.venturerider.org/forum/showthread.php?t=44833 http://www.venturerider.org/forum/showthread.php?t=44719 http://www.venturerider.org/forum/showthread.php?t=44668&highlight=steering+head http://i1007.photobucket.com/albums/af193/gdingy101/PICT5202.jpg The procedure for setting steering head torque is outlined in the service manuals beginning with the 1986 manual. This is under Periodic Inspection & Adjustment - Chassis - Steering Head Adjustment. Also, if you are the proud owner of the MKI (83-85) Ventures, you could use the procedure outlined in the 86-93 manual. If you need a copy of this procedure I can provide it for you. The tool will work on any year Venture. The same part number is shown in the part fiche from 1983 through the RSV's for the steering head bearing nut. The tool will also work on 1st gen VMaxs & FJR's The tool is laser cut from 1/4" thick, 304 stainless steel. I can supply this tool at a cost of $23.00 including first class shipping to lower 48 US, Canada will be $24.00, first class shipping. I can order more at any time. If you would like to order one or more my paypal address is gary@dinges.com. I will see the paypal transaction in my email. I can also accept check or money orders. PM me for address. Please mark payment as a personal transaction. Paypal does not send your address to me when it is marked a gift. Please include shipping address & your screen name in Paypal transaction, comments field. Attached are pictures showing the finished tool. Gary
-
Time to install a new front tire! Where is the best deal now for Avon Cobra's? Also plan on chaning the fork oil and adjusting the steering Head bearings. Could use some input there! This is the only write up I could find for the procedure: http://www.venturers.org/Tech_Library/index.php?action=article&cat_id=002013&id=349 Thinking about putting a zerk fitting in the steering head yoke area? Any thoughts on that? I know there was a how to write up but cannot find it?! What else should I be doing while I have this all apart? THANKS ALL!!
-
Does anyone know the size of the big nut on top of the steering head????????? A few of my sockets seem to have gotten legs and can't find one that fits.....Thanks....
-
 While I was in the process of changing the tires, I tightened the steering head nuts as Freebird describes in the maint section. Question being this: After 32,000 +/- miles, is 1/4 to 1/3 turn too much or about right? Steering feels ok, so I guess that is all that really matters.
 -
Good evening all, went out for a late night rip after getting the steering re-packed , sooooo out and about kept on hearing this "thumping" sound from the steering head area, when I hit a bump, concerned turned the bike around and got her home, jacked her up, checked all the usuals, when I found my Steering stem Nut loose:mad:...... and i mean LOOOSE, tightened it up with a pair of vice grips, steering is still nimble so i figure that was it, QUESTION: did I miss something else to check or should I beat my mechanic when I call him in the morning? not that i actually would but seriously thinking about it....
-
 Hey, just got done with my 16000 mile oil change and I noticed in the manual it said to repack the steering and swingarm bearings. My question is is this somthing I I can do myself? The bike has yet to go to the dealer for anything, I've done all the oil changes and tire changes myself. even took the tires off the wheels and reinstalled on my own, Iv'e had the bike up on the jack and done the steering handle bar swing, can't feel any thing loose. It acts like its supposed to. I did notice today when i got off the Interstate and was braking pretty hard I got a slight vibration in the front wheel. Really don't want to take it to the dealer and leave it for two weeks like they want,(or spend way more money than I have to fix it)
 -
I reordered some more steering head wrenches if anyone is interested. I had a price increase from my vendor, the cost is now $23.00. Shipping included. There is an ad in classifieds, or the info is here to order. I have include a PDF cut from the 1st Gen & RSV service manuals relating to the procedure to set torque. Pay attention to text about setting torque wrench at a 90 degree angle to wrench. Not doing so will affect torque reading. Also listed below are the threads relating to this tool. Gary http://www.venturerider.org/forum/sh...ad.php?t=45046 http://www.venturerider.org/forum/sh...ad.php?t=44833 http://www.venturerider.org/forum/sh...ad.php?t=44719 http://www.venturerider.org/forum/sh...=steering+head http://i1007.photobucket.com/albums/af193/gdingy101/PICT5202.jpg The procedure for setting steering head torque is outlined in the service manuals beginning with the 1986 manual. This is under Periodic Inspection & Adjustment - Chassis - Steering Head Adjustment. Also, if you are the proud owner of the MKI (83-85) Ventures, you could use the procedure outlined in the 86-93 manual. If you need a copy of this procedure I can provide it for you. The tool will work on any year Venture. The same part number is shown in the part fiche from 1983 through the RSV's for the steering head bearing nut. The tool will also work on 1st gen VMaxs & FJR's 1996-1998 and 2005-2009 Yamaha Tour Deluxe The tool is laser cut from 1/4" thick, 304 stainless steel, Mill Finish. I can supply this tool at a cost of $23.00 including first class shipping to lower 48 US & Canada, first class shipping. If you would like to order one or more my paypal address is gary@dinges.com. I will see the paypal transaction in my email. I can also accept check or money orders. PM me for address. Please mark payment as a personal transaction. Paypal does not send your address to me when it is marked a gift. Please include shipping address & your screen name in Paypal transaction, comments field. Attached are pictures showing the finished tool. Socket extension and nut are not included. Gary
-
 I need more advise. I decided to tighten the steering head bearing a bit today. I tried to loosen the top nut but could get it to budge. How hard should it be to move this? Do I need to use a cheater to break it free? I dont want to break anything. Thanks JR
 -
Here is a shortcut to check the amount of grease in your steering head bearings. The problem here is that the service interval for re-greasing the steering head bearings is every 16,000 miles, but on the RSV, the amount of work it takes (and therefore, MONEY it takes) to access these bearings is HUGE! And it gets exponentially worse if someone has added a bunch of accessories and new wiring inside the fairing. The entire fairing, both outer shell and inner shell, must be removed before the top triple tree can be removed to access the bearing lock nuts. And to remove the inner fairing, you have to totally disconnect every single wire, plug and component inside the fairing! In fact, this whole process is supposedly required to simply ADJUST the steering head bearings, but thankfully we have documented a quick and easy shortcut to sneak underneath and adjust them without removing a single part. But back to the problem at hand - it is a full day's work to properly strip everything to drop the forks out of the steering head and inspect/de-grease the bearings. But I think I have found a relatively easy way to at least check the top bearing without going through the entire process. After splitting the fairing, the inner fairing can be unbolted by simply removing two nuts behind the top of the headlight and two socket-head bolts, one on either side of the bottom of the headlight. Once these are removed the fairing can be pulled several inches forward without disconnecting any of the wires, enough to fully access the top triple tree. With someone to hold the fairing, you could remove the triple tree and the top bearing without much more effort. Certainly the top bearing can be inspected and greased in this way, and if it looks like the bearings really need to be serviced, you could then just put the inner fairing back on the two studs and proceed to disconnect all the stuff needed to properly remove the forks. It seems possible that with enough care (and probably three people), one might even lower the forks enough in the steering head to access and grease the lower bearing this way. I think I am ready to try and make a video of this process if I can find a couple of folks willing to spend a day helping me through it. Goose
-
I have received the sample of the tool that will allow the tightening of the fork bearing nut with a 3/8" torque wrench. It came out extremely nice. The part measures to within .002" of drawing. There are no signs of overheating or bluing from the laser cutting. Specification for steering head nut torque initial value is 36 ft/lbs. I tried tool at 65 ft/lbs. and it worked fine with no sign of deformation. http://i1007.photobucket.com/albums/af193/gdingy101/PICT5202.jpg The procedure for setting steering head torque is outlined in the service manuals beginning with the 1986 manual. This is under Periodic Inspection & Adjustment - Chassis - Steering Head Adjustment. Also, if you are the proud owner of the MKI (83-85) Ventures, you could use the procedure outlined in the 86-93 manual. If you need a copy of this procedure I can provide it for you. The tool will work on any year Venture. The same part number is shown in the part fiche from 1983 through the RSV's for the steering head bearing nut. The tool will also work on 1st gen VMaxs & FJR's The tool is laser cut from 1/4" thick, 304 stainless steel, mill finish. I can supply this tool at a cost of $23.00 including first class shipping to lower 48 US & Canada They will have the tools ready for me by Friday, February 12, 2010. I will start shipping as soon as I get them. I can order more at any time. If you would like to order one or more my paypal address is gary@dinges.com. I will see the paypal transaction in my email. I can also accept check or money orders. PM me for address. Please mark payment as a personal transaction. Paypal does not send your address to me when it is marked a gift. Please include shipping address & your screen name in Paypal transaction, comments field. Attached are pictures showing the finished tool. Gary
-
Would someone that has a Yamaha tool p/n YU-01268, ring nut wrench, and could measure a couple of things on it please PM me ? Picture of it is attached below. The RSV & the 86-93 Venture manuals shows this tool being used in the 'Periodic Inspections and Adjustment' section under 'Chassis - Steering Head'. I am looking at getting some of these made and need two measurements from the "official" tool. This tool allows the torque to be set on the steering head bearings without guessing at it. I have several contacts that have CNC laser and/or high definition plasma cutters that could make these. I want to get quotes on this item before I put it out there to see how much interest there would be in them. This tool should work on all 83-09 models. Gary
-
double whammy here! First, my '83 is not tracking straight when I let go of the handlebars. I recall from my commuting days that I used to sit on the back seat of the Virago with the thumb lock on and my hands in my pockets and ride for miles going down I20. My VR ('83) won't do that, she falls away to the left. What would cause this? Warped frame, tire out of balance, left side of my rear too big??? And after that of course, how do you fix it and is it worth the effort? Second and the main reason I bring this up, now that I have a sidecar attached, I am trying to attain neutral steering by adjusting the toe in. In theory I should be able to adjust sidecar toe-in to achieve the rig to be steering neutral, but that might come at the price of increased tire wear. Any suggestions or opinions? Thanks!
-
I couldn't find anything on this in the searches I did....so here goes. I have noticed at slow speeds where my steering lightly locks. It is in the straight position and is a noticeable "slot" where it requires more pressure to turn it. It is getting to be annoying at slow speeds. Took a weekend trip and it seemed worse this past weekend. I have tightened the steering head a while back and the bounce when it's in the air is still on the loose side. Any info would be appreciated.
-
So, if you were way out in back country, good road & visibility, you know your bike is in good shape (tires, shock, steering is tight, stock windshield), and you should take it up to 110 MPH (Mom, don't read this), what would make it get a steering wobble if you let off the gas to coast back to highway speed. Testing the (RSTD) bike yesterday, after a new rear shock was installed, I took it to speed. Acceleration and sustained speed 100 to 110 was fine, but when I let off to coast back to 60 it started pretty serious wobble. I corrected it by bring the engine back up to speed and decelerating more gradually. Seems, perhaps, the engine torque did not agree with something about the quick drop in speed. As it was correctable by increasing the RPM's, I don't think I can attribute it to steering (pretty new Avon tires and the steering head is tight). Ideas,,, (besides don't do that)? Mike G in SC
-
lately my bike seems to have a mind of it's own when it comes to going straight. I have checked the tires, made sure the front fork pressure is even, snugged up the steering head and it just seems to be getting worse. Any idea of what I should check next would be appreciated.
-
Well, I just got done helping another member replace the worn out steering head bearings in his RSV - what a nasty job! Most of us know that Yamahaha doesn't add much lube to bearings on the initial build, so it is pretty important you get in there and lube them at least once on the specified maintenance interval. But it is a big, nasty, and long job (and expensive if you have the dealer do it). I've seen a few folks suggest that you might as well just ignore it and wait until the bearings are shot around 50,000 miles, then just properly lube the replacements. Well, I'm here to tell you that is a bad plan. Much better to keep them in shape from the beginning. The bike we worked on had a bit over 70,000 miles, and the owner was complaning about lots of head shake and an unsteady feeling when coming off the line. When we first checked it out, the front forks had a LOT of slop when pulled front/back with the wheel off the ground. Using the quick technique to tighten down the bearings, we got a huge amount of movement out of the ring nuts, but even after they were tight enough to almost stop the free motion of the forks (where the tire will turn all the way to the stop under it's own weight), the same slop was still in the bearings. No option at that point except changing the bearings! When we got in there, the wear pattern on the inner race for the top bearing was very heavy at the front only (which explains why they had so much front/back play), and the lower race showed major wear marks in line with each individual roller. This showed that the bearing was so loose for so long that the rollers never actually moved in the race! Most interesting was the actual condition of the roller bearings - although there was not a lot of lube in there, this 03 with 70K+ miles still had some, and the rollers all looked pretty good, no pitting or corrosion at all. The message here is that if they had simply been kept properly adjusted, they would have been just fine even after 70,000 miles without a single service! Too bad. The work needed to change the bearings is pretty much the same as what you have to do just to lube them, but I'll tell ya that you really don't want to have to pull those races from the steering head or get that lower bearing off the shaft - that job ain't no fun! Yamahaha really forked up in the design of how those races fit in the head - virtually no lip exposed at all for a puller to grip. And it took a lot of time with an oxy-acetylene torch to finally get that bottom bearing to expand enough to come loose. I normally wouldn't worry about the torch work, but all I could think about was the horror of seeing that cast aluminum lower tree start melting on me if I got a little careless!! Replacing the bearings added at least three hours to this job. Ugh. Here is a quick note on something we learned about adjusting the bearings - the tech library has an article on how to do a quick and dirty adjustment by sneaking a long screwdriver up under the steering head cover and using a hammer to turn the ring nut and lock nut together. These two nuts are locked together with a tab washer, and I always thought there was a problem trying to get much movement of these ring nuts if you didn't use something to pry the lock tabs out of the slots. You see, every other application I have ever seen using a tab washer like this has a key slot in the shaft that prevents the tab washer from turning with both nuts together. Well, not his bike! That tab washer is not tied to the shaft at all, so you can turn both ring nuts together just as far as you want! If you haven't checked your steering head bearings for proper adjustment, you really need to do it. My 05 had noticeable chatter under heavy front breaking on rough surface by about 8,000 miles, but one adjustment using the quickie method took care of it. Now with over 73,000 miles, those bearings still have no sigh of slop in them. Even if you are not going to go to all the work to lube them, best keep them adjusted! Ride safe, Goose
-
Has anyone thought of, or done any mods to the front of the bike like increase the angle to improve the steering???
-
Well I made it home from Espanola late last night in first gear. I was very lucky, I was almost home, but got off the Highway well before I should have because of traffic. Then my steering was acting up. I had a hard time leening into a turn. I heard something metal hit my radiator or engine area so I stopped and looked at my steering and tire. Everything looked ok, so i kept riding, but the steering was getting worse giving a bad shake. I had to drop it down into 1st gear and go slow to keep the bike up and straight. As I pulled into my driveway and took my tire presure I only had 10lbs in it. Boy was I lucky. I put air in with my car mini compressor and I could hear the air leaking out of my tire and then found the little hole. The nail or what ever it was must have been blown out and that was the noise I heard. I had just bought a MC lift two weeks ago so lucky me again, up it went as I don't think I'll have time to get the tire fixed or changed before I leave for Europe in two days. Other bad news I lost or rather forgot my Venture Rider mug at a gas station after filling up. I leave mine attached to the gas cap with a beer foam holder so I always have to remove it when gasing up. Nuts.......am I mad at myself.