Search the Community
Showing results for tags 'jack'.
-
A question for the Canucks on here what bike jack do you have. I see Canadian Tire has one are they any good? Any help appreciated! Ken!
-
I have a HF ATV jack (el-cheapo) and a carbone-one lift adapter. I'm "planning" on taking off the rear wheel this weekend to clean/lube the splines, etc. Couple of questions: 1) Will the HF jack lift the bike high-enough to allow me to remove the rear wheel? 2) Will the removal of the rear-wheel affect the counter-balance of the bike on the carbone-one lift adapter? 3) How "unstable" will the bike be on the lift-adapter with the rear wheel removed? I'm attempting to eliminate any CATASTROPHIC surprises during this maintenace event! Thanks!
-
Maybe someone can tell me if the Carbon One adapter will work with this floor jack. If so the price is right. http://www.kragen.com/ProductDetail.aspx?MfrCode=PBI&MfrPartNumber=640753
-
Will a large C clamp work for a bead breaker for the front tire? I don't have a truck bumper to jack against like was suggested in another thread. RR
-
Where is it?
-
 Hi all... Let me start off by saying how impressed I am with all the help & feedback from members of this forum... It's a nice breath of 'fresh air', from some of those other sites... I'm wanting to service the rearend, not sure how to do it, and what's the best oil to use. It's a 96 w/4500 miles... Pretty sure it's never been done (assuming). Will I need a floor jack (bike lift)? Thanks!
 -
A friend of mine, who no longer rides, gave me a "Goodyear Racing" branded motorcycle jack. It's been a year or two since he's used it and he lost all the instructions that came with it. It's operation seems easy enough with the exception that I can't seem to make it go up. Anyone got an idea of what I might be doing wrong or at least have a scan of the manual that was supposed to come with this jack? Thanks in advance!
-
Just wondering if any of you use the scal rider q2 headset. I see they just came out with a newer version in February. Wonder if anyone has the unit with mp3 jack and your thoughts if it is worth the price and how does the phone feature work at high speeds. Thanks Brian D.
-
Why Me??? But at least it happened in my driveway. Hopped on the RSTC to run a quick errand this afternoon and noticed it did not wanna turn out into the street. Yup, front tire was VERY low. Got the air compressor and pumped it back up. When I took the chuck off, noticed air coming out from the valve stem. It is torn just above the wheel rim. Cannot for the life of me understand what could have pushed it sideways enough to tear it. Oh well!!! As I don't have a M/C jack, just a 2-ton small floor jack anyone have suggestions on how to jack it up enough to get the front wheel off. I'm thinking about running it up on my trailer (it will hold air long enough to do this) where I can tie it off in the rear to hold it upright, then using a 2X4 under the engine to lift the front wheel.
-
Anyone here using Magic Jack??
-
I want to buy a MC jack and both the Larin and the Craftsman motorcycle jacks are on sale. Larin at Pep Boys is $49.00 and the Sears Craftsman is $59.99. Is there one that is better than the other or are they equal? I am leaning towards the Craftsman 1500 lbs jack. COMMENTS ????? Bubber
-
My black cloud is still hanging around I guess. As most of you know I lost my daily ride and trashed the clutch in my Saab. Anyway I was stuck without transportation. Stopped at car lot and grabbed a 2002 Tarus that seemed to run fair. It was dirty. I cleaned it up and it has scratches and stains all over. To make it worse the Warden (trying to help) washed it whith a plastic abrasiave pad and Soft Scrub. Now it does have scratches all over. That is not my problem she was trying to help and just didn't know what she was doing. They could probally be buffed out. My problem is I drove it for over 2 months. Had no reason to jack it up tires are good and it runs as good as a new one. Started making a thumping in the rear when you hit a bump the right way. So I looked under it and one of the pins that connect the rear strut to the sway bar was rusted into. No big deal I stopped at the parts store and picked one up to replace it. Body wise this thing looks good except for all the scratches. I started to jack it up to replace the pin. Jack went against plastic trim that runs along the rocker panels where it is supposed to go. Jack went up thur rocker panel and car didn't go up . Several handfulls of rust fell out from under the trim. I stopped and didn't go any farther before jack came thru floorboad. Question is did I just pay 4000.00 bucks to have a car for 2 months. Car lot owner's assistant promised they would call me back. Hasn't happened and I don't think he will unless he wants me to pay for anything they do to this thing. Didn't mean to write a book just a little ticked with this and thought someone would know what I ought to do. I was liking the Tarus and it runs great. Not as powerfull as my Buick and not as good on gas milage but I just got in a hurry and grabbed something with wheels on it. Thought I had gotten lucky for a change. NOPE!! This rust was complletly hidden by the trim. Is the car lot owner legal obligation to help me with this?? There was a 1000 mile or something like that power train warrenty. Trip to beach took care of that.
-
where is it????
-
 I was one of the first to jump on Condor's MAC muffler offer a few weeks ago. They arrived safe & sound & looked awesome in the box. I had to wait for the never-ending rains to finally move through, and MacGyver some impromptu gaskets as the previous owner (or at least one of the 5 previous owners) had used a metal reinfoced muffler tape in place of proper gaskets. I happened to mention that in my thanks to Condor, via a PM, and lo and behold, the man sends me gaskets ! From California all the way to Ontario ! Thanks again, Jack. I got them today, and had them installed in less than 20 minutes. I think they look world's better than the original stockers I had as they were a little beat up. Worse, they were full of deteriorated baffle pieces and sloshed like 30 pound maracas. The new MAC's sound incredible - it's actually a motorcycle now ! Not obnoxious, but a definite rumble, and I really, really like it. So, the prerequisite pics : I apologize if the quality isn't the greatest - I used a new software package tonight to resize these, and I think the sharpness degraded quite a bit. The first pic is the bike (obviously) with my other new baby, 2009 Dodge Ram Crew Cab 4x4 with the 390 HP 5.7L Hemi (very fun). The second shows a better pic of the muffler. Please ignore the big hack on the bikini panel on the right side of the bike as I am still burning about that (search threads using "pine cone"). Best of all, we finally have a week here that is 100% sunshine. It's just real cold in the morning (about 42 degrees F this morning), but that sure doesn't stop me. Thanks again, Jack !
 -
Thanks to Scott MacMartin from Ottawa Canada for this excellent article. 1984 Yamaha Venture Motorcycle Engine removal, repair, and re-installation Distance traveled since purchase 208,728 km (about 130,000 miles). This Venture was the second year of production, built January of 1984. My 1984 Venture was making a rumbling sound at idle, which went away if I pulled lightly on the clutch. I pulled the clutch cover off, and removed the clutch. It was apparent that the bearing behind this clutch was distressed. Late fall is a relatively nice time in Ottawa, Canada. Temperatures vary widely, from highs around 20 (70f) to highs barely above freezing. I put the bike in the back of the garage, borrowed my brother's 1500-watt heater, and set to replacing this bearing. The garage is now very pleasantly warm (and quiet too - I can hear my watch ticking). This is an excellent time of year to spend a bit of time in the garage with the Venture. First some tools. The Yamaha tool kit is useful, but not adequate for this job. I used the following additional tools: 1. Torque wrench (50 foot pounds) 2. Metric Allen key set 3. Feeler gauges 4. Hydraulic car jack with wheels (3000 pounds) 5. Socket set (10mm to 19mm) 6. 1000 pound press (homemade with 2by6 lumber) 7. Yamaha Shop service manual 8. Circlip pliers The engine can be removed in an afternoon, if you keep steady at it. Since my brain is not total recall, I place each part removed along the garage wall beside the last part I took off. That way re-assembly is just a matter of picking up a row of parts and bolting them back onto the bike. Clicking on the thumbnail photos will open a much larger copy of that photo. http://www.venturerider.org/engineremoval/photo_hdr.shtml_files/810a.jpgThe carbs, exhaust system, rear brake master cylinder, battery, and radiator have been removed. The bolts for the thermostat housing and the starter motor are a bit tight, and I have put WD40 on them. These bolts should remove easily tomorrow. A neighbor's child drops by to see what I am doing. http://www.venturerider.org/engineremoval/photo_hdr.shtml_files/811a.jpgThe bodywork has been removed, the YICS chamber, and the air deflector dams. Foot pegs and shift lever have been taken off. All of the engine attachment points (except three) have been removed. The small hydraulic jack with wheels will be used to lift and move the engine 2 feet to the waiting "pad". http://www.venturerider.org/engineremoval/photo_hdr.shtml_files/813a.jpgThe engine has been out for 10 seconds or so. The engine rests on a piece of blue Styrofoam. It is apparent that the engine is also cosmetically not well - just have a look at that chrome cover on the clutch housing!! The radiator hoses are still attached. On re-assembly, I found it easier to put the radiator hoses on after the engine was in. http://www.venturerider.org/engineremoval/photo_hdr.shtml_files/814a.jpgI am working in a fairly small space - the back half of a one car garage. The blue and black boxes hold my tools. The floor has the parts, in order of removal - drive shaft, exhaust components, radiator assemblies, starter motor, and engine mounting hardware. http://www.venturerider.org/engineremoval/photo_hdr.shtml_files/815a.jpghttp://www.venturerider.org/engineremoval/photo_hdr.shtml_files/816a.jpghttp://www.venturerider.org/engineremoval/photo_hdr.shtml_files/817a.jpgSeveral photos of the failed bearing. You can see that the balls and race are perfectly fine, but the ball-bearings are all bunched to one side. The bearing cage has failed. http://www.venturerider.org/engineremoval/photo_hdr.shtml_files/818a.jpghttp://www.venturerider.org/engineremoval/photo_hdr.shtml_files/819a.jpgThe oil sump has been removed. Two views of the oil pump. You can see small bits of the bearing retainer on the oil pump intake screen. Later, I found other pieces trapped in the baffles on the sump itself. http://www.venturerider.org/engineremoval/photo_hdr.shtml_files/820a.jpgThe various items that attach to the side of the motor are removed (stator, coolant and clutch housings, and the clutch slave cylinder). The oil pump is removed as a single unit, and is not disassembled. The crankcase bolts are loosened in order, and then removed. The crankcase easily pops in half. http://www.venturerider.org/engineremoval/photo_hdr.shtml_files/821a.jpgI have placed the shaft with the failed bearing in the top half of the crankcase for this photo. It is only now that I realize that a 2ton press will be needed to remove this bearing. It is a press fit onto the shaft!! This should be an amusing problem to solve. Perhaps I will sleep on it... http://www.venturerider.org/engineremoval/photo_hdr2.shtml_files/823a.jpgI set the shaft with the stubborn/broken/press fitted bearing aside in the kitchen while I wait for the new bearings to arrive from the dealer. Yamaha Canada is amazing. EVERY single part that I order is in stock in the central warehouse in Toronto, and will be here in three days. Nothing is back-ordered or out of production. It is hard to believe that I am ordering parts for a 16 year old motorcycle. http://www.venturerider.org/engineremoval/photo_hdr2.shtml_files/824a.jpghttp://www.venturerider.org/engineremoval/photo_hdr2.shtml_files/825a.jpgThis is our first view of the upper crankcase. The shaft with the failed bearing is of course in the kitchen, so you cannot see it here. The rear shaft (the "driven" gear set) has two bearings that I will be replacing also. I will have to use a press to gain access to one of these bearings also. http://www.venturerider.org/engineremoval/photo_hdr2.shtml_files/826a.jpgI now can guess why this clutch bearing failed. It is a standard ball bearing. However, unlike all the other ball bearings in this engine, this one ball bearing set must resist sideways thrust every time you pull on the clutch. I show here the clutch pushrod, the seals (I ordered new ones), and the bearing. http://www.venturerider.org/engineremoval/photo_hdr2.shtml_files/827a.jpgThe shift mechanism has long seemed a confusing piece inside the motorcycle. I can understand its design when I look at it closely in real life, but in the photo it looks confusing once again. To me, a planetary gear set would seem a better way to provide gearing on motorcycles. http://www.venturerider.org/engineremoval/photo_hdr3.shtml_files/831a.jpgThis is one of the covers that I cleaned up. The clear-coat applied by Yamaha back in 1984 had weathered a bit over the last 200,000km. This was removed with a paint remover that "removes epoxy paint". Does the job just fine!! Anything that I missed the first time comes off with a second application. http://www.venturerider.org/engineremoval/photo_hdr3.shtml_files/832a.jpgIn areas that the cover had corroded, a gentle circular sanding with 400 grit wet sandpaper brought up a uniform appearance. I use soap with the sandpaper to keep the sandpaper from loading up. http://www.venturerider.org/engineremoval/photo_hdr3.shtml_files/834a.jpgPolishing is a peculiar task. Place a small bit of polish on the rag, and then polish lightly until the polish dries out. At that point of dry friction, more vigorous polishing yields excellent results. I initially used a white shop cloth, but later used "White Swan absorbent and strong paper towels" with results just as good. (and I did not mind throwing these towels out after a single use!) http://www.venturerider.org/engineremoval/photo_hdr3.shtml_files/835a.jpgThese are the three products, and the most excellent result. I purchased a high temperature clear coat spray can used by the local Harley Canada dealer, and trust that it will provide an excellent long term protection. http://www.venturerider.org/engineremoval/photo_hdr4.shtml_files/849a.jpgI went to the lumber yard, and for 5 bucks purchased a length of 2by6. Screwed it together, and drilled a hole of suitable size for the disassembly of this shaft. Note that the wheels on the jack are not supporting the force. A section of 2by6 is directly under the jack so that the jack does not try to move while under load. http://www.venturerider.org/engineremoval/photo_hdr4.shtml_files/852a.jpgI push the shaft up effortlessly with the car jack, and the spring on this shaft compresses. The split washers appear, and it is a simple process to pull the split washers and disassemble the shaft. These two split washers, and the full washer behind them, were the cause of all that "second gear" grief in the 1983 and 1984 model years. I had replaced these split washers almost 100,000km ago when my second gear had failed and thought it might be a good idea to change them again. There was no need. Less that a thou had worn off these washers in those 100,000km (by comparison, the original split washers had worn half through in the first 105,000km, causing the second gear failure). http://www.venturerider.org/engineremoval/photo_hdr4.shtml_files/853a.jpgI have now replaced the bearing on this shaft, re-installed the spring and gear/bearing (the gear and upper bearing are a single unit and do not need to be disassembled). Apply a little force with the car jack to compress the spring, insert the washer and split washers. Release the car jack and the shaft is ready to go!! http://www.venturerider.org/engineremoval/photo_hdr4.shtml_files/854a.jpgThis same press was used to remove the failed bearing behind the clutch, and re-install the new one. The forces on this operation are significant - I would guess a thousand pounds force to push the bearing onto the shaft. While I replaced many items as part of this project, this one bearing was the only item that absolutely required replacement. http://www.venturerider.org/engineremoval/photo_hdr5.shtml_files/855a.jpgThe cases drop together (with care to ensure that it IS easy, or something is out of place). Bolts on the lower cases and upper cases hold the two sides together firmly. I use Three Bond to ensure that the cases do not weep. You can see the 8 main crankcase bolts ready to be tightened. http://www.venturerider.org/engineremoval/photo_hdr5.shtml_files/856a.jpgThe oil gallery has been dropped in place. The oil pump will be added after these bolts are tightened. Then the sump is put on, and the bottom of the engine is now completely assembled. I roll the engine up-side-up and torque the upper crankcase bolts to specification. http://www.venturerider.org/engineremoval/photo_hdr5.shtml_files/860a.jpgThe clutch housing needs to be tightened onto the shaft that it rotates on. We will need a "special tool" to hold the basket from turning while we provide the correct tightening torque. http://www.venturerider.org/engineremoval/photo_hdr5.shtml_files/861a.jpgOnce again, wood is my special tool maker. I drill a hole in the lumber so that I can fit the socket through, and fasten two arms (purchased for 29 cents each) so that they slide into the slots on the clutch basket. Then torque to 600 inch pounds, by far the highest torque of any bolt on this engine. http://www.venturerider.org/engineremoval/photo_hdr5.shtml_files/862a.jpgThis is the setup. The torque is 50 foot pounds, so I use the empty frame of the Venture to hold the piece of lumber from turning. There is a lock tab under the bolt which must be bent over to ensure this bolt does not move. I bend it over with a screwdriver. I re-install the clutch plates, and torque down the pressure plate. The clutch housing can now be installed. The engine is ready to be re-installed in the bike. http://www.venturerider.org/engineremoval/photo_hdr6.shtml_files/863a.jpgI am very pleased at the appearance of the cams. They show no chipping, scoring, or other signs of stress. The exhaust valve clearances should be slightly higher than the intake valve clearances. http://www.venturerider.org/engineremoval/photo_hdr6.shtml_files/864a.jpgA detailed examination shows the tolerances to be good. On the chart, some of the tolerances look "too tight" by half a thousandth of an inch. I am not going to replace a shim which is only half a thousandth of an inch out of range. http://www.venturerider.org/engineremoval/photo_hdr6.shtml_files/866a.jpgThe valve covers need a little cosmetic refreshing as well. I ran these through the same process as the other covers, although I added "washing in the dishwasher" to get the crevices perfectly clean before spraying on the clear coat paint. http://www.venturerider.org/engineremoval/photo_hdr6.shtml_files/868a.jpgThis multipart piece sits on top of the engine between the cylinders. It too needed shining up. On assembly, I used Three Bond to ensure that the part would not weep. (this part is normally sealed by two intricate O-Rings. The O-rings do their best, but are not quite up to the task on my Venture.) http://www.venturerider.org/engineremoval/photo_hdr6.shtml_files/870a.jpgThis multipart piece seems to do many tasks!! It has passages for coolant, sections for crankcase ventilation, and piping for high pressure oil to the cylinders. I will be happy to install this part and forget about it. I really hope it does not get an oil mist on it like it did over the last 100,000km http://www.venturerider.org/engineremoval/photo_hdr6.shtml_files/871a.jpgThis is the starter motor. If you remove the two long bolts, the motor comes apart for maintenance. The brushes are in excellent shape. This starter motor needed just a little cleaning up inside and out, and that's all. http://www.venturerider.org/engineremoval/photo_hdr6.shtml_files/873a.jpgThe multipart piece is installed. The cam covers are being installed. The cam covers get new gaskets, and new "seals" around each of the bolts. These seals have never been previously replaced which is perhaps why they misted oil onto the cam cover. This task could normally be done with the engine "in" the frame, although it is vastly easier to accomplish with the engine "out" http://www.venturerider.org/engineremoval/photo_hdr6.shtml_files/874a.jpgThe engine is ready to install!! http://www.venturerider.org/engineremoval/photo_hdr7.shtml_files/877a.jpgThis is a task that I am a little apprehensive about. I am not exactly a strong man, and I am nearly 50 years old. This engine will have to be balanced on the jack and then kept balanced while I move the jack under the frame. The back end of the engine must go in first, since the drive shaft part must fit into the swing arm. Once that is in place, the engine can be straightened out and bolted in place. http://www.venturerider.org/engineremoval/photo_hdr7.shtml_files/879a.jpgThe drive shaft part is nicely in the swing arm, and the engine can now be straightened out. I have lifted and lowered this engine a number of times by a quarter of an inch or so while I maneuver it around the various obstacles. Even so, I break a small tab on the upper fairing. I will repair this break later with a thin aluminum sheet. http://www.venturerider.org/engineremoval/photo_hdr7.shtml_files/882a.jpgThe engine is back in!! I have held it with two bolts at the rear of the engine and an incorrect temporary bolt at the front of the engine. I am so relieved that this step has been successful that I stop for an early Saturday lunch. http://www.venturerider.org/engineremoval/photo_hdr7.shtml_files/884a.jpgInstallation of the starter motor, and the oil filter (I use an aftermarket spin on filter for convenience). You can see the "incorrect bolt" just above the starter motor, which is temporarily holding the motor in place. http://www.venturerider.org/engineremoval/photo_hdr7.shtml_files/885a.jpgThe coolant system gets installed, with new o-rings all around (the coolant system would occasionally weep a bit when left overnight. I had purchased the seals about a year ago but had not "got around to" replacing them.) The radiator sits ready to be installed next. http://www.venturerider.org/engineremoval/photo_hdr7.shtml_files/886a.jpgThe radiator is in and filled with 50% aluminum antifreeze and 50% distilled water. The right frame tube needs to be installed next. This frame tube is one of the few parts that requires "Loctite Blue" when assembling. http://www.venturerider.org/engineremoval/photo_hdr7.shtml_files/887a.jpgHere is a task that I have not ever done!! I have never opened the top of the rear master cylinder and cleaned it out. Turns out there is a little diaphragm (just like in the handlebar units) that could use a little cleaning. Bled this rear brake, the clutch system, and the front brake. http://www.venturerider.org/engineremoval/photo_hdr7.shtml_files/888a.jpgHere is the jack that Scott used. Also the heater which made this job so relaxing and comfortable. On the heater sits the air cleaner box which has just been de-greased. And to the right on the floor, a large socket used to adjust the swing arm pivot bearings. Well, this is the end of the photo story. The rest of the bike needs to be put together. And then I expect to drive many, many years. I will let you know at 300,000km....
-
I purchased a motorcycle jack from Pep Boys some time ago and have not used it as yet. Yesterday I slid it under my 2004 Venture R/S; I couldn't find a place to position the jack that might not cause damage. Also, is there something on the undercarriage that shows the center balance for my bike?
-
My '83 Royale did not come with a CB and/or intercom but I would like to add one. I have a OEM working radio without headset jack. What would I need to install this on my bike? Does anyone have this and want to part with it? Thanks!
-
Pep Boys in Georgia is having a sale on a MC Jack for $79.98 with a $20 mailin rebate. Maybe its on sale elsewhere as well? TORIN 1500 lb. Motorcycle/ATV Jack #T64017
-
 Thanks guys..
 -
Hey Jeff! On the way to Ellijay this weekend, we passed by a Jack in the Box and I had to take a picture of it for you! I thought you might want to frame it, take it with you and put it in a place where you will see it everyday! Then you will want to hurry back to the good ole USA for some good eating!
-
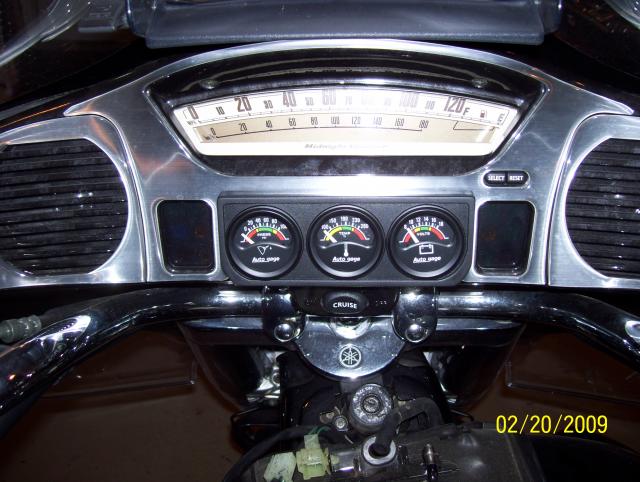
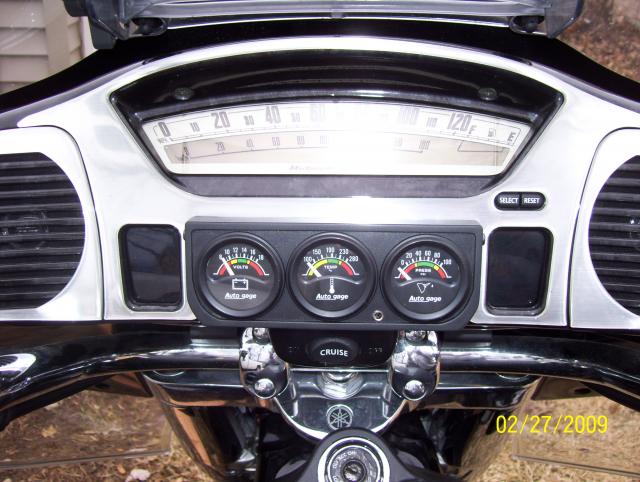
 been working on this for a couple of weeks..........i added gauges where the cassette was...still kept the mp3 jack...........just did a test run....wadda ya think.......
-
I finally got around to welding up my homemade jack adaptor. I threw some pics in. It is made of 1 inch square tubing. I had to inclube the bike too! Its not a big deal, but i am proud of it. It cost me about 20 dollars at lowes, and about 2 hrs in labor.
-
Has anyone ever adapted a 2 1/2 ton car jack to use on there bike. Kind of seems like it could work if some out riggers were added for balance and a small mod to the lift adapter.:lightbulb:
-
bought a new garmin nuvi 200 gps for my wing and just installed it. looks factory and it was cheap. don't have all the bells and whistles but it will get me where i aim it. hope i can hear it cuz it don't have an audio output jack. thats the only draw back. i need to get another power cord and mount so i can switch it over to my vstar.
-
Anybody know off hand if the Venture is GPS ready? I have a TomTom as I had it from my old ride and I want to set it up on the new one so what I mean is, is there an outlet to jack in my adaptor? Or do I have to install one myself? Thanks......... Bluez (Just trying to plan ahead!)


(Copy2).thumb.png.4e3eec1576b3e080ae685eca64852a8a.png)