Search the Community
Showing results for tags 'center'.
-
but I made the team roster. Weight is right for now, I'm more like 6' 0". Position: Center http://www.hometeamsonline.com/teams/default.asp?u=DLOCASCIO&t=c&s=football&p=roster&rsort=weight&rsortFlip=1#dt_r Practice starts Apr 18th. First game is June 15. I gotta lot of work to do.
-
Getting ready to install my new left side lower fairing. The original cracked right where the center screw tab is. Now I notice that there is quite a bit of stress from the screws not lining up properly. I have tweeked the brackets a little and that seems to help. The crash/tipover bars are not bent. I'm thinking of omitting the center screw altogether. Has anyone else had this problem?
-
I Love the other mods for the passenger floorboards they have been great idea's! I was even making a set until I talked with GunnyButch and had him shoot me so photos and with the new conversion to trike I can not have them in that area. Finding Afterwords that my wife needs more forward leg room anyways do to an old injury. she needs to stretch them while riding once in a while. so going down-word will not make her happy.... After saying that.. This is what I came up with on my proto type. I made my templates out of Aluminum (easier cutting and drilling) In this proto type I used the aluminum that I had laying around. the angle was 2 inch. ( will go to 1" Steel) But you must use a 1 inch die aluminum rod for the pegs to bolt on perfect (peg clamp). I will be making the bottom support out of steel painted black, the round aluminum will be polished like chrome when I am done The length now on the rod is at 6 inches long. Just want to make sure the height requirement before I cut to the right size and round the top. I also used the same Kuryakyn Pegs as I use for the front (7980 Longhorn Dually 1" clamp) I got to thinking of Dons Center Stand, and bolted to the same spot he did. also adding two large hose clamp on each side of that helped as well for even more support to the bikes frame on the underside. Anyways , shoot away with any comments you have so I can learn and maybe even make this better. Not having the center stand anymore, I am thinking that even if you still had one on there you could use longer bolts and still be able to attach at the same point. Here are some pics.. [ATTACH]26871[/ATTACH] [ATTACH]26872[/ATTACH] [ATTACH]26873[/ATTACH] [ATTACH]26874[/ATTACH] [ATTACH]26875[/ATTACH] I have a few other idea's and I will Post when this project is complete If it seems to be a winner I will to a write-up on the dimensions of it .
-
Son stopped by with help while I was at work. Picked up bikes and placed them back on center stands. Two of my Ventures had been sitting in the drive under covers when wind picked them up and stacked them on top of my 750 Maxium. Both of the Ventures had the rear wheel off at the time. Anyway he sat them up to surprise Dad. Before I got home "Ugly" took a nose dive off center stand for some reason into "Parts Bike" Yeah I got a surprise when I got home. Something keeps telling me the Warden says. :crying:
-
--s o l d --
-
For the life of me I thought I seen a post somewhere where someone asked if a VMax center stand would fit on a RSTD or RSV. I can't find the post anywhere so I would like to ask this question once again. Would it? Dennis
-
I'm looking for the rear center frame piece you may have removed while installing a trailer hitch. Have you one being kicked around the garage floor or hanging on the wall ? If so ! what would it take for you to part with it ? Gary PM me Or Call 810-516-0035 verizon Thanks
-
Well I think I will be selling my Freebird center stand. No problem with it except that I just dont use it. Every time I use my lift adapter I have to take it off and then put it back on. The other night I took it off and thought when was the last time I used it and figured it out that I just should sell it to someone who will use it. Im asking 100.00 plus shipping. I have even had it powder coated so it looks pretty in gloss black. If someone is interested PM me. I will sell to the first poster or PMer as per the time stamp on the post or PM.
-
Looking for feedback on local Yamaha service centers in the San Antonio/Hill country area. Not having any trouble with the bike right now. We just bought an RSV and hopefully will not need service for a long time to come. But would like to find the best available service center when needed. Thanks much, Ken
-
I hope someone can help. I just finished assembling a 1986 Venture that had been sitting foe approx 2 years. Everything was going along just fine until I started the bike for the first time. It ran pretty well and then I noticed engine oil dripping from the front swingarm boot onto the left side of the center stand. It appears to be leaking from the center of the boot on the bottom. The dripping oil got warmer as the bike warmed up. Has anyone got an idea as to what the problem is and any ideas on how to remedy the problem. Thanks for your input. rick
-
The other day I took a nice ride. Came upon a cross road behind two cars. Both of them with left hand turn signals on and over to the center line. Pretty good indication of a left hand turn, right? No, wrong. That meant right hand turn. I went to go around on the right hand side - suddenly the back car begins to turn right. Relying on my lightening fast reflexes, and the legendary crotch rocket like acceleration of a 1st gen, I did a light twist with my right wrist and presto, zoomed out of the danger zone. Moral of the story - stick to your own safety rules. I have preached it over and over. Just because a left hand signal is on doesn't mean a thing. Even if the car is stopped, wheels turned left, car nearly over the center line waiting to turn left - depend on it. They will turn right.
-
One of my friends, who owns a tire dealership, has suggested that use the truing machine to round the edges of the car tire. He is going to trim 5/32 of tread from the edge and round 1/4 of the way toward the center. This will leave a flat area in the center and give the edges a round profile. He is convinced this will remove the cornering feeling many talk about. Will get this done sometime this week. Cruise On Gregg
-
 ... and need some ideas on what I could do. I believe the console is from an MKII and the Venture Cruise light is in the tach on my installed console. Why would I want to change tachs? Well, my installed speedo is irrepairable and need to replace it with the one I got from Poledar. The guage colors are different between both consoles (Poledars looks better too). So to match the guages, I would need to replace all the guages. Now since the Venture Cruise light location will need to be moved, will I need to add that center console (between the handlebars)? Will the current wiring on my 85 work with the center console? I do not even know what is on the center console as lights. So, what can I do y'all? Btw, Poledar is a great person to work with. Gotta give him some kuddos as he has been great with me. Thanks,
 -
I have one of the center stands available in the classifieds
-
Do the stock pipes that come on the bike have any holes exiting the back except for the large hole in the center? I noticed tonight that my pipes have about 8 holes drilled into the back around the center hole (and they don't look very professional). So I'm thinking the previous owner drilled them out to get some more sound. Just wondering...thanks!
-
 Anyone ever had a problem with their RSV leaning off center while on a Rivco Center Stand ? I checked the garage floor and it is level. My bike leans to the right wheather it is pulled in or backed in, so it's not the floor. I called Rivco and they are having me send it in to have it checked out... Everything looks straight under the bike, but my eyes aren't as good as they used to be. PS... This is an awesome site. I purchased an 07 blue/black RSV last Summer, and using the post on this site, I have set up, worked on and accessorized my bike to be one fine ride... Thanks to all !!!! Sterling Turner Frankfort, KY
 -
I've had a few folks email me about the center stands that I used to make. As I have replied, I no longer offer the stands. I was talking to Allen at Diamond R Accessories the other day though and he tells me this: "I have received about 8-10 of our center stands from the machine shop if you hear of anyone wanting one. These are ones that they had enough parts left after we quit carrying them to make complete stand. However, I will be out of pocket for about 6 weeks, I am having another knee replacement in the morning. After I get back up and around to where I can I will start putting them together." So contact Allen if you are interested.
-
 Hi Guys and Gals, I have recently purchased some R/K mufflers. They look almost like the Ventures. However, although I have seen several people talking about modifying them, i'm not quite sure what they mean about stage 1,2,3,&4 modifications. I do better with pictures than words. On the mufflers I got, I am able to look directly through the center and see what is on the other side. There are baffles in them that I can see, but I can still look through the center of them. My question is how do I know what stage they are, and what can I do to modify them for more sound. Thanks, Big Mike:15_8_211[1]:
 -
 I was going to purchase a center stand for my Venture. 4 questions. 1) Are they really worth it? 2) How easy are they to put on? 3) Can you still use a motorcycle lift with the stand? 4) I've heard rumors that they are hard to use? Thanks.
 -
Any one know what center to center dimension of leveling Links are...from diamond R
-
Rebuilding Pillow-Top Seat on '06 RSV Thanks to Jake (jakenator6) Hannon for this excellent tech article. http://www.venturerider.org/seat/image003.jpg http://www.venturerider.org/seat/image004.jpg After about 8000 miles, the seat on my RSV was beginning to give me some severe discomfort. I felt, since it had been comfortable earlier, the foam might be breaking down a bit. The pressure point was exactly in the back center, right where the tailbone resides. My decision was to rebuild the seat with more of a dished out saddle effect and put firmer foam in place. Attached are photos and description of what I did. Starting point was to get a photo of the seat before I started removing things. Always useful when putting things back together. First job was removing the staples. Easily accomplished with a flat bladed screwdriver and pliers. http://www.venturerider.org/seat/image007.jpg http://www.venturerider.org/seat/image008.jpg The seat cover is held onto the foam with pull-through fasteners seen above. These are easily removed with some needle nosed pliers but some care needs to be taken as they are not exactly robust. Grab one side of the metal clip, pull up to get some slack, and push it through the center hole of the plastic washer. Once the cover is off, use the needle nosed pliers to push the fastener through the foam. I think there were 9 of these. The vinyl cover is now separated from the seat. The seat pan is also pictured. http://www.venturerider.org/seat/image011.jpg http://www.venturerider.org/seat/image012.jpg The soft, white foam on top will need to be pulled off. It was glued to the denser foam but take your time and they can be separated into reusable condition. I was not planning to reuse the soft cover and was planning some surgery on the denser foam so I was not as meticulous as I could have been. http://www.venturerider.org/seat/image015.jpg http://www.venturerider.org/seat/image016.jpg I used the removed soft top as a template and cut a new pillow from much denser foam 1" thick. In hindsight, I would still use the denser foam but only 1/2" thick. The old foam was so soft it compressed easily and gave the seat it's puffy look. The new foam compressed very little and was the dickens to get the cover stretched back over. Putting those stringed fasteners back through is a job that is guaranteed to test your mettle. http://www.venturerider.org/seat/image019.jpg http://www.venturerider.org/seat/image020.jpg Based upon the recommendation from this site, I used a flap disc on a drill to start reshaping the seat. The right picture above is how things had progressed with this tool. It really did some smooth work but my plan was to remove a lot more foam so I resorted to an electric carving knife. http://www.venturerider.org/seat/image023.jpg http://www.venturerider.org/seat/image024.jpg The above photos show most of the knife work. I took the rear center of the seat down almost 3" since I planned to build it up with some really stiff 1/2" foam as a base. From the center back, I taper it up to give a smooth dished saddle shape. This was way past the point of no return. http://www.venturerider.org/seat/image027.jpg http://www.venturerider.org/seat/image028.jpg I used some 1/2" foam rubber intended for flooring in play rooms. A little puzzle work and some spray adhesive got things stuck in place. I had also carved out a niche for the backrest piece you see in the above right picture. I really wanted some more support at the back and to spread my weight to the wider parts of my posterior. http://www.venturerider.org/seat/image031.jpg http://www.venturerider.org/seat/image032.jpg Some more knife work and spray adhesive and the new pillow top was ready for recovering. http://www.venturerider.org/seat/image034.jpg Getting the cover back on will take two people, more patience than I had, and some needle nosed vice grips. The plastic seat base is hard and stapling takes even more patience. How's it work? Pretty good I must say. I've put in two 300 miles days and the pressure point in the center is gone. The built up back rest is largely negated by all that 1" foam (pillow stuff), but it is still an improvement. If you're not happy with how your seat feels, changing it is within the tool capacity of most of us. I wouldn't hesitate to try it again but right now I'm OK with what I have.
-
How in the h*&% does this thing go on? Of course the manual and pics are useless for this. Does the circlip go on first in the groove then the joint goes on after. Does the circlip ride between the o-rings in the joint? How can that be without damaging the orings with the circlip unless the the circlip stays at the bottom of the joint, keeping it from moving down, but it seemed to be in the center when I removed it, and the wear on it appears to indicate it rides in the center groove where the air hole is. Simple little thing kept me from being backtogether an hour ago. Anybody knowledgable here at the moment?
-
ADJUSTING THE HEADLAMP 1. Put yourself on the scooter and position it upright, i.e., riding position. Have the other person measure from the center of the headlamp to the floor of your garage. 2. Measure off 25' from the front of the lamp and draw a line (horizontally that corresponds to the floor to lamp center point) on the wall. 3. Turn your lights on and put them on high beam (not low beam). First, adjust the vertical (with your weight still on the bike) so the light is even above and below the horizontal line you drew on the wall. Then adjust the horizontal so you have an equal amount of light to the left and right of the center point. This should put you "almost perfect" on high beam and low beam. Good Luck.
-
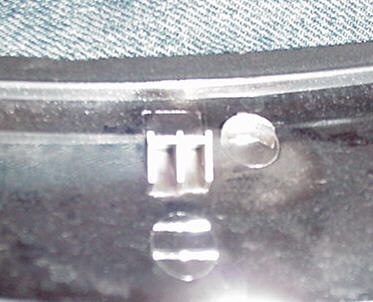
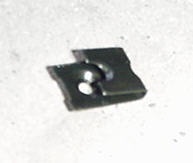
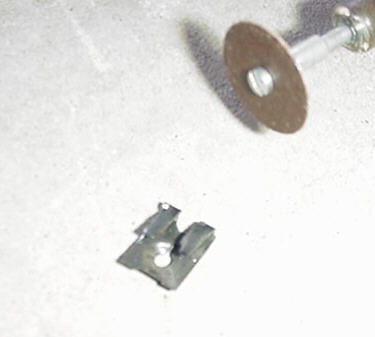
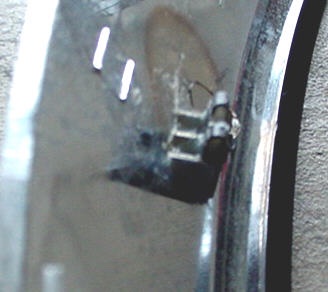
Repairing Broken Windshield Trim Tabs The great things about this forum is the fantastic ideas that we get from each other. This one is so good and so easy that I sure would like to take credit for it but the fact is, the idea came from expanding on a post made by SteveO where he used these type clips to take the slack out of the holes that the tabs actually snap into. His post gave me an idea for repairing the tabs that were actually already broken. The tabs on the back of the plastic chrome windshield trip break very easily. Most people who have ever had the piece off, have broken at least one of them. The following is an easy way to repair them to better than new condition. I had a couple of them broken off and this is so much better and stronger, I actually broke the other two off and did this on all of them. Here is a picture of one of the broken tabs. At most auto parts stores, you will find these clips. They were called "Speed Nuts" at Autozone and I believe these were size 14. It was the smallest ones that they had. Here is what they look like when you take them out of the package. Now...as the top picture shows, there is a center "bar" or "Support" in the center of what is left of the broken tab. In order to slide the "speed nut" over the broken support, you will need to cut the center out of the back of the clip. Also, because the clip is just slightly too wide, you'll have to shave just a bit off each side of the back side of the clip that you just cut the center out of. I used a Dremel tool with a thin cutting disk to do both. Here is what you end up with. Now, simply slide the clip over the broken support and you have a brand new clip that fits right into the slot where it should. It fits pretty tight but just to be sure, I filled the grooves with two part epoxy. They aren't going anywhere.


.thumb.jpg.176b2ebbe9863175975d94710375c414.jpg)