
Search the Community
Showing results for tags 'bolt'.
-
 how do you get the sidestand switch top bolt out. got the bottom bolt out and have a new switch to go in, but having trouble with the top bolt removal. i can not even see it.
 -
Here is Kent Hartland's DIY With my Version for Added Running Lights. He shows his version with the standard set-up . Follow his directions [ATTACH]41117[/ATTACH] Mark and drill a pilot hole on the second ring and across from the bolt stud. [ATTACH]41118[/ATTACH] I went up to a half inch drill bit and finished with my Dremal sanding tool. All my drilling was done form the inside as well. Another thing that is different is place the plastic nut that you just cut REVERSE IT from how Kent show's his. The reason is that it will clear the lens bolt tab perfect. finger tight. [ATTACH]41120[/ATTACH] I also used some clear silicon sealer and just placed a small ring around the butt of the light lens as shown. it will squish out a little and wipe right off with ease. [ATTACH]41127[/ATTACH][ATTACH]41119[/ATTACH] Here it is installed from the inside. [ATTACH]41121[/ATTACH] It is almost in the right spot to be able to notice if you forgot to turn off your blinkers. This one shows that it will be lined up with the blinker bulb. [ATTACH]41123[/ATTACH] And a few more all done , takes about an hour or less. I also added some di-electric grease to my bulbs, they were extremely dirty inside the bulb contact rings. [ATTACH]41122[/ATTACH][ATTACH]41124[/ATTACH][ATTACH]41125[/ATTACH][ATTACH]41126[/ATTACH] Kent's picture was a little blurry, so here is one that might be a little better to read the part number. [ATTACH]41129[/ATTACH] Enjoy, Jeff
-
Hello Everybody, Shadow here. Can anyone tell me how I can remove or rather drill out a broken tap? It is in the foward rear fender bolt hole. Long story, but the head on the bolt striped when trying very carefully to remove it. So that entailed drilling out the bolt but, my bit did not come out center on the inside of the fender. So I took a tap and slowly with oil proceeded to tap new threads. Almost to the end and the tap breaks. I guess it's case hardened cause drilling it even with new cobalt bits seems futile. I've been at this for most of the day. I can't take the chrome fender rail off because the other bolt holding the fender won't turn. They have the red loctite on them. Funny thing the other side bolt came right out. I know heat would help with the loctite but how do you heat inside the fender without removing the rear wheel or hurting the paint. I just need to know if anyone knows, do they make a better or harder drill bit than the cobalt? I still think drilling the tap out is the best way I just need a drill bit that will cut it. I'm sure I'm not the first one of us to break a tap or easyout that had to be drilled. I appreciate all ideas.
-
In a few months, I'll be taking off my rear tire for replacement. Now I also have to think about greasing the splines, etc. What parts should I have on hand, before I tackle the job: 1) J&H Jack - on hand 2) Carbon One with Legs - on hand 3) Bolt to remove the axle bolt - What size do I need for this? Socket? 4) Shaft Drive Seal part - (need 2) - part # 93108-43013-00 - will order soon. 5) Honda Moly60 Tube - will order soon. 6) Rear End Gear Oil - on hand 7) ??? 8) ???
-
So I have started the tear down of the 1st gen so that I may (after 10 Yrs) replace the 2nd gear. In the tear down I have come across a few problems that I am wondering about. The first question being do I have to remove the clutch release cylinder in order to remove the engine? I have found that one of the bolts is stripped :thumbdown:and its a 6MM? allen bolt. If you have seen or done this before you know how tight it is in there. Any suggestions on how to remove this bolt? Thanks in advance:bowdown: Michael
-
Well, actually a WOLO bad boy. had to do this the easy way of course:bang head: , I mounted the horn on the top bolt for the airdam, which entailed removing the spacer and replacing it with two nuts to do the final clamping of the horn to the airdam and the engine guard to the support bracket. It didn't help that I first wanted to stick the bolt through from the other side so that I could just tighten it up, the frame pervents that, but I had already drilled out the threads so I needed to add a nut on the inside as well. Now if I just don't have to remove the airdam too often. I do like the location! next will be a new fuse panel (I think).
-
My light bar will be the death of me.. 6 month after getting the bike the bar got loose and I could tighten it but man what a pain in the patootie to access those bolts properly etc.. Earlier this summer I stopped at a Yammy shop in Maine to get my shock replaced under warranty and they were kind enough to fix a wiring problem I had in the front.. but in the process they took the bar off, but appears it didn't get installed properly as I've been having to re-tighten it all the time and it never seemed to really tighten.. When I put the bike up on jack recently to do some winter maintenance on it, I noticed how very loose the bar actually is and that one bolt is completely loose.. It won't tighten yet it won't come out. I'll have to pull the whole front fairing off to access it properly but alas, I can't pull the fairing off if I can't get that bolt out to move the lights out of the way.. what the heck?! So the big question is: what part of the triple tree are these bolts actually threaded into? It always seemed that if I didn't get the bolt started at just the perfect angle they would simply turn and turn and turn but never tighten, then angle it a bit and boom it would tighten.. It seems there is something amiss other than a stripped bolt or dead threads back in there and I can't see well enough back in there to determine what the heck is going on. the two local Yami shops can't even figure out what bolts I need to order to replace the existing ones as apparently these bolts magically "poof" appear whenever they need to install a light bar.. Can anyone toss in some insight to this problem or even be able to help me acquiring new bolts for this issue? I purchased the extension block which move your light bar ahead enough to permit your fairing removal without taking down the light bar but once again I had issues installing this block because of that acute angle of the bolt issues.. I could never get that block to tighten up properly.. A most frustrating situation.. sigh... Almost to the point of ripping the whole dang thing off and buck-sheeing signal lights up to the fairing and adding highway lamps to the forks.. at least they won't come loose after a few hours of riding.. help!
-
Sweet, after a year of loose light bar issues and frustrations with vibes, cut wires and what ever else, the job is done and doods, if *I* can do it, anyone else can lol.. if your bolt hole threads in the lower triple tree clamp are munged or stripped, this is the fix for you.. Or even if you're sick and tired of not ever being able to get them frikken bolts in proper, this would be a good fix as well.. I have tried to find the link or threads of this aluminium block adapter that mounts your highway light bar ahead of your fairing so that you'll never ever have to remove your light bar to take off the front fairing.. if someone can find it, please advise.. this is an awesome adapter. I had never been before able to make it work for various reasons and now I know why.. nothing wrong with the adapter, it's AWESOME but my bike, for what ever reason, always rejected the adapter or proper installation of the light bar.. Me being the 3rd owner of this magnificent bike, I'm finding a lot of previously buckshee maintenance done to the bike causing me problems.. Now that I have my heated garage for the winter, boom, time to fix it all up proper.. and the light bar is my first victim.. mou'aha.. The main ingredient was to use a 2 inch 7/16th bolt with washer and lock nut (nylon insert) or what ever you feel safe with.. As you'll notice, in the photo, I had to nibble away at the shroud with a dremel tool to make tool alignment easier. These are the bolts passing through the triple tree clamp.. The bolts mounting the light bar are now Loktite and have a lock washer as well.. (if I ever have to remove this again for what ever reason, I'll have found proper sized washed to put under the bolt heads in the recess, but couldn't find them around here).. http://www.myvstar.ca/venture06/mount001.jpg The shot below is taken from the floor looking up in front of the radiator. The brake line splitter is removed as is the half moon mud flap (2 bolts each). You'll want to remove these for easier and better access to the nuts. As you can see, the threaded portion of the triple tree clamp where your highway lamp attachment bolts bolt into isn't all that thick after all.. so the 2 inch bolt used here leaves enough thread showing for safety (min 3 threads etc).. When you're torquing down the bolts, you'll want to be very careful and ensure your wiring isn't being pinched or caught in behind the adapter block.. I have mine laying across the top and out to the left side (kick stand side) of the block. http://www.myvstar.ca/venture06/mount002.jpg Photo below shows why I thought it best to nibble away at the shroud for better access to the bolt head. I used a thin walled 7/16 deep socket to turn the bolt head to get the nut started. However, when the nut tightens up against the washer, its best to turn the nut, and not the bolt to avoid damaging the adapter.. There is sufficient 'bolt head size' to take up the hole without a washer.. but if you're able to fit a washer down that recessed hole, the better. http://www.myvstar.ca/venture06/mount003.jpg Below is the hardware I used.. go for high tensile steel if you're going to torque onto these puppies.. http://www.myvstar.ca/venture06/bolt.jpg Below is where a lot of my problems with wiring happened, the wiring would basically drop down into the fork stops and be guillotined causing shorts, failures and freaking annoyances like you wouldn't believe.. I had used a zip tie to hold this bundle up and away from the fork stops but they eventually fell into them again something got nicked.. Now that the bike is sitting high and pretty on the jack adapter, I'll be able to do properly tuck these bad boys away for good.. http://www.myvstar.ca/venture06/wires-cut.jpg So there ya go.. the hardest part of all this was finding out what proper sized bolt I should be using.. originally I had started with a 2.5 inch bolt but the shank was too long so the 2 inch bolt was perfect.. It will be a while before I can test ride this set up properly but I think this is the permanent fix for my bike.. no more BS with munged threads etc.. never more having to drop the light bar to remove the fairing.. Ahhh nice.. If you have any questions or comments, please feel free..
-
 i've posted this request in the Watering Hole and considering my request is about RSTD i thought i would post here as well. i have an 07 midnight RSTD and was instalingl passing lamp mount bar part # STR-1D635-40-00 and found that i cannot fit my OEM flasher lamp onto the special bolt which is provided with the mount bar kit. the mount bolt is .020 (20 thousandth) larger in diameter than the flasher lamp mount hole (with rubber sleeve removed). no way it will fit. anyone here with an 07 that has done the passing lamp mod and if so could you provide me with the part numbers you used to do the job....thanks....HELP !! Merry Christmas to all ........ buz
 -
OK hope I do this correctly now that I located where to start a thread. Bought a used Markland hitch for my 87 VR that was suppose to have came from same ride. Hitch doesn't seem to line up. Looks like you use the rear floorboard bolt and the rear saddle bag frame bolt, Does anyone have this hitch, pictures or an instalation PDF. thanks Trevor
-
I have a 1989 Chevy 1500 4x4 pickup. It needs an engine. What years engines will fit? Will a 305 or other bolt right in? Thanks and God Bless. Mike
-
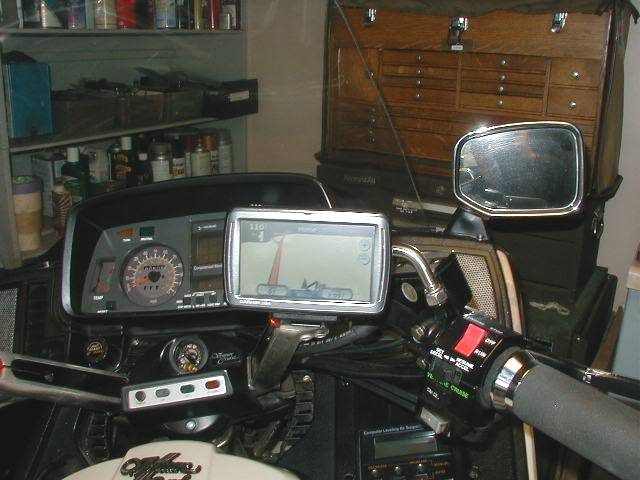
In the past I have been one of those riders that gets on his bike and just rides! With that being said, Jean surprised me big time and got a Garmin Nuvi 855 as my birthday present over the weekend. (Bless her heart!) Well needless to say I spent the better part of Sunday shopping around for a mount for the thing. By the time I was finished, I felt old. There were so many choices and they looked so complicated to install and operate I said, "the heck with it" and made my own. I went to the hardware store, bought a 7/16-14 Stainless Steel bolt, a nylon inserted lock nut, a 10-32 set screw and went to the shop. As you can see in the pics, It went pretty quick. I heated the bolt with my little torch, put a couple bends in it, machined off the bolt head, drilled and tapped it for the 10-32 set screw, machined a Delrin ball for the mount, drilled and tapped it for the 10-32 set screw. On my 87'VR there was a hole plugged for what looked like a mirror, I drilled and tapped this mirror stem hole to 7/16-14 and screwed the mount together. After a test ride, the mount worked perfectly but I think I am going to add a strip of Velcro to the back of the GPS, just for safety's sake. Comments, questions are always welcome, Thanks for letting me share, and thanks Jean for a great birthday gift! Earl

-
Not sure where to put this. I bought this piece off of Ebay..seller said it was off an '84 royale (which I have)..I cannot figure out where it bolts on (If it even DOES bolt on)..anyone have an idea? perhaps it isnt for this model?..thanks in advance. [ATTACH]37779[/ATTACH]
-
Hi there I'm new to all of this but, does any one know if road star hard bags will bolt on 1999 royal star venture brackets? thanks G.
-
So I got my new fuel sending unit and went to install it and found that when I was trying to take my tank off, like I have done many times already, a head of one of the hex head bolt/screw that goes in the front of the tank has been rounded out. I don't know how it happend, when I put it back together last time I didn't notice any slop or anything but when I went to loosen it up, I just spun round and round. I have tried: 1) vice grips and pliers - nothing will grab onto that round head. 2) Easy-out/screw extractors (a few different types including the kind you drill into the screw and then back out and the kind that is supposed to grab onto the head and back it out) none worked - the head of the screw just didn't grab like it should. 3) take grinder and cut slots into the head suitable for a flat head screwdriver - did not work; as I try to use the screw driver to back the bolt out it just breaks the head up even more. I had thought about cutting the head of the bolt off completely and then try to maneuver the tank support out and over it (then I could get the bolt out because I would be able to grip it), but I don't think there is enough play in the tank to do that (as it would have to go ~1 inch to one side and it is just too tight of a fit). I am just plumb out of ideas - any thoughts would be appreciated.
-
While trailering my bike to Ft. Myers I noticed when I was just south of Tampa that I noticed in the mirror that my passing lamp bar looked like it was about to fall off of the bike. I pulled over and checked and one of the mounting screw heads had fatigued and broken. So I wire tyed it to secure it until I could get to Ft. Myers. So great, now I get to hunt up a new bolt and hopefully I'll be able to get the old one out and replaced in the parking lot of the condo. As I neared Ft Myers I recalled that there was a Yamaha dealer just off I75. I called ahead and the service department was open on Saturday until 5:00. I stopped in and asked if they had a bolt. The service mgr found a bolt and gave it to me. I suggested that they install it, after al l've got this five year warranty. He said that if he did that he would have to write it up and there would be a $45 minimum charge. I said fine, send the bill to Yamaha. They must not sell many Ventures because he seemed surprised at the warranty. Anyway, he took my vin number and wrote up the work order. I left the bike with him and went on to store my trailer and about an hour later he called and said the bike was ready to go. They replace both mounting bolts. I was thankful that they were able to get it fixed so quickly. I wasn't looking forward to fixing it in the parking lot. DT
-
I need a lower shock bolt.. the long one that goes thru the bottom of the shock.. I was wondering if any one has one that they would be willing to part with.. i have all of the bushings but my bolt is stripped on the end where the treads are.. it is for an 86 venture royale..:smile11:thanx
-
I just got a used voyager kit. It has everything with it I guess. The have a couple of question: 1 - Where the belly plate connects to the floor board. I have been trying to remove the bolt but it just won't let go. How should I go about removing this stubborn bolt? 2 - That same bolt at the floor board will require to be longer I assume (not included with the used kit). What should the replacement bolt be? Since I can't take off I can't verify the size. I would assume it is metric. Anyone has a size for that? Thanks
-
I ordered the running lights from Yamaha and bought the mount from a venture rider member. Everything is fine except the bolt that runs from the light frame and screws into the piece that holds the turn signals is missing. The bolt has a hole through the middle to run the wire through. Can't find it anywhere and the parts dept. I ordered the lights from seem to think I will have to order a bunch of things I don't need just to get the two bolts. Any ideas or does anyone have them laying around that would be willing to sell to me. Thanks.
-
RE: help me out of this mess Post earlier- 87 Venture Royale with pulsating brakes and washer questions- Got my new brake pads today, and then I spent time aligning the caliper housing. I swear that aluminum bracket was cantered a few degrees off of perpendicular to the axle. I threaded a large carraige bolt through it and used "my little freind" (see pic). A few whacks clearly nudged it. I wonder how it got bent. Then i had to only shim the back bolt with one thin washer. Everything looks square, and the pads are even and the rotor is tracking very close to center front and back. I can't test drive it of course until my new throttle cables arrive, but the rotor is no longer hanging anywhere in the rotation of the wheel. [ATTACH]35449[/ATTACH] [ATTACH]35450[/ATTACH]
-
How to explain this. - - the windshield bolts to a strip of metal running across the inside of the fairing. This strip of metal is mounted on each end with a plastic ear to the inside of the fairing and at the center with a bolt to a raised mount. Both ears are broken - only thing holding it is the center bolt. It's a '05 so the warranty covers it but, in two weeks is a trip up to VA and back. (Blue Ridge and Skyline) Don't think there's time for the dealer to handle it. What about two small angle brackets in place of the ears. Any reason it wouldn't work??? Don't know how much trouble it will be to grind the ears off and mount the brackets. Any thoughts anyone???
-
 This could be a problem on any bike and I need some advice on it. We found the head bolt loose on a Yamaha Radian. I think that's the name. The threads were all on the bolt. Of course the bolt goes through the cylinders and is close to the middle of a 4 cylinder inline engine. Is there a way to repair it? We havn't had the bike apart and it doesn't appear that the head has been off. I've had several ideas but need some input. We really didn't want to take the engine apart. Is there a way to rethread it or maybe a stud that is self tapping with a larger set of threads. I had some head bolts that pulled out of a VW engine years ago and I found a replacement that you could put in that cut it's own threads.. That worked great long ago. Any ideas?
 -
Beam-type torque wrenches are very imprecise, but much better than nothing. Clicker wrenches should be periodically calibrated, but virtually none of us go to the expense and effort to have that done. But you CAN check them yourself. Checking the accuracy of a torque wrench is not too difficult IF you have at least two wrenches with overlapping ranges. Here's how: You need a high grade bolt and nut - I prefer grade 8 (six radial lines on the head) where a 7/16-14 bolt would allow you to test up to around 70 ft lbs. Make sure the threads on the bolt go all the way to the head, and put at least one large washer on the bolt. Now clamp the nut in a vise with the top side flush with surface of the vice, then screw the bolt all the way in. Set your first torque wrench to a low setting in the range that is covered by your second wrench. For example, if both wrenches go from 10-100 ft*lbs, I would start at 15 ft*lbs. Carefully tighten the bolt in the vise until the wrench clicks. Now switch to the second wrench, set to the same torque, and see if it clicks BEFORE the bolt turns at all. If so, that is good, but you are only 1/2 done! What you have just shown is that the first wrench did not tighten the bolt any LESS than the same setting on the second wrench, but it MAY have tightened it more. So to complete the check, you need to loosen the bolt, then repeat the above steps starting with wrench #2. If this test also shows the second wrench clicks before the bolt turns any more, then you can be confident that both wrenches are setting the same torque, so they are almost certainly both correct. Now increase the setting on both wrenches up to something in the middle of the range and re-do the whole test. The only thing you need to be careful about is to make sure the max torque setting you test is within what the bolt grade and size can handle. If the two wrenches you are testing do not both click at the same setting, no matter which one you start with, then at least one of them is bad. To find out which one, you will have to find a third wrench to test. When you have two wrenches that both click the same when you do the entire test above, then you can use either one of those as a baseline to compare other wrenches. Just an FYI to anyone who brashly wants to claim all Harbor Freight torque wrenches are junk - I have a total of 5 torque wrenches here - two from HF (a 1/4" drive clicker and a 3/8" drive clicker), an old beam type wrench in in*lbs, and two very high quality 1/2" drive clickers that were calibrated by a USAF test lab. ALL of those wrenches test the same in every point where the ranges overlap, so the HF wrenches are dead accurate within a reasonable tolerance. The only complaint I have at all against one of the HF wrenches (the 1/4" drive) is that the gradations on the handle are a bit more difficult to use when setting the torque value - I had to compare it to the other wrenches to be sure I was reading it correctly. So if anyone in the North Texas area wants to check their torque wrenches, we can compare them to mine. Goose BTW - How you store your clicker-type torque wrench is important. If you do not have (or haven't bothered to read) the instructions that came with your wrench, you might be in the habit of just chucking the wrench back in your tool box after that last "click" on the last bolt of the job. But it is important to turn the torque setting all the way down to remove the tension from the internal spring before putting it away. Leaving the spring under tension is the biggest reason why these types of torque wrenches change calibration.
-
DRILL PRESS: A tall upright machine useful for suddenly snatching flat metal bar stock out of your hands so that it smacks you in the chest and flings your beer across the room, denting the freshly-painted part which you had carefully set in the corner where nothing could get to it. WIRE WHEEL: Cleans paint off bolts and then throws them somewhere under the workbench with the speed of light. Also removes fingerprints and hard-earned calluses from fingers in about the time it takes you to say, ''What the...??'' ELECTRIC HAND DRILL: Normally used for spinning pop rivets in their holes until you die of old age. SKILL SAW: A portable cutting tool used to make studs too short. PLIERS: Used to round off bolt heads. Sometimes used in the creation of blood-blisters. BELT SANDER: An electric sanding tool commonly used to convert minor touch-up jobs into major refinishing jobs. HACKSAW: One of a family of cutting tools built on the Ouija board principle. It transforms human energy into a crooked, unpredictable motion, and the more you attempt to influence its course, the more dismal your future becomes. VISE-GRIPS: Generally used after pliers to completely round off bolt heads. If nothing else is available, they can also be used to transfer intense welding heat to the palm of your hand. WELDING GLOVES: Heavy duty leather gloves used to prolong the conduction of intense welding heat to the palm of your hand. OXYACETYLENE TORCH: Used almost entirely for lighting various flammable objects in your shop on fire. Also handy for igniting the grease inside the wheel hub you want the bearing race out of. TABLE SAW: A large stationary power tool commonly used to launch wood projectiles for testing wall integrity. HYDRAULIC FLOOR JACK: Used for lowering an automobile to the ground after you have installed your new brake shoes, trapping the jack handle firmly under the bumper. EIGHT-FOOT LONG YELLOW PINE 2X4: Used for levering an automobile upward off of a trapped hydraulic jack handle. E-Z OUT BOLT AND STUD EXTRACTOR: A tool ten times harder than any known drill bit that snaps neatly off in bolt holes thereby ending any possible future use. BAND SAW: A large stationary power saw primarily used by most shops to cut good aluminum sheet into smaller pieces that more easily fit into the trash can after you cut on the inside of the line instead of the outside edge. TWO-TON ENGINE HOIST: A tool for testing the maximum tensile strength of everything you forgot to disconnect. CRAFTSMAN 1/2 x 24-INCH SCREWDRIVER: A very large pry bar that inexplicably has an accurately machined screwdriver tip on the end opposite the handle. AVIATION METAL SNIPS: See hacksaw. PHILLIPS SCREWDRIVER: Normally used to stab the vacuum seals under lids and for opening old-style paper-and-tin oil cans and splashing oil on your shirt; but can also be used, as the name implies, to strip out Phillips screw heads. STRAIGHT SCREWDRIVER: A tool for opening paint cans. Sometimes used to convert common slotted screws into non-removable screws. PRY BAR: A tool used to crumple the metal surrounding that clip or bracket you needed to remove in order to replace a 50 cent part. HOSE CUTTER: A tool used to make hoses too short. HAMMER: Originally employed as a weapon of war, the hammer nowadays is used as a kind of divining rod to locate the most expensive parts adjacent the object we are trying to hit. MECHANIC'S KNIFE: Used to open and slice through the contents of cardboard cartons delivered to your front door; works particularly well on contents such as seats, vinyl records, liquids in plastic bottles, collector magazines, refund checks, and rubber or plastic parts. Especially useful for slicing work clothes, but only while wearing them. DAMMIT TOOL: Any handy tool that you grab and throw across the garage while yelling ''DAMMIT'' at the top of your lungs. It is also, most often, the next tool that you will need.
-
I go to leave work, I unlock the steering and move the handlebars to hook up the GPS. And my bike falls towards me and over on the engine guards. After picking myself and the bike off the ground I found the side kickstand broke. In doing so broke my left highway floorboard in half my driving light but no plastic was damaged. I now am looking for any of you that might have a spare kickstand and bolt. Please I looked it over and the bolt appears to have been cracked for awhile, and probably broke and then one of the kickstand ears couldn't handle the weight and gave out.
.thumb.jpg.176b2ebbe9863175975d94710375c414.jpg)


-Copy.thumb.JPG.e58cff17f54af7db7d9892e57b761574.JPG)


