Search the Community
Showing results for tags 'bearing'.
-
 Anyone know what a failing clutch bearing sounds like. I'm getting a whirring type sound while riding that goes away when I pull the clutch in. ANy ideas
 -
(Or what I did instead of going to Houston for Red Lobster) So, the bike needed new tires. Bought a set of Continental ContiTours from Dennis Kirk. Then I picked up a set of rims on e-Bay. Mount and balance then just swap out. Sounds great in the master plan. Pull the seals to get sized at the local bearing house. Man says not a problem. Also order new bearings. Get a new drive side bearing from the dealer. RIGHT!!! The local dealer wants $68.00!!! Start calling and get a lead on one for $39.00. Get it coming for this past Thursday. Guy from the seal house calls and can't find the seals. Too special but he can order. Tell him ok and go for the Stealership. They have 3 of 4 seals. Go home and take front wheel off and kneel the bike forward. Worked great and I did remember a ratchet strap for the center stand. Start on the rear. Muffler off and set aside, loosen axle shaft a bit to make sure all is ok. Remove caliper bolts in rear and the threads come out with the bolts. Rats-helicoil time. Mutter and loosen the 4 shaft tube nuts and put 1 back as a holder. Pull the axle and drop the wheel perfectly. Wipe down and pull snap ring and remove drive hub. Wait, snap ring groove? The e-Bay wheel didn't have that!! Call tire man in the AM. Already mounted and balanced. Take the disc off my original wheel and take over. Sure enough the drive hub was removed without taking off the snap ring. Would have liked to see the force required to break the entire center of the wheel off! Tire guy charges me for 3 changes and off I go. Want to go to Houston for meet and eat so I drive to Austin and get the last seal. Now I know why I only pulled 3 seals. The broken off end had the fourth. Stop at Harbor Freight and pick up a blind hole bearing puller set. (On sale for $29.00) Go to bolt place and get 10mm x 1.25 permacoil kit. Auto parts - $75.00 and bolt place $32.00. Now I am ready to go. Only it is 6:30 PM on Friday. Decide to quit and repair on Saturday. Reassembly and bearing replacement is smooth. The puller kit made it a snap. All cleaned, greased, neverseized, and blue locktited. Perma-coils put on right on bike without removing caliper. Pictures galore taken and all buttoned up. Guessed at the torque on the rear axle. Calls for 110 ft.-lbs. Used a wrench and white knuckles method. It turns well and no binding. Brake caliper on and holding great. Now I get to clean up in the AM. I have seal sizes and bearing numbers for later. I will post the pics and do a write-up for the archives. Oh, the e-Bay guy is giving me back my rim money. It was $9.99. I got both rims, the radio, amp, and whole wiring harness for $60.00 delivered so the money isn't a problem. I explained what it took to break the hub and suggested that his shop monkeys learn to wipe off stuff and not use a shop press and torch for disassembly. Long-winded story JB
-
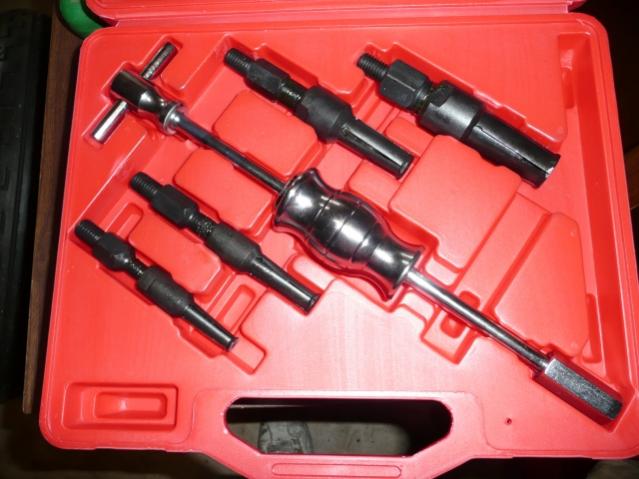
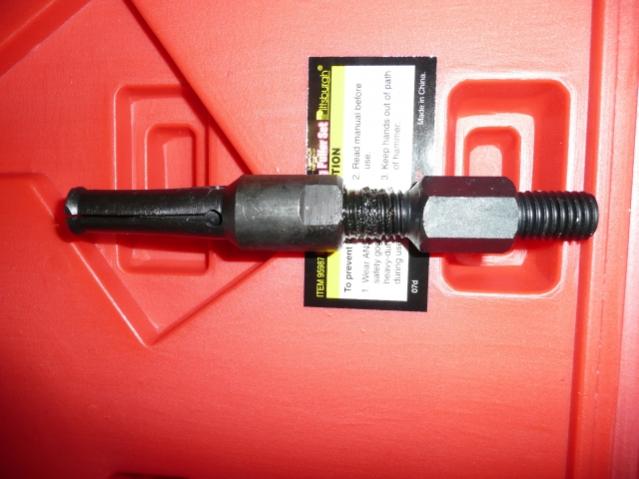
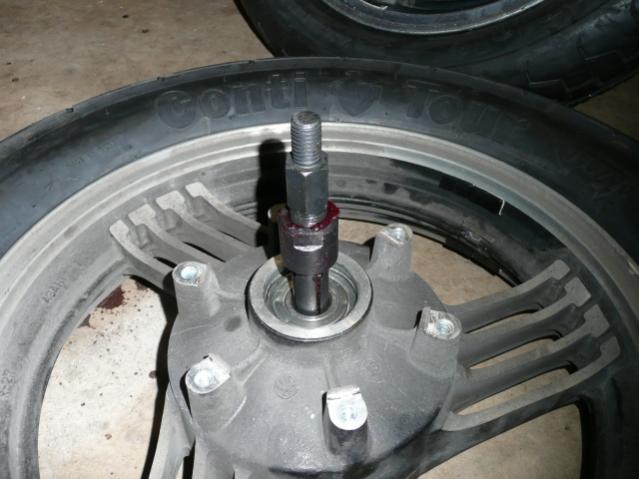
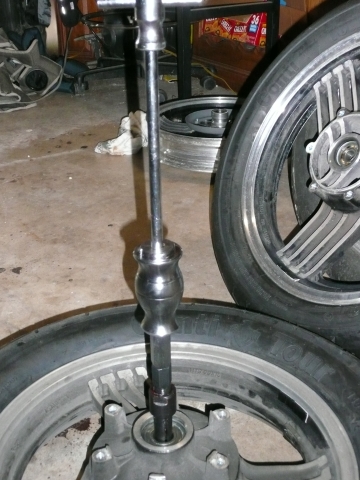
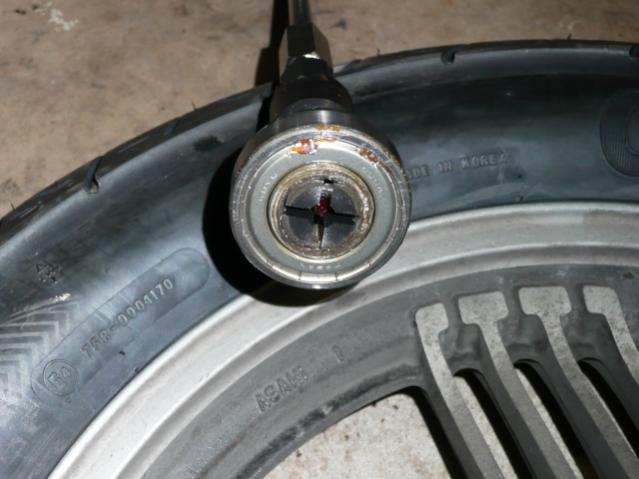
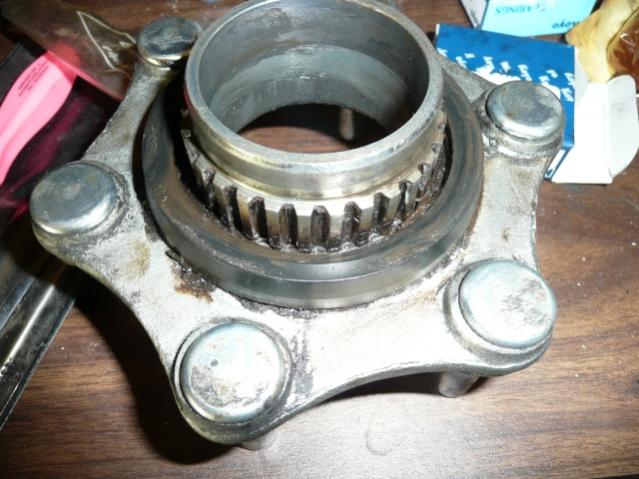
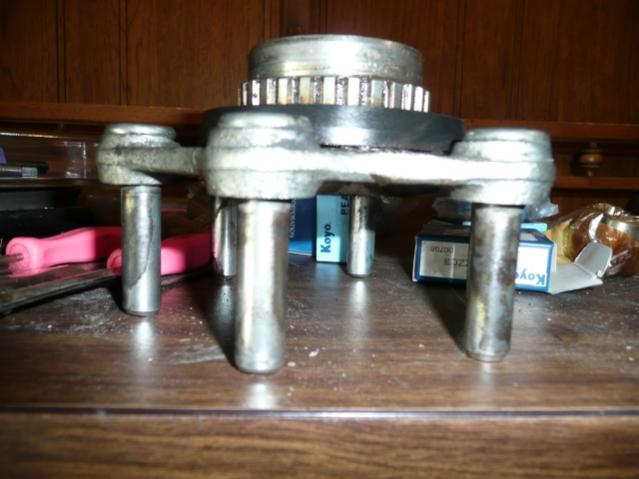
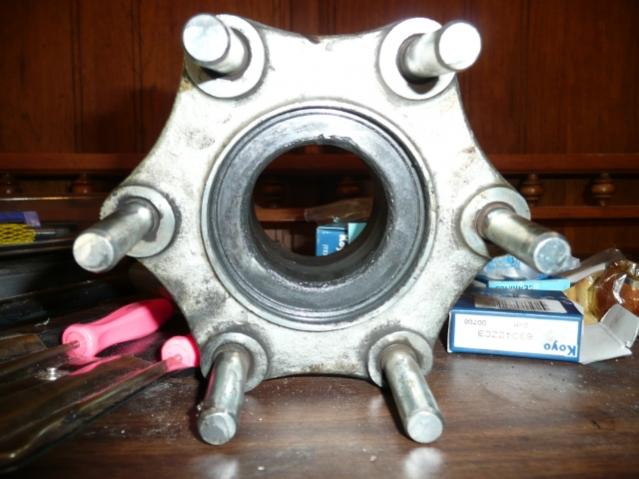
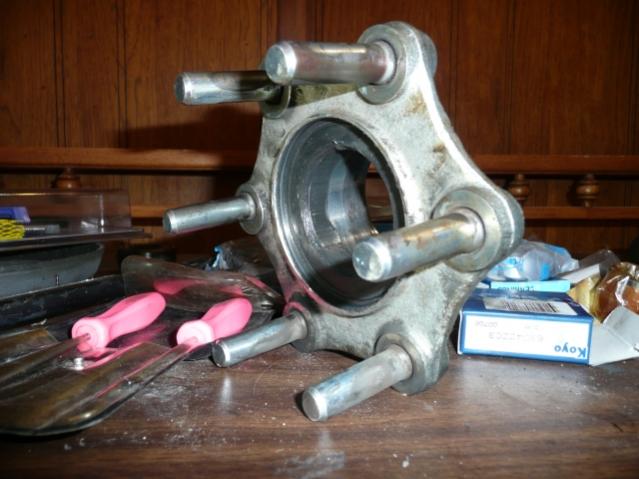
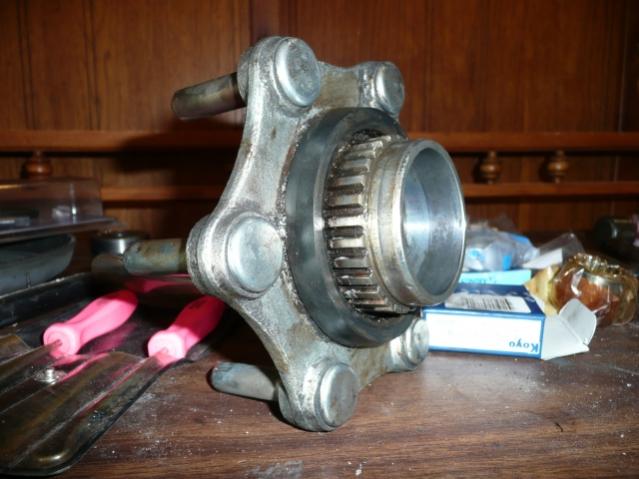
 When I removed the front and rear wheel bearings I used a blind hole pilot puller from Harbor Freight. It is a Pittsburg brand. Normal price is $40.00 I got it on sale for $30.00. You put the collet through the bearing and tighten with a set of wrenches. The collet spreads and grabs under the bearing. On wheels with spacers Tightening securely will force the fingers between the spacer and bearing. Then you use the slide hammer attachment. It could use a heavier weight but it works well. Stop and retighten the collet several times. The other pictures show the front right spacer, the drive hub, the needle bearing sleeve and then the sleeve installed. Also the bearing spacer tube and the rear right spacer. Note: the small raised ridge goes against the bearing. Also shown is the speedo drive tang and its spacer/ring. JB
-
 Hi y'all, When I pulled the rear wheel on my Venture the inner race of the needle bearing on the LH side fell out, exposing the needles. I want to clean up the bearing and put in fresh grease. However, I can't get the needle bearing and its cup (outer race) out of the wheel without damaging it. Any ideas on how to clean the bearing while installed in the wheel? I wonder why Yamaha elected to use a needle bearing there instead of a sealed ball bearing like on the other side? The rear wheel on my Virago has no needle bearing. Seems like a strange solution. Jeremy
 -
 I noticed on the way home from work today that when I take a sharp turn at speed (to avoid something in the road) I get a slight rumble from the front wheel. Is that the front wheel bearing going bad? If so how difficult is it for a shadetree mechanic to fix it himself? I dont have a press but have access to one. does nayone have a procedure for removal of the front tire and service/replacement of the front bearing?
 -
Can the front forks on the first gen be dropped far enough to replace the lower bearing without removing the fairing? I will have the front tire off for replacement. It looks possible. Might have to disconnect the air line etc. Or if I remove the calipers, fender and the electrical for the anti-dive I think the whole fork assembly might drop out. Related thought on the waddle/wobble/shimmy. There are 2 isolation bushings for the handlebars. Look to be built like shock bushing. Any chance that the rubber in these goes soft? Possibly need to replace these with a delrin bushing/steel sleeve assembly. Might get a bit more vibration but the wiggle factor would be reduced. Will a standard motorcycle lift work on the 1st gen? I haven't had one under mine to check alignment. Will I need hockey pucks etc. to make the jack clear? JB
-
Have a squeaking in drivtrain I believe. Sounds much like a bad u-joint. Squeak gets faster with speed of bike. Recently replaces rear tire. Lubed axle,repacked bearing and change final gear oil. Any ideas as to whats causing noise? Thanks in advance
-
 my 86 VR had some extra play in the driveline the last couple thousand miles. Took it to the shop, and tech says the bearing on the pinion gear shaft is bad. Says it caused some unusual wear on the teeth, and recommended a new final drive at $900 for parts only. Is this a lot for this part? Also, could the wear from the bad bearing be so bad that if we just replaced the bearing and seals and set the clearance again, that the gear noise would be bad, or it would fail again soon? My thought is that unless the wear was real deep, that the wear pattern would work into the new alignment eventually (another thousand or so miles) and be just fine. I will try to inspet in person next week, and have time to order the new part or just the bearing. Tried to get a used unit on E-bay and was out-bid. Am I being too penny pinching with this repair? The cost is about 1/3 the value of the bike, and will come close to the total value with the other repairs also being made. I love the bike, and wanted to keep it going for a couple more years, it only has 30,000 miles and everything works and looks good. Thoughts?
 -
.thumb.jpg.5bc608c29d230c44c77c79acb0510cd8.jpg) I thought I'd replace the bearings in the front axle before the trip to Idaho in a couple of weeks. I'm curious as to what type of B6303 bearing I should use. Brand?? Sealed?? Unsealed?? Deep Grove?? US..Japan..China??
I thought I'd replace the bearings in the front axle before the trip to Idaho in a couple of weeks. I'm curious as to what type of B6303 bearing I should use. Brand?? Sealed?? Unsealed?? Deep Grove?? US..Japan..China?? -
I have a Harbor Freight trailor and want to pack the bearings and replace the seals..... But no one has a seal for it.. I know I'm not the only one that has a trailor of this type ... so where do you get the seals for it ????? Thanks guys,,,, I know you will have the answer for me... YOU ALWAYS DO... Mike
-
Thanks to all who helped me work through the issues and bring the bike back to life. GeorgeS, Squidly, and Condor, and others thanks for taking the time to explain each step when I had yet another question. Now if I can locate someone willing to give the Royale a once over to see what else should be done. The engine seems to get a little loud once it is a operating temperature. A little less noticable when the clutch is pulled in. Not a knock like a bearing but more of a possible valve train issue. I live in South Central Pennsylvania, Bedford County. so if anyone lives in nearby PA., Western Maryland, or West Virginia and would be interested in taking a look, please give me a yell! Regards Dave
-
Ok, just noticed on my bearings on both shafts, only 1 has a full circlip on it(Big bearing on main axle). The other two ( small bearing main axle, opposite end from pinion on drive axle) only have half-clips that are in the lower case half. No parts left in the main case. Is that how they're supposed to be? MamaYama manual shows full clips, the case is grooved for full clips. Inquiring minds want to know!!!!!! Dan
-
This trailer I have (Harbor Freight 40x48 w/8" wheels) has a zerk fitting in the back of the hub to lube the inside bearing. Do I really need the bearing buddie for the outer bearing? Seems easy enough to remove and repack using a bearing repacker. Is there another advantage to a Bearing Buddies besides convenience? If y'all think I should get them (because they're inexpensive) what size do I get? How I determine the size if nobody here knows off hand what the actual size is? Thanks for your help!
-
Does the front fairing have to be removed to get to the steering head bearings? I have scheduled a bearing replacement with the shop and have issues surrounding the integrety of the front fairing. It would be better if I took the fairing off myself because of all the plastic repair. Just curious! BTW... I AM KEEPING HER. SHE RUNS GREAT! Derek
-
Help! My 88 Venture has MAJOR steering problems... I basically can't turn the handlebars, and get a grinding and almost ratcheting sound/feel when trying to turn. Is this the main steering head bearing? How difficult are these to replace, or should this be done by a shop? Thanks, Scott
-
 How often do you replace them? Do you go by the service manual? Or do you replace them each time you replace the tires? and will regular wheel bearing grease work or a special kind of grease?
 -
Where's the best place to get wheel bearings for the Venture,any body go with auto part store bearing ? buddy
-
Starter This article should help the do-it-yourselfer understand the probable cause and cure for the starter. The starter is a high speed DC motor that uses carbon brushes much like the ones used in a rechargeable drill motor and can have the same or similar problems. If your starter drags (runs slow) when you try to start the bike in cold weather or when the bike is at operating temperature, you have one of two possible problems: You will need a battery or you need to fix the starter. If the battery is okay, you are going to have to remove the starter from your bike to find the problem. To remove the starter, I would suggest that yon start by removing the radiator and the thermostat housing. I have found the best way to remove the radiator is to take all the hose clamps and four 10 mm bolts on the side, loosen, then pull the top hoses off; then take the bottom ones off using great care with the small hose in the center of the bottom tank. This tube is the only one that is NOT SOLDERED! It is a press fit and if You pry too much or slip and hit it as I did, you will find yourself on the way to the local radiator shop to have it fixed. To remove the thermostat housing, remove the two 5 mm cap head screws at the bottom of the unit and remove the small metal tube; then the large plastic pipe from the housing or the pump. Now remove the two 10 m bolts holding the rear of the starter to the motor and remove it from the motor. NOTE: It's a tight fit, so spray some WD-40 on the front of the starter where it fits into the motor and carefully pry it out. Now that the hard part is done, you should clean the outside of the starter and look for a scribe mark on the front and rear covers where they meet the center part of the housing. Now, remove the two screws that hold the starter together and tap the rear cover off. Note there is an O-ring seal at this joint, so be careful not to damage it! You can now see the rear bearing and the brushes; check them for wear. Carefully remove the front cover and the armature from the center part of the housing. Note this cover also has an O-ring seal. Inspect the parts for rust and wear, use #600 emery paper to clean the corrosion from the commutator. A dirty or corroded commutator is the most likely culprit for a dragging starter with a bad rear bearing running a distant second. If the bearing is stiff when you turn it, try a thin oil or WD-40 on the back of the bearing until it turns freely. This should work unless the bearing is damaged; and in that case, it will have to be replaced. Yamaha does not have a part number for the rear bearing, so take the number off of the bearing and go to your local bearing outlet, then go down to your dealer and have the bearing changed. Check the armature shaft where it fits in the front cover and the gear at the end of the shaft for wear. If you find noticeable wear, the starter will have to replaced. Next, you should check to see that the coating on the copper wires of the armature is not damaged. If you find exposed copper wire, cover it with a coating of shellac, varnish or clear fingernail polish. The last thing to check is the commutator itself. To do this check the spaces between the copper bars to be sure they are free of foreign material and that they are slightly lower than the copper bars. Most starters will only need cleaning, but if the commutator needs work, Page 7-4 of the service manual covers the necessary steps to be taken. If you have decided to replace the brushes, install them before you reassemble the starter. If you found rust inside the starter and you have used the high pressure water at the car wash, you know what to do, or should I say you know what not to do. Reassemble the starter and remember to line up the scribe marks before tightening the screws, and you could also use some non-adhesive silicon to help the O-rings do their job. Test the starter before you install it by using jumper cables and a battery, then test it again after you have it bolted in place. If it passed the tests, reassemble the rest of the bike. Fred Vogt, #01037


(Custom).thumb.JPG.9e28ea2111ab3dc9d16dacf3023dbe7d.JPG)