


Marcarl
-
Posts
11,231 -
Joined
-
Days Won
135
Content Type
Profiles
Forums
Gallery
Events
Store
Posts posted by Marcarl
-
-
If your brake lights work, it won't be a ground. Maybe both bulbs burned out at once? rare but has happened. Other than that, listen to the connection wizards. Or maybe try moving the fourway switch.
-
I/m planning on a tech article on a pump rebuild, but I got to get second gear back together first, and then we'll see. In the mean time, check the fittings at the pump, in the back under the luggage carrier, under the rack. I have found some of those to be loose and cause a problem. Keep us posted and we'll help you out.
-
Will enter a plea for mercy for all of you. Keep the faith Bro.
-
I like it as well, and sent it to the local paper. People reading it might be more sympathic to us riders.
-
Maybe that's why my soul seems to be happier in the summer more so than the winter. Thanks for posting. Amen
-
It wouldn't surprise me that when she was done, one of the riders would have bent down, picked her up and gave her a big biker hug and then passed her on to the next one, and when all was said and done, she'd a had 30 BIG BIKER HUGS. 'Course that might have been seen as child abuse or some fool thing, but who would have cared, I know I cared when I read the story.
-
Thanks Bro.
-
I'm with Kit on this one, word for word. Guess he's not all that dumb after all:stirthepot:
Opps, I didn't say that did I?????
-
Tell us more about the noise. The timing chains run on automatic tighteners, and are not likely the cause. Could be your transmission, When does it do it, just when you have it running on the side stand?
-
All I can say is: piterpaterandgetater. Lots of good potential. You've got wheels, handle bars, motor, seat, the rest is purely cosmetic:rotf:.
-
What you are looking at are wear marks\holes. Some guys fix them with liquid tape, but you are working with old rubber and in my opinion that is a stop gap fix, will hold for a little while but the problem will come back again. New ones at http://www.flatoutmotorcycles.com/ are about $55.00 ea and if you are doing one, you'll be happy to replace all four.
-
I change my plugs every spring, don't even bother to check them. Two springs in a row with a non starting scoot taught me that lesson, saves a lot on batteries as well. The other thing to keep in mind is that it takes more than one priming of the bowls to get the bowls full of fuel. The pump will shut off on time, so if it runs a bit and then shuts off, turn off the ignition switch, wait about 10 seconds and then turn it on agian. If the pump runs again and shuts off, repeat the procedure until the pump doesn't run. Now you are sure the bowls are full. If it doesn't quit running after the third attempt, the tank is out of gas, then you need to put more gas in the tank to fix that problem. Now wasn't that easy?
-
Try this and see if it helps
-
Some one has to control those lads, and it's better with one that is controlled by the One that can, rather than by the one who made it bad in the first place.
-
Sounds like we need to plan another Meet & Greet in the Niagara Area. Let us know if you are planning on being in Niagara, we'll find a dump uhhhhhh I mean place to eat and have good time together. Meet & Greets around here usually take about 3 to 4 hours, so come with an empty loader.
-
http://parts.yamaha-motor.com/partimage.gifx?d=41342,2,0
kit # from yamaha 2KW-W0099-00-00
Hope this helps. maybe not.
Seems you either have some air blocking the process, a blockage in the line, maybe a kink, or the parts are not in the right order or facing the right way. You sure did give it an honest effort though with all that you've done. If you did not clean the slave, then I would suggest doing that as well. A lot of crud can collect in the slave and cause a host of difficulties.
-
When wiring speakers it doesn't really matter as long as you wire them all the same. If memory serves me correct each pair will have 1 black, or 1 of some other colour in common. Hook that to the same side on all the speakers, then you'll be fine.
-
Let's see now, 17 posts and nobody has it figured out correctly. Tut tut, you should all know better than that by now, but I am going to assume that you're all grown men and so will keep the opinion you have no matter how much the truth should stare you in the face.

Oh well, summer is coming soon and then the real scoots will once again lead the pack.
-
You'll probably have to have a licnece to do that as well.Now is the time to move on the lien against the motorcycle your currently in possession of. In Ohio, say a wrecker operator tows your car for you and you fail to pay him, in 30 days, he can apply for title to it and do whatever he wants with it. -
I see nothing wrong with your side of the story, but you wrote it, I didn't really hear you speak and that does make somewhat of a difference. In either case, I would like to hear his side before I'd make up my mind on this, if he has a side. It's important to be fair.
-
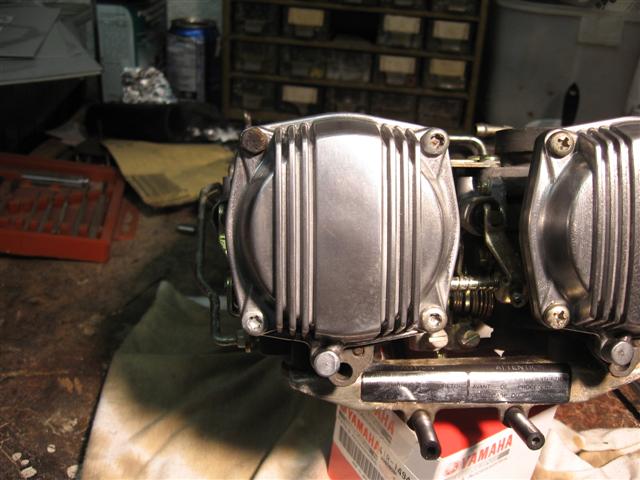
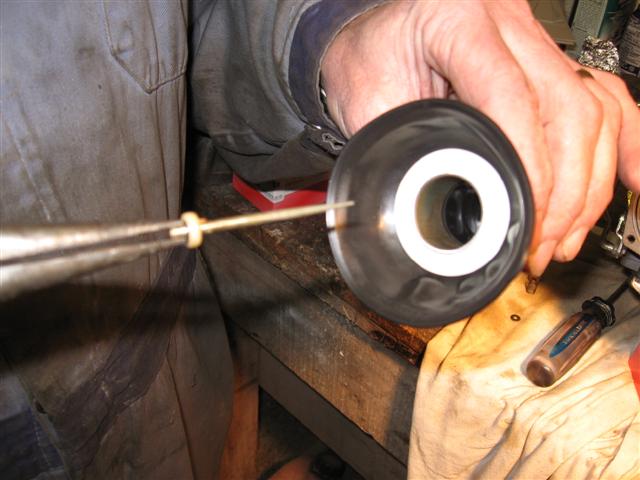
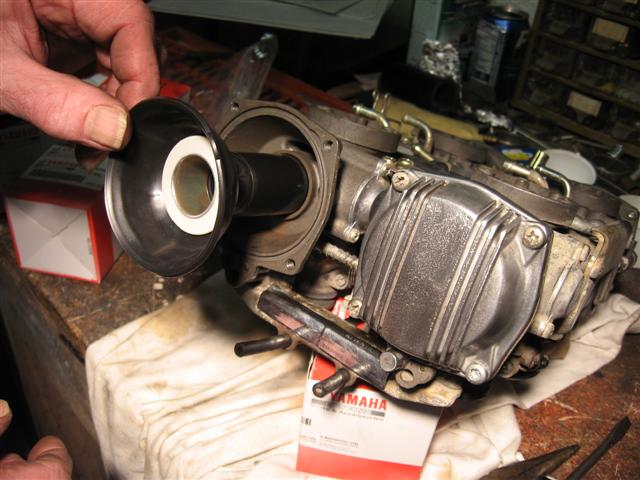
There's been some questions in the past as to how to replace the carb diaphrams, so when I did mine last night, I took some pictures, everybody always like pictures, RIGHT?
Well here goes the write up:
1) Remove the false tank cover, side covers, side rad covers and loosen the lower faring. Remove the air box lid and the air filter. This would also be a good time to clean the air filter and the air box. You need to do this so you can reach into the carbs later.
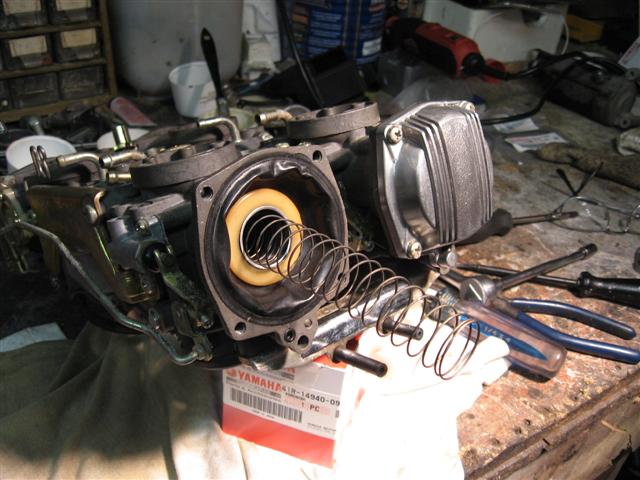
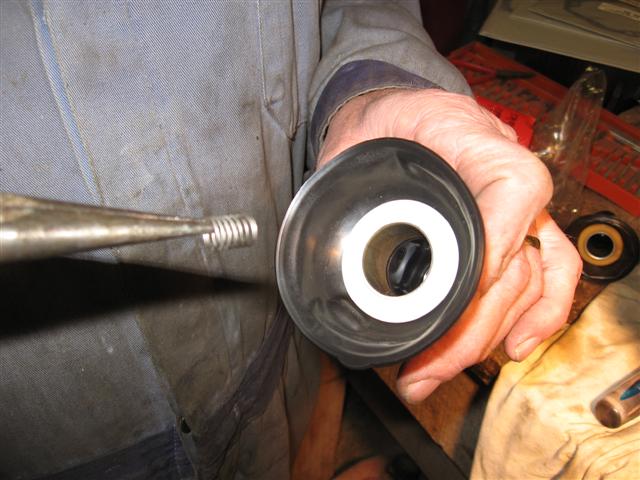
2) Identify the part, the diaphragm cover, which has 4 torx screws, the one having a pin in the middle. This was done to make it hard, otherwise everything would be easy and any mechanic could do it. I didn't have one to show you, so you'll have to take my word for it. It can easily be snapped out by using a needle nose pliers or if it's stubborn a small punch. Just work it back and forth once or twice and it will come clean out.
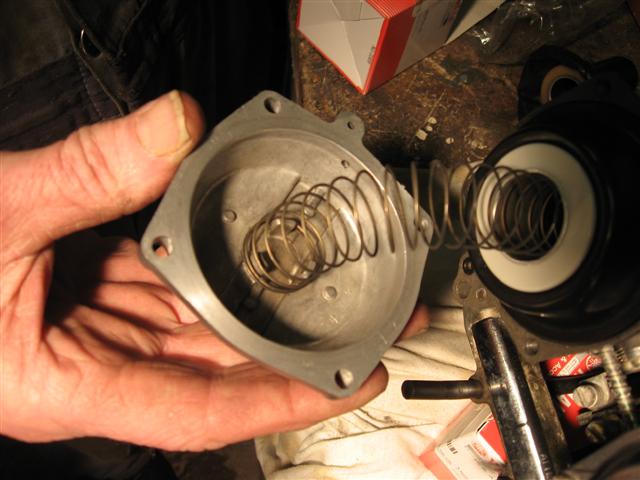
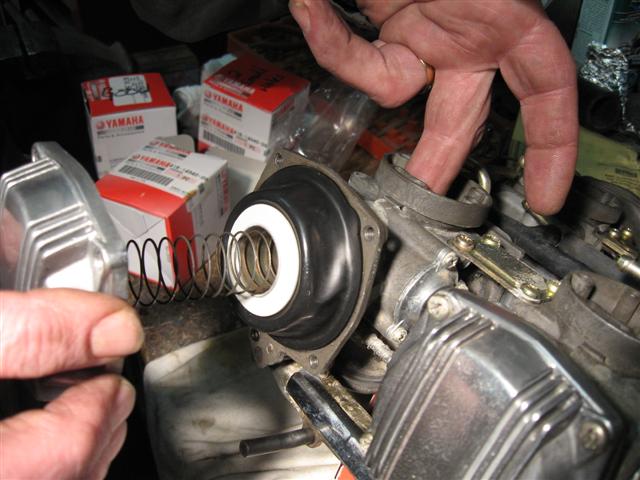
3) Remove all the screws and the cover will pop out by it self, seeing as there is a spring behind it. Save the spring, it will come in handie when you put things back together.
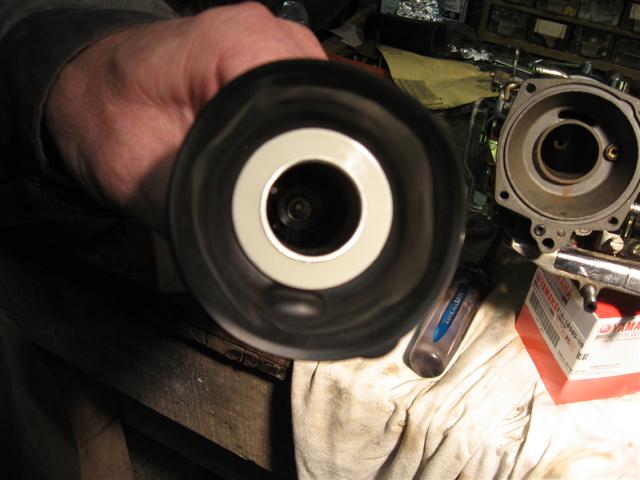
4) Now that you have this area open, it's a good time to use some Carb Cleaner to clean the area, and all the little ports you can see. Finish by blowing out with air. At the bottom you'll see a little built out area that has a rubber ring in it. Be sure to save this ring as well, otherwise it's sure to get itself lost and then you'll have to wait longer for more parts.
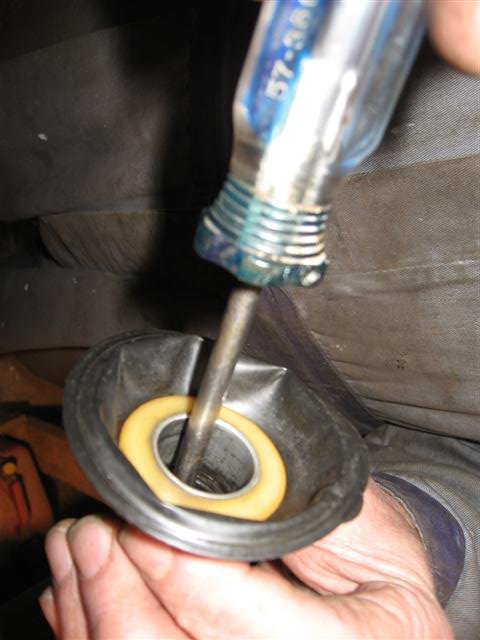
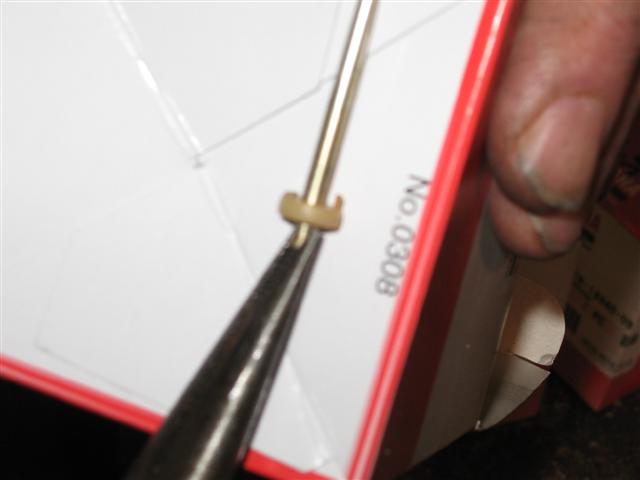
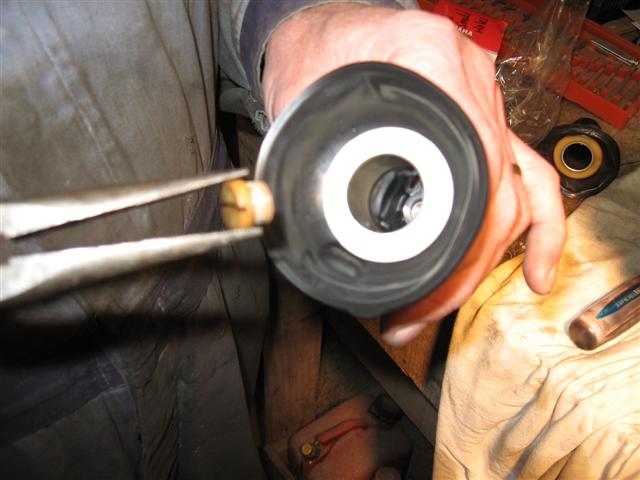
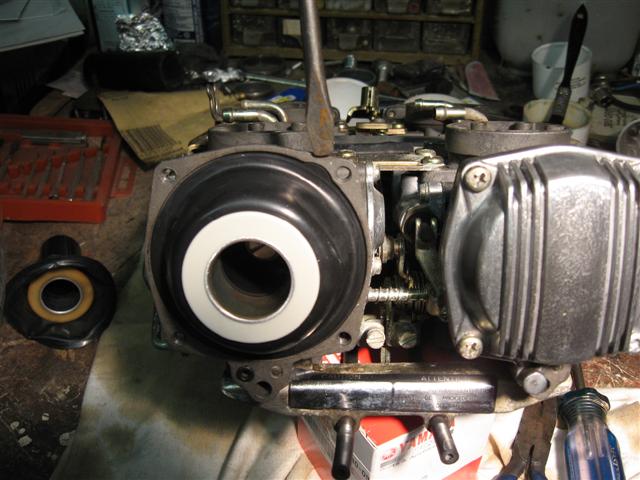
5) Inside the diaphram body you'll find a plastic screw, turn it out by turning counter clockwise, that's the opposite way the hands on a clock turn. Under that screw will be another spring, not at all the same as the first spring, but a spring none the less. Keep it handy as well. Under the spring will be the needle assembly. This consists of the needle itself, a 'C' ring and a small washer. Best not to loose these either. They all need to go back in order in the new diaphram.
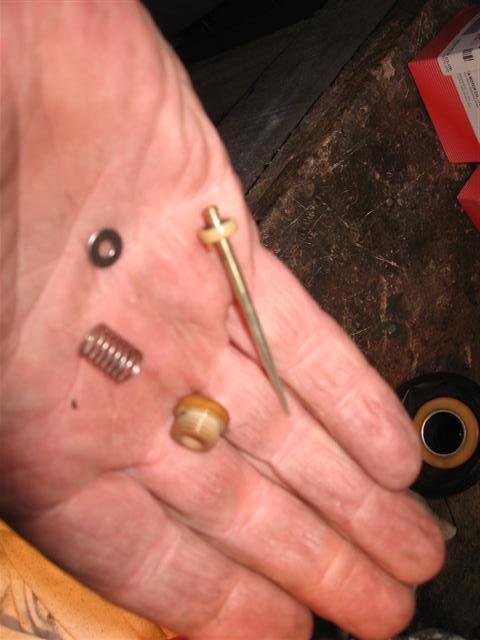
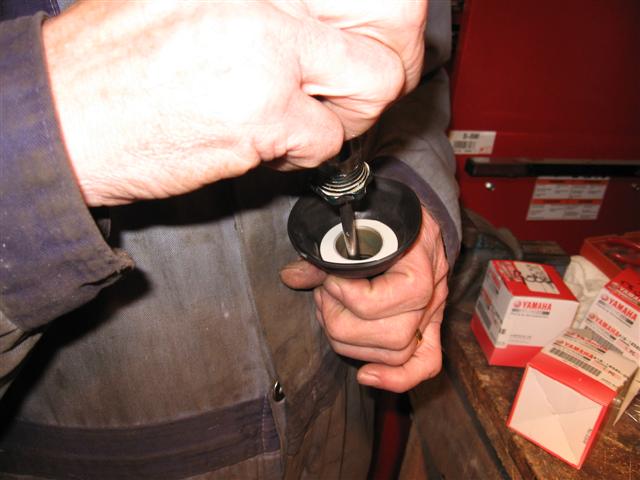
6) You are now ready to begin the installation of the new diaphram. Make sure that the little washer is mounted on the short side of the needle (#3) and then with a needle nose pliers insert the needle into the new diaphram (#1). Now comes the part where you pay attention. On the collar of the the needle you see a little plastic pin,(#2) this needs to seat in the hole provided for it in the base of the diaphram. Once the needle is inserted into it's rightful location you can very slightly push it back and then by turning it you'll have it find the hole (#5). Now you cannot turn the diaphram over again until the plastic screw is in place, but first you need to put the little spring back in on top of the needle (#6). Then with a needle nose pliers you drop the plastic screw down into the diaphram and with flat screwdriver wiggle it until it jumps into it regular spot, at which time you can gently attempt to turn it into the threads. Sometimes this goes easy, sometimes it takes a bit more time, but don't give up, it will happen.
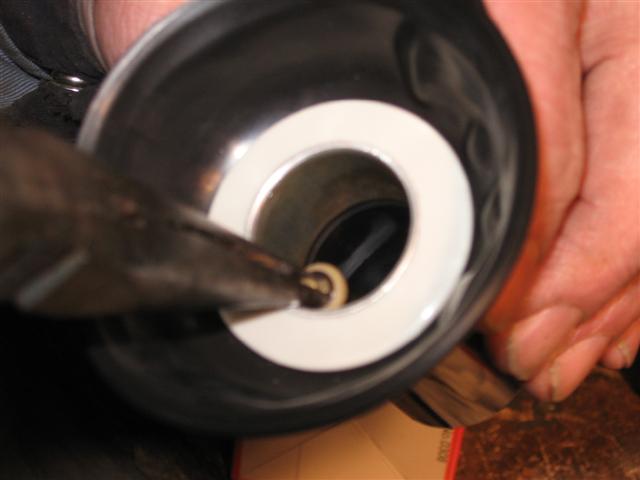
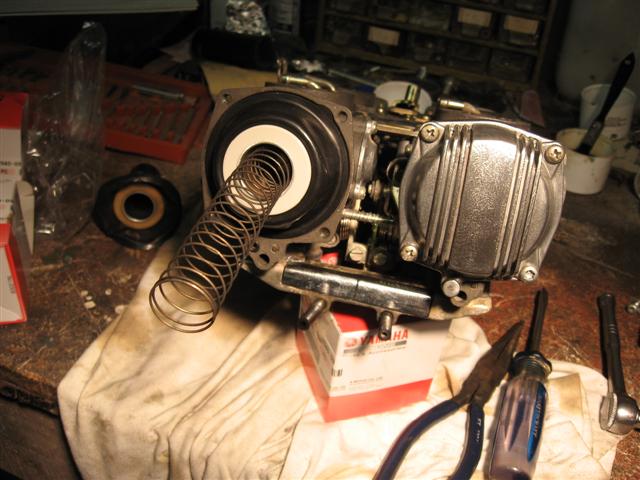
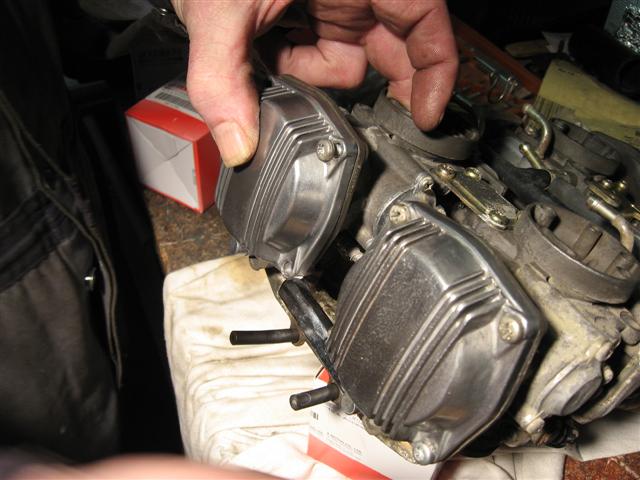
7) Once you have the diaphram together you can slide it back into the carb. You'll find a tab on the outer edge of the diaphram and that seats into the cutout for in the carb. This is also a good time to remember to put the rubber O ring back in place at the lower end of the carb. To make things easy, fold the diaphram to-wards the carb and seat it in the grove provided for it. Next insert the long spring, that pushed the cover off in the first place, into the diaphram, but do not let it seat the plastic slide into the carb as this will cause it to unseat the rubber from the carb. Now seat the spring in it's approved place on the cover. Do not push it together just yet.
8) Now as you can see, I did mine while the carbs were off the bike, that was because the motor was already out and second gear was under construction. You really don't have to wait until second gear goes or you have to take the engine out for some other reason. This can all be done very nicely right on the bike. So now comes the final process: before you push the cover back into place, put your finger or have someone else place their finger, or use a piece of plastic or steel, (I wouldn't suggest wood as you may get dirt into the carb) into the throat of the carb to prevent the diaphram from sliding in. This will keep the bead seated in it's proper spot. Once the cover is in place and two screws have been inserted and tightened you can withdraw your 'finger' from inside the carb.
Now, wasn't that easy?????
-
There's been some questions in the past as to how to replace the carb diaphrams, so when I did mine last night, I took some pictures, everybody always like pictures, RIGHT?
Well here goes the write up:
1) Remove the false tank cover, side covers, side rad covers and loosen the lower faring. Remove the air box lid and the air filter. This would also be a good time to clean the air filter and the air box. You need to do this so you can reach into the carbs later.
2) Identify the part, the diaphragm cover, which has 4 torx screws, the one having a pin in the middle. This was done to make it hard, otherwise everything would be easy and any mechanic could do it. I didn't have one to show you, so you'll have to take my word for it. It can easily be snapped out by using a needle nose pliers or if it's stubborn a small punch. Just work it back and forth once or twice and it will come clean out.
3) Remove all the screws and the cover will pop out by it self, seeing as there is a spring behind it. Save the spring, it will come in handie when you put things back together.
4) Now that you have this area open, it's a good time to use some Carb Cleaner to clean the area, and all the little ports you can see. Finish by blowing out with air. At the bottom you'll see a little built out area that has a rubber ring in it. Be sure to save this ring as well, otherwise it's sure to get itself lost and then you'll have to wait longer for more parts.
5) Inside the diaphram body you'll find a plastic screw, turn it out by turning counter clockwise, that's the opposite way the hands on a clock turn. Under that screw will be another spring, not at all the same as the first spring, but a spring none the less. Keep it handy as well. Under the spring will be the needle assembly. This consists of the needle itself, a 'C' ring and a small washer. Best not to loose these either. They all need to go back in order in the new diaphram.
6) You are now ready to begin the installation of the new diaphram. Make sure that the little washer is mounted on the short side of the needle (#3) and then with a needle nose pliers insert the needle into the new diaphram (#1). Now comes the part where you pay attention. On the collar of the the needle you see a little plastic pin,(#2) this needs to seat in the hole provided for it in the base of the diaphram. Once the needle is inserted into it's rightful location you can very slightly push it back and then by turning it you'll have it find the hole (#5). Now you cannot turn the diaphram over again until the plastic screw is in place, but first you need to put the little spring back in on top of the needle (#6). Then with a needle nose pliers you drop the plastic screw down into the diaphram and with flat screwdriver wiggle it until it jumps into it regular spot, at which time you can gently attempt to turn it into the threads. Sometimes this goes easy, sometimes it takes a bit more time, but don't give up, it will happen.
7) Once you have the diaphram together you can slide it back into the carb. You'll find a tab on the outer edge of the diaphram and that seats into the cutout for in the carb. This is also a good time to remember to put the rubber O ring back in place at the lower end of the carb. To make things easy, fold the diaphram to-wards the carb and seat it in the grove provided for it. Next insert the long spring, that pushed the cover off in the first place, into the diaphram, but do not let it seat the plastic slide into the carb as this will cause it to unseat the rubber from the carb. Now seat the spring in it's approved place on the cover. Do not push it together just yet.
8) Now as you can see, I did mine while the carbs were off the bike, that was because the motor was already out and second gear was under construction. You really don't have to wait until second gear goes or you have to take the engine out for some other reason. This can all be done very nicely right on the bike. So now comes the final process: before you push the cover back into place, put your finger or have someone else place their finger, or use a piece of plastic or steel, (I wouldn't suggest wood as you may get dirt into the carb) into the throat of the carb to prevent the diaphram from sliding in. This will keep the bead seated in it's proper spot. Once the cover is in place and two screws have been inserted and tightened you can withdraw your 'finger' from inside the carb.
Now, wasn't that easy?????
-
When things get that cheap, I get wary.
-
Now what took you so long??????????? We're here to help and long posts give lots of info, soooo, you either tell us off the bat, or we'll have to type a lot to ask the questions you could have answered in the first place.
Tell us about your cync tool, and how it works and we might be able to help you there.
Don't depend on the looks of your plugs, if you have issues the first thing to do is to replace them, they can act bad without showing it.
Half a can of Seafoam is not enough in a full tank when she's been sitting for a while, rather use a full can in half a tank of gas and let it sit for a while in between runs so that it has time to soak.
Valves should not be an issue, so work around that, just leave them be until she gets older.
The colour is awesome, and for me, I would spend a lot more on her before I'd even think of starting to budget. The bike is a great machine and well worth loving a little bit, no matter what the 2nd genners like to say.
When you get new needles get all four at the same time, or you might still have an odd one. $17.88 ea at Flatout Motorcycle http://www.flatoutmotorcycles.com/fiche_section_detail.asp


Carb Diaphrams, info please
in Watering Hole
Posted
Does anyone know or has anyone tried to exchange the diaphrams from the 83-85 carbs to the 86 to 93 carbs. In other words are they interchangable.